|
Author
|
Topic: Restoring the Rubber Shutter Wheel Surface on Elmo ST-1200 (and other tales!)
|
Steve Klare
Film Guy

Posts: 7016
From: Long Island, NY, USA
Registered: Jun 2003
|
 posted July 01, 2015 06:08 PM


Ive never been happy with the idea of running the Elmo ST-1200 without the rubber surface on the shutter wheel. Lets face it: for profit companies dont put in added costs when they dont need to. Putting that belt in there meant an extra part for Elmo, an extra assembly process to glue it on the wheel and extra assembly time while the wheels sat with the adhesive setting up. If they didnt really need it they would have designed the machine without it and kept the difference as profit.
-but unfortunately we live in the Senior Years of Super-8, and all over the place rubber eyepieces on cameras and belts on projectors are reverting to the goo they started out as, and we have situations like this belt (I actually like to call it a tire, but whatever
) where its basically fate that it melted years ago and the only possible solution is to clean up the mess and run on the metal underneath (
or is it?!)
This arrangement is the Achilles Heel of what is an otherwise excellent projector. It is one wheel riding on the edge of another bigger wheel: no gearing, no stretched belt, just a spring for tension on a rocker of uncertain location trying to press the two wheels together for traction: like something the Flintstones would have used!
-then we remove that rubber surface: just like driving your car around on the rims!
I hatched an idea last winter of taking an ordinary rubber band, stretching it around the wheel surface and tacking it down. I grabbed a few bands and opened up the back of the machine. The shutter wheel is narrower than any of the bands I had, and I dont have the patience to sit and split a rubber band in half!
Putting a new tire on that wheel went on the back burner, but a few weeks later circumstances forced my hand.
Mid-March my ST-1200 started to act like it had a flat tire. I took off the back and found the motor pulley was no longer pulley shaped! It was cracked and distorted. Five years after I got it, and for the first time, I had to take my ST-1200HD out of service. I put a semi-retired Eumig 800 in its place and the show went on.
I tore the ST-1200 down and took the old pulley out to do some measurements. For a while it became a bin full of parts up on the dresser in the spare room. (At low moments I was afraid Id created a parts machine!)
I thought finding a replacement pulley would be easy! Turns out this pulley defies many standards that off the shelf ones conform too: the diameter was a little odd, but more importantly the shaft diameter is larger than usual for pulleys this small. I considered getting a standard one and having it bored out, but a hole this large would not leave enough hub material to be sturdy.
-so I went on a quest for a good original Elmo pulley, and that added on another six weeks.
(Were getting to the good part soon, stay with me...)
After all this fuss, there was no way I was re-assembling this machine with the original belts!
I went to my favorite E-bay seller, isellprojectorbelts (His real name is Mark), and I looked at what he had for ST-1200HD. I wanted the two belt set, because I dont really care about the footage counter. Yet I looked at the five belt set, and saw it described like this:
1 Square Upper Take Up Belt, 1 Small Square Motor Belt, 1 Tiny Counter Belt, 1 Large Square Motor Belt, 1 Flat Shutter Wheel Belt.
Shutter Wheel Belt???!!!
I asked Mark about it and it turned out to be exactly what Id hoped: a replacement for the missing rubber surface. (!)
Mark was of the opinion anybody who is reasonably mechanically inclined could handle this job. I once changed a car from drum brakes to disk: I took his challenge! (I get in more trouble this way
)
This could be a nasty job. The shutter wheel is narrow, the belt is springy and prone to diving off in one place when you are holding it in another, the space to thread this thing around the shutter is confined and the visibility is awful. I fought it for about fifteen minutes, and started to wonder if driving on the rim was really all that bad!
-yet there IS a way!
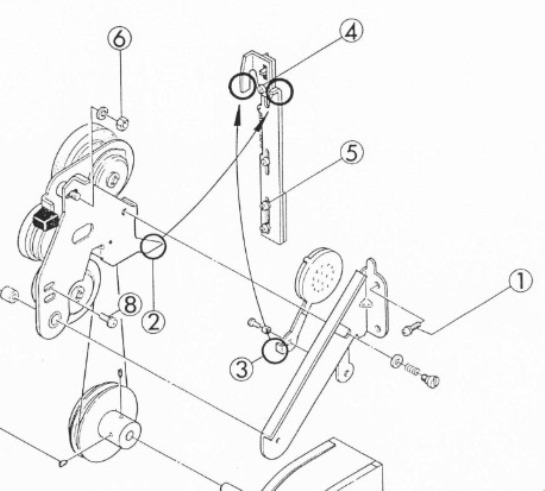
First thing is to remove the two screws holding the rocker/roller assembly to the chassis, set it aside and get some room to work. Second is you need a way around the fact that the ideal way to put this band (
belt?, tire?) on the wheel would be to stretch it out in all directions and place it all on the entire edge at once, because you really cant do this with the wheel still installed in the machine.
-You need an army of little hands to hold it in place while you mount it!
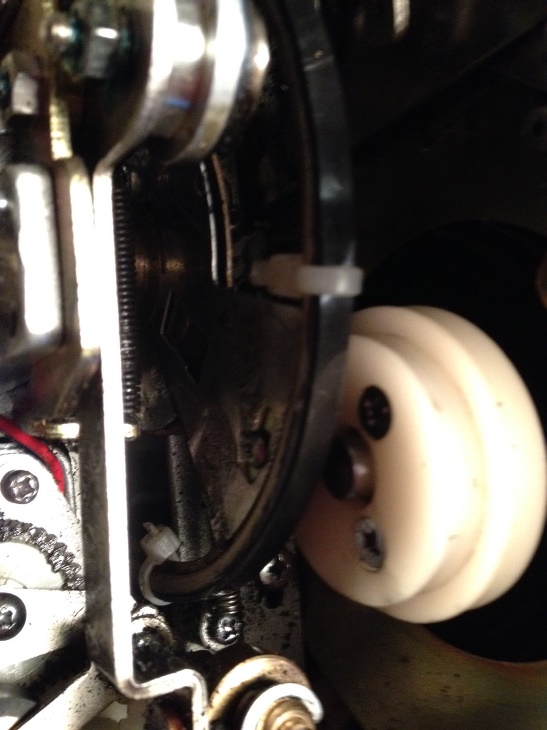
I found the smallest Ty-Wraps (cable ties) we had in the house. I laid the belt on the shutter wheel edge and snugged it down. This took care of only one point on the edge, so I rotated the wheel part of a turn and did it again. This held the belt in place everywhere between those two points. I did it again and again until there was a last segment I stretched into place and I was done! (
at least with THIS!) I put the buckles of the ty-wraps inside the shutter apertures to fit inside the tight confines of the chassis. (It barely helped.)
Mark told me that adhesives between the belt and wheel are optional. Given the difficulty of doing this I didnt want to risk having to do it again, so I took that option.
Janice Glesser recommended Eclectic Products E-6000 adhesive:
E-6000
This was available locally so I gave it a shot. This cement has a narrow applicator tube which allows just a small amount to be applied exactly where you need it. Another nice thing is it is heat resistant (remember: this wheel rotates through the lamp house) and it cures to a pliable consistency. Anything that hardens fully is liable to become brittle and flake away from being pounded by the drive roller 24 times per second for maybe thousands of hours. If I have to redo this someday, this cement should also be easier to scrape off the wheel edge than something like cyanoacrylate (Crazy Glue).
I cemented the belt to the wheel at about 8 points around the circumference. I lifted the belt, placed the cement on both surfaces, held them apart two minutes and then pressed down and smoothed the spot. I let them cure for a while and then clipped off the Ty-wraps. The recommended full cure time was 24 to 72 hours: I erred on the side of caution, especially this first time.
I restored the machine to barely operable condition and ran the transport for one minute. After I stopped I looked at the belt and found in a couple of spots where the distance between the patches of cement was too far. The belt had curved over the edge of the wheel and was now hanging from the adjacent cemented spots. I have to respectfully disagree with Mark here: the cement is mandatory. My belt would have twanged off the wheel for certain without it!
I applied cement in the middle of the problem areas and let it cure, then tried again for another minute. I repeated these steps until it stayed completely in place. I nudged the belt all the way around the wheel looking for loose sections: it was solid.
I ran it an hour: OK. I reassembled fully and tried a 200 footer: OK. 400 Foot: OK. 600 Foot, 800 Foot, 1200 Foot: All OK.
-I felt quite contented by the time I finished up that night, and not just because I had a victory beer!
Lately Ive been operating the machine in normal service (many 1200 footers this week...). I just inspect the shutter wheel before I start (Its visible from the lamp side, and you can see the whole thing if you turn the inching knob.)
-Eventually I wont even do this. Its looking good and Im more and more confident with it.
I am now getting a full 24 FPS out of this machine with almost no time to full speed: something it has actually never done since I bought it in the first place.
Do I think the restored shutter surface is what did it?
-Surprisingly, not entirely.
It seems this machine had a problem all along that only now do I understand. It used to be when I started up cold there was a really irritating squealing sound I always thought was the rollers slipping on each other. It really was my lower belt slipping on the motor pulley and it continued until the lube heated up a little and the slippage stopped. The consequence is that the belt was actually wearing the pulley: cutting the nylon sheave deeper and deeper. In a few places it actually wore through the bottom of the sheave.
As a result, the effective diameter of the pulley was getting smaller and smaller and the maximum possible speed was falling too. It was doing the best it could under the circumstances, but if I wore the pulley down just 10% I was now below 22 FPS! The squealing stopped last Fall when I figured out a proper lubricant and cleaned and greased the cam tank, worm gear and other things, but the damage was already done.
-it was as if I was driving around with undersized tires and wondering why I was having trouble keeping up with traffic!
Moral: If your ST-1200 is running slow, and especially it its making this nasty sound: check out your motor pulley!
I think the restoration of the shutter wheel has helped get to 24 FPS and does get there sooner. It also helps quiet the machine: It muffles the wheel rolling with the drive roller. I also believe that when the rubber was removed the original owner didnt re-adjust the contact pressure and that contributed to slippage. Without changing the adjustment the traction wheel on wheel is noticeably better.
-So I do recommend doing this, and if I get another ST-1200 without the rubber in place I would certainly do it again. At the very least I know the machine is now operating the way it was designed to, and besides: the second one should be easier.
If you are interested: Search on E-bay for Super 8, Elmo ST-1200HD, Projector Belts, 5 Belt Set.
--------------------
All I ask is a wide screen and a projector to light her by...
| IP: Logged
|
|
Barry Fritz
Phenomenal Film Handler

Posts: 1061
From: Burnsville, MN, USA
Registered: Dec 2009
|
posted July 01, 2015 06:37 PM
Great job and nice write-up Steve. It appears there is a writer inside of you wanting to get out!
I have dealt with Mark McWilliams often over the years. If he is selling a multi-belt set on Ebay, and you don't need all the belts, contact him. He has sold individual belts to me. Even if he doesn't list your belt on Ebay, contact him. You'll need to know the size belt you need, but he most likely will be able to help you. Also, as is illustrated in Steve's comment, Mark is not an expert on projectors and their repair. He sells only belts and doubtless has acquired some knowledge about various projectors over the years, but don't take his word as gospel.
| IP: Logged
|
|
|
|
|
|
|
|
|
|
|
|
|
|
|
|
|
|
|
|
|
|
Steve Klare
Film Guy
Posts: 7016
From: Long Island, NY, USA
Registered: Jun 2003
|
posted July 02, 2016 05:26 PM
Well, It's been a whole year...
One of the questions I had about this job was how well it would hold up. I gave up checking the firmness of the new rubber surface on the shutter wheel maybe 11 months ago. The machine has been running at least three times a week and well into the next lamp since I did the work. It's been running everything up to 1200 footers and has handled feature shows either alone or with another machine quite a few times.
This machine typically handles the longer reel when it is working with another one on the table, so most nights it runs at least one 400 footer, maybe a 600, or maybe several. It is also my only 1200 foot capable machine, so it probably is in the lead for screen hours this past year.
-so I decided to take a look.
The rubber belt looks the same as when I installed it: no splits or cracks. The cement was still firm almost all the way around. I found one loose spot, which I just re-cemented. I'll let the machine take the weekend off so the new cement can set and return it to service Monday night.
So I am glad I did this restoration work, and I plan to do it on any future ST-1200s I ever own.
--------------------
All I ask is a wide screen and a projector to light her by...
| IP: Logged
|
|
|
|
|
|
|


 UBBFriend: Email this page to someone!

![[Smile]](smile.gif) I now know it's doable...just not a slam dunk
I now know it's doable...just not a slam dunk ![[Eek!]](eek.gif) You're the best!
You're the best!![[Wink]](wink.gif)


 Printer-friendly view of this topic