|
Author
|
Topic: Review Wolverine Reels2Digital MovieMaker 8mm film digitizer
|
Bruce Davis
Film Handler
Posts: 47
From: Adelaide, Australia
Registered: Sep 2019
|
 posted November 03, 2019 04:31 AM


Mike Spice Hi cheaper CMOS sensors, as far as I can find out, have a problem (but used these days because they are cheaper) with light and dark on the same image (I may be wrong).
As with yourself, I am also disappointed with the results, I have been working on 2 x 50 ft rolls of super 8 for days to try and get reasonable results (post processing). Every scene change seems to be different, I know I am not an editing expert and am still learning, but if things can not be improved, for me it is not worth the time it takes.
I have used Video Fred's script with VirtualDub and it does a good job of good footage, but it is not able to handle or compensate for images with extreme light and dark.
When the same super8 film (with high contrast from Wolverine) is viewed through a projector, firstly the projected image is excellent and if I film the projection with my cheap mobile phone it gives a much better result (but of course the captured video is slightly scewed).
No Mike you are not alone.
I have also tried Nick Whitehead's Telecine program (quite old now), it does, by default, seem to give a better colour reproduction result, but the timing for taking the snapshot does not seem to be quite right. The images are taken while they have not steadied and therefore the images end up wavy.
Regards - Bruce
| IP: Logged
|
|
Mike Spice
Master Film Handler
Posts: 421
From: none of your business
Registered: Jun 2017
|
posted November 03, 2019 05:35 AM
Thanks Bruce.
I'm not sure the scorpion vision is that cheap, some £80, and a £30 lens, I dare to think what the sensor in the Wolverine is (or isn't) worth...
I won't be able to post any stills until later as I have to go our for a few hours, but I will try and post some later to demonstrate the problem.
I understand exactly what you mean about projected images and then comparing to what the imaging source sensor is losing.
Very frustrating, I have spent the last 24 hours trying to get thro a 400ft reel, in tiff format. Some 82Gb currently copying to my network drive as a back up.
A good deal of it will be no good.
I never thought I would admit that the Wolverine can scan certain scenes better than I can with manual control and a frame by frame capture.
Like you, I am no expert, but given I can adjust exposure, gain, hue, gamma and white balance, I am very frustrated I can't get satisfactory results in cases where there are extremes of dark and light in the same frame, yet the wolverine does it will ease, on the fly.
| IP: Logged
|
|
|
|
|
|
|
|
|
|
|
|
David Brown
Film Handler
Posts: 42
From: Centerville, UT, USA
Registered: Oct 2019
|
posted November 03, 2019 06:15 PM
Stan
You should stop reading the forum until you return home!! Helpless.
I can only make general comments as I don't have an operating Hawkeye.
I experienced lens flare early when capturing with a DSLR. I don't know why that is gone now. Maybe the light source and the film and the sensor were not all parallel. With all that resolved, and the same lens, but a light source much like the Wolverine has, it's gone. I still capture the sprockets with the light shining thru and it does not produce any lens flare.
That's not much help for those here, except it was an exposure problem.
I think the Wolverine has always used an auto exposure with the +.5 or -.5 added into the menu, It just put a limit on the auto exposure settings.
I finally captured the sprocket holes when using the Wolverine.
Captures had more detail at full wide, yet the compression was constant.
I wonder why auto focus would be used when the focus distance never changes? How auto focus could even work is a mystery.
Good luck Mike and others, you might wait until Stan returns unless you can find a way to use auto exposure with a limiting factor, and fixed focus.
| IP: Logged
|
|
|
|
|
|
Mike Spice
Master Film Handler
Posts: 421
From: none of your business
Registered: Jun 2017
|
posted November 04, 2019 10:14 AM
David Brown The mention of auto focus on my earlier post, was an error on my part, I meant auto exposure.
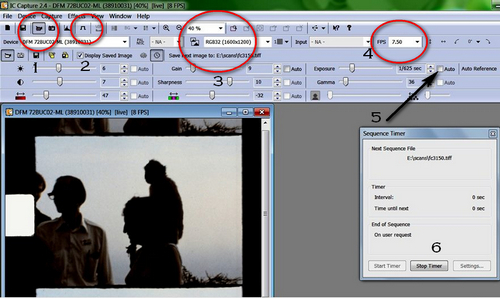
For anyone struggling with IC Capture
This is how I use it.
Begin by making sure
2 (external trigger) is off
1 (live view) is on
Set your resolution 3.
I am using 1200x1600
Use option % near circle 3, to make the preview window look good.
Don't touch 4 (fps) not required.
Choose from the view menu which tools bars you want, you can make various adjustments during a scan with the increment buttons next to each colour/brightness exposure option.
(Once scanning starts you will see the changes made to any settings you change, in the next frame captured in the preview window
In live view, line up some film.
Advance the film a frame or two to make sure the sprockets are correctly registered with the claw, go to capture device settings and make any changes to the 'partial scan' area, so the area of film you want is being captured correctly.
Get the settings for colour, brightness gain exposure etc set the way you want.
Once you have the window and settings how you want them, go to the file/save configuration and save your set up.
Then reload your just saved config file before you proceed scanning. This is your basic set up for scanning.
(Next time you fire up IC Capture, just reload the config file to set it up as you had it, make and save config files for any different set up's you might want to create)
Make a copy of the configs file as well, for back up.
Go to the sequence timer settings, icon adjacent the 'display save image' checkbox in the tool bar.
Choose your settings , image type, path to save, name and prefixes required.
Then, activate external trigger (2), then start timer 6
Then start the scanner.
The sequence timer can be opened with the clock icon next to the timer settings.
Auto exposure easily controlled on or off (5)
Remember if you stop the scanner, turn the timer off, then turn off external trigger to get live view back.
If you have timer turned on, and it is set to zero, without the external trigger activated, the software will capture hundreds of still images in a few seconds, images of nothing.
Get it in your memory:
External trigger on, timer on.
Timer off, external trigger off.
I hope that is of some help
[ November 04, 2019, 01:23 PM: Message edited by: Mike Spice ]
| IP: Logged
|
|
Bruce Davis
Film Handler
Posts: 47
From: Adelaide, Australia
Registered: Sep 2019
|
posted November 05, 2019 09:09 AM
Thanks to Stan & Mike
Compiled from Stan and Mike's contributions.
For anyone struggling with IC Capture:-
Open the GATE cover flap and check that the "CLAW" is in the disengaged position (lowered position), it's easier to place-position the film if the Claw is out of the way.
Due to the bright glare of the LED, I find it easier at this point to have power OFF. Once the film is correctly loaded close the GATE cover flap.
Start IC Capture 2.4 software without the camera connected, when the "Select Device" window opens, plug in the camera USB cable and wait a moment for the camera to appear, select it by double clicking on it or click on OK. Sometimes the IC Capture software will Freeze if the camera is connected at startup.
Advance the film several frames to make sure the film sprocket holes are correctly registered with the claw.
In the VIEW menu / TOOLBARS select which tool bars you want displayed, e.g. MAIN TOOLBAR, DEVICE BAR, EXPOSURE BAR, GAMMA & SHARPNESS BAR, WHITE BALANCE BAR.
1. Check and make sure "Activate External Trigger" is OFF
2. Check that "Live Display" is ON
3. On the DEVICE BAR FPS (frames per second) for our purposes, has no effect, so do not bother with it.
4. Set "Select Video Size" to a size where you see just the film frame without edges (1024 x 768) and set ZOOM as needed.
5. Under DEVICE menu select PROPERTIES / COLOR tab and make sure "White Balance" is set to AUTO, "White Balance Mode" is GRAY WORLD by default. It may not be necessary to touch color adjustments, Lower color saturation is better at this stage.
6. Under EXPOSURE tab "Auto Exposure" should be selected to get you within the ballpark and then switch "Auto Exposure" OFF and adjust manually, do not use "Auto Gain", by default both AUTO GAIN and EXPOSURE + AUTO MAX VALUE are active.
7. Under IMAGE tab set "Gamma" as required to brighten up dark shadows and cut down on overexposed whites.
8. Under the WDR tab (Wide Dynamic Range) by default AUTO is selected. Try out various settings to see the effects.
9. Nothing selected under the SPECIAL tab.
10. PARTIAL SCAN allows one to select the center point of the area of the film frame that is to be captured, it can be left on AUTO-CENTER or adjusted manually.
11. On the DEVICE BAR, (first bar at the top) to the right of the ZOOM option, POI (Point of Interest) can also be used to visually select an area to be captured (Icon - Small red square with magnifying glass).
12. Once happy with settings go to FILE / SAVE CONFIGURATION to backup your current configuration. One can save as many configurations as needed. Reload the saved configuration to ensure it was saved correctly.
Prepare to Capture film frame by frame:-
1. CAPTURE menu / SEQUENCE SETTINGS / "Filename and Target" tab choose the image save Target Directory, File Name and starting index number.
2. "File Type" tab choose image file type to be saved.
3. "Miscellaneous" tab leave at default, no selection required.
4. "Automated Sequence" tab set "Interval" to Zero minutes, Zero seconds and de-select all "Automatically End Sequence" options.
5. "Activate External Trigger" THIS IS IMPORTANT, otherwise multiple unusable random images are recorded when the timer is started. (Icon - _|-|_). When Trigger is activated a "Activating External Trigger" window will pop up, select the bottom option "Leave the property automations....."
6. CAPTURE menu / SEQUENCE TIMER / click the "Start Timer" button.
7. Start the Wolverine / Hawkeye scanner.
8. To turn OFF/STOP the scanner, turn the timer off, then turn off external trigger to get live view back.
Please get into the habit of:-
----------------------------
External trigger on, timer on.
Timer off, external trigger off.
----------------------------
[ November 05, 2019, 05:52 PM: Message edited by: Bruce Davis ]
| IP: Logged
|
|
Mike Spice
Master Film Handler
Posts: 421
From: none of your business
Registered: Jun 2017
|
posted November 05, 2019 09:47 AM
I did mention that sometimes the IC software will freeze on startup if the camera is connected, so I always start IC capture without the camera connected.
When the prompt tells you there is no device, plug in the camera, give it a moment to appear in the device window, and job done. I should have put that in my IC post.
It also makes sense to reload the saved configuration, just so you know it's working and correct, before you begin scanning anything.
-----------------------------------------------------------
I am going to experiment with setting the timer to something ridiculous like one hour, so if I forget to activate the external trigger, as I often do, and start the timer first, the software won't suddenly capture a ton of stills before I realise my mistake.
The many images captured by mistake would be because the timer setting is set to zero, so off it goes, as fast as it can.
I hope that by setting it to 60 mins, for example, this little problem can be overcome.
As soon as scanning starts I watch the timer window to see that file names and images are being captured as I expect, so starting the timer, with a long time set, and not turning on the external trigger by mistake, would give room to stop things and re start, with the external trigger selected, before a pile of dead images are captured at zero time.
The external trigger obviously over rides and timer settings, so a long timer setting should do the trick, rather than zero time.
I hope that makes sense....
| IP: Logged
|
|
|
|
|
|
Mike Spice
Master Film Handler
Posts: 421
From: none of your business
Registered: Jun 2017
|
posted November 07, 2019 10:20 AM
I have just tried out setting the timer to 60mins in the hope that by forgetting to set the external trigger, and starting the timer, IC software would not merrily snap away as fast as it could on a pile of useless stills.
It is annoying when I forget to start the external trigger before the timer, only solution, remember the order of mouse clicks!
It doesn't work.
It appears if any timer setting other than zero is set, it will over ride the external trigger.
Oh well, no matter. Worth a try.
--------------------------------------------------------------
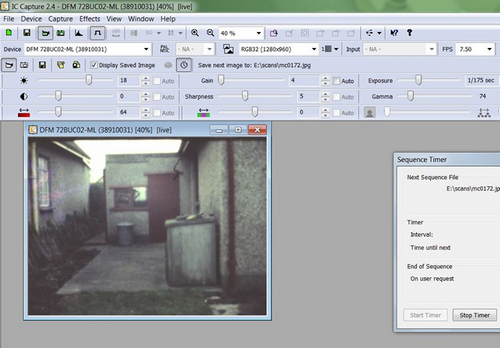
In other news
I find that using a
resolution of 1280x960
partial scan area
X offset 888
Y offset 496
I can scan a super 8 frame with no sprocket hole or any LED light, so that's good.
Giving a 50ft reel a test run on auto exposure.
[ November 07, 2019, 03:58 PM: Message edited by: Mike Spice ]
| IP: Logged
|
|
|
|
|
|
Bruce Davis
Film Handler
Posts: 47
From: Adelaide, Australia
Registered: Sep 2019
|
posted November 09, 2019 06:39 PM
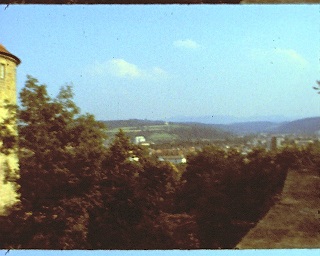
David Brown CCD cameras (as far as I know) handle differences between light and dark much better than CMOS, but CMOS has been adapted because they are cheaper (thanks to Sony if I remember correctly). I think the CMOS camera used here has quality limitations.
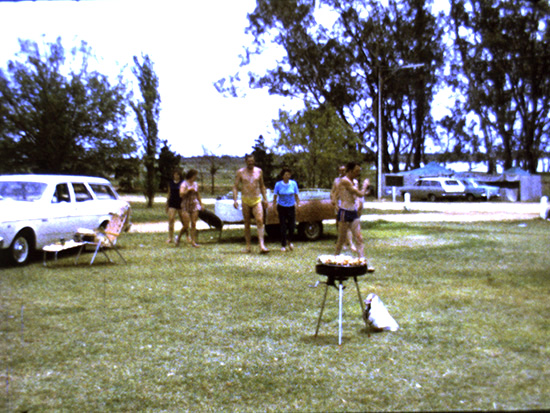
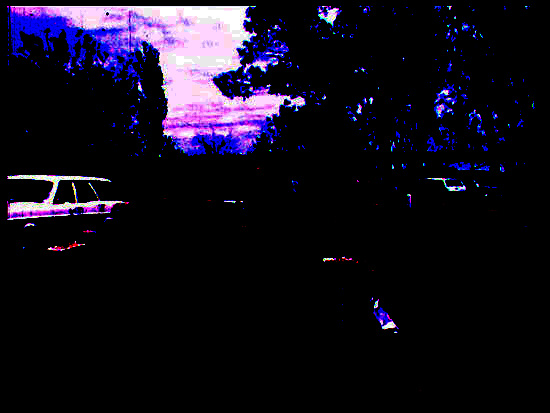
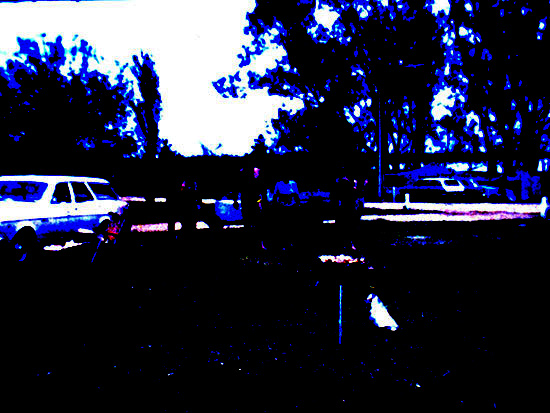
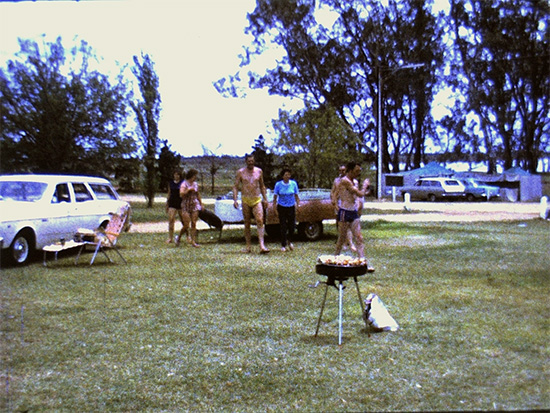
On these sample hawkeye images, exposure was set on auto, white balance on auto, highlight reduction enabled (but does not seem to have an effect), WDR was off.
I have experimented with manual settings but in order to prevent blown-out whites or blown-out skies, the remainder overall image becomes very dark.
As an example to eliminate blown-out whites on the motor vehicle, exposure needs to be set on 1/333 sec, but on auto exposure to get a nice balance (with blown-out whites) the setting ends up at 1/74 sec. The contrast setting has its limitations, and does virtually nothing to eliminate blown-out whites.
I am not sure what can be done to improve the image contrast quality, I realise I am a novice, Mike seems to be having similar problems, look at his side by side comparison of the original Wolverine images compared to the current Hawkeye.
I am not sure what is meant to be done with viewing the histogram in IC Capture as adjustments made do not seem to have an effect on the above problem. Please let me know if I am wrong.
Thanks for your interest, regards - Bruce
| IP: Logged
|
|
|
|
|
|
David Brown
Film Handler
Posts: 42
From: Centerville, UT, USA
Registered: Oct 2019
|
posted November 10, 2019 08:24 PM
Still running your Wolverine's takeup into a box, but can't seem to keep your pet cat from leaping into the takeup box?
This might offer temporary relief! A slip clutch that works like a projector did, with no modifications to the Wolverine.
A super8 takeup reel, a paper clamp, a metal washer & a rubber washer cut from some cupboard liner, and a nylon standoff. Things I had in my drawer.
Ran a 50' reel and it worked fine, then thought I should put on a full load.
A 600' reel works as well as the 50'. The reel oscillates because I didn't remove the Wolverine's key from the 8mm takeup spindle. The nylon standoff bends to fit and causes the oscillation.
Note that I did not even use any of the pulleys after the gate. Extra note: the pulleys are Kamels's design but, one is only supported by a finishing nail while I wait for a new motor. The other is used as a storage place for the 8mm sprocket while using the super8.
https://flic.kr/p/2hJ21dF
| IP: Logged
|
|
Stan Jelavic
Master Film Handler
Posts: 314
From: Fort Lauderdale, FL, USA
Registered: Jan 2019
|
posted November 11, 2019 08:18 AM
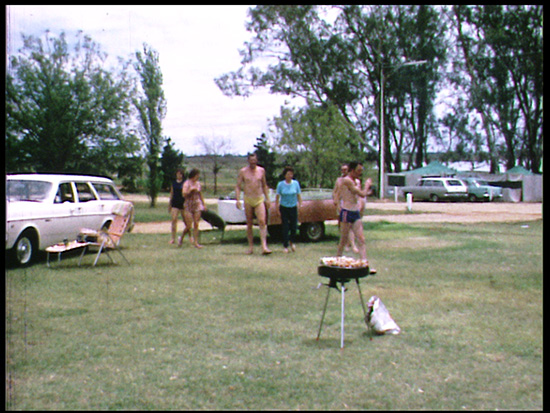
I ran the histogram on both of your images Bruce:
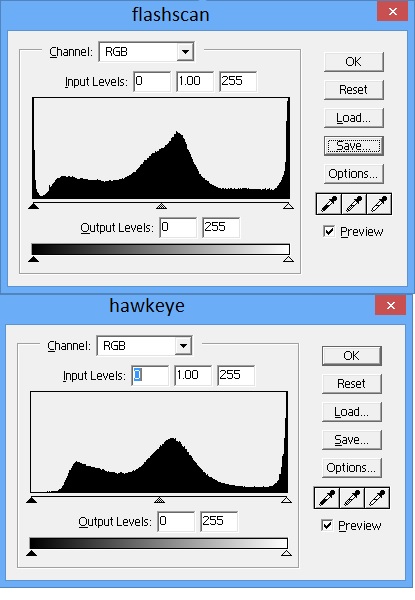
Looks like that you have too much exposure or gain and the black pixels are pushed up and possibly truncating the bright area.
What is the gain set to? Try reducing the gain and or exposure.
I tried to correct it by expanding the histogram in photoshop.
Also correcting the white balance by shifting it towards green.
Here is the result:
One more note... After doing the correction, the trees look un-natural because the white details are missing I believe. No posprocessing can fix that. Reduced gain should fix that.
Here is the comparison between fred script and photoscop. Pretty close but my photoshop version has more natural looking grass... you be the judge.

Here is the analysis of the white areas. Using photoshop curves I turned off anything that is not close to white. As you can see, hawkeye has all white shades saturated to 255.
The areas behind the trees should be darker white reducing the flare.
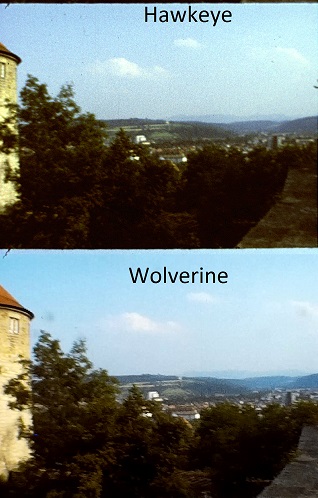
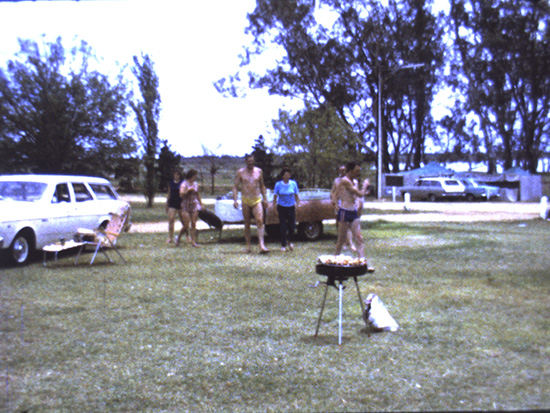
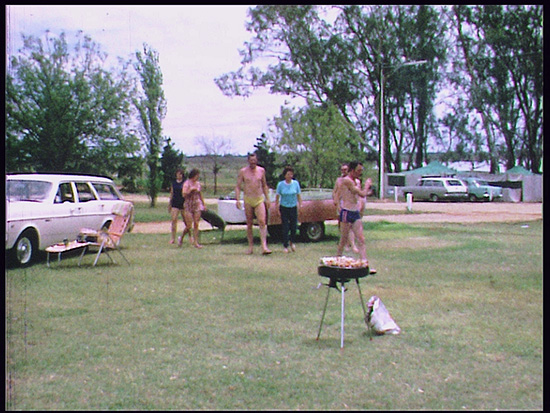
Spent several hours comparing Wolverine and Hawkeye.
Observed that IC Capture auto white balance does not work very well with auto exposure. The auto white balance starts hunting and then settles for a value that overexposes the image if the auto exposure is turned on.
I used a test landscape and turned the auto white balance on. Then turned it off and tweaked the values until the sky is blue and the roof is red etc.
Set gamma to 80 to get the tree details out. With these settings, the image looks a bit washed out because the histogram is very low in the black area and needs to be fixed in post-processing.
Here is the comparison:
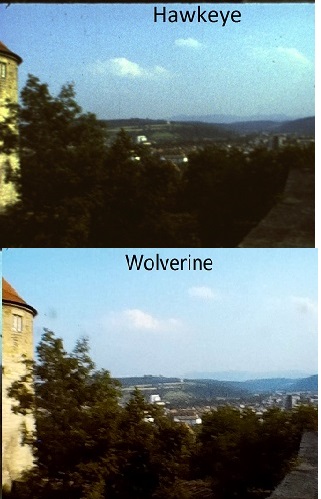
Did some more postprocessing for the hawkeye image to enhance the dark shadows (photoshop curves). Pretty close now. The main advantage of Hawkeye is the lack of digital artifacts (less anyways)
IC Capture settings:
Hue = 0
Saturation = 71
White Balance Auto = off
White Balance Mode = Gray World
White Balance Red = 172
White Balance Green = 113
White Balance Blue = 78
Color Enhancement = on
Brightness = 0
Contrast = 0
Gain = 4
Exposure = Auto
Auto Reference = 128
Highlight Reduction = Enable
Sharpness = 14
Gamma = 80
Denoise = 0
Auto Center = off
X offset = as required
Y offset = as required
Here is another find. With the white balance set to manual, tweak the autoexposure reference to reduce any overexposed areas. I set it to 109 for bright sky with a few clouds.
Now, another trick. If there are really dark shadows, reduce the gamma to say 48 and enable WDR and set it to auto. The dark shadows will jump out and show the details. Better than Wolverine...
[ November 11, 2019, 11:17 PM: Message edited by: Stan Jelavic ]
| IP: Logged
|
|
|
|
Bruce Davis
Film Handler
Posts: 47
From: Adelaide, Australia
Registered: Sep 2019
|
posted November 11, 2019 11:39 PM
@Stan Jelavic
Hi Stan, thanks for the reply, I gather your are back from your holidays, did not think using the posted images (due low quality) would provide accurate results, but your histograms look the same as the better quality images on photoshop.
The gain settings, I have always left on Manual and at (4), which is the minimum. Sometimes I use Auto Exposure and sometimes manual. Yes I have also noticed the exposure/white balance hunting, if WDR/auto is turned on and there is a considerable change with the film like zooming up really close to an object or person, there is a complete dramatic change in colour and it changes back when zooming back out.
To my eyes the Wolverine seems to do a better overall job with the image, Hawkeye also produces a lot of graininess, not sure if its noise (can be reduced in post processing).
Gamma is normally set to 85 (default is 100), as it is reduced the image becomes lighter with less contrast and looks washed out, similar to reducing contrast.
I find all these settings to be time consuming and complex, they need to be adjusted with each scene change.
As mentioned above "to eliminate blown-out whites on the motor vehicle, exposure needs to be set on 1/333 sec, but on auto exposure to get a nice overall balance (with blown-out whites) the setting ends up at 1/74 sec."
Not sure what to do from here on, if the film images do not have too much dark and light, Hawkeye can do a good job, but in most cases there is always a bright sky to contend with.
Regards - Bruce
| IP: Logged
|
|
|


 UBBFriend: Email this page to someone!
![[Smile]](smile.gif)


 Printer-friendly view of this topic