8mm Forum


my profile | my password | search | faq | register | forum home
  next oldest topic   next newest topic
» 8mm Forum   » 8mm Forum   » How To Move a GS-1200 Lamp Holder 10mm for Dummies

 - UBBFriend: Email this page to someone!    
Author Topic: How To Move a GS-1200 Lamp Holder 10mm for Dummies
Bill Brandenstein
Phenomenal Film Handler

Posts: 1632
From: California
Registered: Aug 2007


 - posted May 02, 2018 03:35 PM      Profile for Bill Brandenstein   Email Bill Brandenstein   Send New Private Message       Edit/Delete Post 
This is my request to make this thread definitive.

A few of you have done this - moved the lamp holder back 10mm so you can use lamps other than ESC that have a different focus point in the Elmo GS-1200. Did you drill new holes in the metal frame? What hardware did you use? How do you keep it all in alignment?

I'm no mechanical engineer, so for the benefit of folks like me who are impaired when it comes to this sort of intelligence, a little hand holding and a lot of information (bonus points for photos!) would be appreciated!

 |  IP: Logged

Matthieu van der Sluis
Master Film Handler

Posts: 373
From: Barendrecht, The Netherlands
Registered: Aug 2017


 - posted May 02, 2018 04:00 PM      Profile for Matthieu van der Sluis   Author's Homepage     Send New Private Message       Edit/Delete Post 
If I may add,...
- what's the thickness of the drill?
- How deep can the drill go in the metal, before you damage a print behind it?

 |  IP: Logged

Matthieu van der Sluis
Master Film Handler

Posts: 373
From: Barendrecht, The Netherlands
Registered: Aug 2017


 - posted May 05, 2018 11:49 AM      Profile for Matthieu van der Sluis   Author's Homepage     Send New Private Message       Edit/Delete Post 
The tip I can think of, is:
-Screwing the lampholder lose and messuring the hole by sticking metaldrills inside to see what size of metaldrill fits best.
-Stick some ducttape on the spot you're going to drill, to prevent the drill from sliding away.
Don't forget to remove the tape after making the hole.

 |  IP: Logged

Graham Ritchie
Film God

Posts: 4001
From: New Zealand
Registered: Feb 2006


 - posted May 06, 2018 01:33 AM      Profile for Graham Ritchie   Email Graham Ritchie   Send New Private Message       Edit/Delete Post 
Its a piece of cake Bill [Wink]
 -
This is what I did if I remember right [Roll Eyes]

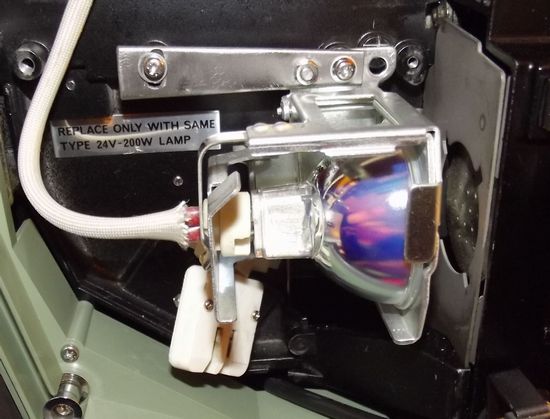
1....Remove the lamp holder from the projector.

2....Scribe a center line between the center of the two screw holes.

3....measure along the center line from the center of the rear screw hole, exactly 10mm forward...mark and center punch it for drilling.

4..."A small drill press is handy"...drill a small pilot hole through the center punch mark, followed by the bigger dia drill "screw size"

5...Screw the lamp holder back onto the projector with the one new hole, you will see you are the 10mm further back, however one screw in not enough, so what I did was to find a piece of scrap metal and make it fit between the existing screw hole at the rear of the lamp holder and a existing threaded post on the projector.

What I did was to drill and file out a slot, so that you can swing the rear of the lamp holder up or down for alinement, so when I first switched on the lamp I swung it to attain the best overall brightness on the screen, with no film running of coarse. Once I was satisfied I tightened the two screws fully.

However to re-attach the black lamp cover which you need to do, I removed its internal little baffle. The one where the spare lamp goes on. Its only held on with a couple of small screws.

Full credit must go to Thomas for coming up with this 10mm mod...it does work.

Anyway I am sure you can do it yourself Bill, its not hard and even if you don't have a drill press, just do it on a block of wood. One tip I would suggest when drilling, don't have the drill bit to tight in the chuck. If the drill bit jams it can then still spin, and not break, or cause your lamp holder to spin into space. Another point when drilling use vice grips, or pliers to hold it...keep your fingers away in case the hole thing jams on the drill press...or wood...or else [Frown] [Smile]

 |  IP: Logged

Thomas Knappstein
Expert Film Handler

Posts: 124
From: Erwitte, Germany
Registered: Oct 2017


 - posted May 06, 2018 02:02 AM      Profile for Thomas Knappstein   Email Thomas Knappstein   Send New Private Message       Edit/Delete Post 
Hi Graham!
I see on your Picture that you can move the Lampholder up and down for adjusting the Lightpoint on the Frame. But it would be much better to move it left and right too. Do you have an Idea how the Lampholder could be modified to do this?
In the older ST 1200 there is a Lamp Holder where you can adjust in both ways.

 |  IP: Logged

Graham Ritchie
Film God

Posts: 4001
From: New Zealand
Registered: Feb 2006


 - posted May 06, 2018 02:43 AM      Profile for Graham Ritchie   Email Graham Ritchie   Send New Private Message       Edit/Delete Post 
That's a good idea Thomas...it should be possible. I see on my old Eiki 16mm projector that the lamp holder has a spring loaded side adjusting knob

 |  IP: Logged

Jean-Marc Toussaint
Film God

Posts: 2392
From: France
Registered: Oct 2004


 - posted May 06, 2018 04:20 AM      Profile for Jean-Marc Toussaint   Author's Homepage   Email Jean-Marc Toussaint   Send New Private Message       Edit/Delete Post 
A little tip that I use a lot when drilling metal, to prevent the drill-bit to slip, in case you don't have ducktape (who doesn't have ducktape???) or a small piston driven puncher tool.
Set you drill to reverse gear ("unscrew"), put the tip of the drill-bit to where you want to make a hole then start the drill slowly for a few seconds. That will create a small circular groove. Then set your drill back to normal ("screw") and start drilling at moderate speed. Voilà!

--------------------
The Grindcave Cinema Website

 |  IP: Logged

Matthieu van der Sluis
Master Film Handler

Posts: 373
From: Barendrecht, The Netherlands
Registered: Aug 2017


 - posted May 06, 2018 08:13 AM      Profile for Matthieu van der Sluis   Author's Homepage     Send New Private Message       Edit/Delete Post 
This is a good specific topic.
Thanks for all the details.
I'm in between a Xenpow HID150 conversion, that needs the lamp on its original place, (but I'm waiting for the results of that other tread, a new technician rising up, or a good explenation for DIY), or this lamp refitting for the 24V250W HLX lamp conversion, (which also give a somewhat whiter/less yellow light).
Good thing with this is that the lamp can be refitted on it's original place again.

 |  IP: Logged

Thomas Knappstein
Expert Film Handler

Posts: 124
From: Erwitte, Germany
Registered: Oct 2017


 - posted May 06, 2018 09:18 AM      Profile for Thomas Knappstein   Email Thomas Knappstein   Send New Private Message       Edit/Delete Post 
I think I will take some Pics of the Wiring in my GS 1200 for the external Transformer soon. If the external Transformer has the right Voltages you can use The Elmo Lamp swich with his two steps and pre heating is working too. Here are some older Pictures.

 -

 -

 -

 |  IP: Logged

Matthieu van der Sluis
Master Film Handler

Posts: 373
From: Barendrecht, The Netherlands
Registered: Aug 2017


 - posted May 08, 2018 07:42 AM      Profile for Matthieu van der Sluis   Author's Homepage     Send New Private Message       Edit/Delete Post 
By removing the wires of the lamp and feeding the 24V250W HLX lamp extern, I probably still have to use the lamp switch to get the fan working in its high mode (if its still working that way).
Hopefully I dont forget after activating the lamp.
Is this how you do it Graham?

Or is your lamp switch still working?
If so, can you tell us where to cut the lampwires, so I can connect it to the extern powersupply, so the projector works like it suppose to do?

 |  IP: Logged

Matthieu van der Sluis
Master Film Handler

Posts: 373
From: Barendrecht, The Netherlands
Registered: Aug 2017


 - posted May 08, 2018 02:41 PM      Profile for Matthieu van der Sluis   Author's Homepage     Send New Private Message       Edit/Delete Post 
I found the answer from another topic I made lsst year here:
http://8mmforum.film-tech.com/cgi-bin/ubb/ultimatebb.cgi?ubb=get_topic;f=1;t=011795;p=1
It's from Thomas Knappstein, who used a Transformer made specielly for his GS1200 machines. See the pictures from his post above.

Long Time ago he went to a Transformer Factory and give them the Voltage he needed and they made the Transformer for him. The Output Voltages must be 0-21,5-24-25 and perhaps 26V. The Input was 230V +- 5%.
In the GS1200 you must cut the three Lamplines on the Transformer.
0=black, 21,5=yellow, 24=white. So you have 6 Lines melt on. Three from the Transformer coming and the three other ends that are going to the Elmo (Lamp). This 6 Lines he has put together in a 8 Point Connector from (Neutrik). By plugging in the Connector from the external Transformer, only the three Lines from the Lamp are passing through. But he has the same connector with three bridges in it and when he plugged this Adaptor in the internal Transformer, the origenal setup works again.

 |  IP: Logged

Thomas Knappstein
Expert Film Handler

Posts: 124
From: Erwitte, Germany
Registered: Oct 2017


 - posted May 10, 2018 01:12 AM      Profile for Thomas Knappstein   Email Thomas Knappstein   Send New Private Message       Edit/Delete Post 
And the original Setup is woking with the external Transformer and the 250W ELC Lamp too. When switchig on the Lamp the Fan is getting high.

 |  IP: Logged

Matthieu van der Sluis
Master Film Handler

Posts: 373
From: Barendrecht, The Netherlands
Registered: Aug 2017


 - posted May 10, 2018 03:17 AM      Profile for Matthieu van der Sluis   Author's Homepage     Send New Private Message       Edit/Delete Post 
Thanks for adding that Thomas.

I found this 24V DC transformer that give 20A, which is not expensive.
https://ledstrip-specialist.nl/Transformator-voor-ledstrips-20A-480-WATT?search=24v%20transformator

Did you cut the 3 wires near the lamp, or in the back near the travo

[ May 10, 2018, 06:11 AM: Message edited by: Matthieu van der Sluis ]

 |  IP: Logged

Thomas Knappstein
Expert Film Handler

Posts: 124
From: Erwitte, Germany
Registered: Oct 2017


 - posted May 10, 2018 06:03 AM      Profile for Thomas Knappstein   Email Thomas Knappstein   Send New Private Message       Edit/Delete Post 
Hi Matthieu!
I unsoldered the 3 Lines direct on the Transformer. Than solder 3 new ones on it and put them together (6 Lines) to the Conector Box on the Top of my Machine. If you are using this swiching power supply with only 24V you can´t use the first lamp step on the Elmo switch And pre heating doesent work too. I´m using a normal wired Transformer with 21,5V, 24 and 26 Volts. With a diming Module I can trimm the Voltage to 25V or lower or perhaps higher. Most of the OSRAM Lamps are with 25V brighter than with 24V.

 |  IP: Logged

Matthieu van der Sluis
Master Film Handler

Posts: 373
From: Barendrecht, The Netherlands
Registered: Aug 2017


 - posted May 10, 2018 10:15 AM      Profile for Matthieu van der Sluis   Author's Homepage     Send New Private Message       Edit/Delete Post 
So I need a 25V transformator instead of 24V and than I can use both lamp settings on the projector?
Or is this only possible with a travo like yours by using the differend settings you have?

 |  IP: Logged

Thomas Knappstein
Expert Film Handler

Posts: 124
From: Erwitte, Germany
Registered: Oct 2017


 - posted May 11, 2018 09:08 AM      Profile for Thomas Knappstein   Email Thomas Knappstein   Send New Private Message       Edit/Delete Post 
Best is you went to a Trafo Shop (Factory) and let them make one with 21,5V, 24V, 25V, 26V with a current of 400 Watts. Than put it in an external Housing like I have done it. But I must warning you. It is very heavy about 10-15kg.

 |  IP: Logged

Matthieu van der Sluis
Master Film Handler

Posts: 373
From: Barendrecht, The Netherlands
Registered: Aug 2017


 - posted May 11, 2018 09:28 AM      Profile for Matthieu van der Sluis   Author's Homepage     Send New Private Message       Edit/Delete Post 
I'm going to check this out, thanks.

So the 21,5V is for the low lamp mode.
The 24V for the Philips Focusline
The 25V for the Osram lamps
When do I use the 26V?

 |  IP: Logged

Thomas Knappstein
Expert Film Handler

Posts: 124
From: Erwitte, Germany
Registered: Oct 2017


 - posted May 11, 2018 11:40 AM      Profile for Thomas Knappstein   Email Thomas Knappstein   Send New Private Message       Edit/Delete Post 
Use the 21,5V and perhaps the 26V. And in the input Line of the Transformer (here in Germany it is 230V) use the Kemo M028N Diming Module. So you can regulating with a Poti from 24V to 26V. because the Lamps are very different. This Module you can get by Amzon or Ebay.

 |  IP: Logged

Matthieu van der Sluis
Master Film Handler

Posts: 373
From: Barendrecht, The Netherlands
Registered: Aug 2017


 - posted May 11, 2018 05:05 PM      Profile for Matthieu van der Sluis   Author's Homepage     Send New Private Message       Edit/Delete Post 
Will the lamplife be very short, like around 25 - 30 hours, on the 26V?
Or is this what's coming out of the GS1200 when putting a multimeter on the lampwires?

Do you mean the Kemo M028N Diming Module is for people who have less than 230V?
Here in Holland we have 230V as well.

 |  IP: Logged

Thomas Knappstein
Expert Film Handler

Posts: 124
From: Erwitte, Germany
Registered: Oct 2017


 - posted May 12, 2018 12:31 PM      Profile for Thomas Knappstein   Email Thomas Knappstein   Send New Private Message       Edit/Delete Post 
If you use the kemo Module and the Elmo swich is setting on high with 26 V on the Lamp than you can diming the Light with a Poti. Some Lamps need more than 24V others do not. So you have always the best performance on the Screen. And the 230V are not even constant. In the Evening it could be less than 225V and than you can diming up and have the same Brightness as before.

 |  IP: Logged

Matthieu van der Sluis
Master Film Handler

Posts: 373
From: Barendrecht, The Netherlands
Registered: Aug 2017


 - posted May 12, 2018 01:03 PM      Profile for Matthieu van der Sluis   Author's Homepage     Send New Private Message       Edit/Delete Post 
To control the inconsistent Voltage, do I need a Voltmeter on the transformator, or do you change this by eye on your experience?

 |  IP: Logged

Thomas Knappstein
Expert Film Handler

Posts: 124
From: Erwitte, Germany
Registered: Oct 2017


 - posted May 13, 2018 05:05 AM      Profile for Thomas Knappstein   Email Thomas Knappstein   Send New Private Message       Edit/Delete Post 
Yes you need a True RMS Multimeter to pich on the Right Voltage. True RMS is very importand because another one gives you incorrect Voltages.

 |  IP: Logged

Matthieu van der Sluis
Master Film Handler

Posts: 373
From: Barendrecht, The Netherlands
Registered: Aug 2017


 - posted May 13, 2018 06:42 AM      Profile for Matthieu van der Sluis   Author's Homepage     Send New Private Message       Edit/Delete Post 
So you've measured this with the lamps of differend brands.
But now you know which brand lamps need what Voltage, or are the lamps not consistant within their type and brand?

 |  IP: Logged

Thomas Knappstein
Expert Film Handler

Posts: 124
From: Erwitte, Germany
Registered: Oct 2017


 - posted May 13, 2018 08:53 AM      Profile for Thomas Knappstein   Email Thomas Knappstein   Send New Private Message       Edit/Delete Post 
No, they are not consistant in their Brightness. I´m using a Lux Meter and measuring the Brightness of each new Lamp and than turn the Voltage up or down.

 |  IP: Logged

Matthieu van der Sluis
Master Film Handler

Posts: 373
From: Barendrecht, The Netherlands
Registered: Aug 2017


 - posted May 13, 2018 11:26 AM      Profile for Matthieu van der Sluis   Author's Homepage     Send New Private Message       Edit/Delete Post 
Thank you for all the information.

 |  IP: Logged


All times are Central  
   Close Topic    Move Topic    Delete Topic    next oldest topic   next newest topic
 - Printer-friendly view of this topic
Hop To:

Visit www.film-tech.com for free equipment manual downloads. Copyright 2003-2019 Film-Tech Cinema Systems LLC

Powered by Infopop Corporation
UBB.classicTM 6.3.1.2