|
Author
|
Topic: Help. Bolex 18-5 belt changing ~ SIMPLE?
|
Scott Gabriel
Junior
Posts: 19
From: Cape Cod, MA, USA
Registered: Jan 2016
|
 posted January 16, 2016 07:39 AM


Hello,
New guy here. I recently purchased a vintage Bolex 18-5 standard 8 projector. Beautiful old machine. It seems to work, but the belts are old, a bit stretched apparently and one of the three is missing. They slip a bit too.
So, I ordered some new, square section belts for it. They're yet to arrive but in the meantime I am looking at the construction of the machine and just how to get the new belts on. I have searched, and read, every thread I can find, both here and elsewhere. Some of which say "it's a cinch" to change the belts.
However, it doesn't seem that way to me. I'd post a pic if I thought I could get a pic down in there but, here is my problem. The distance between the large, 3 step pulley, on the shutter shaft, sits only about 1/16 of an inch from the metal chassis behind it. Maybe less. It's tight. I cannot see getting a belt between the edge of the pulley and that chassis.
And the only other way I can see to do it is disassemble all or most of the geared drive train.
Can that be so? That those clever Swiss would design this thing so one had to disassemble half of it to change the drive belts?
Any help would be greatly appreciated.
Thank you
Scott
| IP: Logged
|
|
Paul Adsett
Film God
Posts: 5003
From: USA
Registered: Jun 2003
|
posted January 16, 2016 10:23 AM
Here is a close up pic of the 18-5 drive arrangement:
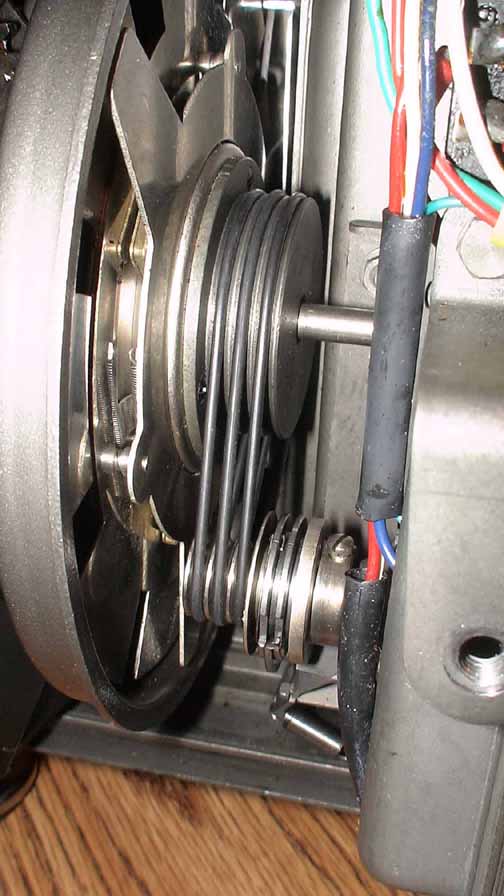
The motor runs at a constant fixed speed, and a mechanical clutch arrangement on the motor shaft, activated by a linkage from the main control knob, reduces the motor shaft rotation by a factor of 5/18 when the knob is turned to the 5fps position. This is a very clever design and I can't tell how it works without taking it apart, which I am not about to do.
Three belts, mounted on pulley grooves in the motor shaft connect to three corresponding pulley grooves on the shutter/cam shaft. I have no idea why three belts were used as they all rotate together, but whatever it works well. The shutter itself is actually three shutters, each with three blades. They are mounted one behind the other, and two of the blades are weighted and spring loaded so that at 18fps centrifugal force on the weights overcome the spring force and all three shutters swing into alignment, and you have a normal three bladed shutter. At the 5fps speed the spring load on the shutter dominates and the shutters all line up between each other, and you have a 9-bladed shutter, which results in no flicker at the 5fps speed.
The whole thing is devilishly clever, and works like a charm. Another example of brilliant Bolex design.
I Replaced the three belts on my 18-5 about 30 years ago with 3 round 0.070 dia butyl rubber O-rings and they still look like new. To replace them you stack them in order on the big pulley first, and them slide them in order onto the smaller bottom pulley. You may have to use a wooden stick to poke them in behind the larger pulley. Its an easy operation.
--------------------
The best of all worlds- 8mm, super 8mm, 9.5mm, and HD Digital Projection,
Elmo GS1200 f1.0 2-blade
Eumig S938 Stereo f1.0 Ektar
Panasonic PT-AE4000U digital pj
| IP: Logged
|
|
|
|
Scott Gabriel
Junior
Posts: 19
From: Cape Cod, MA, USA
Registered: Jan 2016
|
posted January 16, 2016 11:05 AM
Hello Paul,
Thank you for the reply. I believe I studied that picture of yours when I was looking for info on this, in an older thread.
The thing is, though my setup looks similar to yours, it is quite different. Different, smaller 3 step drive pulley on the motor shaft, for one thing. But that's neither here nor there.
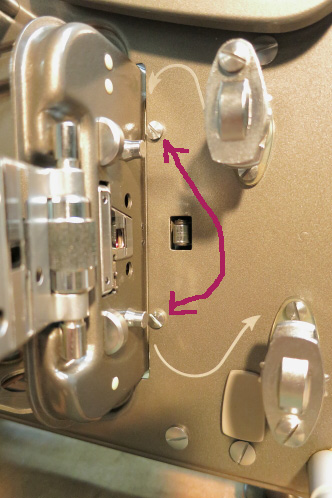
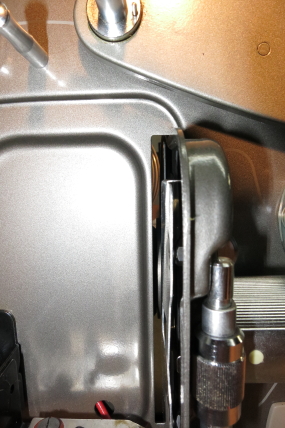
My 3 step large pulley on the shutter shaft looks quite different also. But irrelevant here I guess. My problem is that I don't have near the clearance between the edge of the 3 step shutter pulley and the housing/chassis of the unit as is shown in your pic.
The chassis-metal frame is located further back than in your model shown, but so close to the outer edge of the pulley I don't think I can squeeze, push or cajole a belt between there. Strange indeed.
I may have to get some good light in there and see if I can take a picture.
I'm fairly adept mechanically, so worse case I can remove some of the drive gears, and maybe the round shutter/clutch housing, but I'm certainly not looking forward to trying it.
Thank you,
Scott
| IP: Logged
|
|
|
|
|
|
|
|
Scott Gabriel
Junior
Posts: 19
From: Cape Cod, MA, USA
Registered: Jan 2016
|
posted January 16, 2016 12:40 PM
Barry,
No, I certainly do NOT want to get into timing troubles. That's for sure.
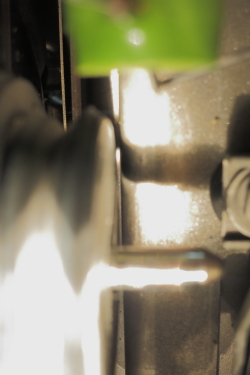
Unfortunately, no, mine does not look like the picture you posted. Shown below, my frame/chassis does not have the cutout as in your pic. The only thing visible through the slot in my chassis is the far end of one belt. No room.
In my other not-so-good pic, you can see the minimal clearance between the 3 step pulley and the chassis next to it. Not a great pic, sorry. Hard to tell scale so, I put my feeler gauge in there, and .020 fit. .025, snug. That is way tight to try jamming a rubber through, I'm afraid. That's less than 1/40th.
Man, but am I starting to get disappointed here. I hope I didn't purchase an expensive door stop....
Thanks
Scott
| IP: Logged
|
|
|
|
|
|
|
|
Paul Adsett
Film God
Posts: 5003
From: USA
Registered: Jun 2003
|
posted January 16, 2016 02:31 PM
Scott, sorry that your machine is not as easy as mine to replace belts, but Barry is the 18-5 expert around here,( I think he has every model they made!), so I am sure that he will be able to walk you through a workable solution.
Like Barry I have really high regard for this machine. Superb quality, so kind to film, and just about the sweetest little projector ever to hit the market.
--------------------
The best of all worlds- 8mm, super 8mm, 9.5mm, and HD Digital Projection,
Elmo GS1200 f1.0 2-blade
Eumig S938 Stereo f1.0 Ektar
Panasonic PT-AE4000U digital pj
| IP: Logged
|
|
Barry Fritz
Phenomenal Film Handler

Posts: 1061
From: Burnsville, MN, USA
Registered: Dec 2009
|
posted January 16, 2016 03:17 PM
Thanks for those kind words Paul, but expert? I'm not so sure. Much to my wife's dismay, I have owned my share of Bolex projectors.
Scott, if your projector is not working with the current belts, you have nothing to loose by removing one. You might try by removing the first one from the bottom pulley and then while turning the inching knob so the big pulley is turning toward you, pull it up and thru the crush point. This is the opposite of how you would put it on. Due to age, it may break, but you aren't out anything if that happens. Now take it to a hardware store (I go to Ace) where they will have drawers of butyl "O" rings. Match the size of the one you removed. Take it home and try to install it as described earlier in this post. Short of bringing the old belt in, you want one that has an O.D of 1.8 inches and a thickness of .10. The ring should cost less than a dollar. I don't think you'll find what you want in the big box stores like Lowe's or Home Depot.
| IP: Logged
|
|
Scott Gabriel
Junior
Posts: 19
From: Cape Cod, MA, USA
Registered: Jan 2016
|
posted January 16, 2016 04:56 PM
Thank you Barry, and Paul,
Greatly appreciated. I just ran my first test reel. The projector did run before I mounted a reel of film, but with a help spin from the front knob. But I could tell the remaining two belts were loose. And slipping a bit. When I put the film in, it does run, but appears to be at about 7 to 10 frames per, or so. Kind of slow. I think.
Thanks Barry but, I already ordered a set of 3 belts from a guy on ebay. By the way, it is not that one guy I see mentioned here. An outfit called Optitech or something, in Andover, MA., and when I wrote to him prior to the purchase, he told me they were OEM Bolex belts. GREAT!...I thought. Then it occurred to me...great, if they're not 40 years old and rotten!. heh.
So, it is running Barry, thank you. But not well I suspect. I may do as you suggest and pick up an O ring to test. The material these original belts, on the machine, seem made of softer material that standard 60-70 shore butyl belts, so maybe the new ones will squeeze through there. But I believe it is doubtful. Boy, but that gap is tiny. 1/40th of an inch!
I'm wondering if this is a very early model standard 8 projector. Have to look at the serial and check it. But it appears as though they realized the problem on this machine and changed the access clearance for belt changing in later models. Not sure, of course.
I very much appreciate the help, fellas. If I may, I might contact you via private message Barry, to discuss this a bit further, specifically on this timing thing. If you would prefer not, I completely understand. Just let me know.
The shop I ordered the new belts has been doing projector work since the mid 60's, but I shudder at the thought of what it might cost to have a pro do it if I can't get this figured out.
Thank you guys,
Scott
| IP: Logged
|
|
|
|
Scott Gabriel
Junior
Posts: 19
From: Cape Cod, MA, USA
Registered: Jan 2016
|
posted January 16, 2016 09:15 PM
Barry,
It has a red switch. Serial number looks like 1962 according to the Bolex collector site. So not all that early in the production run, oddly enough.
I am going try a test ring and see if I can squeeze it through there, and will update this thread as I tinker.
I'm a good tinkerer, but the thought of taking this thing apart makes me shrivel up like a spider on a hot stove. So let's hope it doesn't come to that. But quite honestly, I can't see anything near the cross section of an O ring that width going through there. But I'm going to try it.
I'll also check on that shop I mentioned and see what they say.
Thank you Barry. I'll keep you posted.
Scott
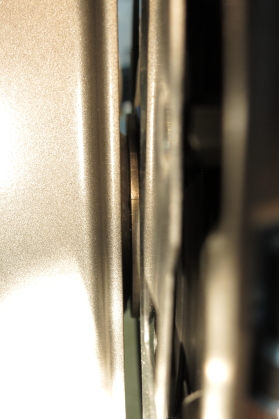
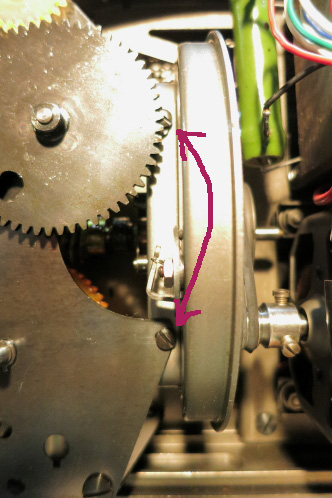
The pic I posted of the drive was not good. I was trying to get enough light in there to show the minuscule gap between the shutter pulley and the chassis/case. Maybe this shot, taken further back, will help the context.
Seeing how differently this one seems to be configured than the pics Barry posted, as well as others I've seen, really has me scratching my head. And wondering if perhaps something in the shutter gear train has shifted.
I also notice how much smaller in diameter the drive 3 step pulley, on the motor shaft, is one this machine compared with Barry's.
Again, thanks to all.
[ January 17, 2016, 07:56 AM: Message edited by: Scott Gabriel ]
| IP: Logged
|
|
Scott Gabriel
Junior
Posts: 19
From: Cape Cod, MA, USA
Registered: Jan 2016
|
posted January 17, 2016 04:17 PM
EUREKA!
I sat and stared at this machine for about an hour, and a possible solution occurred to me.
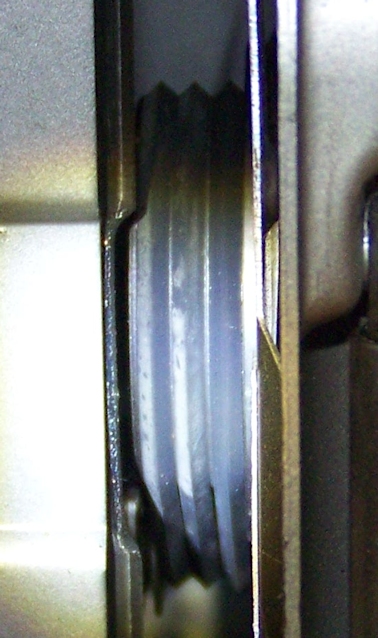
What I needed to do was move that 3 step pulley on the shutter shaft back away from the chassis member behind it. Looking at that tiny gap, I just knew an O ring of the proper cross section would never go through there. Even with brute force and a nuclear popsicle stick.
I'll post my solution here, just in case anyone who may read this in future who might have the same problem, will have it. FWIW. The solution was much simpler than I thought. Typical of me. I had to let my fetid brain think of all the hard ways to do it first.
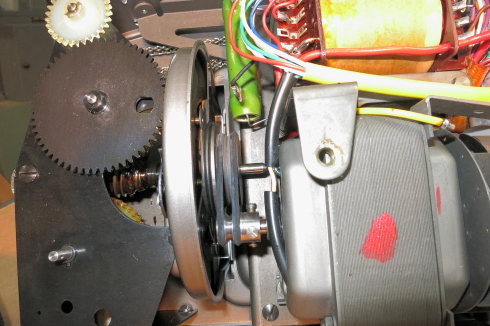
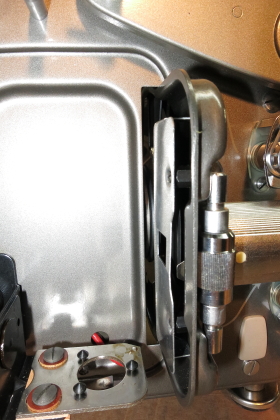
The heavy, stamped housing that cradles the shutter is attached to the main chassis by four screws. Two on the front of the machine in front of the lamp housing, and 2 on the rear, which attach to the black sheet metal member which supports the gear train shafts.
It took me a while but it was closely looking at the 2 rear screws to get this. Those two screws hold the sheet metal support not by standard holes, but by open sided holes in the sheet metal. This allows for some built-in adjustability. Placed there ostensibly to help align the shutter pulley to the drive pulley on the motor, and/or adjust the relation of the worm gear on the shutter shaft to the nylon gears in the gear train.
I found that by loosening 3 of the 4 screws I could move the shutter housing, and thus the pulley, just enough away from the chassis wall that I will be able to get the new belts behind the pulley. I say 3 of the 4 screws because that lower one on the front is very tricky to get to. Even after I broke out my gun smithing screw driver bits and right angle driver, which was just a hair too wide. These front screws appear to be aluminum, and I marred the top one a tad as it is not easy to get a blade on either. But I have the technology to restore that. Never pleased when it happens , though.
The upper screw on the back is not easy to get at either as it sits halfway behind the large black gear. But I wasn't about to remove that gear, and judicial use of a thin electrician's screwdriver got to it.
It occurred to me that this adjustment, moving it like I did, would have slight consequences with the worm gear to nylon gear train mesh, so I intend to align the shutter housing back to where I found it after installing my new belts coming next week.
I'm relieved, to say the least. Especially since this machine looks to be configured slightly differently than the ones kindly shown by Barry and Paul. Or any other pics of this projector's drive setup that I've seen online. Which all seem to exhibit more generous clearance for replacing the belts. Barry posited the idea that this machine may once had one of the flat belt to round belt conversions done on it, which might have affected the position of the large shutter pulley. Which very well might be the case.
Now I hope I can get this fine old machine running properly. I'd like to think Barry and Paul once again, for letting me bounce ideas off of you, and for the considerable help you provided. I'm grateful.
Thanks
Scott
Screws which hold the shutter housing in place
| IP: Logged
|
|
|
|
|
|
Scott Gabriel
Junior
Posts: 19
From: Cape Cod, MA, USA
Registered: Jan 2016
|
posted January 18, 2016 08:06 AM
Thank you Janice, and Barry,
I'm not out of the woods yet but this was a big step. Even though I have some belts coming, which are supposed to be OEM by the way, I'll pick up a trio of O rings too, just to try, if I can find the proper size at ACE.
What's got me stumped is the look, and size, of that 3 step pulley on the motor shaft. You may be right, Barry, that this machine had a conversion done. I saw in another thread you mentioned that you had a conversion kit, but couldn't find the instructions.
Does the motor pulley in you kit look like the one in my pic? Much smaller than the stock one but it looks like the main difference is the lack of what I presume to be the "clutch" mechanism built into the pulley. I won't pretend to understand how that worked originally but I wonder how the shutter speeds function properly without it?
It looks like the diameter of the actual pulley V's may be the same as on the original, which would make sense, as changing that diameter would change the speed of the drive.
Well, time will tell, I guess. My original belts are still slipping too much to get a read on whether this thing will run at proper speed or not.
Thanks guys and gals,
Scott
| IP: Logged
|
|
Scott Gabriel
Junior
Posts: 19
From: Cape Cod, MA, USA
Registered: Jan 2016
|
posted January 20, 2016 10:06 AM
One addendum I'll add here, just for anyone who might be interested. I obtained 3 belts from a seller on ebay who goes by the handle Optech1. A shop in Andover, MA. which has been in the video, lightbulb and projector repair business since 1965.
Gary, the nice guy who owns the shop with his brother, told me these were OEM Bolex belts. And after seeing them, I believe it. Same look, size and composition as the old ones I removed from my machine.
Not as cheap as three O rings, to be sure, but as original spare parts, I consider these quite a good find. And at $13 a set with free shipping, a better deal than some other sellers on the auction site. Also, as these are square section belts, they provide a much more positive contact with the "V" groove of the pulleys over O rings, which theoretically anyway, only contact a V groove at two spots.
Just FYI. I was very happy to find them. And bought another set as spares.
Here is a link to their shop in Andover.
http://www.optechlightbulbs.com
| IP: Logged
|
|
|
|
|
|
|
|
|
|
|


 UBBFriend: Email this page to someone!


 Printer-friendly view of this topic