This is topic Elmo St1200HD M: Foot Counter Belt Repair in forum 8mm Forum at 8mm Forum.
To visit this topic, use this URL:
https://8mmforum.film-tech.com/cgi-bin/ubb/ultimatebb.cgi?ubb=get_topic;f=1;t=009616
Posted by Mathew James (Member # 4581) on December 11, 2014, 09:07 AM:
Hi all,
I am thinking at some point it would be nice to fix the counter on this unit. Will i use it? Not really other that to watch the nice numbers move, but i still would like to fix it eventually.
Has anyone yet done this?, and if so, can you please let me know the exact steps to do this. If you have a scan of a page with instructions, that would be great as well as i do not have the service guide, just whatever i have found so far on the net.
I understand that once the counter assembly is off it is a piece of cake...i found a belt on ebay and will order if i can get some info on how to perform the task at hand...
Thanx in advance!
Matt
Posted by Mathew James (Member # 4581) on December 11, 2014, 09:43 PM:
Not much action on this thread, which tells me perhaps this isn't something done too often?
Maybe I can ask it another way. Can someone who owns the ST1200HD manual tell me if there is a section in there that shows how to repair this counter? The online St1200 service manual does not show of course since only the HD has the counter. I just want to guage if the service manual would be worthwhile to own eventually... Thanx,
Matt
Posted by Steve Klare (Member # 12) on December 11, 2014, 10:08 PM:
I'd have more to say about it, but my counter belt hasn't broken (yet...).
I'm not sure where I stand on this: I've never used the counter on my ST-1200HD and probably never will, but then again if I look at it as a piece of vintage equipment (and it truly is) I want it to function like the day it came out of the factory.
Ten years ago I sent a reel of footage off to be soundstriped and since it was costed by the foot I used the counter on my Eumig to figure out how much I was sending the guy.
That was the one and only time I used one of these!
Is there any other use for a counter?
Posted by Mathew James (Member # 4581) on December 11, 2014, 10:25 PM:
I am not sure myself what other use there would be other than to make mental notes of how long films are as they are played through....
I am thinking the sprocket underneath would need to be unscrewed first and then somehow that counter assembly could be taken off..but not sure. Whatever i end up trying, if it works i will upload pics to this thread in case others in future may wish to try.
Matt
Edit: Okay, I got bored and wanted to explore this further and although i do not yet have the replacement belt, there was alot of black goo from the previous belt that i wanted to remove anyways before it started to get on the film. This removal seems straightforward. Here is what to do:
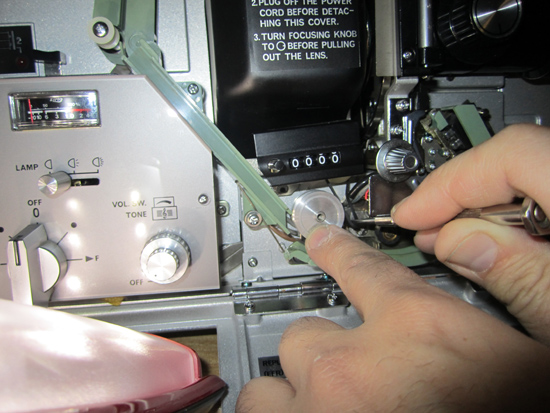
1. Before removing screw to sprocket, the guide below needs the screw removed so you can lower the guide enough below the sprocket to get it off. 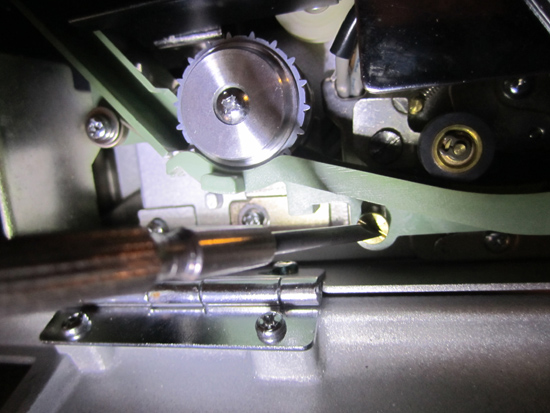
2. Once this screw is off, remove the screw to the sprocket under the counter assembly. Be careful of the order of the following pieces that will come off: 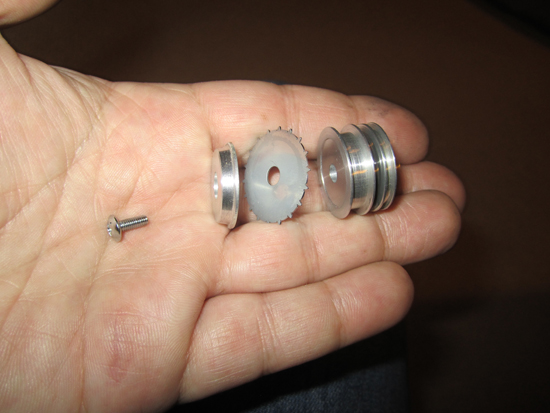
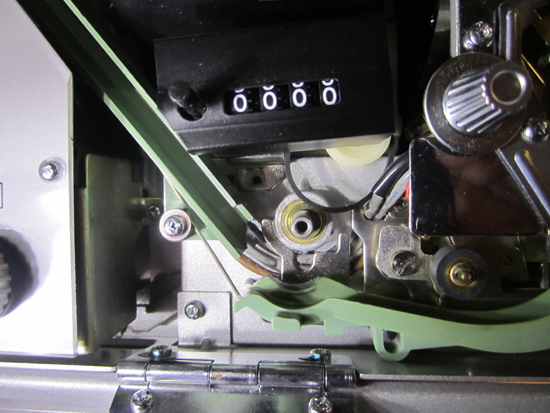
At this point i cleaned the pulley in the middle where all the black goop was. Without a schematic, i now know where the belt goes onto this pulley from previous goopy 'evidence' left ![[Smile]](smile.gif)
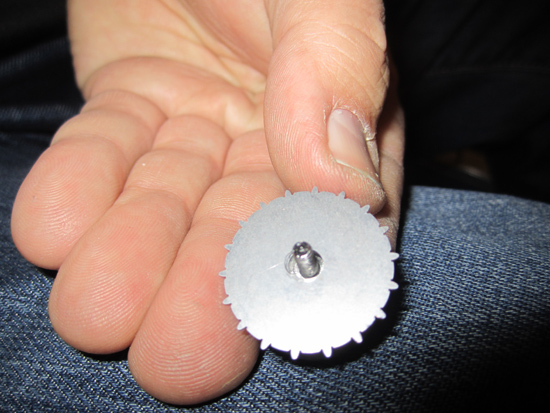
3. There is a washer still left on the shaft that i didn't remove. Make sure it goes back on first if you do remove it: 
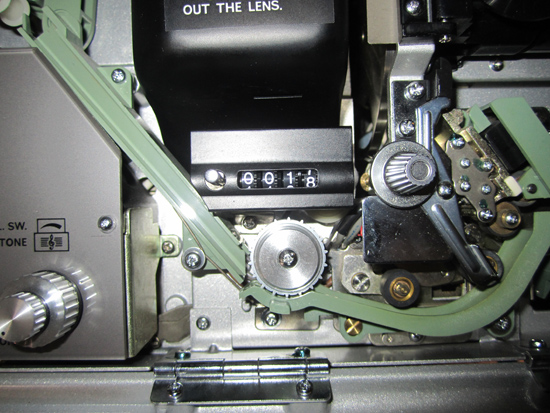
4. This final pic shows a closeup where you can see the white pulley behind the counter assembly where the top of the belt will go...Now that i can see in here, i believe it should be easy to get the belt first onto top pulley,and then put the bottom sprocket back together in reverse of how you took it off, then the belt would pull over this, then the last step would be to replace the screw that holds the guide on. 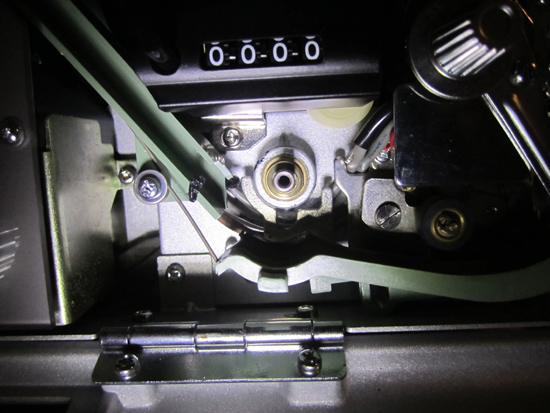
I can't wait to get a belt to try this officially!!
Cheers,
Matt
[ December 12, 2014, 08:59 AM: Message edited by: Mathew James ]
Posted by Mathew James (Member # 4581) on December 12, 2014, 08:52 AM:
Hi All,
I ordered a belt last night so once it arrives, I'll install it and update with a final picture of the working counter!!!
Matt
Posted by Steve Klare (Member # 12) on December 12, 2014, 09:44 AM:
It doesn't really look that bad!
If I remember right, the sprocket ring isn't self centering on the roller. Did you have to fiddle with it to get it centered?
Posted by Andrew Woodcock (Member # 3260) on December 12, 2014, 10:32 AM:
From the last photo, remove the one single screw that holds the entire counter assembly to the frame of the machine, then simply hook the belt over both sets of pulleys when refitting. Dead easy to do ...childsplay!
Posted by Mathew James (Member # 4581) on December 12, 2014, 11:38 AM:
@Steve- You are correct! I did have to fiddle to center it!
@Andrew- Cool! I want to try that! Thanx for the tip.
Posted by Steve Klare (Member # 12) on December 12, 2014, 12:16 PM:
Yes,
This kind of surprised me. I took those assemblies out of my machines to do some cleaning about a year or so ago and when I put them back together the sprockets weaved up and down like crazy!
One of the things I like about the Elmos is they are usually put together in a very commonsense way: it makes working on them easier (and these many decades down the road, that's kind of critical.)
All Elmo had to do here was make the diameter of the hole small enough to be a snug fit on the screw: problem solved!
Posted by frank arnstein (Member # 330) on December 13, 2014, 08:42 PM:
"If I remember right, the sprocket ring isn't self centering on the roller. Did you have to fiddle with it to get it centered?"
"@Steve- You are correct! I did have to fiddle to center it!"
You are both incorrect if you had to do that fiddling.
The sprocket is definately self centering. The centering hole is just big enough to go over the drive shaft after the pulley is slid on. There should be room on the shaft to put both the pulley and sprocket onto the shaft.
If you loosen the screw a bit, you should be able to rotate the sprocket without losing the exact centre point of the sprocket. If not, then its not on far enough to self centre. Better check why the pulley hasn't gone on far enough to leave room for the sprocket. Then tell us what you find. Good Luck.
dogtor frankarnstein
![[Wink]](wink.gif)
Posted by Mathew James (Member # 4581) on December 13, 2014, 09:08 PM:
Thanx for that info Frank!
When the new belt comes in, I will make a mental note to make sure to check that it centres properly....From my memory, it seemed to me that the hole in the sprocket was ever so slightly larger than the shaft, and thus perhaps had some very minor 'play'....but I could be wrong and maybe just never tightened enough.
Cheers,
Matt
Posted by Steve Klare (Member # 12) on December 13, 2014, 09:23 PM:
Maybe until you tighten everything down the roller doesn't seat fully on the shaft.
The next time I take mine apart I'll check this out.
-for now all is well: I'm leaving it alone!
Posted by Mathew James (Member # 4581) on December 25, 2014, 10:20 AM:
Dear All- I just got the belt in the mail! Wow, that is tiny!!!! Big envelope for a 2 inch belt
Anyways, Now that I have repaired the belt..I can show how i did it. There may be different ways, and I have no book. I am just showing what i did that worked for me.
For that sprocket, I learned something neat. We were all correct!!!
The trick is that if you imply removed the sprocket assembly and try to put back on, it will seem like the hole is too big for the screw and thus will spin all wonky.
What needs to be done is that after you remove the sprocket and before you re-assemble, one needs to pull on the shaft and it will come forward 1/8" or so. What this does is allows that when you put the sprocket assmbly back on, the sprocket will actually fit onto the shaft perfectly, and then once you tighten the screw, it will pull it back in perfect. Hope that make sense!
So here is how i did the whole job:
1. Removed screw under bottom green film path so it can lower below sprocket.
2. Removed sprocket screw and then assembly, remembering order!
3. Unscrewed bottom screw to counter. It was mentioned that removing this screw you can take off whole assembly, but on my HD model this is not the case. You would need to remove the left green film guide first to do it this way, so I didn't. With the one screw removed, you can tilt the counter up on the right side so to give more room to put belt on topmost pulley:
4. Once on top pulley, you need to stretch lower side carefully around the sprocket pulley wheel(Back-most grove #3), trying to keep pulley completely straight so belt is not twisted. This took me a while to figure out how to do without twisting, but it can be done. I used a mini screwdriver set to pull with and to keep straight!)
5. Once everything is in place, it is time to put the pieces back together. Make sure to pull out the main shaft a little so the sprocket will it onto the shaft and not spin freely!!!
6. Put screw back onto green film path.
Voila!! I hope this helps. As i say, there may be easier ways
Posted by Andrew Woodcock (Member # 3260) on December 25, 2014, 10:38 AM:
Sorry Mathew, you are correct. To remove the entire counter assembly by the one screw holding it to the frame of the projector, you do indeed have to first remove the green guide. This is only two screws to remove it and this is the way I went about fitting the belt to maximize the room I had.
As removing the guide was so simple and insignificant in completing the job successfully, I completely forgotten about that stage in the proceedings sorry.
Posted by Mathew James (Member # 4581) on December 25, 2014, 10:41 AM:
No probem Andrew!! I think it would be much easier to remove the green guide as you suggest! It is one of those things where unless I do it once, I lack confidence. Knowing we can take off that guide completely is a helpful addition and I will try that for next time!
Cheers,
Matt
Posted by Andrew Woodcock (Member # 3260) on December 25, 2014, 11:17 AM:
Have a go at removing it Matthew next time you need to clean your film path thoroughly. I used to remove all the green guides at the same time and soak and clean them all in hot soapy water with household detergent. Then I would leave them all to thoroughly dry out before finally polishing them all with silicone prior to refitting. There is a location slot that aligns with the lower spring but it is very simple to both remove and refit correctly again.
Posted by Mathew James (Member # 4581) on December 25, 2014, 03:46 PM:
Good tip!!
One Question...Do all models measure in feet?? I ask because i am assuming the right most digit is moves fast to 10 before the next number goes up 1, meaning 1 foot? Do these only measure in feet?
I ask because i am pretty sure my 400' reel only measured half that. Weird.
Posted by Steve Klare (Member # 12) on December 25, 2014, 04:28 PM:
This is "footage", but not necessarily "Feet"!
As I remember it on my Eumig, an increment on the counter signified 18 frames, or about 3 inches. According to the ST-1200HD owner's manual on this site: (Page 27)
Owner's Manual
It's the same.
Posted by Dominique De Bast (Member # 3798) on December 25, 2014, 05:19 PM:
The same for the Yelco DS-630. The instruction booklet says : about the film counter "one increment represents 18 frames". I didn't check what the word "increment" means but following the context it must be a synonym of "unit".
Posted by Steve Klare (Member # 12) on December 25, 2014, 06:00 PM:
It would be a "second counter" if we'd just stick with 18FPS.
Posted by Andrew Woodcock (Member # 3260) on December 26, 2014, 04:33 AM:
You are correct Dominique with your understanding as is Steve with his.
Posted by Steve Klare (Member # 12) on December 26, 2014, 04:58 AM:
You'd think on a sound machine they'd make it an increment of 24 frames per count, but I guess they kept commonality with silent machines this way.
-all it would take is a drive pulley 3/4 the size (...just saying!)
Posted by Dominique De Bast (Member # 3798) on December 26, 2014, 05:35 AM:
Didn't they keep 18 frames as reference as many filmakers shoot(ed) at 18fps, even with a sound camera ? We may have forgotten that the possibiltu of recording with a projector was first put to help people sonorizing their own films and not re-record Professional films as some collectors seem to do now.
Posted by Steve Klare (Member # 12) on December 26, 2014, 06:11 AM:
It gets back to what these things really are there for in the first place.
My car has a nice big tachometer in the middle of the dashboard: beautiful thing, and the biggest display in the instrument panel.
My car also has an automatic transmission...
Other than watching that needle swing up when I stomp on the gas and pretending I'm Mario Andretti, it's not very useful.
Same thing for the footage counter.
Did people actually make use of these when they were composing soundtracks?
Posted by Andrew Woodcock (Member # 3260) on December 26, 2014, 06:28 AM:
I know in the modern digital era, I never use mine when timing re-records etc. After all when you have a digital display that is accurate to one hundredth of a second on my Video digital software, why would you?
I still like all things working as original on my projectors which is why I just had to fix the counter belt on my HD when I had it.
All my counters are now little more than an ornament on my projectors nowadays and that includes the extremely accurate digital one on my Bauer T610.
Even in the old days when I used to make my own sound films, I still used to prefer using a digital stop watch for timings when recording soundtracks.
Posted by Steve Klare (Member # 12) on December 26, 2014, 06:42 AM:
What's needed here are instruments that aren't as sexy, but more useful.
-on my projectors I want a readout that tells me the useful lifetime left in the lamp.
On my car how about an engine temperature gauge? My old car had one and as my radiator became congested it kept me out of a world of trouble!
Posted by Andrew Woodcock (Member # 3260) on December 26, 2014, 06:59 AM:
Good idea the lamp hour meter Steve! Cannot imagine it would at all difficult fitting one in series with the lamp circuit via a relay.
All it would need to have is a simple digital hour counter with a reset button taking its trigger from the relay or CT etc.
Posted by Steve Klare (Member # 12) on December 26, 2014, 07:46 AM:
The only question is do you want it counting down from the rated hours or up from zero with a sticker next to it.
Could be very informative: if you keep blowing lamps with 20 hours left either your lamp voltage is too high or you have ball of cat hair clogging an air passage!
Posted by Andrew Woodcock (Member # 3260) on December 26, 2014, 07:56 AM:
I would want it counting up Steve. The lamps are rated at 50 hours, but they seem to last much much longer now since changing out both the lamp holders for new on the two machines I use the most.
I would still be interested in scientifically measuring this though and it would, as you quite correctly point out Steve, indicate at an early stage when airways etc are becoming blocked or lamp holders are becoming worn again.
Posted by Mathew James (Member # 4581) on December 26, 2014, 09:52 AM:
I wonder if the counter time is supposed to match this time in as well? Always wondered what this count in is for as well....Tells you when to sit down quick with the popcorn?
https://www.youtube.com/watch?v=BY5gFEO2sao
You can also learn alot from this gal- ha ha ha ha!!! At least she likes elmo's!!!
https://www.youtube.com/watch?feature=player_embedded&v=WN188Ix3byA
The counter on a camera apparently was to tell how much of a 50' reel was left.....you would think the logic would continue onto the actual projector.
Visit www.film-tech.com for free equipment manual downloads. Copyright 2003-2019 Film-Tech Cinema Systems LLC

UBB.classicTM
6.3.1.2