This is topic Replacing shutter & Pulley Elmo ST1200HD in forum 8mm Forum at 8mm Forum.
To visit this topic, use this URL:
https://8mmforum.film-tech.com/cgi-bin/ubb/ultimatebb.cgi?ubb=get_topic;f=1;t=011672
Posted by Tom Photiou (Member # 130) on August 19, 2017, 06:43 AM:
I thought i would share this on here and the other Channel, Last weekend i decided it was time to do something about an ST1200HD Magnetic only projector i bought a number of years ago. Not my old faithful, this one was purchased with the intentions of sharing the projecting to give my main one a break. When i bought it the price was very low as it had all the goo rubber around the shutter and the belts were practically all drooped. Not much of a problem, or was it?
First job, pull out everything and clean and re-lube, second job, replace, (standard for us) the second sprocket guide with a brand new one, third job, change the shutter for an exchange unit which comes back with the outer rubber machined off and the circumference nice and flat plus a modified metal motor pulley to take up the difference in the speed. Long story short, everything was done but i was blowed if i could get that clutch adjusted to make contact with the shutter. I sent it off to the main man and it all came back like a new machine. I had two 1200HD's. Well, some time on i noticed after around 40//600ft of film went through that a vibration noise,(quite loud), faded into the normal sounds. If you put your hand on the body of the machine you could feel this vibration, it was quite harsh. Rewind the film, start again with another movie, all OK if it was less than 400ft. I looked inside and out and could not find anything wrong. It ran to perfection, no wow and flutter on either speed, but i did discover is that once the noise started you only had to have it on forward one click, just the motor and pulleys running, it didn't have to engage the shutter and gears to hear it. Well i was stumped, i pestered Bill to ask questions and got some pointers but to no avail. Then around a year ago during use the main motor belt just snapped. I wasn't amused as i only have a limited number of these left now and it was a genuine Elmo belt. A perfect clean break. Suspecting a dodgy belt i simply put a new one on and it bingo, it appeared to cure the noise. Nothing after a feature. I guessed it was the belt.
A few weeks later the vibration came back, i rang for a bit more advice, still nothing worked.
Then a breakthrough, with the rear cover off i switched it on from cold and the vibration happened almost immediately,i noticed the main motor belt appeared to be shaking like mad, this is where the sound and vibration was coming from, so i have put it down to the lower pulley not being quite right. (I'm hoping), also the shutter i had on it for a number of years now, had quite a bit of side wobble, although i understand this isn't too much of a problem, it cant be doing the new 24fps ,(or 18 for that matter) clutch wheel any good.
Hence, the change over, & if this doesn't cure it, well, God knows! ![[Wink]](wink.gif)
Here in a nutshell is the removal of the shutter, anything anyone wants to add in tips or criticism is welcomed. I an certainly no expert and am only following my own experience from previous and of course the trusty Elmo service manual.
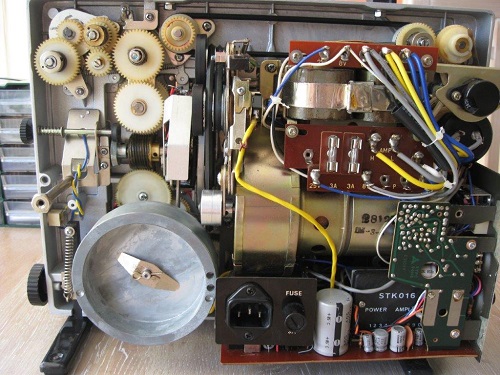
Once the back cover is off i removed the flywheel just to get more space, i unsoldered the two wires from the threading key solenoid. (this is the worst part for me as i am not great at soldering),then, (using the book page shown), i removed the parts in number order to get the machine frame assembly out of the projector. After the parts shown are out you unscrew the three screws holding the part into the projectors body. This gives a great opportunity while its out to have a good clean up and re-lube upon assembly.

Once the machine frame assembly is out i can clean everything up,
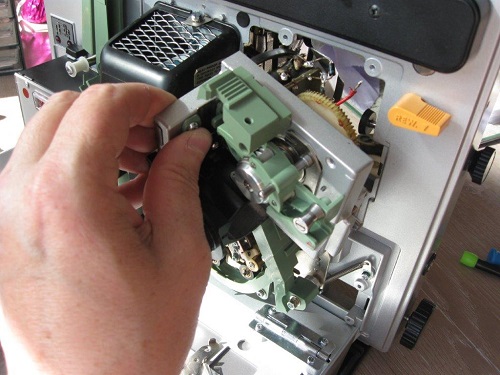
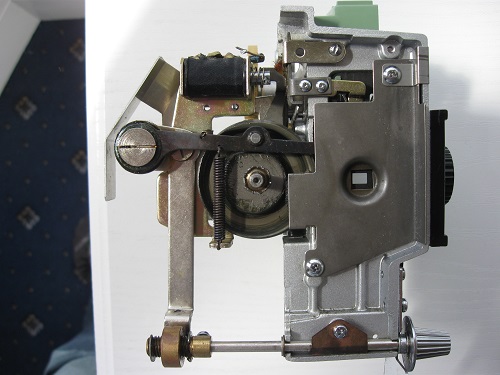
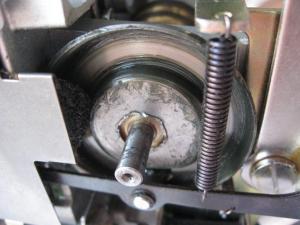
On the next image you can see those tiny allen screws that hold the shutter onto the shaft, once removed getting that shutter off took me almost an hour, to say is was stuck on there is an understatement, my poor fingers have taken a week to heal up.
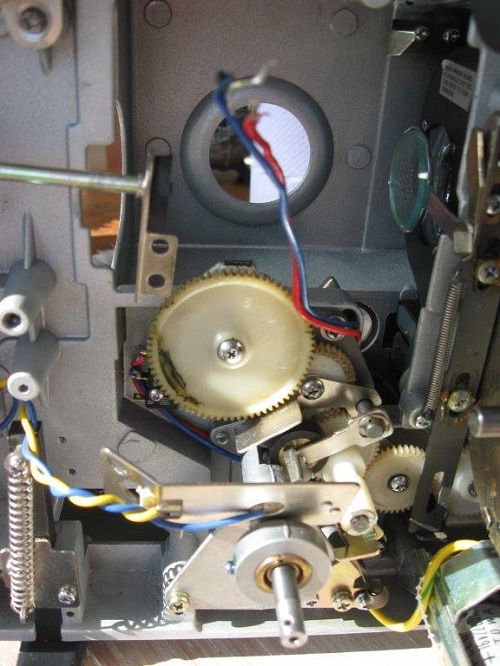
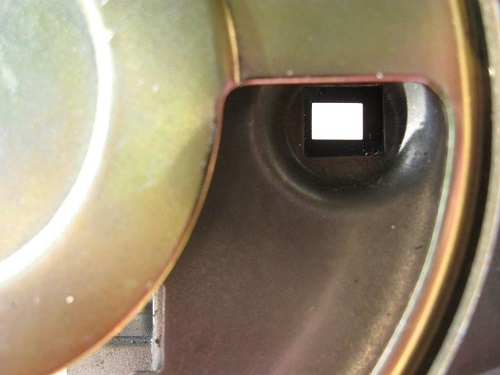
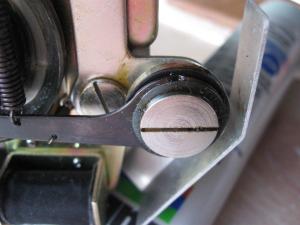
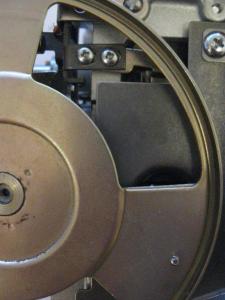
The next image shows the position the new shutter will need to be in at the start of film transportation, as you know, if you get this wrong you end up with image ghosting or trailing.
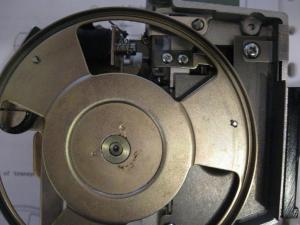
And finally, the machine frame assembly with the shutter removed. Here you can clearly see the threading solenoid at the top, the claw assembly and the camshaft. Now i am just waiting for the replacement, and of course the main motor modified pulley.
I will get back on here for the reassembly within a week or two.
[ July 16, 2018, 02:56 PM: Message edited by: Tom Photiou ]
Posted by Joe Taffis (Member # 4) on August 19, 2017, 07:01 AM:
Nice work Tom! Seeing the actual photos helps as the service manual sketches can be confusing until you get used to them! Doing the job yourself is very satisfying too ![[Smile]](smile.gif)
Posted by Tom Photiou (Member # 130) on August 19, 2017, 07:33 AM:
Thanks Joe, the only part of this i dont like is when it comes to re-soldering those two wires. I know it is so simple for the electrical chaps but i'm not an electrical chap and quite often one can do more harm than good playing with soldering.
[ June 18, 2018, 04:13 PM: Message edited by: Tom Photiou ]
Posted by Mathew James (Member # 4581) on August 19, 2017, 09:21 AM:
Very nice work Tom! Thanx for documenting the pics as well. This is one area I have NOT yet gone into on mine, but am thankful you took the plunge for us!
I do not like soldering either. I make a mess no matter
Posted by Tom Photiou (Member # 130) on August 19, 2017, 09:44 AM:
Thanks Mathew, By the way,
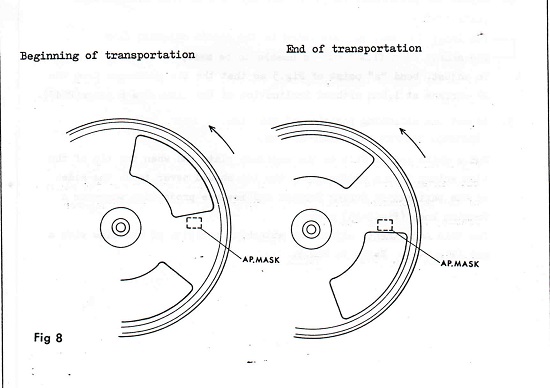
VERY IMPORTANT, i got the positioning of the shutter wrong on the image, I checked the service book and THIS is the correct positioning of the shutter,
Posted by Tom Photiou (Member # 130) on August 29, 2017, 03:17 PM:
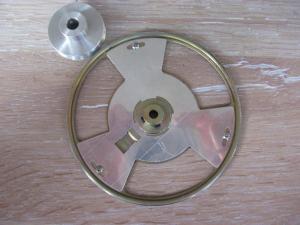
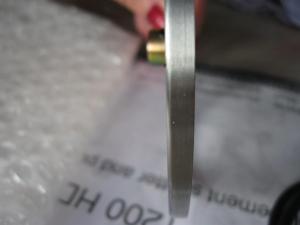
Recieved my recon shutter and lower motor pulley today,
As per the images you will see the new pair and a good close up of the very well machined flat edge which hopefully will give everything a nice smooth run as well as the quietest possible run.
One thing Mr parsons once told me was that my original 1200HD, (not this one i am working on), is one of th quietest he has ever heard. That is something i am very pleased with. Before i fitted the shutter i needed to clean up that shaft as per good advice here.
No way was it going on easy. Half an hour of fine 400 wet and dry paper later & everything went together very smoothly. before i fixed it in place and timed it up i put a little Elmo red oil on that shutter joint and wherever i cud get into especially the oil felt, (plus a little grease).
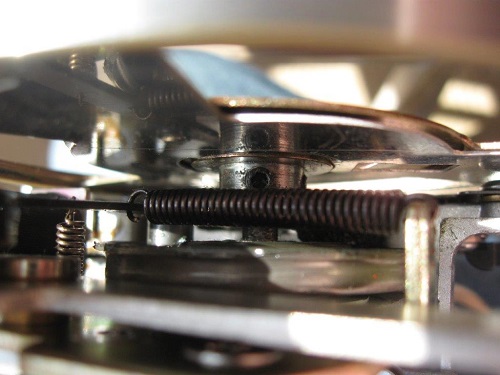
Next was to simply get the claw in the right position to ensure the shutter was correct in order to avoid image trailing. It took about another half hour moving it fractions at a time. (My OCD comes out with this stuff). Once i got it where its meant to be i gently tightened everything up. (Defiantly not over tightens this time). The last two images show where i have positioned it, first at the start of film transportation the last at the end of transportation. It looks at right as i can make it.
Tomorrow evening it will place the unit into the projector and pray i dont need to re position it forward or back tho make sure the 24 FPS rubber wheel sits nicely on it and that the whole width of the rubber is flat against the shutter, and not halfy halfy.
Posted by Andrew Woodcock (Member # 3260) on August 29, 2017, 04:25 PM:
Good work Tom and another here to bolster the excellent "Technical Index" within this forum.
Some good stuff in here and the Shutter to Cam track phasing pointer from the manual will be particularly useful to ST 1200 owners looking to service their shutter wheel outer diameters in the future.
Very well done Tom.
Posted by Tom Photiou (Member # 130) on August 29, 2017, 04:36 PM:
Thanks Andy, i will keep this updated as i go, as always with this sort of thing any feedback is very welcome.
Visit www.film-tech.com for free equipment manual downloads. Copyright 2003-2019 Film-Tech Cinema Systems LLC

UBB.classicTM
6.3.1.2