This is topic Elmo 16CL Need help replacing Tilting Leg Assy in forum 16mm Forum at 8mm Forum.
To visit this topic, use this URL:
https://8mmforum.film-tech.com/cgi-bin/ubb/ultimatebb.cgi?ubb=get_topic;f=5;t=001332
Posted by Janice Glesser (Member # 2758) on September 19, 2015, 09:32 PM:
I recently bought another Elmo 16Cl off Ebay. It was damaged when I received it. The Front Leg/Foot and Tilting Knob were broken. The good news is that the seller did send me replacement parts. The front foot is easy enough to replace by removing the bottom screw with an Allen Wrench...but the Tilting Knob attached to the Leg is another matter. From the 16CL Service Manual it appears the whole motor assembly needs to be removed to access the Tilting Leg Assy. ![[Frown]](frown.gif)
I don't normally work on 16mm projectors so this seems a bit daunting. Has anyone here had any experience with this repair and can lend some advice. Is there a way to loosen the motor enough to remove the Tilting Leg without totally removing the motor?
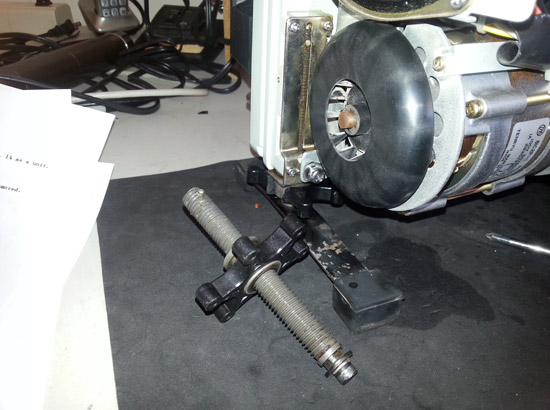
Here's where the Front Tilting leg is located and the new part I want to install.
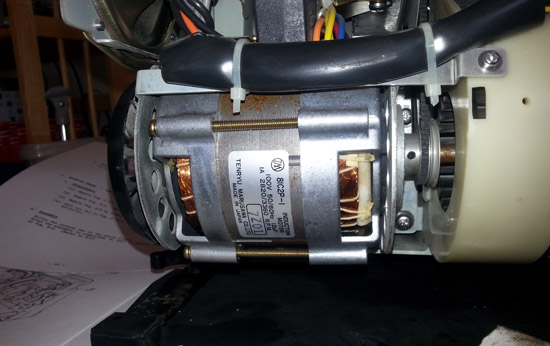
Here is the motor connected to the belt pulley on the right side.
Posted by Janice Glesser (Member # 2758) on September 20, 2015, 04:51 PM:
I'm also wondering if I do have to remove the motor...what do I have to look out for in putting it back together?
Posted by James Romero (Member # 2181) on October 01, 2015, 08:24 PM:
Janice, I just had a tilting knob replaced on the Elmo 16CL and I can testify that yes, you definitely have to remove the entire motor assembly to install it. I didn't do it myself but had a repair tech do it for me.
Posted by Janice Glesser (Member # 2758) on October 01, 2015, 11:13 PM:
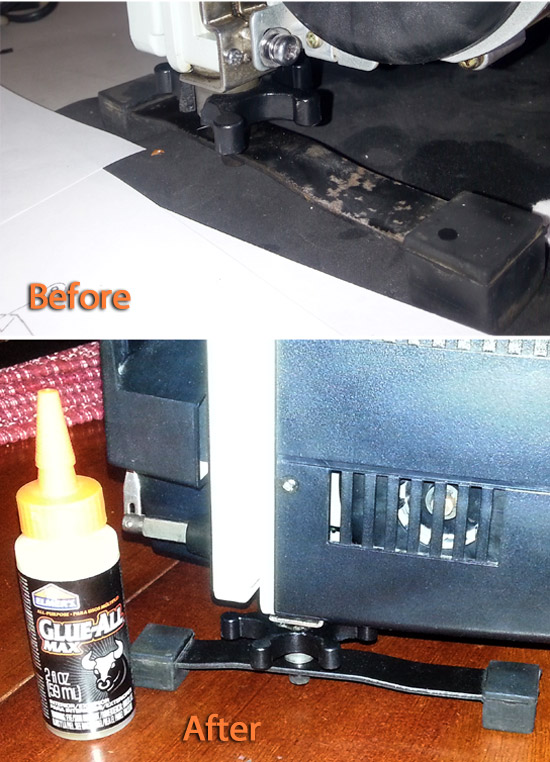
Thanks James for the reply. Yes...even though I was hoping there was an easier way...looks like there's not. Anyway...in the mean time, I wasn't looking forward to taking out the motor so I went to Plan B. As you can see in the before picture...the metal foot bar was pitted and rusted. I sanded and spray painted it and it looks like new again. Then I glued the cracked tilting wheel back on the screw with Elmer's Glue-All Max. This glue expands and make a very tight fit. I sanded away the excess glue and painted it. It's very strong and should hold up well. Looks good too ![[Smile]](smile.gif)
Posted by Barry Fritz (Member # 1865) on October 03, 2015, 10:57 AM:
Looks great Janice. If I were you, I would put a little white dot or some other indicator on the protrusion that you blued back on. That way you could likely avoid putting pressure on that one when using the adjustment. Also, because 16mm projectors are rather heavy, it makes it much easier to turn those adjusters if you take you free hand and lift the projector in the front a bit. This will take the weight off the adjustment and allow it to turn much easier.
Posted by Janice Glesser (Member # 2758) on October 03, 2015, 11:33 AM:
Good point Barry. Yes I'll have to treat this projector a little more gingerly then my others, but I feel the glued wheel will hold up well. I'm going to try putting this machine in my permanent setup in my front room. This way it will keep from having to adjust it to a minimum.
Posted by Janice Glesser (Member # 2758) on October 03, 2015, 11:33 AM:
Good point Barry. Yes I'll have to treat this projector a little more gingerly then my others, but I feel the glued wheel will hold up well. I'm going to try putting this machine in my permanent setup in my front room. This way it will keep having to adjust it to a minimum.
Posted by Richard C Patchett (Member # 974) on October 03, 2015, 10:14 PM:
Greetings Jan
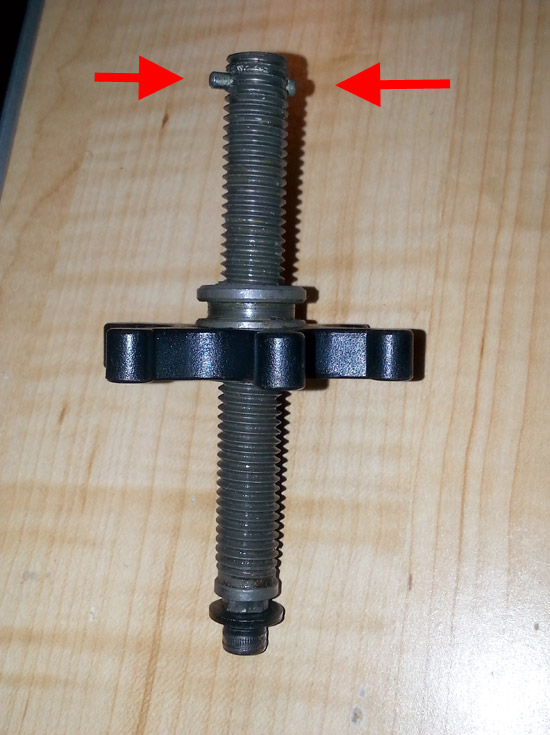
The tilting knob should come off from the top
After you remove the stop pin on top
That top pin goes through the Tilting leg
Your picture don't show that (looks like its there but broken off on both sides that's one reason it will not screw off
I never had to remove the motor to replace one
RC
Posted by Janice Glesser (Member # 2758) on October 04, 2015, 02:26 AM:
Oh Richard...Thank so much for stumbling upon this thread. I just had a feeling that removing the motor was a bit over-kill...but then that's what the manual said needed to be done. I want to understand what you are saying about the pin in the screw.
I see the pin at the top of the screw on the replacement part and I think I can see it in the picture of the one already installed in the projector... I don't recall it being broken, but I'll have to open it up again to actually tell the condition. Richard...are you saying that that pin can be removed to allow the screw to be unscrewed from the bottom? The pin in the replacement part seems rather permanent however I haven't tried to move it. How do you usually remove the pin from the one in the projector ... and then put it back in again?
Visit www.film-tech.com for free equipment manual downloads. Copyright 2003-2019 Film-Tech Cinema Systems LLC

UBB.classicTM
6.3.1.2