This is topic Revere P90... in forum 8mm Forum at 8mm Forum.
To visit this topic, use this URL:
https://8mmforum.film-tech.com/cgi-bin/ubb/ultimatebb.cgi?ubb=get_topic;f=1;t=004247
Posted by Julie Goheen (Member # 1403) on January 01, 2009, 10:15 AM:
Hello everyone... I am hoping someone can help me... I recently received a Revere P90 film projector (from freecycle) so I can watch old 8mm films to see what I want to have copied to DVD and for some reason we are having trouble loading the reel... It looks like we did it right but when we turn it on it seems that the top reel gets caught and will not turn to pull the film through...
Does anyone know if there is a visual of how to load the film online anywhere? I am sure my husband and I are just doing a little something wrong but not sure what...
Any help would be greatly appreciated...
Thanks,
Julie
Posted by Paul Adsett (Member # 25) on January 01, 2009, 01:06 PM:
Hi Julie,
and welcome to the 8mm forum. There are people here who can help you out, and we will have your projector running films in no time.
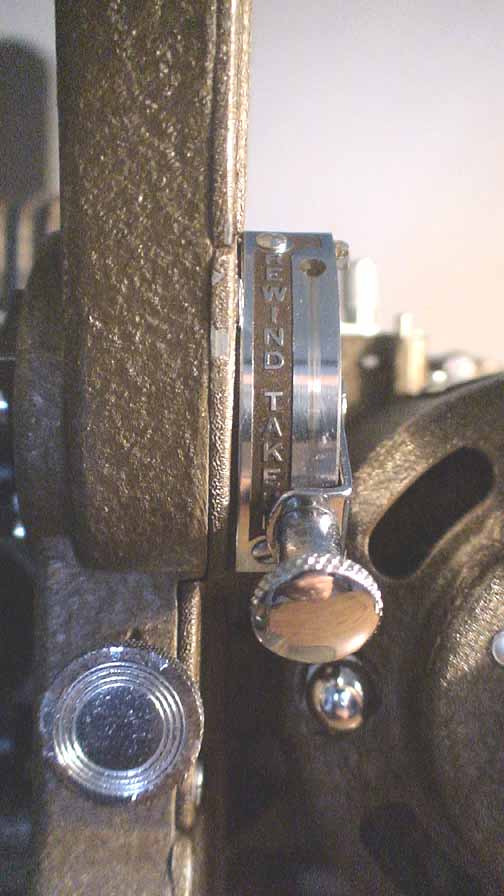
I do not posess the Revere P90, but I do own the P80 which is almost identical in terms of the mechanism and film threading path. It sounds to me that you have the REWIND/TAKEUP knob in the REWIND position. It should be in the TAKEUP position for normal projection.
Here is the correct start up and film threading procedure:
1) Make sure the REWIND/TAKEUP knob is in the TAKEUP position.
2) Set the SPEED control at the half-way position for initial motor start up. (You can dial back the speed if you want to, once the machine gets running.)
3) Make sure the clutch, at the top of the machine is in the OFF POSITION. Then thread up the film as detailed below. After threading the film switch the motor ON, then slide the clutch to be engaged in the ON position to get the projector running. Then switch on the LAMP.

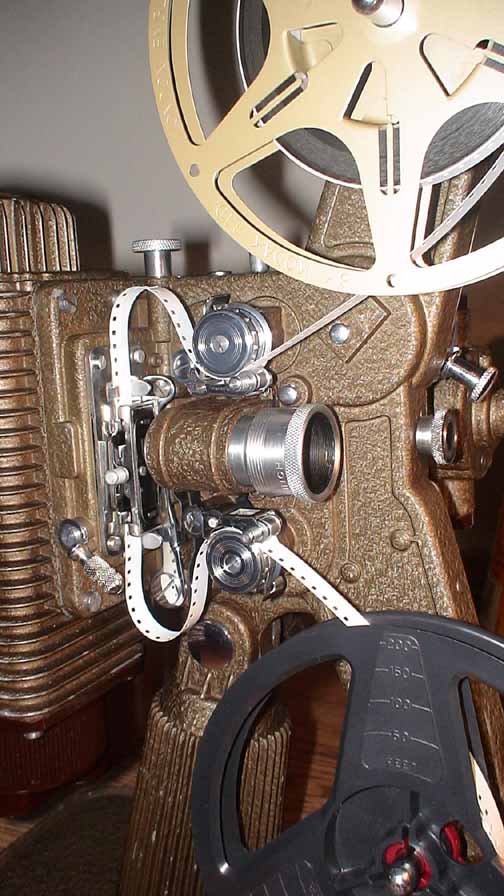
Here is a picture of my Revere threaded up correctly with white leader film so you can clearly see the correct film path.
To thread the film properly, proceed as follows:
1. Load the film reel onto the top spindle with the film coming off the reel in a clockwise direction and the perforation holes in the film facing away from the projector body.
2. Pull off about 18 inches of film from the reel.
3. Open the top sprocket guide and engage the film into the sprocket teeth. Close the top sprocket guide.
4. Open the gate by rotating the gate lever anti-clockwise to the 1 o-clock position. Loop the film as marked on the projector body above the gate then slide the film sideways into the gate, then close the gate by rotating the gate lever clockwise to the 4 o-clock position.
5. Loop the film below the gate as shown on the projector body. Open the bottom sprocket guard and engage the film with the sprocket teeth. Close the bottom sprocket guard.
6. Finally attach the end of the film to the take up reel which is on the bottom spindle. The film should be attached over the top side of the takeup reel so as to roll up in a clockwise direction.
At this point you can check if everything is threaded up properly by manually rotating the INCHING KNOB (sticking out of the front of the projector) in an ANTI-CLOCKWISE DIRECTION. (Make sure the clutch is in the OFF position and the REWIND/TAKEUP switch is in the TAKEUP position before rotating the inching knob).
If all is OK, SWITCH ON THE MOTOR, ENGAGE THE CLUTCH and you should be running film. Finally switch on the LAMP.
Sounds complicated, but its really simple once you have done it. You should be able to thread up in about 30 seconds.
To rewind the film at the end of the reel, simply connect the film directly from the bottom reel to the top reel (totally by passing the film drive mechanism) and switch the REWIND/TAKEUP knob to REWIND.
The Revere is a stunning looking projector, and it is built like a tank. I suggest you give it a really good clean and lubrication - it deserves it after 50 years! ![[Smile]](smile.gif) Clean the film path and gate with FAVOR furniture spray. Go to a photo shop and get lens cleaning wipes for the lens. You can blow dirt and hairs out of the gate and off the lens with a can of AIR DUSTER, but it is best to pull out the gate and do a thorough cleaning with cotton swabs and polish.
Clean the film path and gate with FAVOR furniture spray. Go to a photo shop and get lens cleaning wipes for the lens. You can blow dirt and hairs out of the gate and off the lens with a can of AIR DUSTER, but it is best to pull out the gate and do a thorough cleaning with cotton swabs and polish.
Above all, DO NOT thow away those films after you have copied them to DVD. Film will last much, much longer than DVD, which should only be regarded as a convenience for viewing these films. Keep those films in boxes in a cool dark place. If the films are Kodachrome they will last over a hundred years - your DVD's will be long gone by then.
[ January 01, 2009, 03:07 PM: Message edited by: Paul Adsett ]
Posted by Julie Goheen (Member # 1403) on January 01, 2009, 06:32 PM:
Paul, thank you so much... Not sure what we were doing but we followed your instructions and all was well... The film is very jerky but for some reason the 8mm is not fitting on the spindle well... I am thinking it should have another piece to make it a tighter fit... We did get to view them though and for that I am very grateful...
Thanks again,
Julie
Posted by Paul Adsett (Member # 25) on January 01, 2009, 07:08 PM:
Sounds like your films are mounted on super 8mm reels, which need the little plastic adapter to fit onto the regular 8mm projectors like the Revere. If you look at the black take-up reel in the photo I posted above, you can see the little red adaptor for the super 8 reels. If you need to get some adapters we can tell you where to get them. The film should not be jerkey. I assume you are NOT trying to project super 8mm film on a regular 8mm projector. You can tell the difference by the size of the sprocket holes in the film. Regular 8mm film, which is the only size that the Revere can project, has fairly large sprocket holes, whereas the Super 8mm sprocket holes are very small. If your films were made before 1962 they are definately regular 8mm. After 1962 they could be super 8mm or regular 8mm.
Visit www.film-tech.com for free equipment manual downloads. Copyright 2003-2019 Film-Tech Cinema Systems LLC

UBB.classicTM
6.3.1.2