This is topic Bell & Howell MX43 issue in forum 8mm Forum at 8mm Forum.
To visit this topic, use this URL:
https://8mmforum.film-tech.com/cgi-bin/ubb/ultimatebb.cgi?ubb=get_topic;f=1;t=011046
Posted by Calvin McNeal (Member # 5614) on October 18, 2016, 09:50 AM:
Hi All,
I have a question regarding a MX-43 that I picked up. After repairing the take up clutch, I thought I had this thing working. However, when I tried to load film for the first time the autoload would not feed the film. I took it apart, and it seems that the "claws" that advance the film don't pull back enough, and end up drawing the film back up again. I tried to adjust the depth of the claws, but couldn't find a depth that would both advance the film and not also hang up. As a complete film novice (this is the first projector I have owned), I am wondering if I am missing something...... or maybe I should just cut my losses?
Thanks much for any assistance.
Very Best,
Calvin
Posted by Janice Glesser (Member # 2758) on October 18, 2016, 02:37 PM:
Hi Calvin. Welcome to the forum. I wish I could give you a lot of encouragement about this model projector, but I've worked on several of these and they are one of the worst designs. They also require very expensive bulbs. I have convertered a couple of these to use cheaper halogen bulbs. So my first suggestion would be to not waste too much time on it and find a better projector. That said I can give you a little information about adjusting the shuttle teeth (claw).
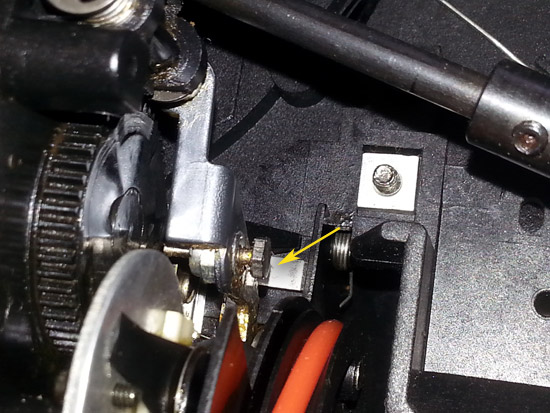
B&H had a special gage tool to measure the penetration distance of the bottom and top claws. Both claws should measure the same distance of 0.042 in (1.06mm). The arrow in the photo points to the claw adjustment screw. If both teeth do not measure the same...B&H had another special tool used to bend the top edge of the claw shuttle just back of the cam shoe area. I've never had to do this so can't give you any more specifics. I would imagine it very difficult to make proper adjustments easily without these tools, but give it a try and report back.

[ October 18, 2016, 06:56 PM: Message edited by: Janice Glesser ]
Posted by Calvin McNeal (Member # 5614) on October 18, 2016, 03:52 PM:
Thanks for your reply! I had located the adjustment screw and had tried adjusting that, without resolving the issue.
As an update and clarification..... I noticed that if I manually spin the motor backwards the film advances fine. If I spin it forward though the claws don't fully disengage from the film. It also seems somewhat uncoordinated, whereas it seems fluid when spinning the motor in reverse. This seems strange as it is obvious that the motor is not spinning backwards (fan blade direction).
Any ideas??
Posted by Calvin McNeal (Member # 5614) on October 19, 2016, 01:52 PM:
I think that I may have made a small discovery that will help me to get this thing working. Then again.....
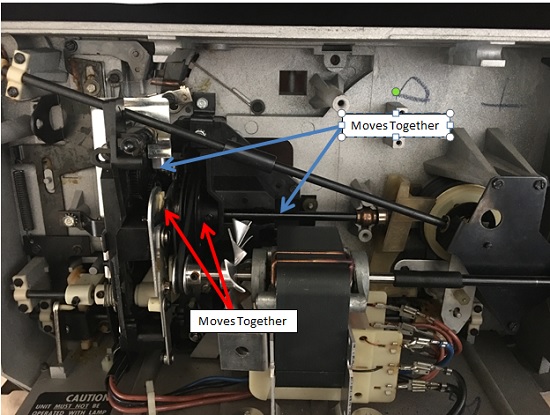
Anyway, after doing some tinkering it appears that the shaft marked in red, and the mechanism that pushes out the shuttle move together, but separately from the gear and the mechanism that raises and lowers the shuttle. Since it seemed that the shuttle was being allowed to move back into the film while it was still in transit back to the top, I believe that these two systems have come out of sync. I am hoping that you have some guidance on how to sync them again. It looks like the gear has a hole in its base where you could either line it up with another hole, or use it as a alignment mark.... not sure though and was hoping you had some advice. I could always try to just "eyeball" it, but I bet it needs to be more precise than that.
Thoughts?? Thanks again for your time.
Best,
Calvin

UPDATE: 3:39 PM
SUCCESS!
There is a flat spot on the shaft that lines up with the set screw..... must have gotten tampered with by the previous owner??
Works like a dream now! Watching a movie of my Aunts wedding from over 50 years ago!
Thanks again!
[ October 19, 2016, 03:51 PM: Message edited by: Calvin McNeal ]
Posted by Janice Glesser (Member # 2758) on October 19, 2016, 04:43 PM:
OOOps! I had just posted a reply when I saw you got it fixed. Great job! Enjoy your movies.
Posted by Calvin McNeal (Member # 5614) on October 19, 2016, 04:50 PM:
I think I'm good now. Its working perfectly. I've watched 6 films so far and all is working well. Someone must have tried to take it apart in the past. The take up clutch was broken (dry rotted rubber piece) when I bought it so maybe someone tried to take it apart to fix it?? Regardless.... now I know, and have a MUCH better understanding of this things inner workings as well. As a side note..... I do not believe that there is any way to replace the belt if it breaks, aside from splicing one together with adhesive or a binder of some sort. There is no way to remove the pulley without completely disassembling the thing.
Hopefully I can get the 20 cans of film digitized before the bulb dies or the belt breaks! HA!
Thanks again.
Best Regards,
Calvin
Posted by Janice Glesser (Member # 2758) on October 19, 2016, 05:09 PM:
You are right about the belt replacement, but you can make a belt our of urethane very easily.
Here are instructions:
http://8mmforum.film-tech.com/cgi-bin/ubb/ultimatebb.cgi?ubb=get_topic;f=1;t=010838#000005
FYI...You won't be able to use this projector for film transfers unless you can increase the speed of the projector to run at 20fps. It does not have variable speed by rheostat. I recommend either a Sankyo 1000 or 2000h for film transfers.
Posted by Calvin McNeal (Member # 5614) on October 19, 2016, 05:23 PM:
I'm actually using software to directly capture the projection to the computer (without recording to tape) and also reduce the fps of the recording in order to sync to the projector. Haven't tried it yet, but I'm hopeful. Sounds like in theory it should work. I did take a short video with my iPhone and that didn't turn out so bad, without any adjustments. Its just a little jumpy. I'll let you know how it turns out.
Posted by Janice Glesser (Member # 2758) on October 19, 2016, 06:30 PM:
I transfer directly to the computer also...real-time capture like you are doing and frame-by-frame. Because of the 3-blade shutter you still need to capture at 20fps if you are using a video camera which should be set to 60fps or 30fps. The MX43 max speed is 18fps. You will get flicker or banding. The only way I've seen to avoid this would be to remove the shutter completely....capture all frames and use software to remove bad pull-down frames.
What software are you using....I've use them all ![[Smile]](smile.gif)
[ October 19, 2016, 10:30 PM: Message edited by: Janice Glesser ]
Posted by Calvin McNeal (Member # 5614) on October 22, 2016, 07:55 PM:
The software I am using is Lightworks. The first transfer worked OK. A little fluctuation in the light level... but no too bad. The software leveled it out pretty well.
However.... I jinxed myself with my last post. I watched about an hour worth of film before the bulb blew. Looks like a replacement is $80-100! From what I could tell there is no easy halogen replacement since this bulb is 80V. Any suggestions?
Posted by Janice Glesser (Member # 2758) on October 22, 2016, 09:17 PM:
I'm familiar with Lightworks...but even it can not remove all the flicker. I guess it's a matter of how the transfer looks to you. If you are ok with it...then go for it. However...you will get much better results if you look for a variable speed projector. The Sankyo 2500h is an excellent choice and it uses cheaper EFP 100W bulbs.
I have done a bulb conversion on a B&H MX33 which is almost identical to your MX43. The difficult part is to fabricate a bulb holder. A ELB (80W 30V) bulb is a compatible halogen bulb.
Here is a video of the projector that I converted.
https://www.youtube.com/watch?v=iSl05ERnx5g
Visit www.film-tech.com for free equipment manual downloads. Copyright 2003-2019 Film-Tech Cinema Systems LLC

UBB.classicTM
6.3.1.2


![[Smile]](smile.gif)