|
Author
|
Topic: Review Wolverine Reels2Digital MovieMaker 8mm film digitizer
|
|
|
|
|
Mike Spice
Master Film Handler
Posts: 421
From: none of your business
Registered: Jun 2017
|
 posted October 22, 2019 08:53 AM


That all makes sense, the IR information.
I find myself with an afternoon off, so I am re scanning the Navy reel I did at the weekend, with different camera settings.
Hopefully later today I can re post a different example.
I think it would be really good to slow down the take up advance, to a point where a loop is present, it doesn't need to be wound tightly on to the take up, and of course, it doesn't want to hang so much it touches the work surface, it just needs taking up, very gently, so at least it is not snaking on the floor.
That may have to be different for the 720 scanner with 200ft reels and the Pro version which does 400ft reels......
A decent rewind is all that is needed, and for me, that is achieved with a cine viewer......
As mentioned, being able to stop the scanner and copy off the images thus far, is a great bonus.
Part way thro a reel, stop the scan, copy off the images to a USB to take to another laptop, and continue the scan. Genius.
So here is this afternoons indication as to whether I have the camera settings good or rubbish.
3.51Gb of tiff images, in to VDub. crop, 15ips and h264 to 63mb. Super 8
(could do with four more pixels off the bottom crop)
Tuesday test scan
I have just worked out why a reel I scanned recently was jumping all over the place
Stan suggested I had the switch for Super 8 set to Standard 8
it wasn't that....It did make me wonder...
It turns out that it was the timer.
The procedure for scanning is to to set live view.
Make it look nice...
Timer setting menu, image type, folder etc etc.
Set the timer settings to zero.
Then set external trigger.
Then start the timer.
Then start the scanner
The jumpy reel was because
I set live preview
Timer settings to zero
Forgot to set external trigger, but started the timer.
So the software is merrily snapping away as fast it as it can on zero timing, regardless of the film advancing thro the gate.
I have just done it again.... but this time, realised what I had done.
Problem solved....don't forget to activate external trigger before starting the timer...
The tell tale clue to this basic human error is to keep an eye on the live preview during a scan.
If you see the film 'dragging' itself through the live preview, you forgot to set the external trigger.
If you just see static frames in the live preview, it's all good.....
Here is the full afternoon scan.
HMS Ganges by Colin Lowe.
8.41Gb of 2183 tiff images. 1300x948 h264
VirtualDub crop took 10 mins and down to 151mb
10 mins on an i5 windows 8 laptop.
I forgot to screenshot the camera settings again...
Monday scan
[ October 22, 2019, 11:19 AM: Message edited by: Mike Spice ]
| IP: Logged
|
|
David Brown
Film Handler
Posts: 42
From: Centerville, UT, USA
Registered: Oct 2019
|
 posted October 22, 2019 01:18 PM


Mike
I didn't want to offer any suggestions as I didn't know if any of the exposure extreme was coming from the film. Looks a lot better now because the highlights are not blown out. If you could boost the shadows (there many names for the same thing) shadows, midtones, gamma, less contrast, or whatever your software calls it, exposure could look great.
For a moment, I forgot I was watching a film and thought, "Wow this dirt is very realistic!". It's from watching so many simulated film artifacts used for video.
Kamel
I have been thinking of a C mount lens in hopes of using cropfactor to enlarge the image. So if M12 is available for 1" and 2/3" sensors, that should also work? I am surprised at the cost. I remember looking at some M12 lenses and they were less than $25. Now, I looked again and it's true.They are low megapixel rated.
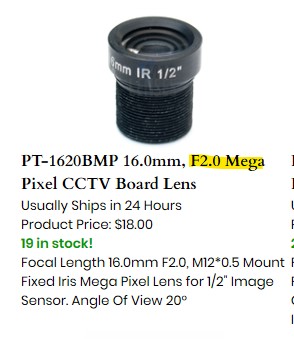
http://www.m12lenses.com/category-s/74.htm?searching=Y&sort=13&cat=74&show=300&page=1
News of the capstan tests? I have printed the cog wheel and it does seem not fit 8mm or S8mm. That could be that my printer is off scale. Is it intended for 8mm or for both?
| IP: Logged
|
|
|
|
|
|
Mike Spice
Master Film Handler
Posts: 421
From: none of your business
Registered: Jun 2017
|
 posted October 23, 2019 05:06 AM


In an effort to better see the scan on a more reliable screen, I have changed capture computer to my Revo.
It has HDMI out to my Sony tv so perhaps I can see things with a more reliable image... we shall see later today.
My old fujitsu latop works very well, but the lcd screen is a pile of pants for contrast and colour definition
Scanning the Aircraft Carrier footage again today, that I did a day or two ago, that looked awful.
Perhaps having a better preview screen will allow me to adjust things with more meaning, we shall find out this evening...
I have also purchased 128Gb memory card for the scans.
I am not scanning to a hard drive, I think it makes more sense to scan images straight to card, less wear on a hard drive, and the files are all ready to move to another machine immediately, rather than having to copy them to card after a scan.
I use two computers, one for the scan, one for the processing.
that way my scanning continues while faffing about with VirtualDub etc.
I have been using a 32Gb card but it is filling up all too fast with tiff images.
With a 50ft reel coming out 10Gb plus, a 128Gb card should see me ok for a 400ft reel....
Here is a sample of todays scan:
4930 tiff images. 1600x1200 19.2Gb
Processed in VirtualDub. 20 mins@ 4.5fps high priority processing thread. h264 now down to 294Mb for viewing.
Todays scan test. HMS Ark Royal 1978
One issue this morning, the 'partial scan' setting wouldn't remember it's setting for some reason, thus you see a few frames shift where I have stopped the scan to make an adjustment, and the partial scan area was getting forgotten.
Must look in to that, It didn't happen when I used the laptop.
The one outstanding thing with this method of scanning is that if you pause the video you get a rock solid still, rather than the wolverine ghosting blurred still frame.
[ October 23, 2019, 08:40 AM: Message edited by: Mike Spice ]
| IP: Logged
|
|
|
|
|
|
|
|
|
|
|
|
|
|
|
|
|
|
Bruce Davis
Film Handler
Posts: 47
From: Adelaide, Australia
Registered: Sep 2019
|
 posted October 23, 2019 07:13 PM


Hi to all with IC Capture 2.4 I have been capturing one 3.5 minute super 8 reel at 2 second intervals, over several days, trying various settings and have had no problems until enabling Wide Dynamic Range.
In order to reduce blown out highlights I changed exposure to 200 (makes the capture darker and leaves more detail in the lighter areas).
To compensate for the darker captures, under Device Properties and the WDR tab, I enabled Tone Mapping "Auto" and set intensity to -0.64. Global Brightness Factor was on 0.00.
Capturing at 2 second intervals with the above settings caused strange behavour, Images seemed to contain half to two thirds of the new or next frame and the remainder of the frame was from the previous frame capture, causing a sort of rip/split in the frame which was made up of parts of two frames.
Going to 4 second captures cured this behavour, I am assuming there must be more processing time required but where, in the capture camera board or the capture software on the computer? The computer processor is never under any stress (Intel i5-2500K @ 3.30GHz) and saving to internal HDD is fast.
Thanks for your sharing, regards - Bruce
| IP: Logged
|
|
Kamel Ikhlef
Expert Film Handler
Posts: 213
From: Arches, France
Registered: Oct 2018
|
 posted October 24, 2019 12:48 AM


Bruce,
That was my question to Mike. I think that the more we will test high resolutions, higher quality or parameters that require calculations, the longer the scan time will be (the larger a picture is, the longer it will take to save on the hard disk.
For some scenes it will be useful to scan at 4 sec and others at 2 sec... For the 4K, in my opinion it will be 4sec, but I have not tested yet...
David,
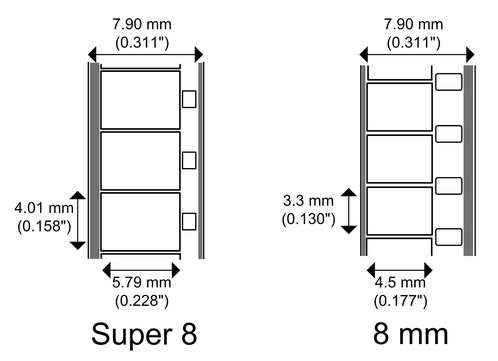
For the normal 8mm, it will be enough to unscrew the pulley front and change the middle toothed pulley (it's very easy and I had already planned this)... No need to open the telecine unit !
We just need to design a new tpulley N8 with the pitch of the teeth corresponding to the N8) . I could not do it because I do not have the movie N8 for testing (My S8 toothed pulley has hole steps to 4.235 mm). ![[Confused]](confused.gif)
BTW: It seems that the perforations of the N8 film are much larger than that of the S8, so they will be easier to design and print.
| IP: Logged
|
|
|
|
|
|
Kamel Ikhlef
Expert Film Handler
Posts: 213
From: Arches, France
Registered: Oct 2018
|
 posted October 24, 2019 09:09 AM


Thanks Mike, but I need to know the hole regular 8 size.
I don't find for the moment (on google, my friend)...
BTw: It seems that I already had the information in my docs stored on my computer. ![[Roll Eyes]](rolleyes.gif)
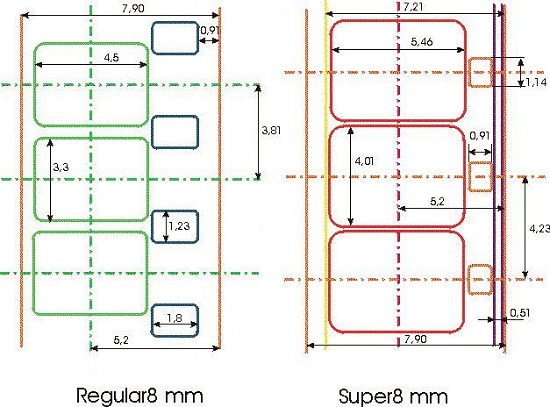
The Holes sizes are : 1,23mmx1.8mm - the steps = 3.81mm.
There is also a larger offset from the left edge of the filmstrip (0.91).
I can design the pulley, I will share it but I will not be able to test on a real regular 8 film. Simply wrap the film on the pulley manually to check if the teeth are centered in the holes of the film.
I think, the Regular 8 Pulley will finished this week-end. I will post it on thingiverse.
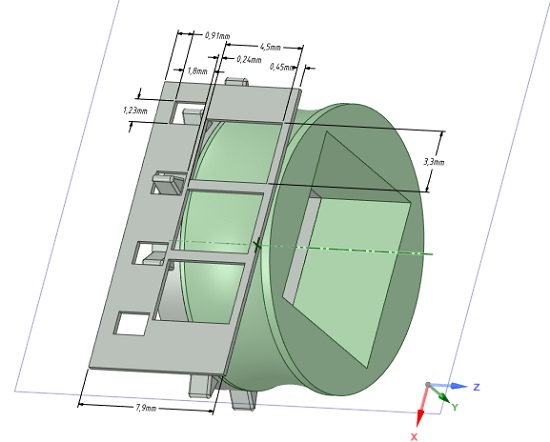
It will be a little smaller that S8 Pulley (12 claws or identical teeth but much wider, see picture below).
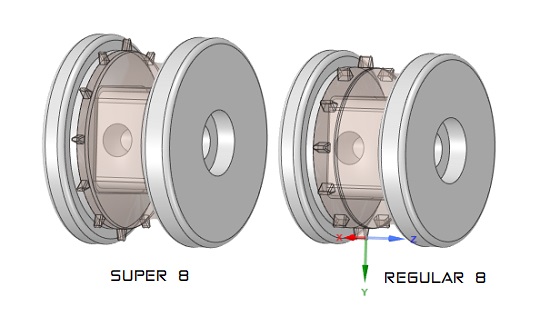
[ October 24, 2019, 05:47 PM: Message edited by: Kamel Ikhlef ]
| IP: Logged
|
|
|
|
|
|
|
|
|
|
|
|
|


 UBBFriend: Email this page to someone!
 Printer-friendly view of this topic


![[Confused]](confused.gif)
![[Roll Eyes]](rolleyes.gif)


![[Big Grin]](biggrin.gif)
![[Razz]](tongue.gif)
![[Wink]](wink.gif) And thanks for all the tests of the mod, I follow that with a lot of interest
And thanks for all the tests of the mod, I follow that with a lot of interest ![[Smile]](smile.gif)


