8mm Forum


my profile | my password | search | faq | register | forum home
  next oldest topic   next newest topic
» 8mm Forum   » 8mm Forum   » Review Wolverine Reels2Digital MovieMaker 8mm film digitizer (Page 52)

 - UBBFriend: Email this page to someone!  
This topic comprises 56 pages: 1  2  3  ...  49  50  51  52  53  54  55  56 
 
Author Topic: Review Wolverine Reels2Digital MovieMaker 8mm film digitizer
Mike Spice
Master Film Handler

Posts: 421
From: none of your business
Registered: Jun 2017


 - posted November 14, 2019 09:26 AM      Profile for Mike Spice     Send New Private Message       Edit/Delete Post 
David Thanks for the kind comment, I am missing my tireless testing too.

Real life work takes me away from scanning for a while.
6 days week slaving in a hot theater at the moment.
Showtime!

My tireless testing was during our half term, I did the mod on the friday afternoon, and then spent around a week testing scans.

I am hoping to scan a reel of standard 8 very soon, and get the partial scan area for that sorted, and try out the manual white balance that Stan is suggesting, along with his other settings..

In the meantime it is nice to sit back and read this thread and watch out for tips and tricks and see what the other folk are up to.

Poor Stan has his work cut out, the problem Bob Vito is having with multiple frame captures is indeed a mystery.

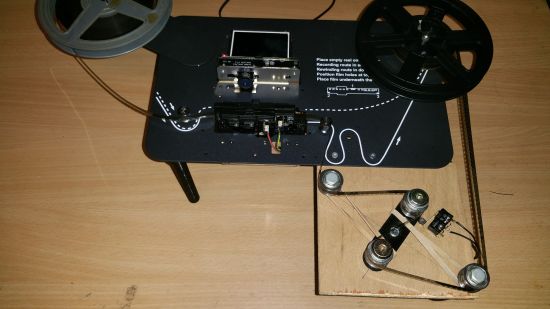
It would be nice to see a re timing on the take up motor, so I can return to using a take up reel and not a drop box.

Much to do...

I was hoping to scan this weekend, but another working Saturday so my free Sunday will be full of chores and not frames.

[ November 14, 2019, 10:35 AM: Message edited by: Mike Spice ]

 |  IP: Logged

Stan Jelavic
Master Film Handler

Posts: 314
From: Fort Lauderdale, FL, USA
Registered: Jan 2019


 - posted November 14, 2019 11:57 AM      Profile for Stan Jelavic   Email Stan Jelavic   Send New Private Message       Edit/Delete Post 
I understand Mike. This activity takes so much time but there is another side to life that needs attending to.
But slowly we will get there.
I ran a white balance on just blank screen without film and with the LED on. Looked pretty good. Was getting ready to run teh test clip but starting getting Bob's issues. So quickly started debugging but shorted something out and zapped my MSP and pretty good.
Think I shorted it to 12V. Poor thing it did not have time to scream blue murder.
But not a big thing. Dropped another one in and back in business.
Will retest the board to see if Bob's issue pops up again. Hope so. Also will run the test clip with the new white balance.

 |  IP: Logged

Mike Spice
Master Film Handler

Posts: 421
From: none of your business
Registered: Jun 2017


 - posted November 14, 2019 12:12 PM      Profile for Mike Spice     Send New Private Message       Edit/Delete Post 
shorted out the MSP?
I don't even know what that means...
My best guess, the chip on the Hawkeye board.
Good luck.
To use an old Naval expression:
'I am gagging' to get the scanner out and continue......
 -

 |  IP: Logged

Kamel Ikhlef
Expert Film Handler

Posts: 213
From: Arches, France
Registered: Oct 2018


 - posted November 14, 2019 12:40 PM      Profile for Kamel Ikhlef   Email Kamel Ikhlef   Send New Private Message       Edit/Delete Post 
Lee,
Your Super8 quality result is really great !
All ideas are good to sharing... [Smile]
We are all looking for the best quality possible with affordable telecine equipment.
And I'm sure we'll get there very soon, some more adjustments and it'll be good ... And now Stan is here! [Wink]

 |  IP: Logged

Stan Jelavic
Master Film Handler

Posts: 314
From: Fort Lauderdale, FL, USA
Registered: Jan 2019


 - posted November 14, 2019 12:46 PM      Profile for Stan Jelavic   Email Stan Jelavic   Send New Private Message       Edit/Delete Post 
Like you picture Mike. [Smile]
And yes Lee. Great job. Thanks for sharing. Maybe add a few notes on how you put it together.

Ok I am back and running. Just reproduced Bob's problem I believe. Noticed the frames skipping. The claw misses the hole and then it catches in but sometime it just slides next to the hole. Some splices do not do that. So it must be the film. Bruce had the same issue. Here is what he posted:
Stan Jelavic I found the problem, it has to do with the Claw position in relation to the gate when set to Super8 or Standard8 and partly the fact that the 8mm film has quite a bit of sideway play inside the gate.

On super8 setting the claw side face is only 0.457mm from the gate guide face, super8 film punched hole edge to edge of film is 0.51mm. Its not much I know but enough to stop the claw from penetrating and simply sliding on the underside of the film. Taking into account allowable tolerances in film manufacture and the amount of sideways play in the gate adds to the problem.

I have set (with the sliding switch) the gate position so that it is roughly half way between the 8mm and S8mm settings, this places the Claw right in the center of the S8 punched holes feeding the film successfully.

Bob- check the film advance and make sure it advances every 2 seconds and does not stall.

Revised the white balance. It is a long story but try to summarize:
- Tried unloaded gate (just light) and autobalance. Not bad but too blue.
- Took my MarkII and macro lens and took a picture of the film with lots of open scenery and found out that there is lots of blue. Actually looking at the film with the magnifier shows lots of blue. Possibly the LED, will check in daylight tomorrow. But now the auto white balance gives you exactly what you see with the magnifier.
- Since I didn't like what I saw with the magnifier I went back to the procedure outlined in the pdf file which actually mimics the Wolverine and I like it. So I think it is the LED and Wolverine are compensating for it...
- The latest values:
Temp - 5000
R - 125
G - 85
B - 58

Here is the test clip:
https://photos.app.goo.gl/rsz8BKRbedJkLkDF6

[ November 14, 2019, 06:58 PM: Message edited by: Stan Jelavic ]

 |  IP: Logged

Markus Baur
Junior
Posts: 7
From: Redwood City, CA, USA
Registered: Nov 2019


 - posted November 14, 2019 06:11 PM      Profile for Markus Baur   Email Markus Baur   Send New Private Message       Edit/Delete Post 
Terry had been asking what light is used in the Wolverine. Since I have a parts machine, I wasn't afraid to take it apart:
 -

Looking at this I don't see a chance for huge improvements by altering the light source. Given the space available I'd say this is a pretty clever design. Ideal lighting would be an integrating sphere for maximum diffusion, but this is getting very close: The LEDs are at a 90 degree angle to the diffuser making sure that almost 100% of the light passing through the film is reflected at various angles. This ensures even lighting and moreover minimizing the appearance of scratches and dirt.

 |  IP: Logged

Bruce Davis
Film Handler

Posts: 47
From: Adelaide, Australia
Registered: Sep 2019


 - posted November 14, 2019 07:02 PM      Profile for Bruce Davis   Author's Homepage   Email Bruce Davis   Send New Private Message       Edit/Delete Post 
Stan Jelavic
Hi Stan, this morning I wanted to process some footage and found that the stepper motor is no longer being powered. When the ON switch (left side) is turned on and the center switch is in the middle position the take up reel motor rotates continuasly as it should, when the ON switch is turned off the take up real motor stops as it should.

The 12 volt supply to the original Wolverine board (CN3-CN1) also powers on/off with the ON switch.
There is a 5 volt supply to CN1.
No power to the stepper motor.

Its impossible to diagnose across the seas but thought you might have some ideas.

Thanks - Bruce

 |  IP: Logged

Stan Jelavic
Master Film Handler

Posts: 314
From: Fort Lauderdale, FL, USA
Registered: Jan 2019


 - posted November 14, 2019 07:16 PM      Profile for Stan Jelavic   Email Stan Jelavic   Send New Private Message       Edit/Delete Post 
Bruce - is the LED on? If so that means that all power supplies are working.
We also had an issue with floating pin12 on the power supply connector (counting from the back cover side of the board )
Carefully short it to either pin11 or pin13 and see if the stepper turns on. You can use a needle or something similar to do the short.

Here is the IC Capture settings procedure. It include the white balance plus much more. Cover most of the settings.

https://drive.google.com/open?id=1aJFqslCVtjdbVqwfUu5jzmtzyvVUGqku

[ November 14, 2019, 09:55 PM: Message edited by: Stan Jelavic ]

 |  IP: Logged

David Brown
Film Handler

Posts: 42
From: Centerville, UT, USA
Registered: Oct 2019


 - posted November 14, 2019 11:43 PM      Profile for David Brown   Email David Brown   Send New Private Message       Edit/Delete Post 
Mike I couldn't stop laughing for 10 minutes, that picture couldn't be better, "the poor thing couldn't even scream....."

Stan I'm ready to order. Check these steps and see if I have missed something .

I have the V7-Gerber.zip: The whole zip, not just the "GerberFiles" inside it, right?
upload that to https://jlcpcb.com/

Buy parts from the BOM.xls. Camera and lens are on that list. I might wait on the camera and lens.

Then follow the "Wolverine_custom_camera_kit-v2.pdf"

Kamel I'm testing the capstan, should be through this weekend with both S8 and 8. If you have tested it let me know what you found. I have seen problems, but I am not ready to report yet.

 |  IP: Logged

Kamel Ikhlef
Expert Film Handler

Posts: 213
From: Arches, France
Registered: Oct 2018


 - posted November 15, 2019 01:30 AM      Profile for Kamel Ikhlef   Email Kamel Ikhlef   Send New Private Message       Edit/Delete Post 
David,
No, unfortunately I could not push the tests further.
So your feedback will be very interesting.

 |  IP: Logged

Bruce Davis
Film Handler

Posts: 47
From: Adelaide, Australia
Registered: Sep 2019


 - posted November 15, 2019 02:58 AM      Profile for Bruce Davis   Author's Homepage   Email Bruce Davis   Send New Private Message       Edit/Delete Post 
Stan Jelavic
Stan thanks for the reply, I see you have put a lot of work into the white balance setting up and instructions - Many Many Thanks.

Yes the LED in ON, Is there a problem with the micro controller and socket? I noticed the MCU slides in and out of the socket exceptionally easily. I bent the pins outwards slightly as to increase pin friction, the stepper motor is now working 99% of the time, sometimes it will not switch on until the second try. I did not short out pin12 to 11 or 13.

Is there a relay in circuit, when the stepper is successfully powered on there is a slight clunk noise (like a relay).

I will follow your white balance guide and report on the results.

Regards - Bruce

 |  IP: Logged

Stan Jelavic
Master Film Handler

Posts: 314
From: Fort Lauderdale, FL, USA
Registered: Jan 2019


 - posted November 15, 2019 09:05 AM      Profile for Stan Jelavic   Email Stan Jelavic   Send New Private Message       Edit/Delete Post 
Here is the updated BOM David:
https://drive.google.com/open?id=16-QQQmMgjHimrJpunptqGqUM18jagrL4

It is for V8 board but it should work for the V7 as well. Note that the V7 USB solution is not very good. I should be coming up with the V8 board soon.

Yes, you use the zip file to order the boards.

I will review the instruction one more time. Plan to add the IC capture settings there.

Bruce - it could be a bad contact somewhere but try the short.
Pin12 is floating and could be causing the issue. No, there is no relay. The click that you hear is from the motor being hit by the out of sync pulse.

Here is the comparison between the Wolverine LED and daylight.
Used my MarkII macro.
Daylight - left one.

 -

Some discussion on LEDs and white balance
https://forums.whirlpool.net.au/archive/2011107

My settings are not bad but some improvement may be possible. When I ran auto white balance with the unloaded gate the light saturates the camera and the white balance is set for white because all three colors are at the max. So maybe cover the gate with the ND filter and run auto balance and then turn auto off.
Might work.

[ November 15, 2019, 11:29 AM: Message edited by: Stan Jelavic ]

 |  IP: Logged

Markus Baur
Junior
Posts: 7
From: Redwood City, CA, USA
Registered: Nov 2019


 - posted November 15, 2019 12:29 PM      Profile for Markus Baur   Email Markus Baur   Send New Private Message       Edit/Delete Post 
Stan, nice comparison with daylight.

I believe the Wolverine images come out more blueish due to the LEDs that were used. The "white" LEDs used here look to be yellow phosphor coated type. Presumably the designer chose a more blueish color temp due to older film stock typically having faded cyans. So neutralizing the blue tint with something grayish in the gate for white balance setup sounds like a good strategy.

 |  IP: Logged

Terry Dowling
Junior
Posts: 24
From: Ashford, Kent, UK
Registered: Sep 2019


 - posted November 15, 2019 02:12 PM      Profile for Terry Dowling   Email Terry Dowling   Send New Private Message       Edit/Delete Post 
Markus, thank you very much for showing the internals of LED design. It's a shame there is not more space available to improve light source.

I tried replacing the original "roller" with proper rollers that actually turn and found that this caused major issues because of the take-up motor constantly tugging on the film. After seeing Markus's design with micro switch controlling take up reel motor, and having endless issues of my own with film jumping in the gate or film jamming in the existing "rollers", I decided to try a tensioner system with micro switch, and this is what I came up with this afternoon:

 -

 -

Video of it running:

https://photos.app.goo.gl/iGgbfwi4kJHHnZ3N6

It's not pretty but seems to work quite well. Need to play around with the tension setting (rubber bands!) as well. I will try design and print something a bit better or perhaps make something smaller that can fit in original film path. I would also like to slow the take up motor speed or perhaps use a stepper motor instead for more precise control.

I don't get anymore debris falling on light table since turning the wolverine on it's back which is a bonus..

[ November 15, 2019, 06:15 PM: Message edited by: Terry Dowling ]

 |  IP: Logged

Mike Spice
Master Film Handler

Posts: 421
From: none of your business
Registered: Jun 2017


 - posted November 15, 2019 02:23 PM      Profile for Mike Spice     Send New Private Message       Edit/Delete Post 
Terry that is pretty special.

 |  IP: Logged

Bob Vito
Junior
Posts: 14
From: Otisville, MI, USA
Registered: Oct 2019


 - posted November 15, 2019 06:40 PM      Profile for Bob Vito         Edit/Delete Post 
Stan-I opened the film door so I could watch the claw. It advances the film one frame every two seconds. The claw does not miss any sprocket holes, or have any false starts. Judging by watching the sprocket holes, the same occurs when the door is closed. When I look at the resulting pictures, the first capture looks fine. The second captures looks squished at the bottom as if it is taking the capture when the film is advancing. Thanks for trying to diagnose this long distance. I will continue to work with the machine to see if I am doing something wrong. I am happy that I am able to capture the individual frames.

 |  IP: Logged

Stan Jelavic
Master Film Handler

Posts: 314
From: Fort Lauderdale, FL, USA
Registered: Jan 2019


 - posted November 15, 2019 07:08 PM      Profile for Stan Jelavic   Email Stan Jelavic   Send New Private Message       Edit/Delete Post 
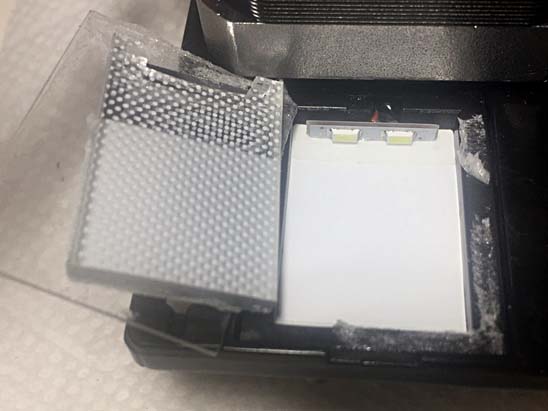
Bob, when I open the gate I see that the claw does not hit the hole in the center but close to the edge. The film gets pushed up and then the claw slides into the hole.
But with the gate closed, the claw misses and catches the film o the second try. When it misses it will still advance the film and the picture is taken with the film half way. That is when you get the mangled picture.
My solution was to push the S-S8 switch to the right a few times to make sure it is at the end.

So, here is what you can do. Remove the film. Open the gate and observe the capture destination folder. Do you get one or two pictures for every claw cycle. If it is one, then you has a slippage issue that I described above and should consider the wide film fix described in the Wolverine FAQ:

Q:MovieMaker - My film wont go through the MovieMaker?
A:
Some old film, split 16mm or Super8 came at a little wider than 8mm or expanded at some sections due to age and for that reason the unit will have a hard time pulling the film from its sprocket holes. A work around this issue would be to get a small piece of paper 1x1.5 inch, fold it four times and wedge it between edge of the flip door and the track in the location shown in the pictures file below to keep the door from closing all the way.


https://www.wolverinedata.com/assets/downloads/Wider_Film_test.pdf

If you get two pictures per cycle then I can send you another board.

Just reproduced the problem. It is two frames per cycle. Started debugging it but the problem was no longer there. Will run for a while and see if I can catch it again.

[ November 15, 2019, 09:11 PM: Message edited by: Stan Jelavic ]

 |  IP: Logged

Bruce Davis
Film Handler

Posts: 47
From: Adelaide, Australia
Registered: Sep 2019


 - posted November 16, 2019 01:59 AM      Profile for Bruce Davis   Author's Homepage   Email Bruce Davis   Send New Private Message       Edit/Delete Post 
Stan Jelavic Next day Hawkeye again failed to start the stepper motor. Tried the shorting of pin 12 to 11 & then 13, made no difference. Unplugged the MCU again powered up Hawkeye with MCU removed and the stepper randomly clunked and rotated.

Removed power, plugged MCU in again, powered up and the stepper worked for a couple of on / offs cycles and then stopped again.

Hoping you might know what the problem could be.

Regards - Bruce
 -

 |  IP: Logged

Kamel Ikhlef
Expert Film Handler

Posts: 213
From: Arches, France
Registered: Oct 2018


 - posted November 16, 2019 02:46 AM      Profile for Kamel Ikhlef   Email Kamel Ikhlef   Send New Private Message       Edit/Delete Post 
Ah! I see that a digitization of quality that deserves! We have to fight with this telecine to scan our precious films.
What patience!... [Confused]

 |  IP: Logged

Bob Vito
Junior
Posts: 14
From: Otisville, MI, USA
Registered: Oct 2019


 - posted November 16, 2019 07:05 AM      Profile for Bob Vito         Edit/Delete Post 
I tried a scan without film and get two files each time the claw moves. This is with the fps field at 3.77. I changed the fps field to 10, and get 5 files each time the claw moves. The external trigger button in IC capture is on. Any chance this could be a software bug? Does the white 2 pin connector near the large chip to the right of the camera need to be connected to anything? Mine is unused. Thank you.

 |  IP: Logged

Stan Jelavic
Master Film Handler

Posts: 314
From: Fort Lauderdale, FL, USA
Registered: Jan 2019


 - posted November 16, 2019 08:04 AM      Profile for Stan Jelavic   Email Stan Jelavic   Send New Private Message       Edit/Delete Post 
Bruce, it could be a bad connection. Try pushing on pin 2 of the MSP. Also pin 2 on the PS connector (from the bottom)
https://photos.app.goo.gl/ToFypajijzHBEKw67

This is the stepper clock route shown. If pushing does not help, measure the voltages along the route shown.

The voltage should be around 1V in run position.

Also push on the PS connector pins one by one with a pin.

Bob - I see the same issue but it is not present all the time. Hope I catch it again. I guess you do not own a scope.

 |  IP: Logged

Mike Spice
Master Film Handler

Posts: 421
From: none of your business
Registered: Jun 2017


 - posted November 16, 2019 10:07 AM      Profile for Mike Spice     Send New Private Message       Edit/Delete Post 
Bob

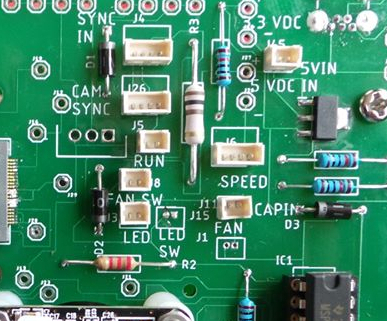
Perhaps your board is different to mine, but the connectors on mine are, top to bottom:

on the left
sync from the claw, sync from the cam, run (on/off) fan switch and LED power

on the right:
5 volt in
speed/rewind
fan power

edit

I have just noticed I have a space where a connector could fit, where you suggest, I can't help with that as I don't have that socket, so perhaps Stan can comment

 -

[ November 16, 2019, 12:56 PM: Message edited by: Mike Spice ]

 |  IP: Logged

Stan Jelavic
Master Film Handler

Posts: 314
From: Fort Lauderdale, FL, USA
Registered: Jan 2019


 - posted November 16, 2019 01:41 PM      Profile for Stan Jelavic   Email Stan Jelavic   Send New Private Message       Edit/Delete Post 
Thanks Mike. That connector is for the capstan sense.

 |  IP: Logged

Bob Vito
Junior
Posts: 14
From: Otisville, MI, USA
Registered: Oct 2019


 - posted November 16, 2019 02:55 PM      Profile for Bob Vito         Edit/Delete Post 
Mike,thanks for the photo. My board is almost the same. Underneath the word "fan" is the location of the empty capstan connector.

 |  IP: Logged

Mike Spice
Master Film Handler

Posts: 421
From: none of your business
Registered: Jun 2017


 - posted November 16, 2019 04:53 PM      Profile for Mike Spice     Send New Private Message       Edit/Delete Post 
I am quite mystified by this problem of multiple captures per frame that Bob is having to put up with.

Wracking my brains trying to think why.

I hope we can get to the bottom of it..

I have had my own software issues, the business of IC Cap not starting if I have my cam connected is almost certainly due to the fact I un installed the software and did a registry 'clean up' and re install, when I was convinced the program had lost it's auto settings.

Turns out, I lost my own auto settings and went a bit mad.

Fingers crossed for some dusty old standard 8 on the scanner and a cheeky cold beer on sunday....

[ November 17, 2019, 01:49 AM: Message edited by: Mike Spice ]

 |  IP: Logged


All times are Central
This topic comprises 56 pages: 1  2  3  ...  49  50  51  52  53  54  55  56 
 
   Close Topic    Move Topic    Delete Topic    next oldest topic   next newest topic
 - Printer-friendly view of this topic
Hop To:

Visit www.film-tech.com for free equipment manual downloads. Copyright 2003-2019 Film-Tech Cinema Systems LLC

Powered by Infopop Corporation
UBB.classicTM 6.3.1.2