|
Author
|
Topic: Repairing rust scars in metal pieces
|
Pere Pasqual
Film Handler
Posts: 43
From: Gandia, València, Spain
Registered: May 2017
|
 posted May 28, 2017 07:02 PM


Hi,
This is Pere from the Land of Valencia and this is my 1st post in the forum. I registered some weeks ago but haven't found to do so until now.
I've just started my first adventures with Super8 coming from the video world (sacrilegy!) after trying to (mostly unsuccessfully) revive some old V2000 VCR. While looking for these machines on places like eBay and so I ended finding some of these machines and, finally, I put my hands on one I could find locally (these machines, although not uncommon, are not that obiquitous here).
Well, this machine is a Boltex SP8 (a clone, or very similar to, Eumig s810 and near models, as I learnt from this forum) is in very bad condition due to having suffered from storage in a very wet/humid environment. Fortunately, I inspected it very carefully and didn't attempted to turn it on. Had I done it, I would probably had ruined it even more, if possible. As its interiors were very rusted in almost every piece and also very dirty, I immediately attempted an almost full dissassembly in order to clean and recover them. I can post some pictures to show you in how bad shape it was.
Well, after having cleaned every rusty piece with a phosphoric acid solution (which, in turn, made extra damage to some of them, like bearings like lost its plating and so on, something I have yet to find how to repair), sanding and polishing, there where some crucial pieces that couldn't be recovered to a near-new state.
For instance, the axels in the picture shows permanent little "pits" in its surface, or residual "scars" after having removed the rust, and I'm thinking about how this can be repaired, if possible.
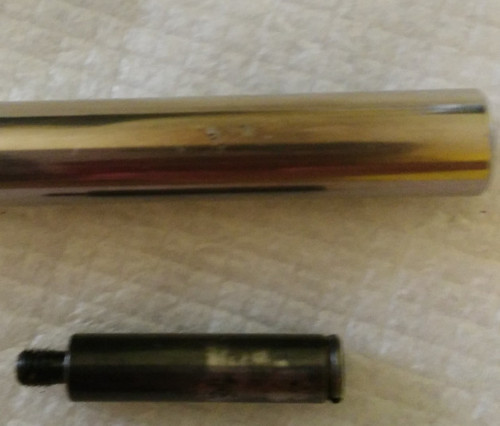
My first option was to sand / polish the pieces, until, hopefully, I get rid of them. There are two downsides to this approach. The 1st one is that metal is so hard it would take ages to remove the necessary amount of fabric. The second one is that I inevitably would create irregularities in its shape that, maybe, could affect the film transport making its playing unfeasible and, even worse, damaging the film forever.
The 2nd one is to use some kind of filler/2-component (epoxi or not) to fill those little scars/gaps. I've seen people doing this on much more larger areas, so I have my doubt that this will work at such a small level. I cannot imagine patches of milimeter (or less than that) size sticking into those "scars". Plus they would need some later sanding and polishing...
Third and last one: leave them as they are. For the little, black piece, it's not a "true" axel as it' screwed and in a fixed position. So hopefully I could adjust the initial position so in the final position the surface area that touches the film is the smooth one. For the big one, I cannot use this trick, as it will be spinning. But maybe the scratches wouldn't hurt the film at all, just like video drum heads usually have longitudinal few um deep lines across them in order to improve tape adherance.
What do yout think abouts?
I'm waiting for your suggestions ![[Wink]](wink.gif)
| IP: Logged
|
|
|
|
|


 UBBFriend: Email this page to someone!


 Printer-friendly view of this topic