|
Author
|
Topic: Digitizing Transfer Super 8mm Sound Films - Wolverine
|
|
|
Mike Spice
Master Film Handler
Posts: 421
From: none of your business
Registered: Jun 2017
|
 posted August 29, 2019 03:19 PM


Always export audio from Audacity as a wav file.
Mp3 is compressed and will get compressed again when exporting the video.
Don't forget to use the 'normalise' effect in the effects menu on the entire track before exporting.
Always begin with a wav file, it is uncompressed. I would never ever use mp3 in a video edit if a wav version was available, altho there are times when I haven't had a choice.
Shotcut is not the easiest or the most obvious editor to work with, but I do use it for certain effects.
It certainly is very capable on a decent computer, mine is an i5 and runs well.
The choice of free video editors is limited, if you have a powerful computer (at least i7) Davinci Resolve is also free, I use that now and again, it is capable of amazing results (and very large proxy files)
I would persevere with shotcut, you are doing the right workflow by the sound of it.
Wav files would be better to work with.
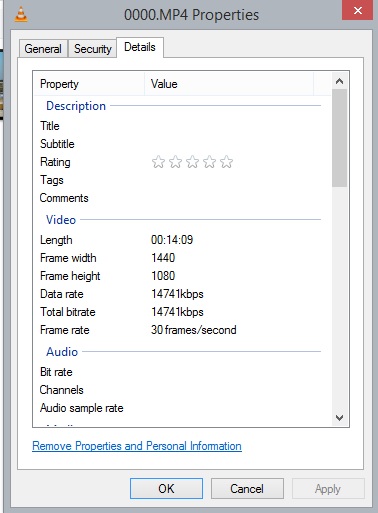
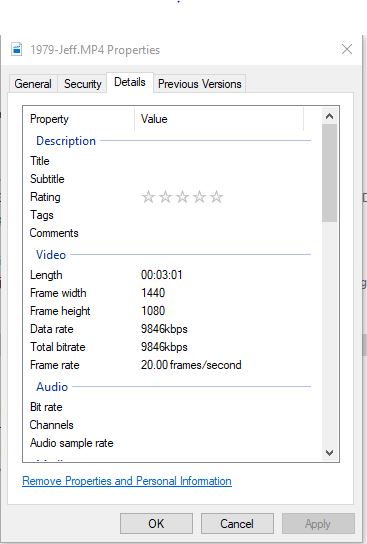
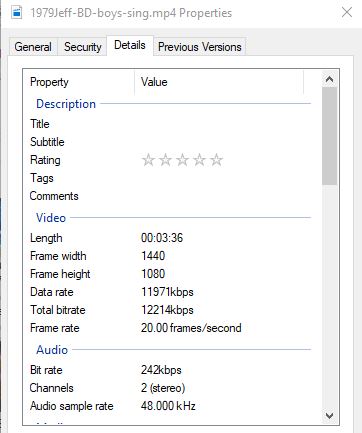
Video files from my 720p wolverine come out at 1440x1080
In my video edit (moviePlus X6) I have a preset set to that dimension and I export at 1440x1080 at the same bit rate as the original scan file.
Doing that means when I export video I don't get sidebars, (which I do get if I just use a generic 720p export preset) which I find much nicer when posting online.
Not forgetting side bars to make a 4:3 image 16:9 is just adding wasted data to your export.
I am not sure what aspect ratio or the bitrate the files come out of the wolverine pro, find one of it's original scan video files on your computer, right click, choose properties then the details tab.
It will tell you the aspect ratio of the file, set your video edit and export to that exact same size.
It will tell you the bitrate too, make sure you export from shotcut at the same bit rate for best quality.
A lower bit rate will start to degrade the image but make it easier to upload online as the file size will decrease with a lower bitrate.
I would right click/properties/details an original scan file and then a file you have exported to compare bitrates and aspect ratio of each to see any difference.
For silent films I wouldn't use shotcut, no need, just put them in to MyMP4 Box and set the fps.
It's free software and the detail of how to do that is buried deep in the Wolverine review thread, I think it's around page 3
Doing the fps adjustment in MyMp4 means no further re encoding.
There are some good shotcut tutorials at youtube.
this shotcut video may help things run smoother for you
Right click a video file, choose properties/Details to see the dimensions and data rate of your scan files and exported files to see the differences
[ August 30, 2019, 06:14 AM: Message edited by: Mike Spice ]
| IP: Logged
|
|
|
|
|
|
|
|
|
|
|
|
|
|
|
|
Mike Spice
Master Film Handler
Posts: 421
From: none of your business
Registered: Jun 2017
|
posted August 30, 2019 04:49 PM
Mono Stereo, a bit of a circus Act.
I would be inclined to record in mono and only use one track in audacity, set it to mono in preferences.
Once recorded copy and paste the mono track to a new track directly under the original recording, then using the pan control to the left of each track. Pan one track left, one track right.
Unless of course it is indeed stereo, then record in stereo.
I wouldn't worry about the file size difference too much unless it gets smaller.
220mmb to 320mb is nothing in my opinion.
I am currently uploading 1Gb files to my FB cine group
If you are on 'dial up' type internet and want to upload, just reduce the export data rate to say 9000 or even 5000 and keep the larger files for local playback or clients.
Both FB and youtube will re compress anything you upload.
I am very lucky to have a blistering upload speed so I don't worry too much about file sizes, just storage space.
[ August 30, 2019, 06:18 PM: Message edited by: Mike Spice ]
| IP: Logged
|
|
Nantawat Kittiwarakul
Master Film Handler
Posts: 280
From: Rajburana, Bangkok, Thailand
Registered: Aug 2017
|
posted August 30, 2019 11:44 PM

Not sure about your workflow, but here's mine (a lengthy ones ![[Wink]](wink.gif) ) )
1.Have the film scanned. The result is frame-by-frame scan, but at 25 fps in my case. It is a DIY setup based on PAL camera video system hence the frame rate. Let's call it "scanned track".
2.Have the second scan with sound projector, real time "off the wall" approach. Direct the audio from the projector's line out to the camcorder's audio input. The result is the video+audio from the film. The picture will be only used as the reference while editing so it doesn't matter if it is flickery/out of focused/off centered/etc. Let's call this "a+v track"
3.Lay both clip in my video editor (Sony Vegas in my case). Then stretch,squeeze,cut,trim,etc the "a+v track" with audio to match the "scanned track" by using the image as visual guide.
And since the "scanned track" runs at 25 fps, I keep working in this setting for the moment. Disregard the chipmunk effect at this state. ![[Razz]](tongue.gif) It will be fixed later. It will be fixed later.
4.Discard the video in the "a+v track", retain only the audio track. Render the edited video, completed with audio (and color correction as needed) out as lossless format. Still at 25 fps at this state.
5.Finally, I do the final encoding on another program - namely VirtualDub. Also slowing it down to desired frame rate 18fps at this step. The audio will be finally stretch back to its intended speed at this step too.
A lengthy process, from LOTS of my trial&error and years of tweaks. This might not fit to yours however, and you might have to find your own approach anyway. ![[Roll Eyes]](rolleyes.gif)
--------------------
Just a lone collector from a faraway land...
| IP: Logged
|
|
|


 UBBFriend: Email this page to someone!
![[Big Grin]](biggrin.gif)


 Printer-friendly view of this topic