This is topic Elmo ST-1200 Delay in Motor Starting in forum 8mm Forum at 8mm Forum.
To visit this topic, use this URL:
https://8mmforum.film-tech.com/cgi-bin/ubb/ultimatebb.cgi?ubb=get_topic;f=1;t=010038
Posted by Janice Glesser (Member # 2758) on June 18, 2015, 10:37 AM:
When cold the motor on this projector has a delay in starting. I usually have to turn the main switch to "S" (Still) first (a couple of times) to get the motor turning...then turn it to "F" (Forward) to thread the film.
Frank Arnstein mentioned having the same annoying problem.
quote:
Curiously enough Janice, my Elmo ST 1200D is doing exactly the same thing and I don't like it very much.
When cold, there is an unexplained delay of a few seconds before the motor actually spins. Once its made the first start for the day all seems fine till its cold again and it then reverts.
Have just replaced the a/c motor capacitor but I can't tell yet if its fixed. Will now recheck all the belt tensions and also try oiling the end bush on the motor.
Has any member with an Elmo ST 1200 experienced this baffling delay on cold start and why is it so?
This is the question which more and more members are asking themselves. Time will tell if anyone discovers the cure.
I'll try and get a video posted so you can see the issue. Hopefully someone will have a fix suggestion.
Posted by Steve Klare (Member # 12) on June 18, 2015, 10:50 AM:
Hi Janice,
I've seen more than a few times where the motor actually turns a second or so before the roller grabs on the shutter wheel, but it sounds to me like you are saying the machine is just stone still and quiet.
I have to guess based on my other Elmos, since I haven't had this part of my own ST-1200 apart, but there are probably some lever switches activated by a cam on the control knob shaft. (There's one for the lamp too.)
Multiple tries to get anything to happen could mean a switch that controls your motor is going flaky.
In your circumstances I'd put a voltmeter (AC scales) on the motor and watch what happens to the voltage when you have one of these awkward pauses!
Safety First: If you go poking around with that back cover off, lethal voltages are present!
(Connect up with the machine unplugged, disconnect the same way. Keep one hand in your pocket if you want to be really safe!)
Posted by Tom Photiou (Member # 130) on June 18, 2015, 03:02 PM:
If the belts were sticky at any point when these projectors are cold the residue within the 18 and 24fps pulley grooves acts like glue, once its broken from cold its usually ok during the rest of the show. Then when its cold again it does it again.
To prove this point before you start up from cold remove the back cover, manually turn one of the two rubber wheels, (this will break the sticky jam), then switch the machine on, if spins on the first position then this is the problem. We had it years ago. I simply had to remove all the belts, use a good quality clean on a skinny cotton bud and clean deep inside all the belt pulley grooves as well as the belts themselves, even if you have put new belts on they will pick up sticky residue left in the grooves etc. ![[Wink]](wink.gif)
Posted by Janice Glesser (Member # 2758) on June 18, 2015, 03:26 PM:
@Tom...I had this problem with all the belts off also.
@Steve... After just replacing a micro switch on my Sankyo 600, I'm wondering if the micro switch might be going bad in this case too.
Here's a video of the problem:
https://youtu.be/jc0TF7yrxzI
Posted by Tom Photiou (Member # 130) on June 18, 2015, 04:36 PM:
weird! i'll take a look in the service book to see if this fault is listed
Posted by Steve Klare (Member # 12) on June 18, 2015, 04:58 PM:
That hum means to me your motor is getting power, so maybe not a switch...
You just replaced the belts. Is it possible the idler pulley on the motor belt is too tight and maybe the tight belt is stalling the motor?
Posted by Andrew Woodcock (Member # 3260) on June 18, 2015, 05:17 PM:
Steve's bang on I reckon Janice. It simply sounds that the motor has stalled due to being too heavily loaded onto the shutter wheel. It sounds like the motor doesn't have sufficient starting torque to overcome the heavy load caused by the friction. Once the shutter wheel drive chain has turned very slightly then the load will become drastically reduced on the motor, and it then will accelerate very quickly up to full running speed just as the video endorses.
This explains when going back to switch position one why the motor isn't simply just driving the lamp cooling fan as it should in the first position of the switch as this is only meant to be the still frame position
The way to prove this theory is simply remove the drive belt which is very easy to do on these and then see if the motor runs instantly when either switch position is selected.
If this does prove to be the case, you will need to adjust the clutch height position so less friction and force is placed on the shutter wheel by the rubber drive wheel on the clutch mechanism.
Please refer to my recent posting to Frank regarding this adjustment.
On many ac motors the starting torque can become greatly reduced over the years by overloading regularly and damaging the rotor through overheating.
Once you have your machine running perfectly, try to avoid cleaning films on rewind etc etc for the reasons suggested above and also to keep your spindle friction linings and clutch mechanism healthy and preserve its lifespan.
Posted by Steve Klare (Member # 12) on June 18, 2015, 05:50 PM:
Yep!,
I replaced a drive belt on my mom's washing machine once, and tightened it as if it was a fan belt on a car. (You go with what you know.)
-made that exact same sound!
(Just moreso...)
Posted by Janice Glesser (Member # 2758) on June 18, 2015, 06:28 PM:
Steve and Andrew...I don't know if you saw my comment to Tom...but I've had this problem since I first got the projector and it didn't have any belts on it.
The 5 belt set I bought is probably the same one you got Steve. It has 2 belts for the clutch rollers - one large and one smaller. I'm not sure why the smaller belt is needed?
I'll remove the belts and test it again in a couple of hours.
Posted by Andrew Woodcock (Member # 3260) on June 18, 2015, 06:36 PM:
in that case then Janice, check the Rotor is free turning with everything removed. Other than that it may well be the starting capacitor that requires change out as it relies on this just to provide a phase lag and therefore a phase shift just to get the thing going. Beyond that the rotor will be damaged beyond repair and you would need a healthy replacement motor (but keep your old one as the stator windings are clearly good and therefore you could always use this again if your other motor windings were to fail).
Posted by Janice Glesser (Member # 2758) on June 19, 2015, 11:13 AM:
OK guys...here's the status. I removed the belts last night and this morning the motor started up right away. This is a good sign that there isn't a problem with the motor, but as you suspected it's the drag from the belts. My intitial starting problem without the belts was probably due to the motor not being run for a long time.
Anyway...Looks like my next step is the clutch adjustment stage and although Frank was very clear on your instructions Andrew...I'm not. My confusion is partly to my dyslexia and partly to just not being able to follow engineering terms yet. ![[Confused]](confused.gif) I have the diagram from the service manual, but things just don't look the same to me.
I have the diagram from the service manual, but things just don't look the same to me.
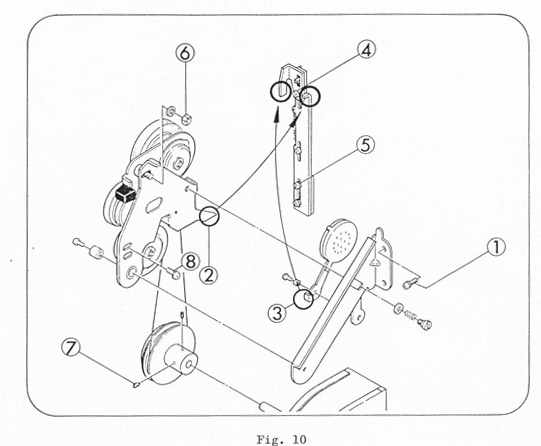
In looking at page 10 of the service manual under "ASSEMBLY"...instruction (4.) says: quote:
"If Clutch unit assy could not convey the rotation of Motor assy during 18 f/s or 24 f/s projection, loosen attaching scres (Fig.10-5) or attaching nut (Fig. 10-6) and adjust the position of Clutch link adjuster and Clutch lever (2) assy."
Is this the adjustment you are recommending Andrew that I need to do?
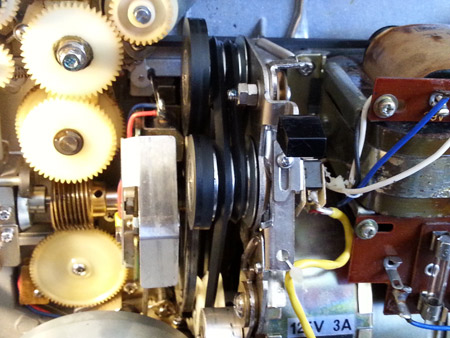
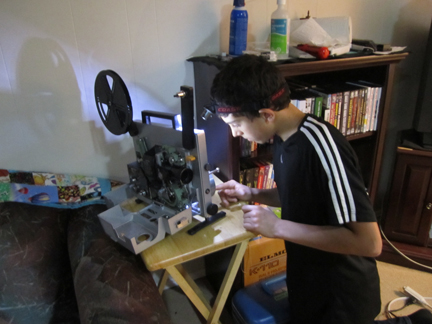
To maybe help me out...I've taken a picture of the clutch area in hopes you Andrew or Frank can point out what needs to be removed and adjusted. I can add pictures in stages to illustrate the procedure. One thing I noticed is that the spring that Frank mentioned... shown in my picture ... isn't even shown in the diagram.
[ June 19, 2015, 01:27 PM: Message edited by: Janice Glesser ]
Posted by Antoine Orsero (Member # 41) on June 19, 2015, 01:21 PM:
I have the same problem with one of my two projectors! I replaced the starting capacitor, but the problem is the same.
Even when I set the start pause button, you hear a buzzing noise and after a while it starts!
I'll try to remove the belts
Posted by Tom Photiou (Member # 130) on June 19, 2015, 01:35 PM:
If,when the belts are removed, it starts immediately I'm 99.9% positive that its not much more than a stickiness within the belts/pulley system. I have had exactly the same problem twice with two different 1200s and although i did replace the belts with genuine Elmo belts after a week or so they began to stick when cold until i turned the switch on and off a few times, this was simply due to the residue of old belts being picked up. I used a good powerful cleaner on all the belts and pulleys and it worked on both occasions. i got the hum of the motor which if left too long wont do it any good.
Please let us know if you do find another fault causing this as i will be very interested in this fault/problem.
Posted by Janice Glesser (Member # 2758) on June 19, 2015, 02:26 PM:
Tom...these are new belts (very smooth and dry) and I've cleaned all the old belt residue off the metal pulleys... so I really don't think stickiness is the problem here. Either the belts are too tight or the clutch rollers are pressing too hard against the shutter wheel...it could also be a combination of both.
Posted by Andrew Woodcock (Member # 3260) on June 19, 2015, 02:58 PM:
Adjustment will be necessary Janice if you have removed the shutter belt. It will,like most adjustments, be a trial and error exercise until you find the point where the clutch drives the shutter wheel ONLY in switch position 2 and with just the correct amount of friction so the projector turns instantly and at a constant speed without slippage.
You have to loosen screws 5 in the diagram from the service manual then raise or lower the cam track along its elongated slots before tightening screws 5 once again.
Posted by Steve Klare (Member # 12) on June 19, 2015, 03:20 PM:
This is the greatness of this forum:
My own ST-1200 is recovering from surgery and just as I am getting ready to stitch it up I'm learning all this useful stuff!
My own roller assembly is dismounted right now. I adhered the new shutter belt in place and I'm 24 hours into the 72 hour maximum set time the cement packaging specified.
(It's been dead since March...why hurry now?)
For you Eumig fans: When the Tank had to go out sick, My Eumig/Bolex 800 series machine came off the bench and has been doing a great job. I think I'll keep it active after my 1200 is fixed.
Posted by Janice Glesser (Member # 2758) on June 19, 2015, 04:48 PM:
I understand that there needs to be an adjustment. GOT IT! My question is....according to my picture (not the diagram since I'm having trouble associating the diagram with the actual parts)... Looking at my photo of the clutch what do I need to do next? I don't want to remove anything until I know what I'm doing. Is the adjustment screw accessible without removing something? OR...If I need to remove something please point out the exact screw(s) to do this. I'll take a second photo of the adjustment screw when I've located it. This may seem very obvious to you guys...but not to me. I need help to document this process with pictures and annotations. I think this will also be helpful to others with this projector.
Posted by Andrew Woodcock (Member # 3260) on June 19, 2015, 05:24 PM:
It's been a while Janice as my love for the St1200 ended quite some time ago, but from memory I removed the clutch assembly completely each time I made an adjustment to the cam track just to gain access to the screws on cam track labelled 5.
If my circumstances were different right now Janice, I would have spent much longer doing the work and posting pictures etc.
I am sorry Janice but I just don't have very long each day at the moment to spend on film or projectors however my interest and love for both never falters.
Though I wasn't able or willing to post photographs on here at the time, I am certain I would have written about the topic in greater detail at the Times I carried out this work so if you do some historical back tracking on here Janice at the time I did what you're doing now, hopefully you'll gain a full understanding of the situation. ![[Smile]](smile.gif)
[ June 19, 2015, 06:34 PM: Message edited by: Andrew Woodcock ]
Posted by Janice Glesser (Member # 2758) on June 19, 2015, 09:47 PM:
OK Andrew...thank you for your input anyway. Now...Is there anybody else willing to take a stab at explaining how to remove the clutch unit to get to the adjustment screws?
Posted by Steve Klare (Member # 12) on June 19, 2015, 11:06 PM:
Hi Janice,
I'm going to be looking into that myself the next couple of days.
I'm hoping the adjustment is possible with everything installed because it will get nasty if it isn't.
Posted by Janice Glesser (Member # 2758) on June 20, 2015, 01:11 AM:
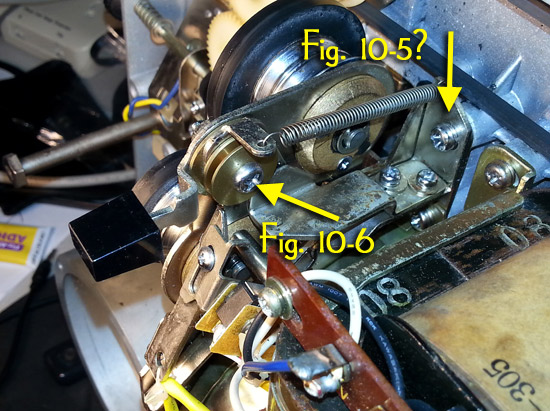
Steve...I think this will help. Here's another angle looking straight back into the clutch area. This looks more like the piece in the service manual diagram. I've pointed an arrow to where I think the Fig. 10-5 screw is. It would seem to me that you could just use a long screw driver to reach into those screws and not have to remove anything. However, I'm still not sure what to adjust if that screw is loosened.
Posted by Andrew Woodcock (Member # 3260) on June 20, 2015, 03:59 AM:
Yes that's it Janice, so if you can do the adjustment in situ,then that's obviously the easier and simpler option.
Posted by frank arnstein (Member # 330) on June 20, 2015, 06:21 AM:
Hi Janice..
You said....."I understand that there needs to be an adjustment. GOT IT! "
I say.... "Going by what I see in your video, it doesn't need adjustment so don't bother."
Janice, tell me, why do you start your projector in the manner seen?
You go from OFF, and then skip the important position 1, to go straight to 2.
Don't do that Janice as its bad for the motor. You are actually helping the motor to stall.
If the motor doesn't start spinning with the fan on position 1, then don't go to position 2. Stop and wait there till it spins.
It will have absolutely no hope of turning the shutterwheel until the motor is spinning at full speed and it can only get up to speed if its not touching the shutterwheel.
So that's position 1. Motor spinning, drive wheel clear of the shuttershaft. Also the fire shutter will be automatically deployed, designed to protect stationary film frames from burning if caught in the light beam.
Now is the time you can move to position 2 or project.
The already spinning driving rubber wheel is now allowed to drop onto the edge of the shutterwheel. The extension spring helps pull it against the shutterwheel.
Now the drive wheel is easily able to turn the shutterwheel as it already has full momentum.
As I can see on your machine, once its spinning, its quite capable of turning the shuttershaft normally.
So don't mess with the adjustments if its not needed Janice.
Then that leaves the question, " If its clear of the shutterwheel, why won't it spin instantly?"
1. It could be Motor belts are too tight preventing the motor starting to spin due to too much friction generated.
2. After years of being idle, the sliding bush at the outer end of the electric motor may be dry or even tight, thus preventing normal startup of the rotor. This bush needs to be oiled and eliminated as a possible suspect. Put a few drops of fine oil on the bush and try to run it in.
3. The motor starter capacitor has failed so it wont start turning. I don't think its that as I replaced mine and it made no difference.
4. It could be that the electric motor has been damaged by too much stalling of the rotor when previously attempting to project. This can leave its starting torque much diminished permanently, but it may still get up to normal speed once running. If you cannot overcome the low start-torque issue and it becomes a constant pain, the cure is to replace the motor .
See what you all may think about the above rambling.
dogtor frankarnstein.
![[Roll Eyes]](rolleyes.gif)
[ June 20, 2015, 09:13 AM: Message edited by: frank arnstein ]
Posted by Andrew Woodcock (Member # 3260) on June 20, 2015, 08:09 AM:
Great points raised there Frank. I hadn't watched the video as carefully as I should so didn't know switch position 1 was being ignored.
Frank is right of course, adjustments should only be made when it is necessary after all these are factory settings that ordinarily never need revisiting. However when shutter belts have been removed I would have thought the difference in diameter would have deemed it necessary, as in this case.
Whenever i have made these adjustments and adjustments to the diffuser mechanism, it was always when I first got the machines as they weren't running correctly to begin with.
In many cases the diffuser didn't move at all when I got them as the cam mechanism which can be quite finicky, was misaligned.
Once the adjustments had been made I have never had to do it again on the same machine.
Hopefully Frank you now have your still frame function back now in switch 1 position?
Posted by Janice Glesser (Member # 2758) on June 20, 2015, 01:14 PM:
Hallelujah Frank!!!! Thank you! Finally some feedback I can get my teeth into I was up until 1:00am this morning trying to analyze and locate the parts that may need adjusting. Although not as detailed as you have presented Frank...I was coming to some of the same conclusions. I couldn't see where any adjustment of the clutch would solve the delay in the motor starting.
As far as "Why" in my demo video I started it in position 2...I was just following the Owners Instruction Manual. I don't think I've ever had to start a projector in the "Still" position before.
I'm going to start with your first and second suggestions.
1. "It could be Motor belts are too tight preventing the motor starting to spin due to too much friction generated."
I've already tested it with both motor belts removed and motor/fan start up fairly rapidly. Last night I tested it with only one belt installed. There was some delay, but the fan started and the motor got up to speed much quicker than with the 2 belts. I'm going to try making a belt with some belt material I have. It will be a round belt, but I'll see if a looser belt helps.
2. "After years of being idle, the sliding bush at the outer end of the electric motor may be dry or even tight, thus preventing normal startup of the rotor. This bush needs to be oiled and eliminated as a possible suspect. Put a few drops of fine oil on the bush and try to run it in."
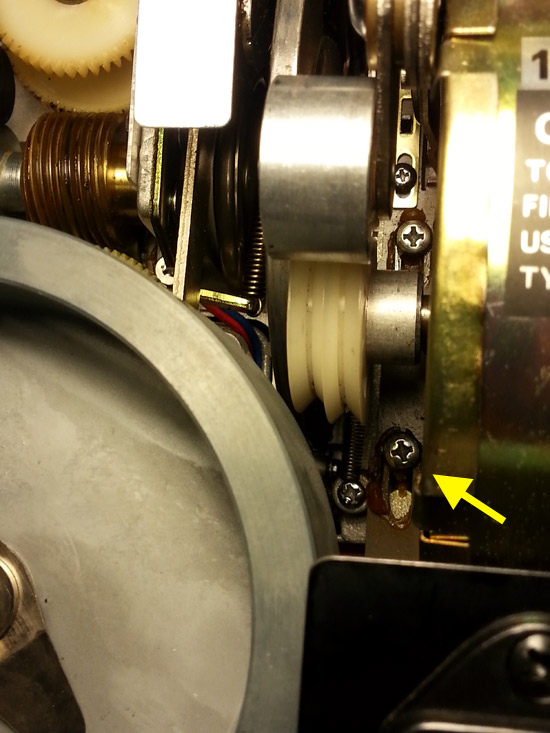
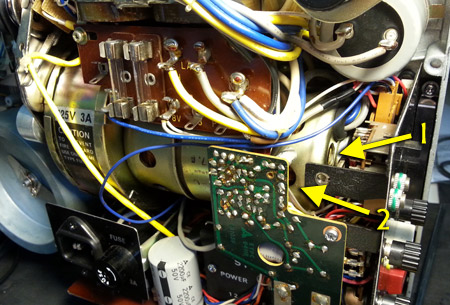
The fan sits up against the left side of the motor. So by the outer edge do you mean the bush is on the opposite end to the right? I see two locations with holes there... Arrow 1 and Arrow 2. Is it one of these holes I should drop-in some oil?...or some place else?
[ June 21, 2015, 10:44 AM: Message edited by: Janice Glesser ]
Posted by frank arnstein (Member # 330) on June 20, 2015, 08:30 PM:
Hi Janice,
The 2 holes you mention are not where to put the oil in.
The rotor shaft will be seen protruding about 2mms from the right hand end of the motor. It is a shiny shaft and it can be seen spinning around when the motor is running. Have a look right in the middle of the end plate of the motor. Then drop oil on the protruding shaft and watch it spin when turned on. Lift up one end of the projector so the oil can run into the bush.
dogtor frankarnstein
[ June 21, 2015, 07:37 AM: Message edited by: frank arnstein ]
Posted by Barry Fritz (Member # 1865) on June 20, 2015, 10:17 PM:
Janice, does this projector have an inching knob? If it does, and you cannot solve your problem, giving the inching knob a turn while the motor is just humming, would likely get it going.
Posted by Janice Glesser (Member # 2758) on June 20, 2015, 10:18 PM:
Frank...Things are looking much better for this projector. The oil on the motor bushing really REALLY helped. There's now no delay in starting at all. I didn't have to make a belt. The one new belt from the set I bought is working just fine.
I was experiencing slow audio in the beginning of a reel. I noticed the sound improved if I pressed the roller to the shutter wheel. So I added another spring to the top of the clutch as you had mentioned in a previous post. This seemed to do the trick...and in testing a couple of times the sound is now pretty much at the correct speed from the get go.
Frank...I'll keep testing it over the weekend...but so far things look promising.

Posted by Andrew Woodcock (Member # 3260) on June 20, 2015, 11:53 PM:
well done Janice and Frank! I am glad you're machine is getting better and stronger for you now Janice with your every move. Great news!
Posted by Steve Klare (Member # 12) on June 21, 2015, 08:03 AM:
There is supposed to be a second small belt running between the two rollers' pulleys and I think this is to make up for the smaller area of contact of the drive belt around the 18 FPS pulley.
-BUT
I don't use this machine for 18 FPS so I think it may just contribute drag and slow the frame rate.
I'm going to experiment with leaving it off, especially if 24 FPS comes out noticeably slow.
Posted by frank arnstein (Member # 330) on June 21, 2015, 08:28 AM:
Thats great news Janice.
You are going very well on servicing this nice looking Elmo you have. The great pics and video clip you posted made it much easier for all of us here to jointly diagnose.
Here's an interesting small sound function test you can do while in the midst of all the other testing being done.
Have the back off the machine so you can watch the flywheel.
Make sure you can reach the control knob at the front.
Have no film threaded for this test.
Power to the machine is then turned on.
Switch to position 1 so the motor starts running.
While switching from 1 to position 2, observe the stationary flywheel and see if it is sent spinning within a few seconds to full speed. Thats with no film at all.
To try it again, go back to Off, then position 1 and after a few seconds try position 2 again. Every time you go from 1 to position 2, the stationary flywheel should be sent spinning. Then it will slowly stop turning in about 20 secs if no film follows.
Let us know the result Janice and anyone else wanting to do the same simple test on their ST 1200 can report their result as well. Hopefully all the projectors will all pass.
This function is interesting and important as it provides full speed to the flywheel straight away so the sound from the projector is almost perfect right away. No hearing wow in the sound while waiting for the flywheel to catch up to the film speed. Its already spinning fast, well before the film actually takes over as the means of driving the flywheel and spinning at a steady speed.
dogtor frankarnstein
Posted by Dominique De Bast (Member # 3798) on June 21, 2015, 09:12 AM:
I removed the final film path that is used for 180 m (600 ft) reels as it tended to unlock during the projection and touch a larger reel. I use this projector for 360 m (1200 ft) anyway. I Wonder if it's a common fault on this projector.
Posted by Maurice Leakey (Member # 916) on June 21, 2015, 11:14 AM:
The projector does have an inching knob (at the front.)
http://super8data.com/database/projectors_list/projectors_elmo/elmo_st1200dmo.htm
Posted by frank arnstein (Member # 330) on June 22, 2015, 04:05 AM:
Janice, Steve, Tom and the others following the "St-1200 low starting torque saga", thread.
After repeated testing of my ST-1200d all weekend, I am happy to report that it appears to now be completely cured of the dreaded syndrome which has plagued it ever since I bought it.
Even on cold start, it responds immediately and the motor spins without delay. I cannot make it stall anymore by quickly turning from Off to Project. There is no need to wait for the motor to spin up before switching from 1 to Project because it responds so fast. It also sounds smoother and quieter.
So I hope that Janice's 1200HD also gets a similar positive report from her. We will wait and see what she says but I am hoping we have now got this problem finally solved for the benefit of all Elmo ST 1200 owners.
dogtor frankarnstein
Posted by Janice Glesser (Member # 2758) on June 22, 2015, 09:45 AM:
Terrific Frank!!! It shows it can be done Out of the several steps I took, which ones specifically solved the problem for you Frank or did you do something else?...AND I invite Steve, Tom and other members to post here which steps worked or didn't work for them on the ST-1200.
I'm going to do the last test today that you recommended of observing the flywheel. I don't recall seeing the flywheel move without film running thru it, but then I wasn't looking for it at the time. I wanted to let the projector sit for a day to see if the audio delay was actually improved from a cold start.
Posted by Steve Klare (Member # 12) on June 22, 2015, 10:05 AM:
I plan to do a thread on my experiences restoring the rubber surface to the shutter wheel (especially if it works out!). So far it looks good, but I haven't run it for more than a 10 minutes at a time yet.
Something I'm not clear on: I don't see a motor shaft poking out the right (non-fan and pulley) end of the motor. My machine looks exactly like Janice's so I think I'm just misinterpreting. Maybe I need to look more carefully. (Everything is packed so close together!)
I've never had the delayed start problem with my machine, but have suffered from the gradual rise towards (never quite "to") 24 FPS.
-so I would like to find this lube point and kill off yet another contributing factor to pokey-projection.
This is an irritating problem: you project reel #1 and everything sounds bassy, musical tempos a little downbeat, and actresses a little masculine sounding, but your ear and your brain compensate. Now you do a changeover to a second machine for reel #2 and until you re-compensate the actors sound like there's just a pinch of helium in the air!
This series of threads could actually turn out to be important: I know a number of us that have been limping along with these problems for years, just maybe we're going to get these machines back up to 24 FPS at last. I'm sure 40 years ago when they left the factory, they were all full speed.
Posted by Janice Glesser (Member # 2758) on June 22, 2015, 10:42 AM:
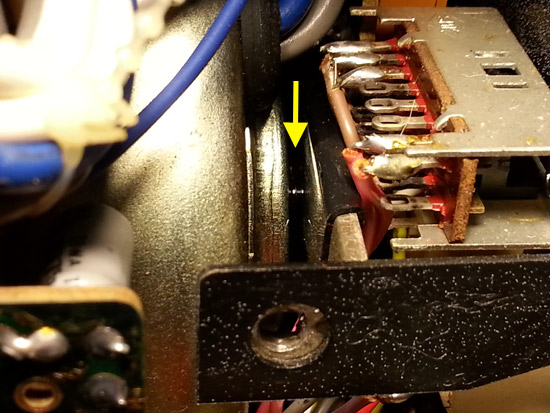
Steve...Here is a close-up of where I placed a few drops of oil at the far most center point on the motor. I then tilted the projector to allow the oil to penetrate a little further inside.
Posted by Steve Klare (Member # 12) on June 22, 2015, 10:59 AM:
I see it!
I assume we're talking something like 3 in 1 oil?
Posted by Janice Glesser (Member # 2758) on June 22, 2015, 11:09 AM:
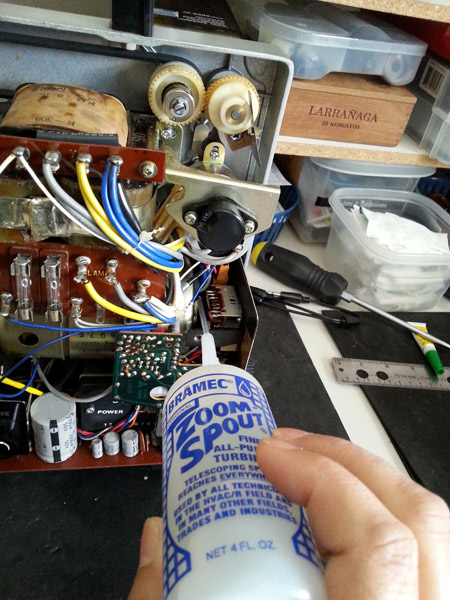
Steve...This is what I used. It's probably the same as 3 in 1.

Posted by Tom Photiou (Member # 130) on June 22, 2015, 12:00 PM:
Janice, you did very well there, I cant even see that rear part of the motor, its buried.
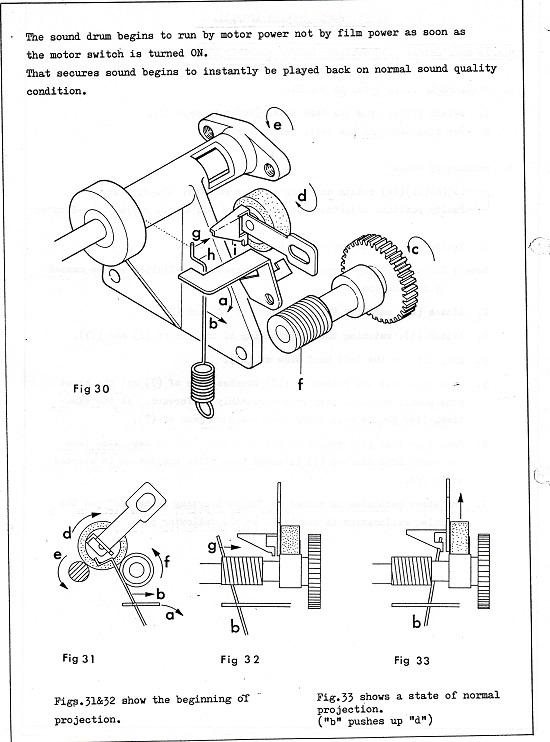
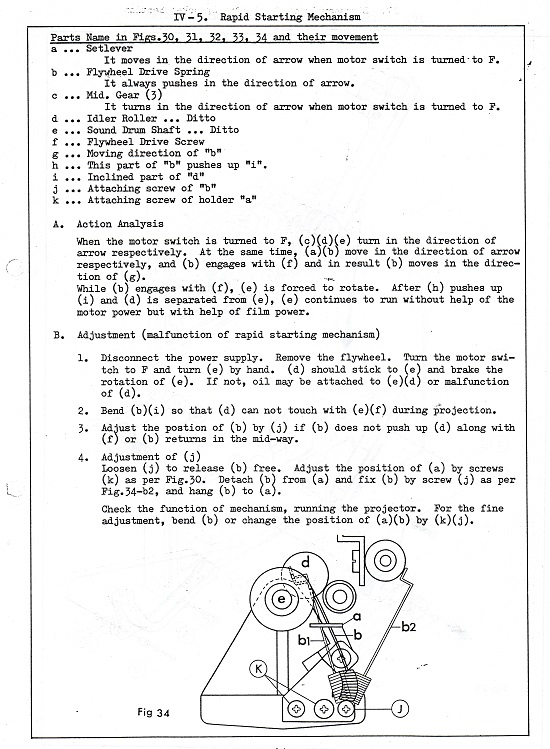
The flywheel spinning without film quite often doesn't work properly on these, Hence if you have a short leader the sound can be very wobbly for a couple of seconds until the film goes through and spins that flywheel. This is called the rapid start up mechanism & was designed to get the flywheel running as the switch is put into forward before film gets through, this was to cause less stress to the film on threading and also to give the sound an instant,(or near instant) play with no warble. Its actually quite an intricate set up, if any oil or grease what so ever gets onto the rubber roller below the flywheel that starts the flywheel spinning it just wont work without stripping it and cleaning it all, it relies on friction to get going.
Posted by Steve Klare (Member # 12) on June 22, 2015, 12:45 PM:
I'm thinking of putting something thin like a coffee stirrer or the end of a Ty-Wrap in there and letting the droplet slide down it to the lube point.
-counting applying the lube, tilting the projector and aiming the flashlight, we are up to at least four hands!
(Shame I didn't know while I had the back of the motor exposed...)
None of the other STs and many other manufacturer's machines don't have a driven flywheel, yet life still goes on! (The GS(s) must at this rate, right?)
Posted by Andrew Woodcock (Member # 3260) on June 22, 2015, 02:37 PM:
That's the beauty of the capstan driven machines. Perfectly matched running speed between sound track and film running speed from the second the rubber roller comes into contact with the capstan roller. More manufacturers should have adopted this fine design principle.
No dancers, no loss of loops, no noticeable Wow or Flutter. Very good idea indeed.
The GS goes someway to fixing these issues by taking a feed of one of its drives onto the capstan drum to get it up to speed before threading.
[ June 22, 2015, 04:33 PM: Message edited by: Andrew Woodcock ]
Posted by Barry Fritz (Member # 1865) on June 22, 2015, 04:32 PM:
I like Zoom turbine oil. Penetrates well and withstands high temps. It has a long flexible retractable nozzle for reaching hard to get at areas. It is available at Ace Hardware stores and online. Most projector repairmen do not recommend 3 in 1 oil.
Posted by Andrew Woodcock (Member # 3260) on June 22, 2015, 04:40 PM:
It does have it uses Barry, just not as a one for all solution.
It is particularly good on the two tiny roller shafts at the top sprocket shoe on the ST1200.
Without, the rollers WILL at some stage or another cease turning and then DO scratch film here.
With it applied to the roller shafts, as a very light machine oil, it keeps these tiny rollers free and constantly turning in between timely maintenance interventions and therefore prevents scratching to films at this particularly vulnerable area of these machines.
I find the early silver coloured steel ones are better than the later white plastic ones on these machines.
Posted by Janice Glesser (Member # 2758) on June 22, 2015, 06:35 PM:
After letting the projector sit idle for a day...the motor had a little delay in starting...but a drastic improvement. Once the motor starts the first time... it will continue to start instantly and it's start-up speed is right on. I think the extra tension of the added spring helped with the speed issue. Years of non-use and poor storage is probably the cause for the motor seizing and the oil on the bushing has helped loosen things up.
Frank...I did your test... and yes...the flywheel turns when going from position 1 to project. Yeah!
Posted by frank arnstein (Member # 330) on June 22, 2015, 09:36 PM:
Hi Janice,
I think that the one single thing which restored the projector operation to normal was the lubrication to the tight rear motor plate bush.
The application of more oil to the bush on the next day has improved it even more.
So give yours a second oil treatment and see if it further improves.
This has made such a difference to my Elmo that I can't resist testing it every hour to convince myself that it really is fixed. Then I do some more watching of movies to listen to the great sound and terrific picture.
At night before bed, I set it up ready to do another motor torque test in the morning.
Happy Days.
dogtor frankarnstein
Posted by Steve Klare (Member # 12) on June 22, 2015, 09:58 PM:
Awwwww great!
Now mine is stalling from start up.
I do believe my new belts are a little bit...tight!
Well...Guess I'd better get some oil.
Posted by Mathew James (Member # 4581) on June 22, 2015, 10:10 PM:
I may have to do this to mine as well as I think I have a similar issue, but less drastic as Janice had.
So thankful for all your help solving this Frank so we all benefit in the log run. Janice, thanx for your perseverance!
Cheers,
Matt
Posted by frank arnstein (Member # 330) on June 23, 2015, 03:19 AM:
Janice.....
Glad you got a positive result with the fast spin to the flywheel. As Tom has just told us, if the slightest bit of oil gets onto the small rubber roller that drives the flywheel shaft, then the friction is lost and it wont work again till its sprayed with evaporative cleaner then dries clean and bone dry.
The interesting thing about this "all mechanical" sub device, is the way it is engineered to turn itself off after about 10 seconds of friction drive to the flywheel shaft.
Pathescope Baby projector owners like Janice will soon recognize the familiar "worm shaft and peg" design that is used in this Elmo to ensure the device switches off after a short but precise time. Its is fascinating to watch it in action, just behind the flywheel.
Good Luck with your Elmo's Steve and Matt. Keep us informed with progress.
dogtor frankarnstein
Posted by Andrew Woodcock (Member # 3260) on June 23, 2015, 04:53 AM:
Great results all round Frank. Brilliant knowledge sharing, well done once again!
This type of activity is what keeps our community rolling in the world of real film for yet another 30 years hopefully!
Posted by Janice Glesser (Member # 2758) on June 27, 2015, 04:25 PM:
Barry Fritz posted:
quote:
I like Zoom turbine oil. Penetrates well and withstands high temps. It has a long flexible retractable nozzle for reaching hard to get at areas. It is available at Ace Hardware stores and online. Most projector repairmen do not recommend 3 in 1 oil.
Thanks Barry for the recommendation. If this oil is not considered the same as 3-in-1 Oil then projector repair individuals out there will be happy. I ordered a bottle of Zoom Spout Turbine Oil...and the applicator alone is worth it. I don't know how good the oil is...but the spout tube extends to allow more precision oiling in very tight areas...super design.
[ June 27, 2015, 10:09 PM: Message edited by: Janice Glesser ]
Posted by Barry Fritz (Member # 1865) on June 27, 2015, 06:49 PM:
Janice, I agree the spout is worth the price alone. Zoom oil is praised by many in the 16mm community. That is where I first learned of it.
Posted by Mathew James (Member # 4581) on September 30, 2015, 08:51 PM:
@Frank,
My ST1200HD seems to have failed the sound test you posted.
What should I try next?
I always felt the sound was okay to date but maybe it could be better, so now I want to know why my flywheel is not turning in the #1 position?
I have started lubing using the superlube that i just picked up from home depot online. Great stuff! I would like to get the zoom oil next as i can see that rotor shaft is going to be brutal to try to hit with my unstable hands(i was never good at the game operation)...
Thanx,
Matt
ps: on my model, the shutter-wheel does NOT have the rubber.
pss: Now I a thinking i hear some sound warble ![[Frown]](frown.gif) Could this because of no rubber on shutter-wheel? Even when playing i think i heard some warbling of the sound...
Could this because of no rubber on shutter-wheel? Even when playing i think i heard some warbling of the sound...
Posted by frank arnstein (Member # 330) on October 04, 2015, 04:58 AM:
replying to Matt,,
as I stated a few posts back, and as Tom has also told us previously,
"if the slightest bit of oil gets onto the small rubber roller that drives the flywheel shaft, then the friction is lost and it wont work again till its sprayed with evaporative cleaner then dries clean and bone dry".
So spray the flywheel shaft and rubber driving roller with iso-propyl or other suitable evaporating spray, where they press against each other, till they are flushed clean and then make sure they are bone dry before retesting its operation. Don't inhale the fumes or ignite them accidently.
Regarding the fact you are running without a shutter belt... I am doing the same with mine and am perfectly happy with the sound result. I believe they run smoother, quieter and with less vibration if there's no shutter belt.
If you think yours still has warbling sound then try adding a bit more spring pressure to the shutterwheel as Janice did, and see if that's all it needs to drive smoothly without slip. Also clean the sound head if you haven't done that yet.
Good luck and keep us informed of your progress.
dogtor frankarnstein
Posted by Steve Klare (Member # 12) on October 04, 2015, 06:47 AM:
Something I noticed after I restored my shutter surface was this slight ringing sound that I'm pretty sure was the wheel vibrating is now gone. There was also a rumbling sound which was probably the roller.
It also seems to me the contact between the roller and shutter wheel is more reliable now. I had a lot more trouble with slippage before.
The machine is actually much, much better these days, but then again I made another major fix (motor pulley) at the same time so It's not all because of the shutter belt!
Posted by Mathew James (Member # 4581) on October 04, 2015, 02:32 PM:
Thanx very much for replying Frank. My son and I are working on it right now!
One thing that is puzzling me is that I do not see any way that the flywheel would turn...that is, while in position 2, with no film, the roller(which has now been cleaned) does not spin, nor do i see the shaft moving..so I am puzzled at what drives the flywheel ultimately...
After cleaning, we are still not seeing the flywheel spin, but know we must be getting close to homing in on the problem and thank you very much in the meanwhile for your help! We will continuing on this and perhaps we will self discover the issue in the meantime....
Matt
UPDATE: My 12 year old son to the rescue!!! This where we fathers start to appreciate our great inheritance in offspring...especially as eyes fail and others are needed! Joel has determined that I have observed and cleaned the wrong rubber I was at the front of the machine where the roller at the endmost of the shaft is, but he has pointed out that there is indeed another roller, and looking at it it is indeed dirty!!!
I will report back with good news shortly i am certain!
*Steve, show this pic to your son so he knows he has a friend in super 8's!!!
[ October 04, 2015, 04:26 PM: Message edited by: Mathew James ]
Posted by Tom Photiou (Member # 130) on October 04, 2015, 02:50 PM:
The rapid start up mechanism on these rarely works for very long, it required 100% friction and any little bit of lube of any kind near it is enough to stop it working.
The lazy way out is to simply have a good long leader for your movies, 1/ to obviously protect the beginning of the film but it also gets that flywheel up to speed by the time film starts.
Quite often the first few seconds of a film has awful wobbly sound until the flywheel picks up speed.
I am going to upload the two pages from the service book, see what you make of this, it looks quite complex for such a simple idea. But it may help.
Posted by Janice Glesser (Member # 2758) on October 04, 2015, 04:17 PM:
Thanks for posting the illustrations Tom...very helpful!
Posted by Mathew James (Member # 4581) on October 04, 2015, 04:24 PM:
Extremely helpful! Thanx for posting these Tom.
SUCCESS!! My flywheel, after cleaning the roller, is now spinning without film.... Thanx so much team!!!
Matt
Visit www.film-tech.com for free equipment manual downloads. Copyright 2003-2019 Film-Tech Cinema Systems LLC

UBB.classicTM
6.3.1.2