This is topic Review Wolverine Reels2Digital MovieMaker 8mm film digitizer in forum 8mm Forum at 8mm Forum.
To visit this topic, use this URL:
https://8mmforum.film-tech.com/cgi-bin/ubb/ultimatebb.cgi?ubb=get_topic;f=1;t=011395
Posted by Robert Hudson (Member # 3996) on April 01, 2017, 09:58 PM:
For just over a monrth now I have been using the Wolverine Reels2Digital MovieMaker to convert Super 8mm and Regular 8mm film to video. Overall I love it: it is highly compressed but when I upload my movies to You Tube and watch them on a 40 inch HDTV they look great. I digitized some old movies I've had for years and by selling those films on ebay, I paid for the Wolverine in about a week or two (I link all the ebay listings to the You Tube videos: being able to see the whole movie really makes it so much easier for buyers). I've also digitized a bunch of my wife's family's movies. These were on the Super 8 Technicolor Super 8 Magni-Cartridges: it's a chore getting the film out of those!
The Wolverine digitizes at 30fps, which is the NTSC standard and - I understand - is hard-coded into the video chip they use. It's easy to slow the video down in your editing program: slow it to 53 percent for 16 fps film or 60% for 18 fps.
Another issue is Kodachrome: yellows are really bright: I roll back the color saturation a small amount to clean that up.
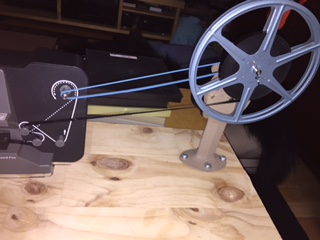
Yet another issue is that the machine can't use 7 inch reels: I made an adapter to play them:
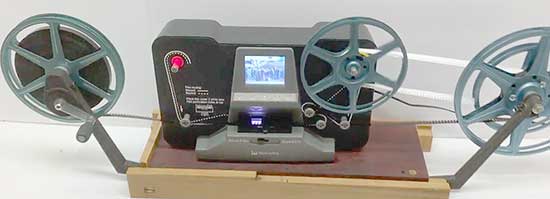
This has worked pretty well. I did a couple of videos on the adapter. Here's the You Tube playlist for those: Wolverine videos
Okay - ONE MORE VERY SERIOUS ISSUE (shouting is intended):
My Wolverine is melting! The drive belt is soft, sticky and melting onto the drive pulleys and other parts of the Wolverine. My latest video on the playlist gets into that. This is a serious problem unless you like having a tar-like substance gumming up expensive gear.
I'm going to try to remove the melting belt and see if I can find a replacement online and Wolverine needs to find a better quality belt.
It's a pain to deal with that but sadly Chinese-made products suffer from poor quality control and often inferior parts. I fly drone/quadcopters and it is amazing how often something ships without key components (twice I've gotten empty envelopes from Chinese vendors).
Back to the quality: I've worked professionally in digital media since the 80's and I am pleased with the kind of video produced by this $300 machine. Image quality is often more about perception than technical specs and the reaction to the Wolverine-digitized movies has been totally positive. Is this the machine you want to use to digitize 8mm movies for your Hollywood film production? No...but with some color grading in Final Cut Pro or other editing programs you could get some footage well-suited for most online viewing purposes, including documentaries. Content is king with these old movies: if the content is right, the quality only has to be "good enough."
I will mention that the Wolverine is subject to some of the same pitfalls as any other film handling device, including projectors. Splices can jam in the film gate and the film can break - but the low speed of the Wolverine (four hours to digitize a 7 inch reel) is much more gentle on the film when it breaks. I've found it easy to rewind film after a break and splice it back together without losing more than a couple of frames (one of my videos covers that). The Wolverine shuts off when there's a jam, which is really nice.
When I built my 7-inch reel adapter I was concerned about whether that would put too much strain on the Wolverine take-up reel (which is used as a drive pulley for the adapter). If there is any extra strain, that should not cause a belt to melt. It would be interesting to learn if anyone else with a Wolverine Reels2Digital has a melting belt even without using an adapter similar to mine. It's easy to remove the back of the machine in case you want to check on your unit.
I hope they fix this problem: my other wish is that they'd make one for 16mm film !
Posted by Robert Hudson (Member # 3996) on April 03, 2017, 12:45 AM:
I speculated that heat might cause some problems such as a melting belt. I ran some tests today: one of the belt pulleys is about 1/4 inch from the stepper motor and the temperature in that spot was almost 130 degrees after digtizing one 5 inch reel. Here's a video for that WOLVERINE TEMP VIDEO
Posted by Graham Ritchie (Member # 559) on April 03, 2017, 03:25 AM:
Robert
I would remove your old belt and match it to a Neopreme O ring from a local supplier of seals and O rings.
Regarding the heat, why dont you cut a hole in the back cover and install a small.. say a 12volt 80mm Silent case fan. they are very cheap to buy and place a small vent opposite the fan, to allow air to flow in through the vent and out of the unit with the fan. That should draw most of the heat away.
Posted by Andrew Woodcock (Member # 3260) on April 03, 2017, 04:20 AM:
As has already been pointed out previously, never forget though, that "O" Rings are not designed to have much elasticity or stretch like a drive belt by design has.
They are by design, made only to fit a machined recess to form a seal and therefore are made to a precise diameter and not one which is intended to be increased by stretch.
Try if you can, to find a belt designed to be a drive belt in order to keep the load and wear to your motor and pulley bearings to a minimum on our aging machines.
Posted by Peter Scott (Member # 4541) on April 03, 2017, 05:34 AM:
I have a wolverine moviemaker but keep getting problems with the sensor getting dirt on to it and then run constantly when I switch on.
Do you have the same problems ?
Posted by Paul Adsett (Member # 25) on April 03, 2017, 07:42 AM:
Robert, can you post some links to the videos showing the results that you get with the Wolverine?
Posted by Robert Hudson (Member # 3996) on April 03, 2017, 09:47 AM:
Here's my YouTube channel: all of the 8 and Super 8 videos uploaded since February were digtized on the Wolverine: Bob Hudson You Tube channel
Here's one with some (rare) nice camera work:
Parade Movie
Regarding: ".. have a wolverine moviemaker but keep getting problems with the sensor getting dirt on to it and then run constantly when I switch on.
Do you have the same problems ? "
I blast the heck out it with canned air each time I use it.
Posted by Peter Scott (Member # 4541) on April 03, 2017, 11:21 AM:
Thanks Robert, I have found out that is the trick now.
Posted by Robert Hudson (Member # 3996) on April 03, 2017, 12:38 PM:
I have created a playlist of the 8 and super 8 movie's I've uploaded to You Tube: Wolverine digitized movies playlist
The only correction to the movies was to reduce saturation very slightly because of the very bright yellows in Kodachrome films. The music was added from You Tube's audio editor. Several more scanned movies are not on the playlist: they are my wife's family movies circa 1967-72 and I did some color and exposure corrections on those since I wasn't going to sell them.
Actually there is one for sale that I played with and did some scene-by-scene corrections on - nothing fancy, just quick and dirty adjustments: Parade movie
Posted by Berend De Meyer (Member # 5856) on April 03, 2017, 02:17 PM:
Hi Robert,
This thread is exactly what I was looking for. I just joined the 8mm-to-bytes party - rather late I know - last week. I'm planning to capture about 120 hrs of double-8 family films to 720/1080p mp4's.
So thanks for sharing and I'll surely keep track of this thread with great interest. Do you by change know where to find some raw capture material from the Wolverine, so I can testdrive it in my software render farm to check its output?
Thanks in advance and keep up the good work!
Cheers
Posted by Gary Sayers (Member # 5545) on April 03, 2017, 02:54 PM:
Hi Robert,
Many thanks for the link to your films that were transferred using the wolverine unit - they look very good to me.
I've been thinking about getting one of these for a while now but have been put off by the mixed opinions that I've read about this machine. Seeing your footage has swayed my opinion in favour of the unit.
Also, I wish it was available in the UK rather than having to import from the U.S.A (or from Germany, where a branded one is available). Not because of the extra costs (although it is a factor) but in case of the need to return it for repairs.
Can I just ask what alerted you to the melting drive belt? Was it it's performance, a noise, a smell or was it discovered simply while doing an inspection of the interior?
Thanks,
Gary
Posted by Robert Hudson (Member # 3996) on April 03, 2017, 03:55 PM:
"Can I just ask what alerted you to the melting drive belt? Was it it's performance, a noise, a smell or was it discovered simply while doing an inspection of the interior?"
I have digitized perhaps 60 reels of fil, most of them 5-7 inch reels. Some have been scanned twice because I accidently deleted a folder on my MacBook. Some were captured in two or more segments and there were some short recordings that were not used. I have started over 200 capture sessions and put a big load on this: in the last month I have had this thing running almost every waking hour when I was home.
It started to slow down so that the takeup reel was not turning and/or there was a noise from the takeup reel spindle on the MovieMaker.
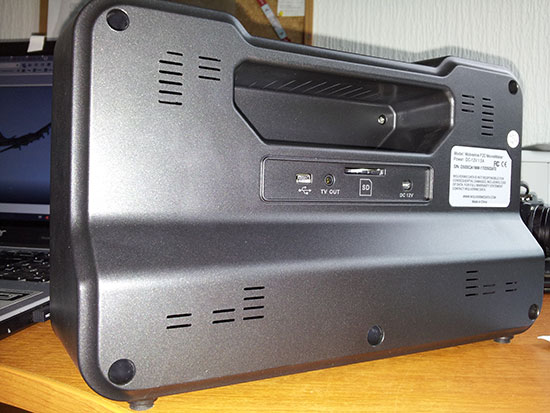
I decided to open it up and see what's up with that. I could feel a very warm spot on the back of the Wolverine (the indentation above the SD card and power ports).
I was shocked when I did the tests and found the temperature was almost 130 - and that was after running just one 5 inch reel: I can only imagine what might happen encoding a 7-inch reel (or a couple of them back-to-back). One online expert said that every 35 degrees above 85 F can cut belt life in half. I can envision this machine easily running 70 degrees above 85 when scanning a 7-inch reel or two for 4-8 hours.
I am going install a cooling fan and drill some vent hole in the back cover. Before that, though, I will encode another 7-inch reel and record the temps from that.
I've pushed this thing like it was made for commercial service, which it clearly wasn't. The stepper motor seems heavy-duty (which may be why it generates so much heat) but someone made a major design mistake by putting it so close to the belt and the control board (which gets heated to perhaps 100 and beyond).
I'd suggest not pushing like I did. The machine has paid for itself and I've pretty much cleaned out the large inventory of old 8 and super 8 movies I've accumulated from estate sales. And, we only have a dozen 3-inch reels of my wife's family movies left to scan, so unless I get some fantastic finds, I shouldn't have to repeat the heavy workload of the past month.
I will try to post some raw footage from the scanner: the files are surprisingly small, but also surprisingly good.
I used to consult on DVD production and video compression and I remember seeing 15 years ago some early low-cost hardware encoders that looked like they could change things around: they've come a long way and I give the encoder in this good marks. Don't worry about bitrates, etc. - just enjoy the pretty pictures!
Oh, by the way: all of my Wolverine movies were edited and uploaded to You Tube as 720p videos.
Posted by Gary Sayers (Member # 5545) on April 03, 2017, 04:15 PM:
Thanks for the very detailed reply Robert.
I probably have less than a tenth of the amount of film to digitise than you have put through the unit, so I may well give it a go.
A youtube video of the fan installation, when it is done, would be useful for many prospective buyers too (I think wolverine may be interested in your conclusions - it may be worthwile sending them an email).
Thanks,
Gary
Posted by Paul Adsett (Member # 25) on April 03, 2017, 05:43 PM:
Robert, no self respecting rubber drive belt would fail at 130F, that belt must be fabricated from some very crappy material. A Butyl rubber, neoprene, ethylene-propylene or silicone rubber belt would not be damaged by temps well above 250f. I suggest you measure it up and try and find something close at an Ace hardware store.
Posted by Graham Ritchie (Member # 559) on April 03, 2017, 06:16 PM:
As Paul has mentioned Elhylene Propylene rubber EPM will do
As mentioned before those O rings "EPM" of that material is readly available in a wide range of sizes, that's why you need to take in your old one as an example when you visit a supplier. Because those O rings are so cheap to buy, a extra one, say a size bigger and possible one smaller as well as the one matched up at the counter.
Those EPM O rings are black in colour and have a range from -70 to 250 F.
When fitting them, just make sure to get just the right amount of tension...not to tight.. not to slack...like adjusting your car fan belt ![[Smile]](smile.gif)
An O ring is a torus, or doughnut-shaped ring, generally molded from an elestomer. O rings are used primarly for sealing. They are also used as light-duty mechanical drive belts.
Robert talk to the person at the counter and tell them its purpose and if they are like the people I have dealt with over the years they will be very helpfull in your quest.
Posted by Will Trenfield (Member # 5321) on April 03, 2017, 06:18 PM:
Hi, Robert. I don't know why, but, when I click on the link to "Parade movie" in your 4th post, a list of my own digitised cine clips uploaded to YouTube appears. They're definitely not for sale!
Posted by Robert Hudson (Member # 3996) on April 03, 2017, 06:51 PM:
"Hi, Robert. I don't know why, but, when I click on the link to "Parade movie" in your 4th post, a list of my own digitised cine clips uploaded to YouTube appears. They're definitely not for sale! "
Hmmm - I checked and it seemed okay. https://youtu.be/i5G33jfJIAg
Posted by Paul Adsett (Member # 25) on April 03, 2017, 07:50 PM:
Following up on what Graham has said, yes O-rings are used primarily for sealing purposes, but they can definitely be used as pulley drive belts. About 25 years ago I had to replace the OEM drive belts on my Bolex 18-5 projector, which had disintegrated. I found a Butyl B6-12 rubber o-ring and replaced them into the 3 pulleys on the Bolex drive shafts. The Projector has worked perfectly ever since and the O-rings still look like new. So.I am absolutely sure that with a little trial and error Robert will be able to find the perfect o-ring to do the job. Main thing, as Graham states, is not to overload the toy-like shafts of the Wolverine drive system.
Incidentally, web reviews of the Wolverine range from great to " a piece of junk", so what is the true assessment of this very interesting product? Is it purchase at your own risk?
Posted by Will Trenfield (Member # 5321) on April 03, 2017, 07:53 PM:
Thanks. Now, that link works ok for some reason. Good quality.
Posted by Robert Hudson (Member # 3996) on April 03, 2017, 09:01 PM:
"Incidentally, web reviews of the Wolverine range from great to " a piece of junk", so what is the true assessment of this very interesting product? Is it purchase at your own risk?"
No risk: out of the box it will produce nice video copies of 8mm and Super 8mm movies. Anyone who has ever been frustrated trying to shoot movies on the screen or one of those right angle mirror things will quickly appreciate what this machine does, for really not much money. The next cheapest solution I've found is $1,800 and only does Super 8.
The lack of heatsinks aside, the bulld quality is pretty good. Compromises were made to keep the price down (the film path "rollers" don't actually roll), but I like the results and I could afford it.
Posted by Paul Adsett (Member # 25) on April 03, 2017, 09:29 PM:
Thanks for your valued opinion Robert. I am seriously considering springing for one of these, and modifying it for larger reels as you have done.
[ April 03, 2017, 11:56 PM: Message edited by: Paul Adsett ]
Posted by Robert Hudson (Member # 3996) on April 03, 2017, 11:50 PM:
I have uploaded some raw Wolverine files to my server in case anyone wants to see what that looks like. These were uploaded direct from the SD card so nothing has been changed: http://bhmilitaria.com/samples/index.html
Posted by Paul Adsett (Member # 25) on April 03, 2017, 11:56 PM:
Robert,
Looking at your 'melting belt' video I am wondering if the belt continually slips on the pulley when the film is stationary in the gate. This could possibly create heat and wear on the belt. Perhaps what you are seeing is the result of wear rather than melting. Just a thought.
Posted by Robert Hudson (Member # 3996) on April 04, 2017, 12:19 AM:
"Looking at your 'melting belt' video I am wondering if the belt continually slips on the pulley when the film is stationary in the gate. This could possibly create heat and wear on the belt. Perhaps what you are seeing is the result of wear rather than melting. Just a thought."
There could be some wear that way, but it would have to be some high speed friction to compete with that intense 130 degree+ heat from the motor. I have had slipping belts in old phonographs and reel-to-reel recorders and I seem to recall a belt slipping enough to generate lots of heat also generated the smell of burning rubber. There are no smells here. The take up reel spindle on the Wolverine is designed to slip if too much of a load is put on it and that should slip before the belt does. As it is, the belt is permanently sticky and between that and the melted belt goo stuck to the pulleys, I think the belt has too much traction to slip.
If anyone wants to open up their Wolverine to check the belt it's really easy. There is a screw in each of the deep holes on the back. Take those out and the back cover lifts off: no wires to disconnect. There are no stickers that would be broken if you remove it, so it wouldn't affect your warranty.
I ran another test tonight: I used my 7-inch reel adapter and scanned a 7 inch reel that wasn't quite full. The temps were about the same as when I scanned a 5 inch reel using just the Wolverine and not the adapter: 90 degrees ambient temp inside the case during scanning, over 130 degrees between the motor and the pulley after the scan ended. It was over 115 degrees in the 3mm or so space between the motor and the SD card slot mounted on the circuit board: that's warmer than the previous test, but the circuit board had a long time to cool off before being measured for the first test.
I had expected temps to get much higher with a longer tape to scan, but thankfully that did not happen. I'm going to put in a fan, hopefully find a new belt and continue to use the machine with the large reel adapter.
Posted by Berend De Meyer (Member # 5856) on April 04, 2017, 03:19 AM:
Hi Robert,
Thank you very much for providing the raw samples from the Wolverine for the 8mm and Super 8mm! As soon as I've processed both, I'll post back in this thread.
EDIT: my first render test in Power Director 15:
1. import 4:3 raw into 16:9 timeline -> zoom (crop) to full frame
2. noise reduction
3. color-grading incl. new white-point
4. speed adjustment to 0.600
Here is my first result. Wel, I'm afraid the conversion from 4:3 to 16:9 full frame was not the best of ideas.
https://m4v3r1ck.stackstorage.com/s/QWW0ju1LVs0mGwD
Comments and suggestions for improvements greatly appreciated!
Cheers
[ April 05, 2017, 09:52 AM: Message edited by: Berend De Meyer ]
Posted by Berend De Meyer (Member # 5856) on April 05, 2017, 02:17 PM:
Hi Robert,
I found the European version of the Wolverine, the Somikron HD-XL 8mm film scanner. Note that the resolution got a slight bump. Can the USB 2.0 port be used to transfer the raw to a PC while scanning, or is it only used to copy raw from the SD - after the scan - card to a PC?
* translated the German info at https://www.pearl.de/a-NX4294-1301.shtml?query=somikron to English with Google *
HD-XL film scanner for easy digitization of Super 8 and 8 mm films (switchable)
High-resolution 1/3 "CMOS sensor with 3.53 megapixels
Scan resolution: 1440 x 1080 pixels at 30 frames / sec.
Stand-alone recording: saves directly to SD (HC) card up to 32 GB, no PC necessary
Recording format: MP4 video, no recording of the audio track
Automatic exposure, manual correction (-2.0 to +2.0 EV), automatic white balance
Light source: LED lighting
Built-in TFT LCD display: 6 cm / 2.4 "
USB 2.0 port for data transfer to the computer
TV output: PAL / NTSC
For Super 8 and Normal 8 film coils (adapter 8/13 mm included) up to 17.8 cm / 7 "
Automatic stop at the end of the movie
Fast rewinding (requires about 2 minutes for 10 minutes of film)
Integrated carrying handle
Connections: TV-Out (3.5 mm jack), mini USB, slot for SD (HC) cards up to 32 GB, power supply
Supports Windows XP / Vista / 7/8 / 8.1 / 10, OS X from 10.7.3
Power supply: 12 V via 230 V power supply (cable length: 1.2 m)
Measurements: 32 x 18,5 x 11 cm, weight: 1,5 kg
Filmcanner including Film-Leerspule, Film-coil-adapters, spacer-rings for the film guide, power supply, video cable (3.5 mm jack to RCA, 150 cm), USB cable (mini USB to USB, 100 cm) And German instructions
Cheers
Posted by Winbert Hutahaean (Member # 58) on April 05, 2017, 04:59 PM:
It is very hard to justify the result of this transfer, if the source material is a home movie, due to shaky, coloring, lab process and shooting technique did not have the standard. Can you guys do the transfer from a packed film or trailer, if you have such material please.
Posted by Tom Spielman (Member # 5352) on April 05, 2017, 07:46 PM:
Sounds like they're selling fairly well. There are some pretty positive reviews at B&H photo, an online photography supply shop.
When my brother and I looked at the cost of digitizing our family films using a quality service, it would would cost about $1,000 and I don't think it was even HD. This is 720p for $300 and considering the quality of our family's movies, that's probably good enough. If image quality was very important to my Dad, he would have cleaned the gate and lenses a little more often. ![[Wink]](wink.gif) He just wanted to capture the moments and allow them to be replayed. Right now all I have are bad VHS copies of a 1/3 of the movies with the originals sitting in Hawaii.
He just wanted to capture the moments and allow them to be replayed. Right now all I have are bad VHS copies of a 1/3 of the movies with the originals sitting in Hawaii.
If you're still shooting Super 8 today, you're already investing a fair amount of money into it and probably want to get the best results you reasonably can get. In that case, the wolverine may not deliver.
Maybe if enough people get these, it will drive down the costs of more professional scanning services.
Posted by Bill Brandenstein (Member # 892) on April 05, 2017, 11:08 PM:
Having looked over the clips here and other stuff previously, forgive me, but I'm going to rain on this parade. I think the Wolverine is an amazing product for the price. But it's not an amazing product when compared with professional quality imaging, and I understand it doesn't claim to be. And here's the consumer-level problem: anyone with a DSLR and a variable-speed projector can get a more true and detailed transfer for free. BUT if you don't have them, you can't buy a DSLR and projector for a mere $300!
This strikes me as a case of you-get-what-you-pay-for. If you want amazingly faithful, film-like images from your movies, this is NOT the ticket. If you're merely happy to just be able to see what's on those reels, well then, shoot away! But these transfers should never be considered a replacement for the real reels.
Posted by Trevor Adams (Member # 42) on April 05, 2017, 11:40 PM:
Here is a bit of raw super 8mm done on my Wolverine.....
https://www.youtube.com/watch?v=PvCveP_G_v8
Straight from the Wolverine to my computer..now!
https://youtu.be/d9fTsuAXSpc
[ April 06, 2017, 01:55 AM: Message edited by: Trevor Adams ]
Posted by Tom Spielman (Member # 5352) on April 06, 2017, 12:25 AM:
Well I have a DSLR and a good projector but telecine is still kind of a black art. It took a lot of experimenting and researching various settings on the camera to get good results. And I was not smart enough to write down what I ended up with so next time I'll have to go through at least some of it again.
Then there's the process of getting everything lined up and in focus.
Based on the clips I've seen I'm not sure the results from the Wolverine are any worse than what I was able to do. It's hard to know without seeing the originals.
Posted by Winbert Hutahaean (Member # 58) on April 06, 2017, 02:27 AM:
Trevor, thanks for posting the telecine from Marketing trailers.
One question, I believe the trailer is on 24 fps, why sometimes the transfer looks faster than normal?
cheers,
Posted by Graham Ritchie (Member # 559) on April 06, 2017, 03:51 AM:
Very interesting topic, have a look at this on Vimeo and see what you think...he also shows the results on Vimeo which look very good indeed.
https://vimeo.com/millerandmiller/telecine
https://vimeo.com/20900718
Posted by Berend De Meyer (Member # 5856) on April 06, 2017, 04:17 AM:
Hi Trevor,
Thanks for your reply! Is there a way - link - to download your raw for testing purpose?
Hi Graham,
Thanks for your reply!
quote:
Very interesting topic, have a look at this on Vimeo and see what you think...he also shows the results on Vimeo which look very good indeed.
https://vimeo.com/millerandmiller/telecine
]https://vimeo.com/20900718
Our family owns the EUMIG MARK 610D, but I'm very reluctant to do so much hardware adjustments. I just ordered the Somikron HD-XL 8mm Film Scanner 1080 from PEARL.DE, it's the 1080 version of the Wolverine. When the Q is still very disappointing I may consider this DIY modifications in the near future.
Cheers
Posted by Winbert Hutahaean (Member # 58) on April 06, 2017, 05:06 AM:
quote:
Thanks for your reply! Is there a way - link - to download your raw for testing purpose?
Berend, Trevor uploaded with HD qualit,. If you set your youtube on HD quality you will get 720P, that is something Wolverine max can do right?
Posted by Berend De Meyer (Member # 5856) on April 06, 2017, 06:05 AM:
Hi Winbert,
Thanks for your reply.
quote:
Berend, Trevor uploaded with HD qualit,. If you set your youtube on HD quality you will get 720P, that is something Wolverine max can do right?
Yes, the Wolverine brand of this machine (US-market) has a max output of 720p and I did play his Youtube video at that resolution. What I meant by downloading his RAW footage from the Wolverine, is to be able to test drive his raw in my Cyberlink Power Director v15 software.
quote:
One question, I believe the trailer is on 24 fps, why sometimes the transfer looks faster than normal?
IIRC When - like say - the original footage was filmed @18fps, the Wolverine captures @30fps so you have to slow the capture in an video editing application down by 0.6 to get the 1:1 speed of the original.
My second trial-and-error, now again back at 4:3 aspect and tuned the speed to the original @18fps.
Wolverine test footage 4:3 / speed @18fps
Cheers
Posted by Trevor Adams (Member # 42) on April 06, 2017, 06:51 AM:
Thanks Winbert and Berend,loaded at 30fps is a bit quick.Needs to go to iMovie for edit/speed treatment. Those Marketing promos used to be sharp as tacks and beautifully coloured.MUCH better than the 1200ft digests I got them with.All gone now.I'm really only playing around with bits of old home movie.I have to learn to use the Wolfy properly and in conjunction with a site like iMovie
.....regards Trev
Posted by Gary Sayers (Member # 5545) on April 06, 2017, 08:28 AM:
Took the plunge and ordered a wolverine from Amazon.com, which worked out at £331 including postage and import duties to the UK.
They estimate the import duties and refund any overpayment but don't charge extra if they have underestimated.
I figured that at least I would have the backup of Amazon's excellent returns service if anything goes wrong with it (in the first month at least).
Not in stock at the moment but should be shipped by the middle of May.
EDIT: April 23rd - Took advantage of improved exchange rates. Cancelled my order - then re-ordered, with the total cost now coming in at £293.79!
[ April 23, 2017, 06:09 AM: Message edited by: Gary Sayers ]
Posted by Trevor Adams (Member # 42) on April 06, 2017, 06:50 PM:
Sent the Marketing Promo to your email Berend,regards,Trevor
Posted by Paul Adsett (Member # 25) on April 06, 2017, 08:40 PM:
Trev's digitized family movies look great, far better than I have yet been able to get with videoing off the screen. I am getting very tempted to purchase a Wolverine.
Posted by Trevor Adams (Member # 42) on April 07, 2017, 12:12 AM:
Paul,those kids(Daniel in swing,Lucy pushing)are now 49 and 52!
PS can I get rid of my photo? ![[Roll Eyes]](rolleyes.gif)
Posted by Winbert Hutahaean (Member # 58) on April 07, 2017, 01:42 AM:
Trevor, I don't really get when you are saying:
quote:
loaded at 30fps is a bit quick.Needs to go to iMovie for edit/speed treatment.
Is Wolverine scanning frame by frame or real transfer (real time screening)?
If this is scanning frame by frame, why it is 30 fps? Cannot we order the computer to play at 24 fps instead?
cheers,
Posted by Robert Hudson (Member # 3996) on April 07, 2017, 02:11 AM:
"If this is scanning frame by frame, why it is 30 fps? Cannot we order the computer to play at 24 fps instead?"
Wolverine uses a hardware encoder that has an NTSC frame rate, 30 fps. But even fror PAL countries you do not want to change to 24fps: the movies will still look fast, so you slow them to 60% of fulll speed for 18fps films or 53% for 16fps movies. All of the movies I show at https://www.youtube.com/watch?v=_07k-Fk3TBA&list=PL4GkBnpUqP1ruSiEDMv7wAwvPP548HNP_ were digitized by the Wolverine and then slowed to 53% in Final Cut Pro (some of my earliest Wolverine projects were only slowed to 60% when they should have been slowed to 53%)..
Posted by Barbara Strohl (Member # 5227) on April 09, 2017, 11:06 AM:
Has anyone been able to confirm that the European version, the Somikron HD-XL, does have higher resolution?
Posted by Robert Hudson (Member # 3996) on April 11, 2017, 02:38 PM:
"Has anyone been able to confirm that the European version, the Somikron HD-XL, does have higher resolution?"
The Wolverine/Somikon machines all have a 3.53 megapixel CMOS camera chip with 2304x1536 resolution and the videos are recorded at 720p. The German retailer site seems to indicate that they are scanned at 1080 resolution, which well could be, but they are encoded to video at 720p 30fps
[ April 15, 2017, 10:19 AM: Message edited by: Robert Hudson ]
Posted by Robert Hudson (Member # 3996) on April 22, 2017, 12:34 AM:
I have installed a cooling fan and some vents in my Wolverine - here's a short video:
COOLING FAN VIDEO
Posted by Alan Taplow (Member # 4702) on May 14, 2017, 08:44 PM:
To Robert Hudson: What kind of temperatures are you getting after installing the fan?
Posted by Alan Taplow (Member # 4702) on May 15, 2017, 03:30 PM:
I just received a new Wolverine, and probably thanks to Bob Hudson, I see that it now has vent slots on both the top and bottom of the rear cover. Have a fan on order anyway, can't hurt, and now it has slots to have the air come out of without my needing to drill vent holes.
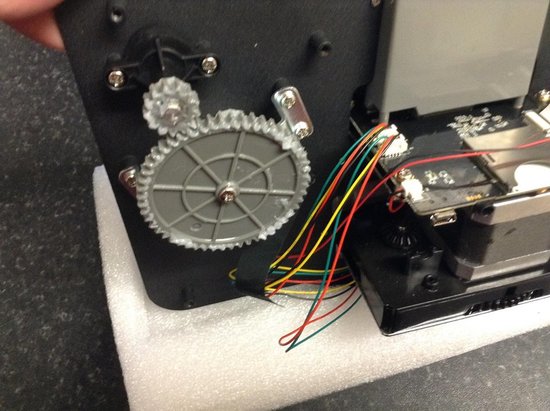
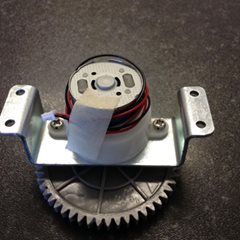
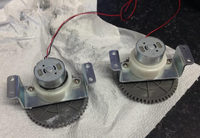
Posted by Alan Taplow (Member # 4702) on May 17, 2017, 01:57 PM:
I just opened up the back of my new Wolverine in order to measure the belt & order spares as well as mount a 40mm cooling fan. Wolverine engineering has been paying attention --- the new model has no belt -- a small gear motor has replaced the belt drive. There is a little cooling fan mounted on the circuit board and vent holes on the rear cover. With nothing more to do, I closed it back up.
Happy to send pictures on request: ataplow@gmail.com
Alan Taplow
http://preserve-your-memories.info
======================================
Posted by Robert Hudson (Member # 3996) on May 17, 2017, 04:46 PM:
Alan: do you have a photo of the cooling fan? (By the way, these are very easy to open: remove the screws from the deep holes and that's it).
Here's the new vent holes in a photo someone brought to my attention today:
Posted by Alan Taplow (Member # 4702) on May 17, 2017, 05:48 PM:
Some pix of inside of newer model:
Apparently my pix don't match forum standards, so you can download them at:
http://omlets.tripod.com/omnilucent/Wolv-fan.jpg
http://omlets.tripod.com/omnilucent/wolv-motor.jpg
http://omlets.tripod.com/omnilucent/wolv-assy.jpg
Alan Taplow
http://preserve-your-memories.info
======================================
Posted by Berend De Meyer (Member # 5856) on May 21, 2017, 04:09 AM:
Hi Alan,
Your links above don't seem to work...
Cheers
Posted by Doug Stratton (Member # 5923) on May 25, 2017, 09:12 PM:
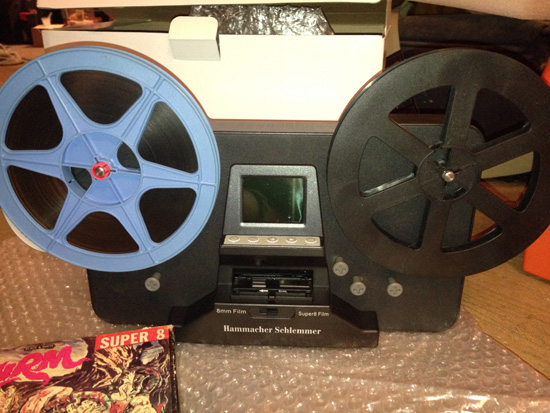
It was seeing this thread with some info on whats going on behind the shell of the Wolverine that prompted me to join the forums. I did not see it mentioned, but in the US the rather well known (mainly) catalog company Hammacher Schlemmer a few months ago offered their exclusive version of the machine (for all intent purposes it seems Wolverine made this for HS and this will explain why the HS has 2 features the normal version does not.
Pretty much 100% the same in all specs except that the HS version allows for 400 foot 7" reels and captures at 1440x 1080
They also charge an arm and a leg for this ($500.00), but I bought it. Like many I was very unsatisfied with the horrendous mp4 artifact noise this created to try and keep a smaller file size (3" reels come out to about 236 megs)
what also got me interested was the post from Alan Taplow. If indeed its actually true with the whole new inners design, I am more concerned if they finally lowered the compression giving a larger file size and better quality. That is what I need to know.
My unit heats up like Roberts and I too was thinking to mod it for a fan. The only thing stopping me was if they ever upgraded the firmware or something else to improve the overall quality. HS gives a life time guarantee so no matter how long goes by, if I am not happy I can return it which means I obviously can't modify the machine
You guys are also aware that you can just rebuild the mp4 container the video stream is in and change the frame rate OF THE container and therefore you do not have to re-encode the clip or loss any quality.
MP4 like MKV is a container file for many different formats. When you remux your video stream back into a new mp4 container- computer programs obey the info of the container and not the actual file inside. So our files are 30 frames per second but you made the mp4 file saying the framerate is 24 frames per second. All media players will obey this. Now instead of always changing the speed in a player (or if you bring it somewhere else) it will play the speed it should be with no re-encode and no quality loss---
here is how to rebuild the mp4 container and fix it to the proper framerate with no re-encoding and no quality loss
Below is the tool used (my mp4 box gui) which is free and you can get this at videohelp.com (also where I posted info about the HS scanner).
So if you want to fix your clips speed with no encoding and in 20 seconds or less- follow these steps below:
on here download and install my mp4box gui
https://www.videohelp.com/software/My-MP4Box-GUI
once installed open the program and you will see a box with 4 tabs you can choose (mux, demux, join and split)
1. click the demux tab and on the right side click "open" and now browse to any mp4 file made from the wolverine. It will then show the video track of that file and tell you its dimensions. Click the small box next to the video file it shows
2. Now hit "demux" (on the right). It will save a file in the same directory as your original mp4 video clip with a name something like "0021_track1.h264" That is actually the raw video stream from the mp4 file made by wolverine
3. with mp4box still open click the "mux" tab and on the right select "add" and browse to the demuxed track it just made (ex: 0021_track1.h264)
4. NOW on the bottom of the program box you will see an option on the left "FPS:"no change". Click that drop down box and select the proper framerate your film should be. Now hit "mux" and in like 4 seconds it will create a new mp4 file for you with a name like
0021_track1.h264-muxed.mp4
enjoy your proper speed clip-
This is the Hammacher machine with a 400 ft reel on it (Squirm, super 8 sound). Very similar to the Wolverine and upon first glance they look the same, but cosmetically a little different to allow the larger film reel. Sorry if the image is large
Posted by Alan Taplow (Member # 4702) on May 25, 2017, 10:21 PM:
To reduce the heat problem on the older model Wolverine machines without cutting up the case and installing a fan, it should be possible to run it with the back removed to let the hot air out. Also, if that isn't enough, direct the airstream from a small household fan into the rear to keep the air circulating.
Posted by Barbara Strohl (Member # 5227) on May 26, 2017, 10:06 AM:
Alan,
Better than a household fan are these fans that overclockers use. They are computer fans with rubber shrouds that you attach or push up against openings in computer, or other electronics, case. I've used mine on various things. You just need any opening.
For more serious cooling I use a USB or battery fan with a frozen water bottle or ice pack behind it. Don't use open ice because the melted water is too much of a risk.
Posted by Alan Taplow (Member # 4702) on May 28, 2017, 11:12 AM:
The download for mp4Box-gui results in a file: https://www.videohelp.com/download-XqkqHdPR/My%20MP4Box%20GUI%20v0.6.0.6.7z
I can't seem to find any way to open this .7z file --- any other download which will result in a .zip or an application file which will open on most windows computers?
Alan
ataplow@gmail.com
Posted by Janice Glesser (Member # 2758) on May 28, 2017, 04:21 PM:
Alan any of these apps will extract a .7z archive.
7zip (FREE)
https://sourceforge.net/projects/sevenzip/files/
WinRAR
http://www.win-rar.com/download.html?&L=0
WinZip
http://www.winzip.com/win/en/
Posted by Gary Schreffler (Member # 5945) on June 12, 2017, 12:24 PM:
So far, I am pretty happy with this unit. I currently have a Moviestuff CineMate 20, which works great, but takes a lot of footprint. And my Moviestuff Workprinter XP has the same foorprint issue. So when I saw this Wolverine, I figured what the heck. I mostly like it because it has a smaller foorprint, even when I am doing 7" films and using my rewinds. I have to say that I am pretty much impressed with the output quality of this device. Probably as good as the Cinemate (after I edit the video in my Adobe, the differences are really impossible to distinguish).
One very pleasant surprise: it handled a film with sever VS (curly and does not lay flat). I had all but written this film off, despite its significance (footage of the F7F Tigercat aboard USS Kearsarge (CV-33) in 1948), as no projector I tried could even run this film. The Wolverine captured it almost perfectly, and the entire field is in focus, so the film is held very flat at the gate. I was not expecting that...
I haven't noticed a heating issue, yet. In the event I do, what size O-Ring has been found to be most effective? 
Posted by Ty Reynolds (Member # 5117) on June 14, 2017, 02:52 PM:
Gary - The pulley belt path on the take-up side looks different than what I have seen on other modifications. Could you post a close-up photo?
Posted by Gary Schreffler (Member # 5945) on June 14, 2017, 03:05 PM:
I will get a photo later, but it is very low tech. After playing with tandem reels and looped leader and whatnot, I discovered two things: ONE: I have a set of rewinds that only engage the gears and spindle when the crank is pushed in. TWO: a 7" rubber band (the type you buy at the supermarket that hold large trash bags to the trash can) makes a great drive belt. Since the rewind gears are not engaged, allowing the spindle to turn without any resistance (or wasting energy by turning the hand crank), the wear and tear on the rubber band seems minimal. I have done 13 full 7" reels now with the same rubber band, and it is not showing any signs of giving up.
I hope my attempt to describe this makes sense... 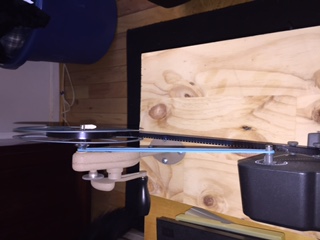
[ June 15, 2017, 06:13 PM: Message edited by: Gary Schreffler ]
Posted by Doug Stratton (Member # 5923) on July 04, 2017, 06:12 PM:
Hey Alan,
Sorry for an almost 2 month reply. Normal life got very busy and I took a long break from the computer world
I was even thinking of doing a resin cast of the back cover to then fully modify. In my case because Hammacher offers a "for life" guarantee, the units cover has one more screw covered by a sticker under/around the memory card slot, and I would have to carefully peel this which I have not attempted yet. At the same time with the heat you can feel especiially around the memory card slot I could always say it heated it up enough to peel
Amazon had 2 external usb powered PC (5volt) type fans with a knob for speed adjust that would work well with this unit. One fan on the left side of the case to suck air in and the other fan with the opposite direction on the right to suck that air flow out. Course keeping the cover off with a full fan is ideal as well. I used to do that many, many years ago with an old PC video capture card I had.
I also have not used my machine since my post about it back in May. Really want to get some fan control working before I do or finding out that in addition to the case and internal design your newer version has if they actually lessened the compression of the final MP4, which would mean it now has better video quality (sent a PM with more info)
Also going to get it real sprocket rollers and swap them with the plastic ones these machines all come with
Posted by Berend De Meyer (Member # 5856) on July 06, 2017, 05:34 AM:
Hi all,
For those interested in more information on The Wolverine and its use, post-production etc. I would like to share the channel of YouTuber Ron:
https://www.youtube.com/channel/UCSIu1cyLMCNfuDJ9GGuUOVA
Cheers
Posted by Doug Stratton (Member # 5923) on July 10, 2017, 10:08 AM:
Was pleaseantrly surprised this morning. I finally took another shot at opening up my HS unit. The HS has 7 screws and what I thought was another screw behind the serial number sticker was just plastic. This time I sort of pulled it open by holding one of the plastic front sprockets.
However the biggest surprise was that it actually has a fan attached to the back cover!!! You would not think anything is there if you feel the heat on the back of this unit in use. Why they did not put in vent holes is completely beyond me. I also need to turn on the machine and make sure that fan works.
PS: I also spoke with Alan about his newer edtion of the wolverine and the firmware number is the same as the old meaning they may have revamped the internals but they did not touch or do anything with the compression

Posted by Berend De Meyer (Member # 5856) on July 10, 2017, 10:18 AM:
Hi Doug,
quote:
However the biggest surprise was that it actually has a fan attached to the back cover!!! You would not think anything is there if you feel the heat on the back of this unit in use. Why they did not put in vent holes is completely beyond me. I also need to turn on the machine and make sure that fan works.
The EU Market rebrand Somikon has a new backplate with vente holes!

Cheers
Posted by Doug Stratton (Member # 5923) on July 10, 2017, 10:24 AM:
Hey Berend,
the newest version of the Wolverine (posted by Alan) also has vent holes, but at the time this HS unit was made, none of the other units even had a fan. Will just drill or dremel in some vent holes and thats it. Also going to take a look and see if another extension is free on the circuit board to hook in an additional fan
Posted by Osi Osgood (Member # 424) on July 10, 2017, 12:03 PM:
I'm amazed to hear that something so new, (belts) would be melting so quivkly. However, not all the parts are necessarily as "new" as other parts on a "new" machine. I hope that you can replace those belt and have a perfectly workable machine, (if you have already addressed this, I apologize, as i didn't get to read all of the posts on this subject.)
Posted by Gary Schreffler (Member # 5945) on July 18, 2017, 11:41 AM:
I have been doing a lot of talking back and forth with the Wolverine technical people (a really good bunch of folks). I originally bought the belt-driven, non-vented back. I use it modified for 7" reels. I then sent it to them for evaluation, and they upgraded to the gear driven, vented back.
Interestingly, the gear-driven model performed miserably with the 7" setup. Constant slipping, chattering, machine turning off, etc., that made the conversion unviewable.
Wolverine then asked me to send the unit back to them for evaluation, and they subsequently advised that the gear driven units do not appear handle extra tension very well (the type of additional tension experienced with a 7" reel setup), so they have modified the unit again. Now back to belt-driven, but modified/improved over the first belt-driven iteration.
So I will now do robust testing with the latest model/improvement, and post the results here.
Posted by Paul Adsett (Member # 25) on July 18, 2017, 12:01 PM:
Obviously a product still in development and not thoroughly tested before marketing it.
Posted by Gary Schreffler (Member # 5945) on July 18, 2017, 12:07 PM:
I think it was well tested as designed. But for folks like me who modified it to handle 7" reels, we went beyond the design capability/specifications. To their credit, rather than just blow us off and say we are not using as designed, they have done a good job in listening and making it work in an environment to which it was not intended. So I guess I view that as darned good customer service, as many companies today would never have responded to my issues when I first brought them up. Or would have simply said outside the warranty, too bad...!!!
Posted by Mike Spice (Member # 5957) on July 18, 2017, 01:31 PM:
4 weeks in and my wolverine scanner is broken.
the take up reel has stopped turning, lost all its power.
couple of emails to the tech support.
I have two choices, return to the seller Amazon or have them send me a new take up motor assembly from california.
It is now a separate motor and cog wheel system on the take up, Not an O ring.
I took the back off to check.
They are sending me spares and I will fix it myself.
No cooling fan in mine but I do have air vents.
Posted by Paul Adsett (Member # 25) on July 18, 2017, 03:35 PM:
They need to make the unit more robust, incorporate forced air cooling, and make design changes so it can routinely handle at least 200ft reels without problems. Also incorporate software for 18 and 24fps scans. If this results in the price of the unit going up by an additional $100 or $200 so be it, they will still have an eager and ready market at that price.
Posted by Berend De Meyer (Member # 5856) on July 18, 2017, 04:30 PM:
quote:
Obviously a product still in development and not thoroughly tested before marketing it.
I have to agree to a certain extend
quote:
4 weeks in and my wolverine scanner is broken.
the take up reel has stopped turning, lost all its power.
couple of emails to the tech support.
I have two choices, return to the seller Amazon or have them send me a new take up motor assembly from california.
Mine took almost the same time to break down. I got a brand new deck for the exchange.
quote:
They need to make the unit more robust, incorporate forced air cooling, and make design changes so it can routinely handle at least 200ft reels without problems. Also incorporate software for 18 and 24fps scans. If this results in the price of the unit going up by an additional $100 or $200 so be it, they will still have an eager and ready market at that price.
This is exactly my sentiment. It's a great little device that serves my needs, but the engineering is somewhat poor. Using a post-production software to reduce the speed is of no importance to me.
The upcoming weeks I'll be batching some more 180 mtr reels. Keep you posted!
Cheers
Posted by Mike Spice (Member # 5957) on July 19, 2017, 12:13 PM:
A Massive Thank You to Doug Stratton
I have just tried your software to bring my wolverine scans down to a better frame rate.
ABSOLUTE GENIUIS. quick. really good.
I chose 15fps which is a lot closer than the 30fps Wolverine spits out.
I tested it on a 50ft reel and it was done in seconds.
Very Many thanks. Highly reccommended!
Thank You to Doug Stratton
[ July 19, 2017, 02:32 PM: Message edited by: Mike Spice ]
Posted by Gary Schreffler (Member # 5945) on July 19, 2017, 12:51 PM:
regarding the dreaded MP4 issues and 30FPS speed, this from Wolverine:
"As for MP4 compression we tried our best to lessen the compression as much as possible with firmware. If we do more than that the MP4 files becomes unstable. We rely on a chip manufacturer that provide us with the camera module integrate with the processor. Therefore, very little we can do with firmware to change the hardware. Today there is no hardware that can do less than 30fps and for that reason we cannot offer a playback speed of 18 or 24fps."
I also like the freeware mentioned by Mr. Stratton, so I guess not a horrible issue...
Posted by Mike Spice (Member # 5957) on July 19, 2017, 02:28 PM:
if I was to be real picky, I would like 18fps as a choice, but 15fps is a significant improvement over 30fps.
It is really quick as doing the task too, so it's the best solution for now. My customers will be very happy.
Posted by Mike Spice (Member # 5957) on July 19, 2017, 06:29 PM:
here is a picture of the wolverine, minus the O ring.
Mine has stopped taking up film.
A new motor assembly is on the way from california.
Lets hope it lasts longer than four weeks.
To date my scanner has done around fifty thousand feet and died...
The customer service is excellent, i have to say. new motor assembly in the post with in six hours.
Posted by Paul Adsett (Member # 25) on July 19, 2017, 06:38 PM:
I was about to spring for the Wolverine, but have decided to hold off for a few months in the hope that they will make some significant design improvements.
Posted by Paul Adsett (Member # 25) on July 19, 2017, 06:39 PM:
I was about to spring for the Wolverine, but have decided to hold off for a few months in the hope that they will make some significant design improvements.
Posted by Malcolm John Toye (Member # 4474) on July 20, 2017, 04:19 AM:
I also received my Wolverine in May and also had the wheel assembly stop turning .I believe the gear assembly keeps missing sprockets and has finally stopped turning .Wolverine service seems very good and will be sending a new wheel assembly for me to repair myself . I am very pleased with the results I was getting far better than copying from a projected image and definitely better than the Cine to Video service I had done professionally many years ago.I have found using a Cine Editor as the supply reel and an old Cinrex variable projector at its slowest speed copies my 7 inch reels ok .I do not need to use the Wolverine take up reel at all.
Posted by Mike Spice (Member # 5957) on July 20, 2017, 11:50 AM:
very interested to hear it is not only my scanner that has failed on the take up spool.
I did think they were very quick to send me a new assembly so they must be aware of the problem.
I will be interested to see if the new assembly is identical.
I have some 6x200ft and 4 x400ft reels to get through. that will push it to the limit...
I will post an update and photo when the new parts arrive
Posted by Kurt Froberg (Member # 5922) on July 20, 2017, 04:33 PM:
Mike said: "if I was to be real picky, I would like 18fps as a choice, but 15fps is a significant improvement over 30fps."
You can actually choose ANY frame rate you wish if you do this little change in My MP4Box: Under "View", choose "Edit Command Line". When you start Mux, you can choose Fps=15, you will see a new window with the actual command line which you can edit where you see the fps=15 you just change the numbers from 15 to 18 (or 24 or whatever), the press "Copy and Run".
Hope this helps
Kurt
Posted by Paul Adsett (Member # 25) on July 20, 2017, 07:19 PM:
The good news here is that Wolverine seems to be very responsive to customers problems. Hopefully that will be reflected in a robust upgrade of what appears to be an excellent performing product at a great price.
Posted by Mike Spice (Member # 5957) on July 21, 2017, 02:32 AM:
Thank you SO much Kurt
Next time I use it I will try this out.
Most helpful of you to point that out to me.
Not something I would have otherwise known.
Posted by Doug Stratton (Member # 5923) on July 23, 2017, 02:05 PM:
Overall glad the mp4box trick worked for many of you.
I do disagree with Wolverines claim about not being able to lessen the compression of the chip due to stability. They could easily lower it at least another 10-15% and that would help as well. Right now (assumed) it clearly is at a 30-50% compressed. Sometimes the images almost gives a digital sheen that you would have otherwise seen in 1990's early FMV (full motion video).
They could have also allowed you to use the PC to capture and then not worry about any mp4 nonsense
I also found out that my HS version was updated to include vent holes but I am not sure about the internals yet
Posted by Berend De Meyer (Member # 5856) on July 24, 2017, 03:34 AM:
Hi Doug,
quote:
They could have also allowed you to use the PC to capture and then not worry about any mp4 nonsense
I fully agree on this biggest (flaw) disadvantage for this - otherwise - very nice product for the $!
Cheers
Posted by Mike Spice (Member # 5957) on July 25, 2017, 10:21 AM:
new motor arrived today
Posted by Malcolm John Toye (Member # 4474) on July 25, 2017, 10:49 AM:
Mike ,Is the Motor and Gear assembly the same as your faulty one ? I hope it is not going to malfunction every couple of months and require replacement.?
Posted by Mike Spice (Member # 5957) on July 26, 2017, 09:29 AM:
I hope to swap them out thursday or friday so I will report back with some photos.
I too, hope this motor will last longer, I have just been given around 3000ft to scan!
Posted by Mike Spice (Member # 5957) on July 27, 2017, 01:50 AM:
old motor on the left, new motor on the right.
I was hoping they would send a new take up clutch assembly too, as that feels quite tight.
I shall run a scan today and see what happens altho I am not full of hope
Posted by Peter Scott (Member # 4541) on August 03, 2017, 06:58 AM:
Hello Mike
Did the new take up motor cure your problem ?
Posted by Berend De Meyer (Member # 5856) on August 03, 2017, 07:22 AM:
Mike,
I'm in the middle of this awful issue too, so as Peter said could you please share some more detailed feedback on the new motor and if you had any communications about the clutch yet. Thanks.
Cheers
Posted by Mike Spice (Member # 5957) on August 04, 2017, 04:44 AM:
with the new motor I have scanned around 1600ft and so far so good.
I have decided not to use the 'rewind' function on the machine, I am doing that using my projector, the rewind function was pathetic in the first place using the wolverine.
When you see the size of the take up motor, it's quite obvious that it is not sufficient to rewind a 200ft reel tightly enough or evenly enough, glaring error on the part of wolverine imo.
Rewound films were really loose on the reel, as the tension is not good enough on the wolverine rewind, so putting more strain on the take up is not something I want to do, let alone put up with loose rewinds.
I have also only been scanning two 200ft per day, rather than non stop back to back scanning, with some crazy idea if I don't push it too hard, it might just last. Of course, that should not be the case, it should be capable of running all day long.
I am tempted to open it up and see if the new motor has begun to leak black goo as the first one did, I may look over the weekend.
I have little faith in the machine right now and am expecting it to break down again, but that's just me and machines.
I have around 900ft to go on my current project so if it breaks down again I will let you know, but for now, it's working.
I was expecting a new clutch with the new motor, but they only sent a motor, and as I say, so far so good... but I'm yet to be convinced until I take a peek inside, which I may do this weekend.
I'll let you know the moment it fouls up, or I open it up for a look at the new motor.
I sent a photo of the old motor back to wolverine in california, they thanked me for that, they do seem helpful enough, but if and when this new motor fouls up and I contact them for a third motor, I hope they will still be as kind!
As I say, it is working as expected, but if a machine of mine breaks down when it is so new, it takes me a long time to regain faith in it again......
If you are interested in my scanning results, you can find me at youtube by searching for 'Mike Spice HMS Ark Royal' at you tube and there you will find my old movie junk, old Royal Navy 8mm from the 70's of mine and some clips of other folks films that I am charging £2 per 50ft reel for.
You can also find a link to my 'Super 8 Rescue' facebook group from the youtube page, where you can see in depth video tutorials and samples of my customers films and general tech stuff about my hobby.
[ August 04, 2017, 06:04 AM: Message edited by: Mike Spice ]
Posted by Berend De Meyer (Member # 5856) on August 04, 2017, 10:36 AM:
Hi Mike,
Thanks for your reply and further feedback, appreciated. I've also never used the rewind option. I do it manual because a) I'm not sure it will work on the Somikon in the first place b) don't want to use a projector. I use my Erno viewer and the Somikon together, change the full reel from the right to the left side, line up the film and gently rotate the reel on the viewer to rewind the film back to the original reel. Only the two (far right and far left side) rollers in the viewer are used because I don't set it to editing modus of course.
I'm not sure when using a projector, it will rewind the film better in a sense of tightness. I now touch the reel on the Somikon gently to make sure it has a bit of pull force. Am I correct in my assumption?
Mike, thanks for your links to Facebook and Youtube. I'll have a visit.
Posted by Mike Spice (Member # 5957) on August 04, 2017, 10:41 AM:
I am currently looking at some viewers on flea bay so I too can do a manual rewind.
I move the full reel from the take up on the wolverine, to the feed spool, and rewind back to the projector, applying the slightest pressure to keeps things taught.
My old Eumig is not very good these days so it too tends to slow to a crawl on rewind, I would sooner put the pressure on the projector than the wolverine however.
I'll be glad when I find a movie viewer with nice winding arms on it!
Posted by Pere Pasqual (Member # 5906) on August 05, 2017, 01:34 PM:
Hi people,
I'm quite new to the forum - in fact, this is my first post. I've been laying around for the past 3 months, since I registered, though.
Well, the thing is that I put my hands into one of these machines. I find the quality is more than OK for the price, but I'm a bit disappointed with the software functions. As many of you have already said, I would have expected things like:
- A computer-controller operation mode (this way each frame could be, for instance, saved directly to the hard disk and we could choose the output format; for instance, lossless png, etc).
- Ability to choose between 24 or 18 fps on the output file. I find nonsensical and very annoying we have to do it afterwards.
- Fine-tuning options on the machine itself like choosing different output resolutions, different formats and, the most important one, DIFFERENT bitrates/compression. I notice a lot of compression on the generated files.
- Better zooming options, allowing to capture even the registration holes if we wanted to, to crop them during postprecessing if we wanted to.
- Better brightness, contrast, gamma, tint and those all functions.
Now here it goes the main reason of my post: getting a better firmware.
I already exchanged some emails with Wolverine support (they were very kind); they told me "it's impossible to set the frame rate on the machine to 24fps because 30fps is the less that the chip can deliver" (a statement that I would label, in the best case, as "incorrect" - a claim that, simply, cannot be upheld), and even asked them if they could make some source code available in order for us to improve it. I'm a computer engineer and believe that I could make some improvements I had access to it. Unfortunately, they replied is closed-source. Althought they sent me a newer firmware version:
20170511-ZS04 (file: FWDV180N.bin) (Please let me know if it's ok to share the firmware and I'll post it in case anyone is interested)
It's a bit strange, because my machine was bought the past month and it came with a far older version (20170215-ZS02). Anyway, I haven't still tested it because I'm afraid of losing some features and not being able to roll back to the previous version (I don't know how to make a backup of the current one).
The interesting thing was that now I had a firmware in my hands and, thus, something that we could potentially "reverse engineer" in order to "retouch" some function here and there.
Please, don't misunderstand me: reverse ingeneering a firmware is a very difficult task and I don't have the necessary knowledge to ever do so. My biggest ambition was to find some flag that could change, for instance, the default FPS to 24 by looking at the file with a hexadecimal editor. Or, to say it more properly, find someone who could do so.
And this is what it happened: by inspecting the file I found the string "NT96650". We know the machine has a NovaTek chip because that's what appeared the first time I connected it to my computer. So some googling for these strings produced interested results.
The funny thing is that the chip appears to be used on a wide range of those car cams people uses to record their travels (specially in Russia?) and that it has already a huge base fan and they are already hacking their firmwares for better functionallity.
The site https://www.goprawn.com has a section for NovaTek cams, and there, on the first 4 sticky posts, there are a bunch of tools for customizing NovaTek firmwares!
So this is what I did:
- I used bnGui, "Load firmware", it successfully recognized it, -> "unpack", and got an un packed .rbn file.
- Then I opened it with NtkMPE, and... Bang! A list of valid video modes, with different resolutions, fps and bitrates is available!
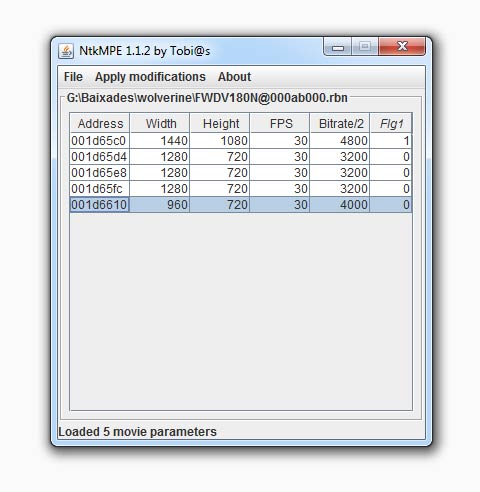
You can see the last one is our old friend 960x720, @ 30 fps and 9000 kbps bitrate.
And then I ended the investigation process because I have yet to figure out how does this work. I can edit the width, height, fps and bitrate settings, so I bet it would work if I change them to any valid combination. What is a valid combination? Any of the ones that appear in the list? Or any that is known to be hardcoded inside the chip?
Also the highest 1440x720 resolution from our European companion is available there.
I've seen captures of this list for those car cams and they have set up them to very esotheric combinations, with very high fps and bitrate settings. So I don't see the problem setting fps to 24.
I made modifications to that file and saved it successfully. Anyway, haven't been able to repack it into a proper .bin firmware files. But in case I had it, I'm not sure if I would attempt ruining my machine by flashing it with an unproper firmware...
I plan to get in touch with the programmers to see it the tools could be used with our machines, also.
More to come...
Posted by Mike Spice (Member # 5957) on August 05, 2017, 02:00 PM:
Really Interesting Pere.
I wasn't even aware one could upgrade the firmware on the wolverine machines, or how to.... I have no idea what FW is on my machine......
I just take it at default settings and put the focus on sharp.
I am reasonably happy with my results.
I think hoping for so many more features is asking a bit much of a machine at this price point however nice it would be to have.
Posted by Berend De Meyer (Member # 5856) on August 05, 2017, 02:58 PM:
Hi Pere,
Wow! a great find and thank you so much for your work and sharing your findings here on the forums! There are a few members (me included) with the Somikon HD-XL you mentioned and indeed the compression is one of the downsides of these both products. Also I would like to have a much better and more configurable firmware.
I'm accustomed with reversed engineering only as an end-user - not tech savy at all - and I flashed a tweaked Mac EFI ROM from the original GTX-680 Mac Edition to GTX-680 PC version. Much cheaper and more available! ;-)
So I really believe in the route you're taking now, after your discovery and I do hope so that the tech support of Wolverine is able/willing to help you. That would be really great.
Good luck with your quest and keep us posted!
Posted by Mike Spice (Member # 5957) on August 06, 2017, 06:26 AM:
Simple to find the FW version in the menu, silly me...
For information, my Wolverine was purchased via the Amazon website, in the UK, delivered from Singapore in early July 2017
FW Version on mine: 20170310DN08EN
Posted by Pere Pasqual (Member # 5906) on August 07, 2017, 10:31 AM:
Hi people!
Well, noting down our firmware versions is important, as well as our "hardware versions", because probably the same firmware won't work at the same time for the step-motor version and for the belt one, possibly rendering the machine unusable by flashing it with wrong firmware!
Anyway, I've come to a dead end: I understand what I have to do to fit the modifications inside a new firmware file, but it's the program what's failing now. It hangs when trying to "pack" the file, and there's nothing I can do to solve it. Theoretically the source code for this utility is available but I have to yet find it, and also I don't have the knwoledge to implement the proper modifications. I contacted the author regarding this issue both by a private message and by a forum topic reply here and here; now I'm waiting for a reply that who know when will it come, if ever...
Suggestions welcome, as always!
Posted by Berend De Meyer (Member # 5856) on August 08, 2017, 08:15 AM:
Hi Pere,
Thanks again for all your work. Please keep us posted.
If only I knew how to, I'd surely lend a hand here!
Posted by Mike Spice (Member # 5957) on August 08, 2017, 08:28 AM:
At the risk of tempting fate, I have just finished the last reel of my current project for a customer.
The new motor has scanned 2675ft over the last week.
All seems to be fine...
I really do believe that not using the wolverine to do any rewinds has made a difference.
That little motor is not up to rewinding, the temptation to apply finger pressure during the rewind to get a tighter wind, and often giving the winding spool a helping hand, no doubt, put undue strain on what is basically a toy motor.
It is fine for the scanning process but from my experience I would encourage anyone with a wolverine, to find an alternative rewind method, as I and others, have done.
I just have 2 400ft reels of my own to do, so let's hope I am not tempting fate and facing a third motor!
[ August 08, 2017, 10:33 AM: Message edited by: Mike Spice ]
Posted by Pere Pasqual (Member # 5906) on August 09, 2017, 03:19 PM:
There are great news about modifying our firmware...
Tobi@s, the genius behind those hacking tools, kindly replied to my messages and yesterday he released a version of his software that will do the job with ours. It's amazing! I was so tired that I wasn't able to play with it; let's see if today I'm able to do so before I fall asleep...
In the meantime, for the brave people out there, you can try by yourself. And don't forget to say "thanks" to Tobi@s! this is the link to the forum post.
Finally, I made another discovery I have yet to play with. I read here and there different file names for putting the machine in "engineering mode", tried some and this one seemed to work.
If you place an empty file named "engmode", without extension, in your SD card and turn on the machine, when you start the Wolverine, once the logo disappears, the screen is put into a red background and some messages appear:
"jpg size is too big or too"
"update logo2 failed"
"cfg file error: Open"
Then it turns off again.
Obviously it's trying to do something. I would be have if I could make a backup of my existing firmware before doing anything...
Posted by Berend De Meyer (Member # 5856) on August 09, 2017, 03:47 PM:
That's great news indeed. But as you stated, no mods before you have a virgin back-up of the original firmware. I hope the genius can help you further. Thanks again for sharing your endeavour.
Posted by Mike Spice (Member # 5957) on August 10, 2017, 03:16 AM:
interesting stuff Pere.
I shall leave mine well alone for the time being as I have around 15 50ft rolls to scan for someone.
Watching your hacking stories with great interest, good luck!
Posted by Kurt Froberg (Member # 5922) on August 10, 2017, 04:34 AM:
Hello all, I am quite new to this forum.
I am following this thread with great interest. I bought the Somikon machine a few months ago and have only just tested to get a decent quality from the machine. Any improvements of the compression of the picture would be welcome. I have tried using the Neat video plugin in my editing software (Vegas Pro 13) for reducing the digital noise with some success. I have also adjusted the focus of the lens since it was not really focused from factory. This is my second Somikon, the first one suffered from bad jitter / jumping picture and bad take up spool. Is anyone here using the new Reflecta Super 8 + scanner? I have searched the web for any reviews or user comments but not found any so far.
/Kurt
Posted by Pere Pasqual (Member # 5906) on August 10, 2017, 07:15 PM:
I just want to announce that I tried my first firmware modification, with about 10x bitrate, 1440x1080 and 24fps, and I failed miserably. The file isn't flashed into the machine. The original update firmware file they provided me gets correctly written using the same instructions.
I have yet to repeat the process to discard any potential mistakes, and also there are still some other options available that could work.
Posted by Mike Spice (Member # 5957) on August 11, 2017, 04:04 AM:
good luck. I hope your experiments don't write off your machine.
I wouldn't have a clue where to begin!
My scanner is still chugging away. I have been sent 15 50ft reels and the motor is still holding out.
Posted by Osi Osgood (Member # 424) on August 11, 2017, 10:57 AM:
We just watched (in order to sell it) the Orson Welles version of Treasure Island. Still looks great!
Posted by Berend De Meyer (Member # 5856) on August 11, 2017, 12:15 PM:
quote:
We just watched (in order to sell it) the Orson Welles version of Treasure Island. Still looks great!
Yep, for sure we will find out where to look and how to use the goodies! ![[Big Grin]](biggrin.gif)
Posted by Mike Spice (Member # 5957) on August 11, 2017, 03:25 PM:
without wishing to offend anyone, this thread is about the wolverine scanner, not orson wells films.
Posted by Berend De Meyer (Member # 5856) on August 12, 2017, 06:51 AM:
Hi Mike, I think @Osi only made a joke about our quest to find the diy treasure goodies for the Wolverine and Somikon scanners. At least that's my interpretation of his off-topic post
Posted by Pere Pasqual (Member # 5906) on August 12, 2017, 02:38 PM:
Sorry people, now I've really come to a dead end ![[Frown]](frown.gif) . I've tried every possibly recipe I could attemp to "cook" our custom firmware and failed. The machine would simply not attempt to flash the image (althought something is recognized as the machine won't start when I put the file on the SD card).
. I've tried every possibly recipe I could attemp to "cook" our custom firmware and failed. The machine would simply not attempt to flash the image (althought something is recognized as the machine won't start when I put the file on the SD card).
Also my machine is now flashed with the updated firmware version they sent me, and there's no bitrate difference on the generated files (in fact, with the same captured footage, this time it's a few bits lower). I don't notice any differences, in part because I didn't play enough with the old firmware to see any. I could play with crop and zoom settings a lot so I even captured half of the registration holes (it's regular 8 footage), unveiling a significant % of the image that was hidden until now and that to me suits better for 16:9 cropping. But that was probably available also on the previous firmware version.
Also the "border" on the registration holes area looks like a very thick black line. It looks to me like if the resolution was in fact fake - could it be that it was an interpolated resolution, thus the output resolution was in fact much lower than the announced CCD/CMOS chip one? Hmm...
Sorry to be this deceiving...
Posted by Mike Spice (Member # 5957) on August 13, 2017, 06:34 AM:
don't apologise. you have been doing some very interesting work indeed.
I admire your efforts to try and change things with the firmware
Posted by Berend De Meyer (Member # 5856) on August 13, 2017, 06:40 AM:
Hi Pere,
I agree, no need to apologize at all! You've done an amazing job so far trying to find and how to DIY upgrade the firmware. I hope my efforts regarding my e-mail to Somikon will have some - if any - result.
Posted by Pere Pasqual (Member # 5906) on August 13, 2017, 07:30 AM:
Well, some minutes ago I got some "partial" success thanks to new instructions I got from the firmware tools author! ![[Eek!]](eek.gif)
Don't get too excited: it doesn't work. The machine got flashed! That's the good news. But then the machine can't operate, appart from the scanner light being turned on.
The good thing is that it can be flashed back to it's original firmware, so no harm done.
I was able to make a simple test using these tools where I simply unpacked the image and repacked it again without modification - the machine detected it as a valid firmware and flashed it, but again, it was non-functional. So this leads to the conclussion that the problem is not with my modifications, but the tools that are generating the firmware image. I'm going to pass this info (along with a more technical one) to the creator of the tools. We are in his hands again . But hopefully it is a minor modification he is able to do for us
In the meantime, I've uploaded my first and only capture with the wolverine to this moment:
https://youtu.be/e_O5HESFlqQ
It's a one-minute minute from a home recording I bought at a flea market for 1 ; God knows how it ended there! This is Spain in the mid-60's or first 70's, judging by the car model (Seat 600). The car plate belongs to Alicante, so it was probably shoot in a town near there.
I applied a lot of zoom out so I even captured the registration holes. This is regular 8 mm footage, so a lot of visual information is discarded if you crop it to 4:3. I used MP4Box to change framerate to 18 fps (althought I can't be sure if that's the proper one) and applied a simple color filter because the original capture looked far more washed and with a bluish tint. On the top left corner you can notice that I also applied a "logo remove" filter to test if I could diminish the registration hole lack of information.
This was done in seconds with the filters that AVIDemux ships by default, so please don't be too hard!
Posted by Berend De Meyer (Member # 5856) on August 13, 2017, 07:53 AM:
Hi Pere,
Thanks for your update! Firmware-modding can be a real PITA as you've seen last week. I hope your flash-man will be able to accommodate you with the proper files to upgrade your Wolverine.
When seeing a 8mm home movie that was bought by an unanimous 3rd party, I always wonder who those peoples are and what has become of them. Thanks for sharing. Are you willing to share this RAW footage with me - sending me the original non modified mp4 file - so I can compare it with the RAW footage I get from my Somikon? Thanks in advance.
Enjoy your Sunday afternoon!
Posted by Pere Pasqual (Member # 5906) on August 13, 2017, 09:46 AM:
Sure Robert! Here it goes:
https://mega.nz/#!dW4zlLwA!WYg2tq_SDd8yUrJlIa5635Fvw4s_BPO2WegYgZqXuP4
My thoughts about the people who appear in the footage are the same. I even put the plate number on the Youtube description; who knows? I wish it could be broadcasted and any of the starring persons watched it.
By the way, I'm on vacation!
Posted by Mike Spice (Member # 5957) on August 13, 2017, 12:12 PM:
Keep up the excellent work on the firmware Pere.
Really interesting.
I enjoyed your film clip too, I have subscribed to your channel and look forward to seeing more clips from you.
my understanding is regular 8mm is usually 16fps
while super 8 silent 18fps and sound 24fps.
I have been making my regular8mm at 15fps with mp4box.
Posted by Berend De Meyer (Member # 5856) on August 13, 2017, 12:20 PM:
Hi Mike,
AFAIK normal 8mm and/or Super 8mm is commonly shot @ 18 fps or 24 fps. In post-production I convert all from 30 fps to 18fps (factor 0.6) because of my assumption that 18 fps was by far the most used - time/cost effective - speed by most filmers.
Posted by Berend De Meyer (Member # 5856) on August 14, 2017, 07:45 AM:
quote:
By the way, I'm on vacation! [Big Grin]
Have a great time and enjoy!
Posted by Mike Spice (Member # 5957) on August 14, 2017, 10:24 AM:
AND ANOTHER FAILURE!
This time the take up spindle clutch has seized up and thus causing the motor to judder like an old bus.
Email sent to Wolverine, so we shall just have to wait and see.
let's hope they send me a new one, as they did with the motor...
I should add, having opened it up again, the replacement motor still seems fine...no sign of gunk oozing out..
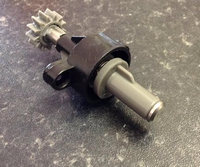
Posted by Berend De Meyer (Member # 5856) on August 14, 2017, 03:06 PM:
Mike, sorry to read about your machine failing AGAIN! Wow, a buyer needs to stress their nerves big time. What a pity still...
Posted by Mike Spice (Member # 5957) on August 14, 2017, 03:35 PM:
a great shame, but thankfully I have completed my 'paid scanning'
Lets see how Wolverine Data respond to this fault....
That will be the make or break.
I have until 21 sept to take this up with Amazon, Until then, I am happy to see how Wolverine data deal with it.
It is not easy technology to get right, I am disapointed, but I am not angry or heartbroken, yet...
The problem is trying to make a take up reel do two jobs, clutch feed take up from the film gate, and rewind.... tricky problem to solve at this price point...
Posted by Doug Stratton (Member # 5923) on August 14, 2017, 09:30 PM:
Amazing stuff going on here !! I unfortunately sent my Hammacher Schlemmer version back to them for a refund. I am pretty glad I did not end up drilling air vents in it. In the short time I had mine since Feb, Wolverine already had 2 major internal revisions. The HS version reflected this as well. Why on Earth would I want to pay 500$ (what the HS sells for) for a machine thats more so "a work in progress" and poorly tested?
I am going to wait a good year or so and hopefully by that point they will have down a final solid design and possibly better menu/control internals. Then again if the wonderful fimrware MOD gets perfected I wont have to worry so much about Wolverines internal settings
Posted by Mike Spice (Member # 5957) on August 15, 2017, 01:25 PM:
24 hours later a response from wolverine:
how many feet of film have you scanned?
I said 10,000 feet altho I am not sure, probably 7000 ft.
The reply came back that they wanted to charge me $20 for the new take up assembly.
I pointed out that the machine has now failed twice in less than two months and perhaps I should take the matter up with amazon, who I purchased thro.
I also pointed out that I take great care of the scanner, I never use it rewind and it runs less than 6 hours a day..
I am now being sent the new part for free, after the 'engineers test it thoroughly to make sure it won't fail'
yikes..... not overly happy, I am tempted to try and get my money back thro' amazon, but I do like having the ability to scan 8mm film and charge a small amount of pocket money for it!
Posted by Berend De Meyer (Member # 5856) on August 21, 2017, 03:56 AM:
Hi Mike, please let us know about the outcome, thanks
quote:
The reply came back that they wanted to charge me $20 for the new take up assembly.
Are they out of their minds?
Posted by Mike Spice (Member # 5957) on August 21, 2017, 04:48 AM:
a new take up assembly has left california and is in transit.
free of charge.
Apparently they have tested it to make sure it won't seize up like the original
I intend to take the seized up assembly in to my work, where I can call on a technician to take it apart.
Taking it apart involves two small circlips, if I try and remove them I know they will fly off and never be seen again... perhaps we can find out why the original assembly seized up...
Posted by Berend De Meyer (Member # 5856) on August 21, 2017, 04:52 AM:
Hi Mike, that's a great idea to take it apart and get it reviewed by technicians. Thanks for your input.
Posted by Mike Spice (Member # 5957) on August 23, 2017, 08:15 AM:
The new take up assembly arrived.
Fitted today but it looks like I made the mistake of thinking it was the take up clutch, when it actually appears to be the motor again..
I have made a video of the problem, along with the repair I did this morning, but it is still not working as it should do.
Right now I have a two month old $400 paper weight.
I have emailed the link of the video to Wolverine Data and will not hold my breath for too long to see what they say in reaction...
If you would like to see my repair and my current problem here is a link to the video
Mike Spice You Tube
Posted by Mike Spice (Member # 5957) on August 23, 2017, 11:52 AM:
I decided to open up the original wolverine motor to have a look and see if there was an obvious reason for it's failure.
wolverine original motor, fail.
Posted by Daniel D. Teoli Jr. (Member # 6043) on August 23, 2017, 02:15 PM:
I had 2 Wolverines. They produce a low quality image. They are easy to use. They are cheap $ and built to be disposables.
My first one lasted about 21 reels. At about 18 reels it started to squeal terribly. Then it started to jam up and wrecked some sprocket holes at rel #22.
I returned it for an exchange. The next one lasted less. I gave up on them. If you can use a low grade image for cheap money and are lucky enuf to get one that works they seem like an interesting prospect.
Posted by Berend De Meyer (Member # 5856) on August 23, 2017, 03:10 PM:
Hi Mike, thanks for the video, I'll forward the link to Somikon as well presuming you would mind. I never dared to open it up, afraid losing my warranty. Daniel has a point, but still I don't agree to accept the quality for the euros, because 400 isn't sort of pocket money, at least for me.
Posted by Mike Spice (Member # 5957) on August 24, 2017, 02:52 AM:
Berend you are welcome to use the video in any way you choose.
It turns out I have made a mistake. Wolverine looked at my video and came back to me to point out I have not re greased the grey gear wheels on the take up.
This morning I will go out and get some grease, that is surely my fault/stupidity for not doing that.
For the frame Jitter they have suggested a quarter turn unscrew on the metal plate in the gate.
Give them due for offering advice, and I will try and report back in a day or two.
I had two choices at my first fail, there are no service centres outside the USA.
Return to Amazon for a new machine, and probably face the same problem again.
Get in touch with Wolverine and see what can be done.
I chose to get in touch with Wolverine who sent me a new motor for free which I am able to fit.
Second fail, they have sent me another part, for free, half way around the planet.
credit it to them for that, altho I now fear that is the end of my free servicing! lol....
The image quality may not best the best, but at least I have my films saved now.
The machine cost me £300 (around $380) and my films would have cost me around the same price to have them scanned by someone else. So far I have made around £230 scanning films for other people so the machine has almost paid for itself now.
I shall continue with wolverine, the actual scanning mech seems up to the job, it is the take up section that seems to be the weak link in the chain.
I knew there was a risk buying this machine, I looked at online reviews, videos at you tube and advice from another user and reading at this forum, but I chose to go ahead and buy it, while I am dissapointed I am not going to slag off Wolverine or Winait (the people who actually make these devices)
It's clear to see the machine is evolving, the original O ring is gone, my version now has a cooling fan and gear driven take up, and they have given me good support and advice.
Posted by Berend De Meyer (Member # 5856) on August 29, 2017, 04:35 PM:
Mike, I just visited your YT channel. What video editor are you using? I'm getting great results removing the dust and scratches with the Neat Video v4 plug-in.
Posted by Mike Spice (Member # 5957) on August 30, 2017, 07:14 AM:
I've made no attempt to clean up my pictures in edit.
I am happy with them the way they are....
In the same manner, I quite like the clicks and pops from my 1960's vinyl.
I have a choice of edit software I can use, from moviePlus X6, Imovie and FCP
My 'go to' for speed and ease is MoviePlus x6 on my everyday laptop
Posted by Berend De Meyer (Member # 5856) on August 30, 2017, 07:37 AM:
I understand of course, I was just curious what your editing program is and if you made any - if so how - attempts to clean-up the output of the scanner. Thanks for your reply.
Posted by Kurt Froberg (Member # 5922) on August 31, 2017, 06:25 AM:
Hi all,
I mentioned in an earlier post that I have adjusted the lens focus on my Somikon since I thought the pictures looked too soft with the preset focus from factory. I also read on the Filmshooting forum about this problem and how it could be improved. I have now made a short video to show the difference between the preset focus and my adjusted. You really need to connect the machine to a big screen or TV to be able to adjust the focus properly.
Here is the video https://youtu.be/POOHxe7dt3M
I wonder how many machines out there that are poorly focused?
Kurt
Posted by Mike Spice (Member # 5957) on August 31, 2017, 07:45 AM:
it would be helpful to know how to manually adjust the focus
Posted by Kurt Froberg (Member # 5922) on August 31, 2017, 08:18 AM:
To get access to the focusing ring on the camera lens you have to dismantle the machine back and front cover INCLUDING snapping off the touch panel (you won't get the front cover off without doing that!). There is some locking glue on the lens ring but with some gentle force it will loosen.
I have now modified mine machine with enlarged the hole in the front cover to be able to reach the focusing ring without taking the machine apart again. Yes I know that the warranty now is gone...
Hope this helps.
Kurt
Posted by Mike Spice (Member # 5957) on August 31, 2017, 08:57 AM:
thanks Kurt, Wow, that is some 'MOD'
My warranty is long gone on the Wolverine as I have had to replace the motor and take up assembly myself due to there being no service centers outside of the USA and I am in europe.
I have now greased the gears and adjusted the gate screws on my Wolverine as per the instructions from Wolverine Data.
I am sorry to say nothing has changed, the machine is still useless and I have sent a link of the video which demonstrates the problem, and a very strongly worded complaint to Wolverine Data in California.
I really am beginning to regret buying this peice of junk now..
Greased up Wolverine scanner still not working!
Posted by Berend De Meyer (Member # 5856) on August 31, 2017, 09:27 AM:
Hi Kurt, thank you for sharing your modification! Could you please share some photos if this DIY mod? So if I understand correctly, you did not use the firmware menu settings - high-mid-low - for sharpness in any of these samples? I looks amazing, great job!
Mike, your story is horrible and I'm sorry to hear that your scanner has become useless! Wow, what can I say more. Please keep us updated on the feedback from your supplier.
Posted by Mike Spice (Member # 5957) on August 31, 2017, 09:47 AM:
As well as complaining to Wolverine Data I have now filed a return with Amazon and Winait who supplied the machine.
If I can get my money back, I will.
I will keep you updated, but I am unlikely to hear anything for a few days.
Posted by James Wilson (Member # 4620) on August 31, 2017, 10:06 AM:
Hi Mike,
So sad to hear about your wolverine,
I emailed Winait the builders of these machines, they`re reply was
that they build the Somikon, Wolverine, Winait, etc. All these machines have the same works so it appears it depends on your luck.
Well I was going to get a Somikon, because of the 7" reel caperbility, having done a lot of reserch online, it seems your better of setting up some sort of gismo to taks 7" reels, anyway that`s of no use to you now, needless to say I will not be going ahead with any purchess now.
Regards,
James.
Posted by Mike Spice (Member # 5957) on August 31, 2017, 11:09 AM:
within an hour of my stroppy "im going to amazon for a refund" email I am told they are now going to send me a second new motor and new gears
I have to give them credit, they are very good at sending out free parts, so I will accept thier kind offer and see what happens this time!
I think sending them the video to actually see and hear the problem will have helped too
Posted by Kurt Froberg (Member # 5922) on August 31, 2017, 01:29 PM:
Hi Berend,
Here are some photos I took when I did the refocusing of the optical lens on the Somikon HD-XL scanner. I also enlarged the opening in the front cover for the lens so I am now able to set the focus without remantling the unit again.
Here is the machine with the front cover taken off. The camera lens can be seen in the middle of the picture.
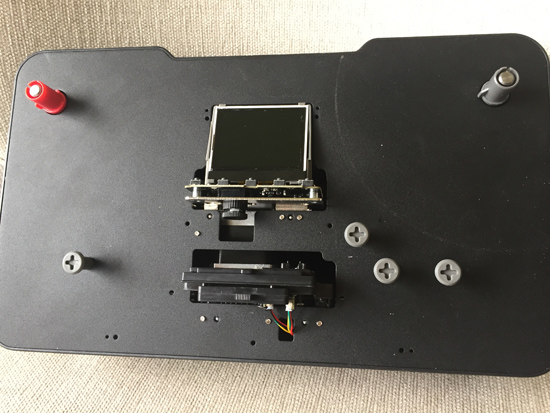
Here is a close up of the lens. There is some locking glue on the lens, but it is quite easy to brake the locking.
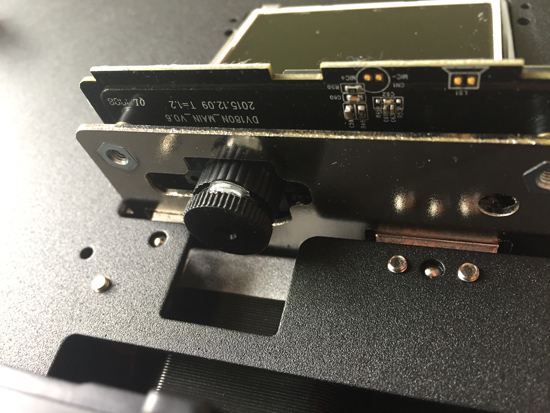
You must snap off the touch button panel to take off the front cover!
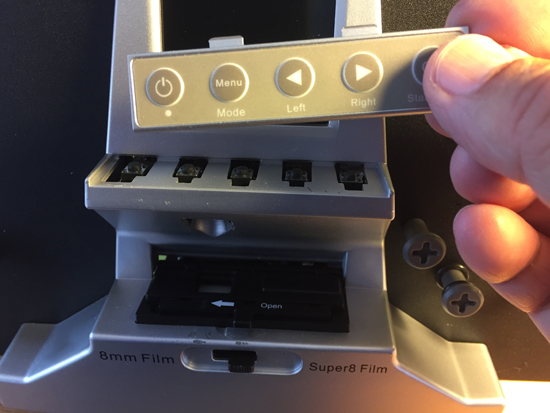
Here is how I enlarged the hole for the camera lens to be able to adjust the focus when the machine is assembled. I simply filed up the round hole in the plastic a little when I had the front cover away.

Posted by Mike Spice (Member # 5957) on August 31, 2017, 01:41 PM:
Hey Kurt, many thanks for the photos. Really interesting.
Are you not worried now you have cracked the sealant on the lens, that it could drift out of focus during a scan, due to the machine vibrating?
Also, are you worried about more stray light getting in to the lens with a larger opening?
I usually stand a peice of card in front of my gate area during scanning to stop stray light getting in...
thanks for sharing the photos, not sure I am prepared to do that to my wolverine even tho your images do look better with a manual re focus, altho the exposure does look slightly different/brighter on the re focused image, as well as sharper.
Is the brighter exposure because of the video edit or did you change it in the scan?
Posted by David Hollandsworth (Member # 3805) on August 31, 2017, 02:54 PM:
Been using this unit for a number of months. Have probably done several dozen reels of film and am pleased enough with it. My problem is that every now and then, the unit will just stop when recording. It did it several times one day several months ago and then never had a problem until today when it did it again 3 or 4 times before running fine. Anyone else have this issue?
Posted by Mike Spice (Member # 5957) on September 01, 2017, 02:16 AM:
The only time mine has stopped is when it hit a broken sprocket or bad tape splice. When that has happened I have just pulled the film to the right of the gate until it picks up and continues.
When you say yours stopped, do you mean it powered down, or perhaps the film stopped moving but the machine appeared to be running, or has it stopped capturing and the motor shut down?
Posted by Kurt Froberg (Member # 5922) on September 01, 2017, 02:16 AM:
Hi Mike,
"Are you not worried now you have cracked the sealant on the lens, that it could drift out of focus during a scan, due to the machine vibrating?"
The lens has sufficiant friction so I don´t think it will move due to vibrations.
"Also, are you worried about more stray light getting in to the lens with a larger opening?"
That could perhaps be an issue in some cases, but I have used the machine in a fairly dark room.
Kurt
Posted by Mike Spice (Member # 5957) on September 01, 2017, 02:19 AM:
Thanks Kurt, you have given me something to think about. I went back and looked at some of my scans and I agree that the focus doesn't appear to be as sharp as it could...
Posted by Berend De Meyer (Member # 5856) on September 01, 2017, 02:28 AM:
Hi Kurt, thanks you very much for your DIY photos, appreciated! My 3rd new Somikon will arrive next week. I find your tweak very interesting, so I'll follow this with great interest.
Posted by David Hollandsworth (Member # 3805) on September 01, 2017, 08:32 AM:
By stopping, I mean it just quits advancing. Everything else is on and I can see the image on the screen.
Posted by Berend De Meyer (Member # 5856) on September 01, 2017, 08:59 AM:
Hi David, you mean the takeon - rightside of your deck?
Posted by Mike Spice (Member # 5957) on September 01, 2017, 10:31 AM:
Hi David, so is the film getting stuck because of damaged sprockets or bad splices or stopping on good film for no reason?
if you gently pull the film to the right of the gate, will it carry on scanning?
There are two little white tabs in the gate path, have you made sure the sprocket side of the film is tucked under those as you thread up the film and close the gate?
Posted by Berend De Meyer (Member # 5856) on September 02, 2017, 04:25 PM:
quote:
Mike - There are two little white tabs in the gate path, have you made sure the sprocket side of the film is tucked under those as you thread up the film and close the gate?
I agree that this is probably the reason for your issue.
Posted by Kurt Froberg (Member # 5922) on September 05, 2017, 05:30 AM:
The Somikon and Wolverine suffer as we know from quite heavy digital compression with quite strong digital noise. I think however you can improve the results quite much with some post production in an editing software. I use Sony Vegas Pro 13 and I made this short video clip to show what can be done to enhance the picture using the software. I have the Neat Video plugin for noise reduction which is quite amazing, though it costs in the full version around 125 USD. There is a free trial of it with some limitations. A little bit of stabilization and sharpening is also applied in Vegas.
I made the video with split screen so you can see the difference.
Here is the video clip:
Video clip
Posted by John Kor (Member # 6062) on September 05, 2017, 03:13 PM:
"By stopping, I mean it just quits advancing. Everything else is on and I can see the image on the screen."
David - My unit sometimes stops too when there is a long section of blank (transparent) film. I think the Wolverine, at least the version I have, may be monitoring the image, and when there is a period of "inactivity," stops scanning. All film movement stops, but the light source stays on for a while, but then eventually will also turn off, followed by powering down of the unit entirely. The same also happens when the reel finishes when I've left the room and don't get back in time (don't hear the alarm timer on my phone, or I'm just lazy and forget).
General comments - I recently purchased my unit through Amazon when the price dropped to $269.95 US (it's since gone back to $299.95 last I checked). I've been on a scanning spree of my dad's 125 or so 8mm home movies (50 ft lengths) from the early 50s through early 80s. So far I've been very impressed with the scans, though the quality of the source material is not that great (what you get from a Bell and Howell Sears special in one hand and a high-ball or beer in the other). So far I've scanned 75 reels. Only a few reels so far did not make it all the way through due to the film width being too large in some sections (oddly, for the ones that bind they start off ok, but seize at some point usually a third to halfway through). And even then I'm able to scan most of these reels by "nursing" the film through by partly opening the cover (i.e. closing it to the point it restricts the movement of the film so it stops at each frame, but not pressing it past its "click" point, which ends up seizing the film). Also, sometimes I pause the scan to adjust the frame, which sometimes shifts after the first seconds or minute, especially on the oldest reels. You lose several frames (4 I think) each time you do this (and creates separate files), but is worth it to avoid losing too much of the film. I've been using Doug Stratton's great MP4Box GUI referenced earlier in this thread (thanks Doug!) to re-join the files (and adjust the speed) in post-processing.
I just hope my Wolverine survives long enough to finish up the remaining 50 or so reels, but it should still be under warranty if something does go wrong seeing as I've only had it for a little over a week. I'm also buoyed to hear of Wolverine's excellent customer service (admittedly for a partly flawed design and subpar construction, though it's difficult to complain too much at this price point). Hopefully they'll keep refining the unit (as they've apparently been doing regularly), and upgrade those components leading to common failure - even if they have to raise the price by 20 or 30% there would still be a good market, as others here have mentioned.
John
Posted by Mike Spice (Member # 5957) on September 08, 2017, 09:14 AM:
Wolverine have just informed me they are sending me new parts.
Hopefully I should be getting my second new motor, new gear wheels and a new motor bracket..
So far I've had one motor and one take up assembly....
If you suffer from the frame jitters, wolverine also advised me to unscrew a quarter turn on the two screws that hold the silver plate in the gate, I can't test this yet as my machine is not running..
I also had an email from richard at winait, it is too late to return my wolverine for a refund, but they are happy to reapir it, if I send it back to china!
No way am I posting it back to china, wolverine in california are sending new parts, so we'll see how things turn out.
Posted by Pere Pasqual (Member # 5906) on September 09, 2017, 08:30 PM:
Hey guys, could you pass me the email address of your Winait contacts? I wasn't able to find any at their web page...
Posted by Mike Spice (Member # 5957) on September 10, 2017, 04:02 AM:
My email from winait came via the amazon website so the address is hidden from me.
I found this at the winait website.
Richard...
sale1@winait.com
Posted by Pere Pasqual (Member # 5906) on September 10, 2017, 07:00 AM:
Thanks a lot, Mike. I couldn't find it and it's my last resort to try to get the missing info needed to attempt to do any firmware modification.
I'm still following this thread with lots of interest. I feel sorry for your late problems with the machine and hope you can fix them with the coming spare parts.
Also, I'm really amazed by Kurt Froberg work and wouldn't discard applying them to my machine... But I still have two priorities: one is modding it for accepting bigger rells, and another is being able to increase the bitrate of the output files. I feel like it's not enough to take really advantage of the increase in focus sharpness without it...
Posted by Mike Spice (Member # 5957) on September 10, 2017, 07:52 AM:
I am going to try the re focus at some point and if I see an improvement I will re scan my navy films again..
My mod for larger reels is to use a projector to feed the 400ft reel, and do a cut at 200 ft and a new take up spool. It's not ideal but I have presstapes to splice things back together during a rewind on the projector.
I won't be doing too much paid work now, so hopefully the new parts will last a while longer this time.
I will post a video of the new parts and repair at some point in the coming weeks. The spares have arrived in the uk according to the parcel tracking info but I won't have time to do repairs for a couple of weeks as my real work is about to get very busy for a fortnight.
Posted by Berend De Meyer (Member # 5856) on September 10, 2017, 03:46 PM:
Thank you all for these great new posts, infos, insights and tweaks. Greatly appreciated.
Posted by Mike Spice (Member # 5957) on September 11, 2017, 11:08 AM:
Arrived today. Take Up Motor number 2
That is now a total of three take up motors.
I won't have time to fit it for a couple of weeks, but I will post a video when it is done
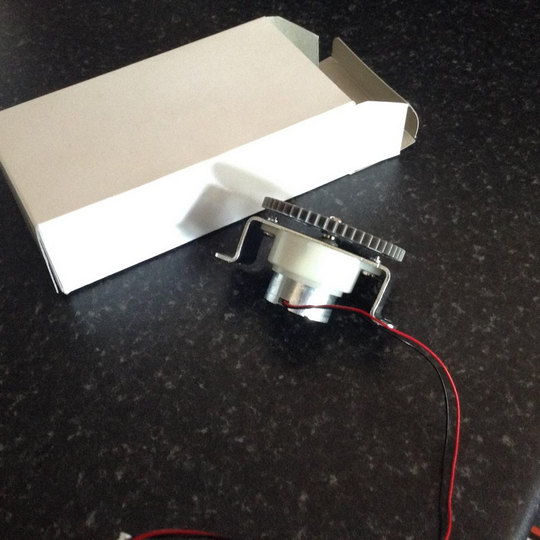
Posted by Berend De Meyer (Member # 5856) on September 11, 2017, 11:36 AM:
Thanks for the update Mike! Cheers
Posted by Phil Hall (Member # 5915) on September 12, 2017, 07:02 AM:
I'm glad to see the issue of poor focussing is being discussed;it seems it is still an issue with Wolverine and different brands, and was so bad on mine that I re-scanned many feet of film. As mentioned in the Post Script of my old post Focus Problem it is possible to check your focus without dismantling the unit, and should be the first thing to do when you get it new out the box: then you can choose whether to send it back, or open it up to re-focus yourself.
If in doubt, opening the unit up is easy, AS LONG AS YOU POP OFF THE SMALL TOUCH PANEL FIRST! There were no evident 'anti-tamper' seals to void your warranty.
Posted by Mike Spice (Member # 5957) on September 12, 2017, 10:30 AM:
My wolverine warranty is long gone! ha ha.
I have fitted a new motor and a take up assembly in the last two months.
I decided to email winait in china, through the Amazon site where I purchased.
I have just received this reply from Richard at Winait when I asked if it was possible for me to buy spares direct from winait, needless to say I have replied asking for a metal motor to arrive at my home asap with many thanks.
If Richard is prepared to send me a third gen motor I'd be foolish not to accept.
As always I will keep you up to date, altho this could take three weeks to arrive.....
Richards email:
hi Mike
good day, sorry for the problem
do you mean the motor have problem?
now we are on the production of the third gerenratoin, we will change the Motor to be metal one
if you need, we can send one motor to you , if you can change yourself
Regards
Richard
Winait Technologies Limited
I have also decided that for sure, I will hook the scanner up to my plasma tv and look at the focus and re adjust. I will use a little 'evo stick' rubber glue to re seal the focus afterwards.
[ September 12, 2017, 11:49 AM: Message edited by: Mike Spice ]
Posted by Mike Spice (Member # 5957) on September 13, 2017, 05:02 AM:
and another reply from Richard at Winait
hi Mike Spice
get your address, will arrange it as soon as possible, will send out this week, now motor still on process of testing
Regards
Richard
Posted by Mike Spice (Member # 5957) on September 13, 2017, 10:26 AM:
Phil Hall
Thanks for your post and the link to your focus thread.
Really helpful, as was one other post about the focus, with pictures.
I will definately be refocusing mine when I put the new motor in.
Posted by Simon Hawketts (Member # 5756) on September 17, 2017, 01:59 AM:
Hi all
I've not posted to the forum before but I've been watching this thread because I was interested in getting one of these machines. Well on Sunday last I took the plunge and ordered the Winait version from Amazon and it arrived on Friday.
My first impressions were quite positive - I did a short 'first impressions' post on my vintage camera blog if anyone is interested (I haven't included the URL - not sure if that is within forum rules but you can find it by searching "simonhawketts.com winait") but subsequently I've found an issue.
My first 3inch reel film went through quite well and I started the machine on a 5-inch longer film, leaving it to run in the bedroom while I got on with other things. I regularly checked it and everything seemed to go well until about half-way through when I found the display frozen with lines running down the screen. The reels were still turning, but the device had crashed. I tried turning it off, but the keyboard had locked and I had to just pull the power lead out to stop it. After this, the unit crashes regularly when I attempt to run a film through it - sometimes within a few minutes, sometimes 30 minutes but without fail it will crash. I discovered if I hold the on/off key it will stop, but I have to then turn the machine on and off and the SD card has only the starting few seconds of the recording.
I emailed winait via the Amazon message centre asking if there are any firmware updates and received a response which said the version I have (20170310) is the only version but another will be released before the end of the year. At the moment I've tried a 'restore defaults' in the menu to see if that sorts it but if it doesn't (and I suspect it won't) I'll have to organise a replacement or repair. I'm also going to suggest when I email back, that the upcoming software update adds a 'slower speed, higher quality' option to the menu.
This is really just an informative post for anyone who is interested but I also wondered if anyone else has seen anything similar on their machine?
Posted by Mike Spice (Member # 5957) on September 17, 2017, 03:28 AM:
really really sorry to hear your wolverine failed so soon, and a very frustrating fail too, mechanical fails are easier to deal with, your fault would drive me really mad!
there is a video at you tube of an exact same fault so you are not alone. I would email wolverine data in california and see what they say.
youtube video with the 'lines on the screen' fault
the link to Simons blog
Posted by Simon Hawketts (Member # 5756) on September 17, 2017, 03:44 AM:
Hi Mike
Yes it is annoying. I'm writing an email to support at the moment, but thanks for the video link - it's useful to know that the problem is not entirely unique and that people seem to have had a good response from support at Winait.
Posted by Simon Hawketts (Member # 5756) on September 17, 2017, 08:33 AM:
Just in case anyone has this crashing problem I've found there is a workaround of sorts.
If you set a film to record and then every few minutes stop the recording and start it, the Winait will close the file it's writing and start a new one when you restart the recording. In this way, if a crash happens you only lose a small part of the encoding. Interestingly, since I've been doing this the machine hasn't crashed so it could be the problem is tied to having open files and memory issues.
Anyway, it's a way I can get films digitised until a solution is found although you can't leave the machine unattended so it's a bit of a pain.
Posted by Mike Spice (Member # 5957) on September 19, 2017, 09:39 AM:
The problem of many files, generated by mulitple scans of the same film....
Further back in this topic you will find reference to a peice of software called MyMP4Box GUI and a link to download it and how to use it.
Use this to seamlessly join all the chunks of film files back together without any re encoding, and also use this software to correct the frame speed back to 18 or 16 fps without any re encoding.
It is really easy to use, it's free and safe.
If you need any help using it, let me know. I have been using it for several months now, it's a great peice of software to have on your laptop if you have a wolverine or similar.
I know you could rejoin the files in a video edit, but I prefer to join the original scan files without any re encoding so you always have the original scan file to go back to at a later date, in one complete file, and then do any video edits from the master file
[ September 19, 2017, 11:02 AM: Message edited by: Mike Spice ]
Posted by Berend De Meyer (Member # 5856) on September 20, 2017, 02:49 PM:
Thanks all for the additional info's! My new Somikon is still unboxed, haven't had the time yet. Keep up the good works...
Posted by Simon Hawketts (Member # 5756) on September 23, 2017, 03:11 AM:
Thanks for the software tip Mike.
I've emailed Richard at Winait to see if he is organising a replacement machine - if he doesn't I'll try getting a replacement through Amazon because as it stands I can only digitise films if I sit with them stopping and starting every 5 minutes.
Posted by Mike Spice (Member # 5957) on September 23, 2017, 04:57 AM:
I tried going through Amazon to get a replacement or refund but it seems I left it too late for a refund, but subsequently 'contacting the seller' is how I am in touch with Richard at winait.
I chose not to go for a replacement or repair option as it meant posting my scanner back to china, seeing as I have a new motor and Richard is still promising to send me a third gen motor, I might as well keep the scanner I have and fix it myself.....
I am still being told a third gen motor is on it's way, however it was meant to leave china last week but as yet, nothing in my email from Richard so I will jog his memory again next week.
Posted by Berend De Meyer (Member # 5856) on September 24, 2017, 09:54 AM:
Thanks for your update Mike! ![[Cool]](cool.gif)
Posted by Jeffrey Miller (Member # 6092) on September 25, 2017, 07:44 PM:
Just got a Wolverine Movie Maker and generally like it very much (for the price). However, about half the time I am getting thin vertical blue streaks. These are not on the film, but show up on the scan and the LCD display. Any ideas? It usually happens after the machine has been running for a while.
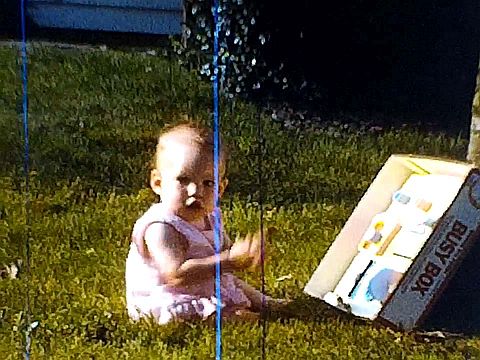
Posted by Nantawat Kittiwarakul (Member # 6050) on September 25, 2017, 10:17 PM:
Does that blue/black vertical streaks stay fixed in its position throughout the video? If it wanders a bit and/or show up intermittently,I bet that it's definitely emulsion scratch.
So the bad news is it's possible that that wolverine already DID SCRATCH your film,especially if you remembered that those streaks weren't there before.
But if that streaks stay consistent to the entire video,then that's another story.
Posted by Mike Spice (Member # 5957) on September 26, 2017, 09:58 AM:
If you are convinced it is the wolverine doing this, then there has to be something obvious in the gate aperture, or one of the feed guides has a sharp point on it..
See which side of the film the damage is on, as a clue to find the problem on the scanner.
I have never had this issue with my Wolverine.
Posted by Pere Pasqual (Member # 5906) on September 26, 2017, 12:26 PM:
I just entered my Facebook and this appeared in front of my eyes:
https://www.facebook.com/WolverineData/videos/1475709579176099/
Ok, as the forum doesn't seem to show a preview of videos, here is cap:
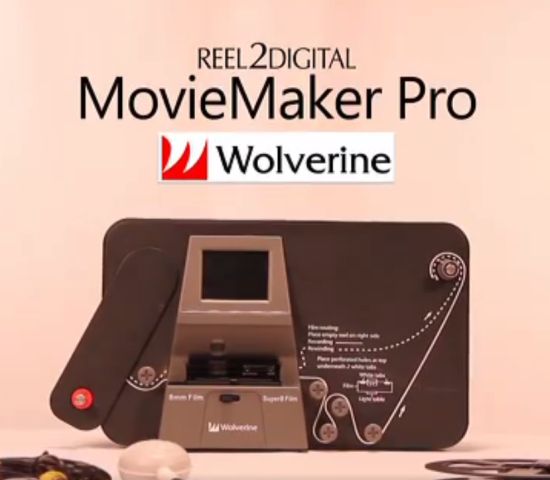
Resume:
It looks like Wolverine released an upgraded ("pro") version which accepts up to 9' reels.
Having bought the original version just 2 months ago, I'm feeling very angry now...
PS: forum admins, please fix the crappy picture uploading method...
Posted by Mike Spice (Member # 5957) on September 27, 2017, 09:26 AM:
I have to say that I am furious at Wolverine.
The problems I and many others have had with the scanner and lo and behold here is a new gen with 1080p and 9" reels and I am left with a paperweight peice of junk...
Not Happy.
I hope anyone who buys the new version has more success than I and others have been having. I would love to see the results from the new machine.
Had I known 1080p and 7&9" reels were on the way in to production, I would have never bought the Wolverine I am stuck with now, at 720p with 5" reels, having to mess about splicing 400 reels in to two 200s to scan them.
In the meantime I am still waiting for a third gen motor from china, here is Richards reply to yesterdays' email asking when I might receive it:
good day
becuuse this is update for the machine, to change the hardware need to make sure it can work with software work well, so need careful test.
i will check with production team, once it pass test will send to you as soon as possible .
Regards
Richard
here is a link to the new scanner on thier facebook page
Posted by Pere Pasqual (Member # 5906) on September 27, 2017, 11:57 AM:
I've seen your comments there, Mike. Have you seen mine? They replied me insinuating that I had nothing to complain since "the original unit was about $100 cheaper". Jeez, it's not because of the price but due to the inconveniences...
It's a shame we couldn't modify the firmware. Until someone makes a proper report of the new model, I wouldn't discard that the image quality is the same, so probably the 1080p resolution is just a different setting in the firmware (one of those I was trying to change). Maybe when firmware images come out we are able to flash our old models with them...
Posted by Pere Pasqual (Member # 5906) on September 27, 2017, 12:53 PM:
[please delete; double post]
Posted by Mike Spice (Member # 5957) on September 27, 2017, 03:32 PM:
I have seen your comments Pere I am as mad as you are with wolverine data.
1080p.... I would hope is not just a marketing ploy to entice folk in to buying in to this machine.
I would really hope there is a significant difference in picture quality.
I guess we will have to wait and see......
Posted by Nantawat Kittiwarakul (Member # 6050) on September 27, 2017, 08:05 PM:
Since the original model at 720p resolution already did look much like an UPCONVERSION from vga resolution to me. This "upgraded" 1080p won't give me any much hope too.
Posted by Peter Scott (Member # 4541) on September 28, 2017, 03:14 AM:
Can anyone from USA tell me who I can complain to about Wolverine, heres my story, in August I bought the take up motor assembly for the Wolverine MovieMaker, I done 2 x 200ft reels then got the same problem that the take up spool would not move smoothly, I got in touch with Wolverine and they said that their was no warranty outside USA and that I could buy a heavy duty version for $45 plus $18 dollars shipping, why should I have to pay again when I only paid the same amount in August, over here in the UK we have trading standards to complain to, do you have any organisation in the USA ? that could help me
Thanks
Peter
Posted by Mike Spice (Member # 5957) on September 28, 2017, 07:48 AM:
sorry to hear of your similar problems to mine Peter.
They wanted to charge me $20 to send a new motor from California and I refused to pay it, stating the machine was almost new. They sent it for free, they also sent me a take up assembly for free when I threatened to raise the issue with Amazon (the supplier in my case)
They have now sent me a second motor which has yet to be fitted, after my last video clearly pointed out the problems.
They told me they had sent me a heavy duty motor but from the video I put at you tube, the so called heavy duty motor was identical to the original.
Richard at Winait is promising to send me a third gen motor once it has been tested but I have a feeling it won't work with my machine, call it a hunch......
Posted by Peter Scott (Member # 4541) on September 28, 2017, 08:49 AM:
Hello Mike seems we are in the same boat as Wolverine wanted to charge me $63 for a "heavy duty" motor but my original was only 3 weeks old, I also spoke to Richard at Winait and he has promised to send me a heavy duty motor once they have been tested.
I have put in a complaint with www.bbb.org who seem to be like trading standards.
I bought mine from B&H photo but they have just said they couldn't do anything
Posted by Pere Pasqual (Member # 5906) on September 29, 2017, 02:19 PM:
Anyone remember me saying that there wasn't really any technical reason for limiting the output file to 30 fps? Remember Wolverine telling us that "30fps is the lowest framerate that any chip can output nowadays"?
Well, we already knew that it was a lie, but now they actually confirmed that: the new model output video files will run at 20fps. Another stupid design decision, because no footage is shooted for playing at they framerate. They say they've chosen that because it in the middle between 18 and 24! What an absurdity! So you won't get a proper framerate in any case! Instead, had they chosen 24 they would had generated proper video files for most of the cases!
Another lie, another deceivment from the Wolverine staff. And I can't understand why they are so uncompetent not to make the ouptut framerate available as a menu setting...
Posted by Ty Reynolds (Member # 5117) on September 29, 2017, 03:36 PM:
Since the Wolverine is intended for home movies, not commercial releases, the preferred rate would be 18 fps, not 24. However, I think most customers would accept 20. After all, is that not the effective frame rate of film transferred via the variable speed projector method?
Not to defend Wolverine, mind you. The frame rate is the least of its shortcomings.
Posted by Mike Spice (Member # 5957) on October 11, 2017, 10:15 AM:
Sorry to bump this thread back to the top with no news.
I have emailed Richard at Winait once a week and again just now, to find out if I am actually going to get the new third gen motor....
I was hoping to fit the new motor sent from Wolverine in California a few weeks back, in the next couple of weeks, but my real life work is so hectic with enjoyable sound installations and theatre work right now, I probably won't have the time to do any super 8 work until I hit the Christmas break...
Wishing you all well my little Wolverines.....
Posted by Mike Spice (Member # 5957) on October 12, 2017, 09:55 AM:
this week's reply from Richard contains exciting news!
I hope the tracking number is forthcoming .....
quote:
hi Mike
Good day
for the motor is the new update, so need to test all . sorry take so long time
now it is ok, i will arrange the motor to you today
later send tracking number to you
Regards
Richard
Posted by Joanna Crowder (Member # 6130) on October 20, 2017, 12:12 PM:
I just purchased the pro and it arrived yesterday. I messed with it a little but only ran one roll of film through it. What I got looks very good considering $379.00 and no shipping cost. Seems to be fairly well built but pretty much the same construction as the lesser model with the exception of the 9" swing out reel arm and the better resolution. Now I am trying to find some software for restoration that was NOT made for video cameras and doesn't cost 3k to 12k. Any suggestions? Oh an by the way the frame rate is 30fps not twenty as advertised. I called Wolverine and suggested the correct it where the have it listed as that.
Posted by Mike Spice (Member # 5957) on October 21, 2017, 04:36 AM:
Good luck with the new toy Joanna. Keep us posted please.
When you say software for restoration, Many video editing packages have basic tools to clean up video.
AVI synth is popular, free, but hugely demanding in terms of the learning curve, Plenty of info online about it, it is capable of all sorts of tricks but as I say, quite difficult to grasp as it is command line.
I use a cheap no frills video edit software for my work, but I haven't done 'restoration' as such. Just a bit of jitter correction and contrast/brightness and colour correction.
Do keep us posted on your progess with the new version Wolverine and thanks for telling us about it.
You are the first person in this thread to have one!
I am told by Richard at Winait that my third gen motor is on the way from china, so I will update if and when it arrives....
Posted by Berend De Meyer (Member # 5856) on October 21, 2017, 04:50 AM:
Hi all and a very warm welcome to Joanna! 😎
For postproduction I use Apple Final Cut Pro X and several plugins. For the best cleanup possible - grain, noise and dust artifacts - I use the euro 100 plug-in NeatVideo. For me personally a must-have for all my restauration projects 8mmToDigital.
For reference I would like to share one of my test-video's on my YouTube channel "8mmToVideo".
https://youtu.be/ay8VENaag4o
This is a capture from one of my many 8mmToDigital scans (Somikon HD-XL 1080p) showing the Demo Modus of the plug-in, thats why the output is generated only for the 720p dimensions, although this video has an output of 1080p. Nevertheless a great way to show the impact of it on the scan - see closely the very clear picture Q inside the green demo-box!
If you have any further Q's, please let me know! 😎
Cheers
[ October 21, 2017, 11:57 AM: Message edited by: Berend De Meyer ]
Posted by Berend De Meyer (Member # 5856) on October 21, 2017, 04:23 PM:
Hi Jeffrey,
A welcome to you too!
quote:
Just got a Wolverine Movie Maker and generally like it very much (for the price). However, about half the time I am getting thin vertical blue streaks. These are not on the film, but show up on the scan and the LCD display. Any ideas? It usually happens after the machine has been running for a while.
Are those blue verticals lines - if not on film - visible when you connect the WMM to an external monitor or TV, to rule out the LCD?
Cheers
Posted by Paul Adsett (Member # 25) on October 21, 2017, 04:38 PM:
Joanna, where did you purchase the Wolverine Pro?
Posted by Mike Spice (Member # 5957) on October 27, 2017, 07:11 AM:
hot off the boat from china... the third gen motor which does look quite robust.
I must email Richard at Winait and say a thank you very much.
This motor looks much better, but until it is fitted we won't know....
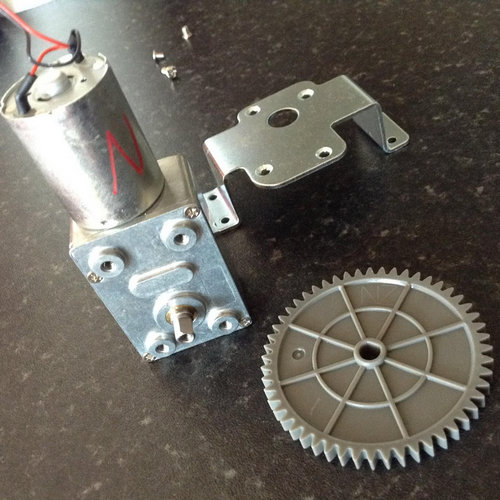
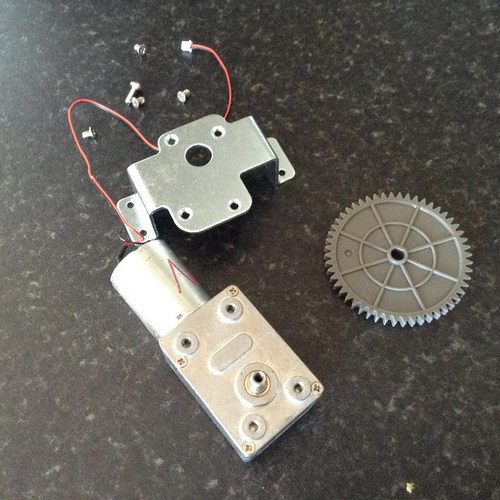
[ October 27, 2017, 11:42 AM: Message edited by: Mike Spice ]
Posted by Mike Spice (Member # 5957) on October 27, 2017, 10:35 AM:
New motor fitted and working.
The take up tension is a lot lighter with this motor.
So far so good, a test scan looks good.
new motor fitted, next to add some grease.
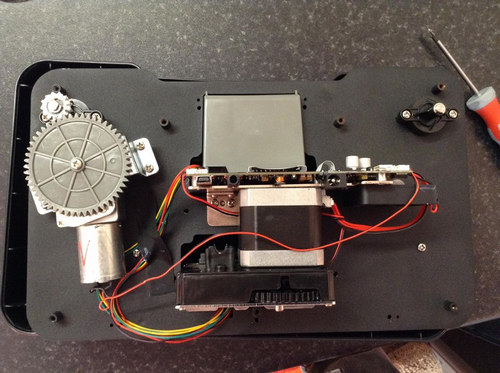
Place the new motor to check the fit
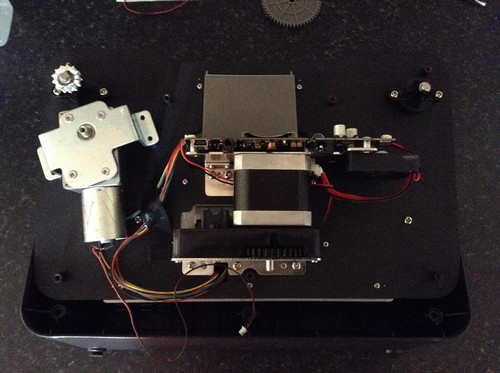
Old motor
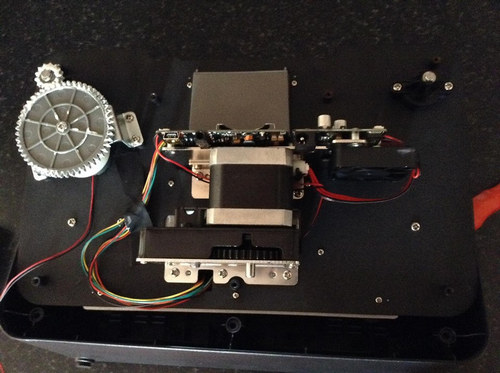
Posted by Berend De Meyer (Member # 5856) on October 27, 2017, 10:41 AM:
Hi Mike,
Thank you for your update! Good luck with the new rugged motor.
Cheers
Posted by Mike Spice (Member # 5957) on October 27, 2017, 12:40 PM:
Thanks Berend.
It's been a long slog with this motor, This is motor number 4, the original factory fitted, a new one from wolverine california, then another new motor from california, then a take up assembly from california, then a third gen motor from china.
As much as I am annoyed, I have to take my hat of to wainait and wolvering in Ca.
I have had amazing customer support.
My persistance paid off hopefully, I have high hopes now I have seen this new motor. All metal...
If this is the motor in the 400ft reel wolverine, then hopefully they will have a good lifetime of scanning.
It was the only weak link in the chain, not counting the 30fps/mp4 thing...
heavy duty motor fitted and working
[ October 28, 2017, 04:35 AM: Message edited by: Mike Spice ]
Posted by Berend De Meyer (Member # 5856) on October 28, 2017, 03:13 AM:
Hi Mike,
Great to hear about your excellent customer experience with both Wainait and Wolverine in Ca. I sincerely hope that your issues are all left behind in the past.
Many happy scans in the future!
Cheers
Posted by Gian Michele Soddu (Member # 6108) on October 28, 2017, 02:29 PM:
Hallo, I just wish to share a link to the meticolous and precious observations of an enthusiast owner of at least two (up to now) Wolverine Reels2digital Moviemaker:
http://www.drviragopete.com/film-scanner-maintenance.php
Posted by Gian Michele Soddu (Member # 6108) on October 28, 2017, 02:30 PM:
[ November 02, 2017, 06:06 PM: Message edited by: Gian Michele Soddu ]
Posted by Mike Spice (Member # 5957) on October 29, 2017, 05:44 AM:
HI Gian. It's good to have you in the Wolverine thread, welcome to you.
Your blog is most interesting.
Your meticulous observations are pleasant to read and I agree with everything you say.
I see you have first generation with the O ring take up.
A lot of folk have had problems with this machine.
There is a video at youtube of this version, overheating.
Link to Bob's video at the bottom of my post.
Thanks for the link to your blog, I shall continue to read it with interest.
Your point about not using the wolverine for rewinding is something I concur.
I use my projector to rewind, I get a better wind, and less stress on the scanner, which can not rewind very well.
overheating wolverine with O ring take up
[ October 29, 2017, 08:31 AM: Message edited by: Mike Spice ]
Posted by Gian Michele Soddu (Member # 6108) on October 30, 2017, 02:23 PM:
Sorry Mike you misunderstood my post: that is not my blog, I just found it over the web and wished to share the informations thereby. Anyway I'm glad to announce that me too will soon become a presumably happy owner of a Wolverine r2d mm, provided 1) the package which is coming tomorrow will not be broken, nor 2) the device inside it is broken and does not go clickety clackety and does not melt its rubber belts!
Posted by Berend De Meyer (Member # 5856) on November 01, 2017, 07:15 PM:
quote:
Hallo, I just wish to share a link to the meticolous and precious observations of an enthusiast owner of at least two (up to now) Wolverine Reels2digital Moviemaker:
http://www.drviragopete.com/film-scanner-maintenance.php
Great blog Gian! Thanks for sharing.
Cheers
[ November 01, 2017, 08:29 PM: Message edited by: Berend De Meyer ]
Posted by Mike Spice (Member # 5957) on November 02, 2017, 08:47 AM:
Gian Michele Soddu Ah yes, I mis read your post. None the less, thank you for finding and sharing it.
Good luck with your scanner, please keep us up to date with how you get along with it, or any problems that arise in the coming weeks.
If you post any video online, it would be good to see clips, or if you need help or advice, be sure to come and ask us.
Good luck and fingers crossed you have a good scanner!
An update on my scanning work.
I took the front cover off, hoping to mess with the focus, but it seems my lens has been sealed with what can best be described as super glue.
A transparent substance that is very tightly glued up.
I am afraid that if I take pliers to it, I may damge the camera or crack the plastic, so the front cover will go back on, and I will live with the factory set focus for the time being.
The films I have scanned don't look too bad to me, I watch my content online, not on a 50" tv set, So I am happy.
Being able to share my Royal Navy clips with other Navy folk from the 70's is quite remarkable.
Some footage has never been seen by anyone other than me and my Mum when she was alive.
Social media and YouTube are a godsend for sharing content.
Another cheap plug for my You Tube Channel, Super 8 Rescue
[ November 02, 2017, 09:54 AM: Message edited by: Mike Spice ]
Posted by Gian Michele Soddu (Member # 6108) on November 02, 2017, 05:30 PM:
Mike, thank you very much for your friendly welcome. It was my post to be somewhat misleading, and I apologise for having been unpolite. Sorry.
Good news: my Wolverine Reels2Digital Moviemaker arrived in the morning. Bad news: I had to pay 92 Euros more because of Italian import taxes from the USA. Since the device cost 300 Euros (shipping included, from Adorama), the taxes amount to almost 1/4 of the whole price! Italian buyers be aware!
Item to be unboxed in the weekend, stay tuned! Bye!
Posted by Gian Michele Soddu (Member # 6108) on November 02, 2017, 05:44 PM:
Cheers, Berend. I love The Netherlands, also because it was the first "foreign" country I ever went to, maybe in 1994. The weather during the flight was sunny up to the border, but as soon as we entered the country it started to rain, and this made all the Dutch people laugh abruptly. Unforgettable
[ November 03, 2017, 01:48 AM: Message edited by: Gian Michele Soddu ]
Posted by Bob Russell (Member # 6166) on November 18, 2017, 12:51 PM:
Hi, I'm been following this thread for a few months, after I found it while searching for a way to digitize my old Super8 home movies from the 80s, less expensively and safer than sending them to Costco. My goal is to archive precious memories for my children and grandchildren, in a format that they will actually use.
I've read with interest the problems with the MovieMaker and the improvements Wolverine Data has made over the last few months, apparently in response to customers on this forum and elsewhere. I was planning to buy one late this year (when I could actually get to the digitization project), planning on getting one of the later model improved MovieMaker.
But then I saw the post about the MovieMaker Pro, hopefully with the better components and with the 9" reel capacity. (I have several 7" reels). So I ordered ($379 after coupon, plus sales tax) and it arrived a couple of days ago. This post is to show what the external AND internal components are for those of you interested.
Front view:
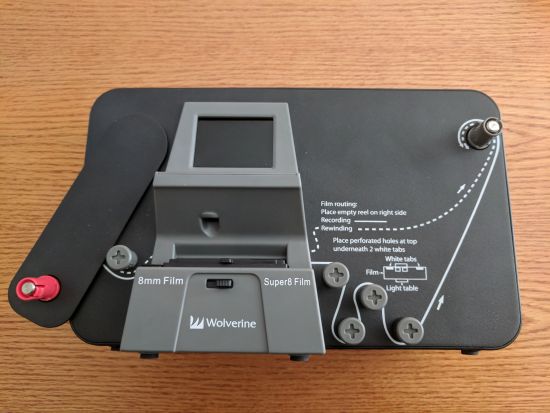
Back View (notice the vent slots):
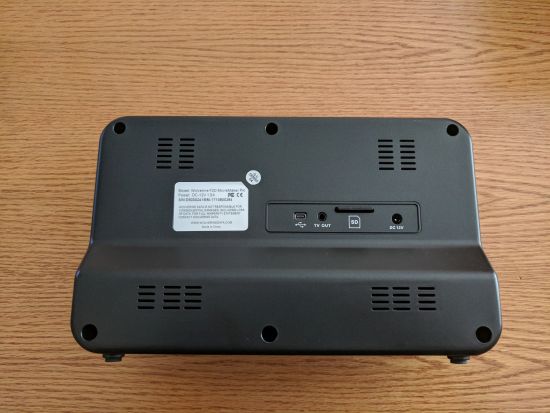
View with 9 inch reel:
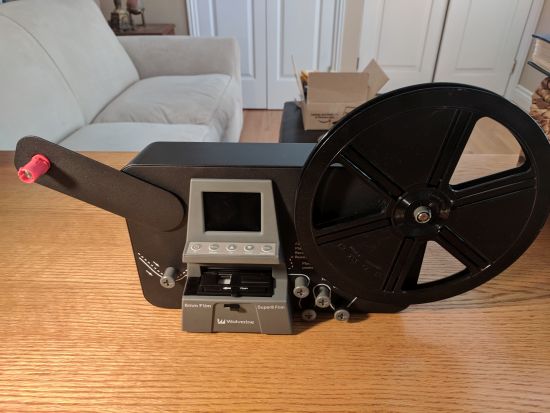
Inside (looks just like the updated original MovieMaker a few posts back. No belts, just gears. Cooling fan under the electronics):
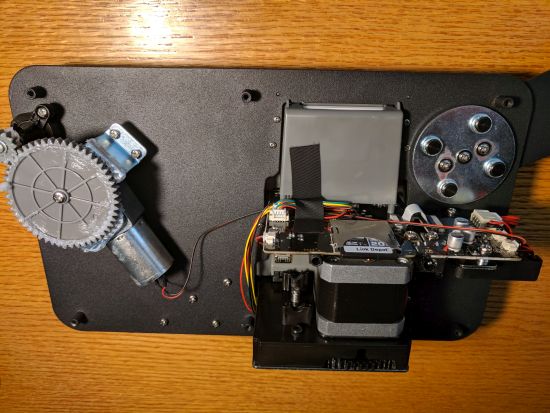
Firmware version is reported to be 21070803-ZS06.
I've just started trying to scan some film. I'm experimenting with Shotcut as a simple video editor (but I'm open to suggestions!...) and it is interesting to note that Shotcut reports my Super 8 scan as:
Codec: H.264/AVC/MPEG-4 AVC/MPEG-4 part 10
Resoluton: 1440x1080
Frame rate: 20
Format: yuv420p
Aspect ratio 4x3
Scan mode: Progressive
So it appears that they have actually changed the frame rate! And my initial impression from my first video is that the new rate is close to the 18 frames per second my Minolta camera used when taking that video.
When I get some videos scanned, I'll try to upload to youtube.
Thank you to the 8mmm forum members who have pioneered this little gadget!
[ November 19, 2017, 04:59 PM: Message edited by: Bob Russell ]
Posted by Chris Holton (Member # 6169) on November 18, 2017, 04:00 PM:
I just got my moviemaker"PRO" yesterday and the "titan" slide scanner..I have film cleaner on the way and then I will be schooling myself on how to use this new equipment, I will be doing 8m.m. home movies...
Posted by Berend De Meyer (Member # 5856) on November 18, 2017, 04:14 PM:
Hi Bob & Chris! A very warm welcome to the forum and thank you for sharing the info's about your all new W-PRO. Much appreciated!
quote:
Firmware version is reported to be 21070803-ZS06.
I've just started trying to scan some film. I'm experimenting with Shotgun as a simple video editor (but I'm open to suggestions!...) and it is interesting to note that Shotgun reports my Super 8 scan as:
Codec: H.264/AVC/MPEG-4 AVC/MPEG-4 part 10
Resoluton: 1440x1080
Frame rate: 20
Format: yuv420p
Aspect ratio 4x3
Scan mode: Progressive
As for the framerate, they have obviously went for the in between route for both the 18fps and 24fps - most common - framrates so users don't nessecarely need to adjust, when viewing the output OOTB!
Enjoy your new scanner and I hope you'll share some footage very soon!
Berend
Posted by Bob Russell (Member # 6166) on November 19, 2017, 04:55 PM:
Thanks Berend.
I've edited my original post to correct the name of the film editing program I'm trying. It is Shotcut (not Shotgun).
I have also noticed that the Pro has 4 film path guide spindles before the take up reel, vs 3 on the original model. Maybe to adjust for larger reels, or reduce take up tension?
In any case, my films so far are all feeding smoothly, although I've only used 3" and 5" full reels, and nothing with splices yet.
Posted by Gian Michele Soddu (Member # 6108) on November 20, 2017, 08:00 AM:
Title: "A sad story of rashness"
Hallo everyone.
As I stated, two weekends ago, in a warm Sardinian sunny afternoon, surrounded by green leaves in the terrace above our garden, I happily unboxed my (expensive) Wolverine Reels2Digital Moviemaker 720p and, soon after, tested it, scanning a 5" reel Mickey Mouse colour cartoon and showing it on a 22" tv-set.
The images where beyond my expectations and I was very happy and satisfied, even though I noticed it was a (very little) bit out of focus. With my smartphone I shoot a movie of the unboxing and of the testing operations, willing to show them on my YouTube channel.
By a fault of some sort the smartphone lost every image of the operations and I couldn't recovery any of them, even spending hours with special recovery tools for Android.
Next weekend I opened the machine and unlocked the lens-holder threaded cilinder, with the help of a steel awl, a cotton swab and isopropyl alcohol; then put a piece of a teflon ribbon around the screw's thread to improve it's adherence;then I wrapped a segment of an electric band at its edge, making a ring and a handle, then I carved the cover and enlarged the lens slot, so that I could easily set the focus from outside. I filmed all my operations and will put on YouTube in the future (I anticipate that the movie is a little bit frightening)
In the previous days, the technical assistance staff at Wolverine kindly sent me a copy of firmware, which I asked them "for safety reasons". I also asked them what did they think about the possibility of testing on my 720p machine a firmware which could be downloaded from Somikon.de and was intended for their 1080p machine, which seemed equivalent to Wolverine's. They warned me that it could be a dangerous action, because the hardwares were different.
Even so, in ditto weekend, after having unlocked the lens, I decided that it was also worth the effort to make some "firmware improvements", to put the machine at its maximum, before starting to copy, once and for all, my family's movies.
First thing first, I put an empty file named "engmode" in the SDHC card, fancying to access to a secret menu of options to fine tune the hardware. The machine returned a long error message and nothing else happened.
I substituted engmode with the firmware file which was given to me by Wolverine's staff, and the machine seemed to start normally as before. At this point, I noticed that the version of this firmware was older than the original in the machine.
Anyway, I felt safe, having a copy of a regular firmware, so I decided to make the next experiment and loaded the Somikon's firmware...
The machine started with the Somikon's logo, then I noticed that the menu was a little richer: more languages, even Italian, and a counter of the duration of the scanning, which also took into account whether the reel was 3, 5, or 7".
I felt as cunning as a fox, and rubbing my hands with pleasure and satisfaction, put again my Mickey Mouse cartoon in the machine, ready to scan...
TO BE CONTINUED
[ November 21, 2017, 12:53 AM: Message edited by: Gian Michele Soddu ]
Posted by James Wilson (Member # 4620) on November 21, 2017, 08:29 AM:
Hi All,
Just wondering what is the best machine,
The Somicon or the New Wolverine Pro?
Many Thanks.
Posted by Gary Schreffler (Member # 5945) on November 21, 2017, 09:41 AM:
Here is my two cents worth. I now own three of these Wolverines. The first one is the original, non-vented belt drive. The second is vented, with a modified belt system (that came out before the first motor drive). Now I have the Wolverine Pro. Back on page 3 or four of this thread, I posted photos of the first unit, adapted to do 7" reels. I have done no fewer than 150 7" reels without any mishaps. The second unit is used as designed (up to 5" reels). I have done about 80 reels on that without any issues. But regarding the 7" reels, I hated the footprint with having to use my rewinds to facilitate the larger reels. That is why I bought the Pro. Last night I completed the 26th 7" reel, and the machine is working perfectly. I also LOVE the 20FPS record rate, All of the films I own are home movies filmed aboard U.S. Navy ships of all types, but mostly carriers. So for me, a 20FPS rate accurately reproduces that 'real-to-life' appearance of the video. I only wish there was a way to adjust the frame without stopping the recording, especially after splices, etc. But over all, I am very pleased. Up until I began using these scanners, I used both a Moviestuff Workprinter-XP and Cinemate-20 with a HD camera. These scanners reproduce the films as well as either the Workprinter or Cinemate, for whatever that's worth. And these units are a heck of a lot cheaper...
I will save some of the videos I have completed using the Wolverines (or at least portions) to YouTube and post the URL's, so folks can see. I will also post videos from the Workprinter and Cinemate so that folks can compare for themselves.
I am exceedingly reluctant (read afraid) to mess around with the firmware, etc. While there could be some improvements in 'userability', I am not so sure that there would be much improvement to the output quality...
Posted by Mike Spice (Member # 5957) on November 21, 2017, 10:00 AM:
Gian I didn't think for one minute that you had been impolite. not at all my friend.
I enjoy reading your posts very much.
Bob Russell Thank you very much for your photos of the pro wolverine.
Most interesting to see inside, and oh look, there is the third generation motor Richard at winait sent me!
Really very kind of you to open up your pro and let us see inside, so very many thanks for those photos.
If I credit the photos to you I hope you won't mind me using them in my closed facebook group to show my friends how it looks inside.
This thread really is becoming the history of the Wolverine.
For framerate corrections... it takes a few seconds to demux a file in MyMP4box GUI mentioned further back in this thread, with a complete explanation of how to choose your own framerate.
Another alternative in video edit is to slow the film to a suitable speed, as long as the film is exported in equal quality or a little higher, I don't have a problem with that method.
I always keep the original scans to go back to if I need a fresh edit or copy.
There is no re encoding in MyMP4Box, just framerate change, to any frame rate you choose.
Personally I like my standard 8 films at 15fps.
Gary Schreffler wow, you have had some luck! I agree witih you about the firmware, I won't be going there, but I do wish I can mess with the focus, but I don't want to damage the lens, or camera module soldered to the circuit board, by trying to remove the sealant on my lens.
James Wilson The Wolverine pro would be my go to, now they have sorted the take up motor, but I have no expereince with the somikon
Posted by Bob Russell (Member # 6166) on November 21, 2017, 11:59 AM:
Mike Spice, feel free to use those photos, and no need to give me credit. I'm happy they are useful to you and others, since everyone on this thread inspired me to look into the Wolverine, and I was very fortunate that the Pro came out just before I was going to pull the trigger on purchasing the original version.
Gary Schreffler, I agree with you on trying to change firmware, unless there is a documented process from the manufacturer for doing so. (as is common with wifi routers). That said, I think there is a possibility that the firmware in the Pro would be compatible, since the manual's limited description of the chip in the two machines is identical.
Gary, let us know if you ever put your Navy films up on YouTube. I was in the maintenance department of an A6 Intruder squadron during Vietnam and have a Super 8 film taken by our aircrews of operations on the carrier and missions over N. Vietnam. It has not been digitized yet, but is very similar to this extremely well done video on YouTube:
https://www.youtube.com/watch?v=V_H8yebjnK8
Fly Navy!
That is a great example of what can be done with handheld Super 8mm cameras.
Posted by Gary Schreffler (Member # 5945) on November 21, 2017, 12:42 PM:
Bob Russell: Yes, I have seen that video, and it is very comparable to the work I do (I convert those old films for fellow veterans free of charge). I also served on USS Midway, 1984-1991. I was an air crewman and rescue swimmer, flying in the mighty SH-3H Seaking (crewed by heroes of all men, lovers of all women...!).
I have a few clips on YouTube (I just copied the URL from my cell, so no clue if have to do something special to view on a computer). The links below are from the USS Lake Champlain (CVA-39), circa 1954/55 and 1961. Also, another film listed by another user (CHAMPCV39) is work I did for a veteran. It's the last link.
https://m.youtube.com/watch?v=E-zkloyoruw
https://m.youtube.com/watch?v=CrGgCKdbX_0
https://m.youtube.com/watch?v=Fh41T1vJpgI
GO NAVY/BEAT ARMY!!!
Posted by Mike Spice (Member # 5957) on November 21, 2017, 01:11 PM:
How nice to know we have some navy vets saving movies.
The only reason I bought a Wolverine was to save the films from my time in the Royal Navy
I went to the Royal navy right from school, in 1974, as a cook.
I served 12 years, I saw active service in 82 down in the Falkland islands.
My earlier navy days are on 8mm, if you like that sort of thing, aircarft carriers and flying, here is my playlist of 8mm.
GO NAVY!
Mike's navy home movies
Posted by Paul Adsett (Member # 25) on November 21, 2017, 02:55 PM:
Where in the USA can I buy the PRO version of the Wolverine?
Posted by Alan Taplow (Member # 4702) on November 21, 2017, 04:16 PM:
I just bought one. You can order directly from Wolverine:
http://www.wolverinedata.com
Be sure to use their coupon when checking out:
Use Promo Code WC2009 and receive $20.00 off AND FREE SHIPPING (ground)
I have an old model with the direct drive motor and vented. Only used a few times. if anyone is interested in buying it for $225, contact me.
Posted by Gary Schreffler (Member # 5945) on November 21, 2017, 04:53 PM:
Mike Spice; I have a few Royal Navy films in my archive. Most recent RN project was a Royal Fleet Auxiliary, the RFA Forth. One of the cool sequences is the Royal Yacht Britannia steaming past at high speed, with the three flags flying on the three masts, indicating the royal family was embarked. Also have a few RN destroyers and a carrier or two.
I also have a home movie filmed in 1951 aboard the USS Franklin D Roosevelt (CVA-42), that has great images of Princess Elizabeth and her husband, Captain Philip, touring the ship (walking on the flight deck) when she visited Gibralter. This was filmed just before she became Queen Elizabeth. So that's pretty cool.
The Wolverine scanners make preserving these films a whole new ballgame.
[ November 21, 2017, 07:20 PM: Message edited by: Gary Schreffler ]
Posted by Mark Stanley (Member # 6180) on November 24, 2017, 02:31 AM:
Hello all. I am building a 16mm scanner, and notice that the Wolverine does not have upper/lower loops, sprockets or a pulldown claw. Could someone describe how the intermittent movement of the film is obtained (the start and stop)? Thanks. Mark.
Posted by Berend De Meyer (Member # 5856) on November 24, 2017, 09:59 AM:
Hi all!
The all new Wolverine F2D Pro X Plus 8mm filmscanner! Scanning 8 mm film will never be the same!
https://youtu.be/w7779CZKd8M
nJoy your weekend!
Posted by Paul Adsett (Member # 25) on November 24, 2017, 10:14 AM:
Sorry Berend, there are not enough hours left in my life to digitize a single reel of film this way!
Posted by Chris Holton (Member # 6169) on November 24, 2017, 11:28 PM:
I just purchased the F2D "titan" it does a fantastic job on the slides..
I also just got the "moviemaker pro" I haven't used it yet but I plan on trying it out sunday..
Posted by Chris Holton (Member # 6169) on November 26, 2017, 05:10 PM:
Here is my result,,this is a learning experience..
https://www.youtube.com/watch?v=gY4F3ZZoZ1U
Posted by Mike Spice (Member # 5957) on November 27, 2017, 10:04 AM:
Chris Holton I really enjoyed your movie clip.
Thanks for sharing that.
Posted by Alan Taplow (Member # 4702) on November 27, 2017, 04:20 PM:
Back in May, Doug Stratton (on page 3 of this topic) outlined a method of changing fps speed by using MP4Box-GUI --- demuxing your file and then muxing the result with the option to change the fps. However, I notice that there is a pull-down box with a preset list of speeds and that 16 or 18fps are not options. The options offered go from 15 to 23.9 with nothing in-between. Anyone know how to make this program work and bypass the presets and customize it at 16 or 18 fps???
Posted by Chris Holton (Member # 6169) on November 27, 2017, 09:25 PM:
Thanks mike!..I'm glad you liked the old race cars, I have a few more to do..
Posted by Kurt Froberg (Member # 5922) on November 28, 2017, 12:51 AM:
Alan, the answer to your question about the frame rate is on page 4 in this thread.
I will copy it here:
You can actually choose ANY frame rate you wish if you do this little change in My MP4Box: Under "View", choose "Edit Command Line". When you start Mux, you can choose Fps=15, you will see a new window with the actual command line which you can edit where you see the fps=15 you just change the numbers from 15 to 18 (or 24 or whatever), the press "Copy and Run".
Hope this helps
Kurt
Posted by Mike Spice (Member # 5957) on November 28, 2017, 09:08 AM:
Kurt beat me to it. You can type in any FPS you like this way, works a treat, just backspace the fps number and insert you own, without adding any extra spacing to the command line
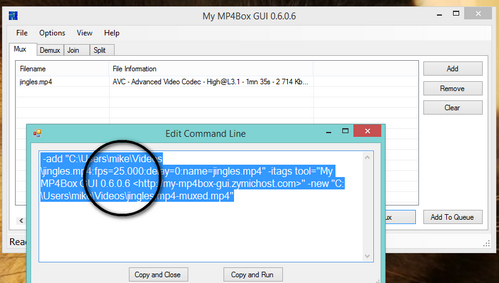
Posted by Alan Taplow (Member # 4702) on November 28, 2017, 09:09 AM:
Thanks so "Mux", Kurt. That makes my day a delightfully happy one. This is the first order of over 50 reels where I'm using the Wolverine instead of the Focuskye setup I traditionally use. I'm finding this better in many ways except the output seems to have a bit more graininess than I normally get --- any thoughts about reducing the grain?
Posted by Mike Spice (Member # 5957) on November 28, 2017, 09:14 AM:
perhaps post us a test clip at youtube and link here so we can see and maybe advise.
[ November 28, 2017, 10:42 AM: Message edited by: Mike Spice ]
Posted by Kurt Froberg (Member # 5922) on November 28, 2017, 09:22 AM:
Alan, regarding the noise/graininess, please see my post at page 7 in this thread where I also have an video clip example. I use the Neat Video plugin (in my editing software Sony Vegas) for noise reduction. It is almost a must for this bad compression.
Kurt
Posted by James Wilson (Member # 4620) on November 28, 2017, 10:52 AM:
Hi Berend,
I`ve just ordered The Somicon i hope I get the 20fps software
& the updated motor. It was between the Somicon & the new Pro Wolverine, But I could`nt find anywhere they would ship to the UK, I hope I`ve chosen the right one.
I will let you know when it arrives.
James.
Update, I`ve just heared from Somicon they only ship to Germany or Austria, so if anyone has any Ideas please let me know. PS. I don`t like bank transfers.
Posted by Ricky Daniels (Member # 95) on November 28, 2017, 03:08 PM:
James,
Here is your answer....
https://www.bhphotovideo.com/
Happy shopping.
Best,
Rick
Posted by Doug Stratton (Member # 5923) on December 02, 2017, 12:27 AM:
With the New Wolverine pro has the quality itself actually improved at all? On videohelp.com someone had mentioned that Wolverine told them the machine was now made to use the max quality possible, though this completely contradicts what they told someone here
Can anyone compare file sizes from the SD card if they own the older versions with the pro?
Posted by Gerald Pech (Member # 6194) on December 02, 2017, 03:47 AM:
Hi, I'm following this thread today from France.
I just wish to share a official link to the 20fps software for Somikon (Firmware-Update für 20fps (2MB)) https://www.pearl.de/support/product.jsp?pdid=NX4294
Pere Pasqual, there are great news about modifying our firmware if you can modifying this new firmware ???
Posted by Tom Tomlinson (Member # 3195) on December 06, 2017, 10:09 PM:
I just got the pro model & its failing to scan--it says to check the "power". But no power problem displaying the error message...
I've triple checked my threading. Anyone have issues like this?
Wolverine Support told me to not scan the leader......??? still no good--tried 3 rolls of Super8 film.
not too encouraging so far. Any tips much appreciated.
Posted by Mike Spice (Member # 5957) on December 07, 2017, 09:01 AM:
I always scan the leader.
Threading would not make a difference to power supplies.
I would suggest checking the psu is the correct rating for your power supply, ie: 120v /240v
other than that, a mulitmeter on the low voltage plug of the psu to see what voltage it is kicking out.
Posted by Ken Abruzzo (Member # 6188) on December 07, 2017, 01:21 PM:
I would also try a different SD card or reseating the one you have. If I remember correctly, the machine will turn off when the SD card is removed.
I've run about 30 reels through mine so far (5", 6" and 7"). Only problems I've had are with it getting stuck sometimes on a bad splice and misalignments. Not too concerned about the misalignment since I can correct it in software.
Posted by Adrian Winchester (Member # 248) on December 08, 2017, 01:42 PM:
I confess I have nothing to say on this subject, except it's great to see that it will shortly have prompted 250 posts with many useful observations since April! A warm welcome to the forum members who have recently posted here for the first time. I don't think I would have dared predict 10 years ago that the forum would be thriving in 2017 with so many contributors and posts!
Posted by Bob Russell (Member # 6166) on December 10, 2017, 11:41 AM:
Question for those with more experience than I using the Wolverine: (especially the Pro with its 1080p resolution)
If I plan to do post processing (correct color balance, etc) what would be the likely best settings on the Wolverine for Sharpness and Exposure? Or is there a single best setting for post processing corrections?
Case in point: I have one film that is underexposed (in a dark room) and the white areas (striped clothing,lighted area, etc) are digitized as yellow by the auto color balance of the Wolverine. Wolverine Data tech support has suggested for this particular problem to use lower EV (-0.5) and Sharpness to Low.
My thinking is to get all of my films digitized (50+ 3" reels plus 4 or 5 7" reels), and only then post process the ones that need help. I'm trying to avoid determining the best settings for each film by trial and error on each one.
Any thoughts?
Thanks!
Posted by Berend De Meyer (Member # 5856) on December 10, 2017, 01:00 PM:
Adrian Winchester wrote:
quote:
I confess I have nothing to say on this subject, except it's great to see that it will shortly have prompted 250 posts with many useful observations since April! A warm welcome to the forum members who have recently posted here for the first time. I don't think I would have dared predict 10 years ago that the forum would be thriving in 2017 with so many contributors and posts!
Hi Adrian, thank you very much for your compliments. I must confess, this forum is a great place to contribute to, because we all post with great passion!
I have only one polite but nevertheless very urgent request - perhaps on behalve of many more - and that is to give this great forums a GUI upgrade asap, if possible of course.
Sincerely, Berend
Posted by Douglas Meltzer (Member # 28) on December 10, 2017, 04:12 PM:
Berend,
I would be thrilled for that to happen! Until then, we can only do our best to continue to make this a great place to post.
Doug
Posted by Mike Spice (Member # 5957) on December 11, 2017, 10:05 AM:
Bob Russell if time permits, i would scan each film on two different exposure settings, but keeping sharp focus each time, and then experiment in the edit.
I have to admit I have done very little post scan correction other than fps. I am on the older wolverine 720p
Posted by Bob Russell (Member # 6166) on December 11, 2017, 05:15 PM:
Mike, by "sharp focus" do you mean set Sharpness on high?
Thanks for the suggestions, I'll try that.
Posted by Mike Spice (Member # 5957) on December 13, 2017, 09:52 AM:
I always go for the sharpest focus setting in the menu, It may not work for you, but doing a few test runs at different settings will allow you find out what the machine can do.
it is time consuming, but doing a few different settings on the same film means you can see how the different settings affect certain types of film and exposure, it also means you can use different bits of scan in an edit later on.....
Posted by Miguel Roman (Member # 6208) on December 14, 2017, 04:54 AM:
Hello everyone: I've been with this forum for a long time, especially, the subject of telecinado of 8mm films.
Finally, I have decided; I purchased a few days ago: The Somikon HD-XL-Film Scanner. New engine, (3rd generation) new firmware 20 frames, etc.
The first tests; all right. but I have observed that also as it has been doing some, reels, begin the unrest and instability, that cough you have noticed in the Wolverine ...
I'm somewhat disappointed
Posted by Joe Wein (Member # 6216) on December 16, 2017, 11:47 AM:
Thank you Robert for posting raw samples from the wolverine at 720. I did a clean-up with image stabilization in premiere, speed change, noise reduction, and color correction.: https://www.youtube.com/watch?v=LnA9ivyP8Xk&feature=youtu.be
I would LOVE to see some footage from the 1080 version and have a chance to see how it compares, if anyone has any footage directly from the new Wolverine with a 1080 file... THANK You!
Posted by Pere Pasqual (Member # 5906) on December 26, 2017, 07:44 PM:
quote:
Pere Pasqual, there are great news about modifying our firmware if you can modifying this new firmware ???
Sorry for the delay! I just arranged this test site with my own modified firmwares, changing resolution and bitrate. Use at your own risk! (really there's not much risk of bricking the machine) and more to come soon!
http://retromania.pandelground.com/wolverine-reels2digital-moviemaker
Posted by Jake Mayes (Member # 3292) on December 26, 2017, 07:59 PM:
As these post a JPG sequence just before making the movie which you can save if you remove the card before making the movie after capture, much of the image quality issues look like jpg compression artifacts. Can you reprogram your custom firmware to adjust the JPG compression rate to the lowest? That would mean you could save images of all frames in good quality. Good work with the firmwares!
I am going to give this a try. It would save much telecine costs if i could do my own as the quality seems acceptable and 1080p resolution is fine.
Posted by Tom Tomlinson (Member # 3195) on December 26, 2017, 10:17 PM:
I was and still am having a power issue with the machine. I checked the voltage on the plug output & it measured 12V. I contacted support via phone & they sent another plug which still had no change.
I've had the machine about 3 weeks now & have yet to scan anything. I asked if I can get get a replacement unit. They said no & to send the unit in for repair.
To me, this says a lot.
I asked for them to let me know asap regarding its status/repair. I hope they follow thru. Because my finger is on the trigger to request my money back.
Posted by Pere Pasqual (Member # 5906) on December 27, 2017, 07:30 PM:
Has anyone tried the modified firmwares?
I've uploaded a couple of new files - one is the original without any modification, that is, 960x720 4:3 at about half the bitrate of the modified ones, in case you want to go back to the maker's one. Beware that it doesn't has to be the same exact version you have, but I'm quite sure this one is one of the newest ones, as it allows cropping & more image sharpness settings.
There is another one I find very handy, in case you just want to convert to DVD. Adjust your cropping and start capturing - no need to convert the captured footage to DVD compliant resolution, avoiding resizing loses and an extra step which can be time-consuming. Oh, this is for PAL resolution (720x576); let me know if there's "market" for this and I'll upload a 720x480 version...
Sorry again but I'm short of time - as a last word, just to say that in the other forum there's people who says has flashed the Wolverine with the Somikon (https://www.pearl.de/support/product.jsp?pdid=NX4294) and getting 20 fps. Although I haven't checked it by myself and the firmware says @30fps when inspected. Also it is 14400 bps out of the box. Do at your own risk!
http://retromania.pandelground.com/wolverine-reels2digital-moviemaker
Posted by Kurt Froberg (Member # 5922) on December 28, 2017, 05:32 AM:
Hi Pere and thank you for your work with the firmware, very interesting!
I did a quick test with my Somikon HD-XL scanner and scanned around 30 sec of the same footage with:
- my original firmware for Somikon 1440 x 1080 30 fps
- the new f/w from Somikon with 1440 x 1080 20 fps
- your f/w 1440 x 1080 30 fps
The raw files properties showed like this:
- original Somikon 1440 x 1080: 30 fps, 14441 kbit/s
- new Somikon 1440 x 1080: 20 fps, 10003 kbit/s
- your 1440 x 1080: 30 fps, 16200 kbit/s
I then converted via MP4Box GUI all the files to 18 fps and the result was:
-original Somikon: 18 fps, 8851 kbit/s
- new Somikon: 18 fps, 8752 kbit/s
- your 1440 x 1080: 18 fps, 9929 kbit/s
Visually I can´t really see any difference between the clips. I guess it would need to be at least 20000 kbit/s at 18 fps to se a possible improvement but that is perhaps impossible with the current hardware?
Cheers
Kurt
[ December 29, 2017, 04:11 PM: Message edited by: Kurt Froberg ]
Posted by Pere Pasqual (Member # 5906) on December 28, 2017, 09:47 AM:
Hi Kurt,
The thing is that my modifications, although uploaded later, where done *before* the Somikon firmware was released. So now my firmwares are mostly unnecessary, as what most of people was demanding was 1080p resolution and higher bitrate. Once the Somikon firmware was proven compatible with the original Wolverine, both goals were accomplished without further "hacking"... :/
Anyway, I'm sharing them so people can choose mainly between different capture resolutions.
The original bitrate of the Wolverine was about half the new one, and yeah, compression artifacts were highly noticeable. The current bitrate is a very high one, so I'm sure no one would ever notice any improvement going from near 10000 to 20000. Also note that bitrate will unavoidably decrease with lower framerate - you need a less amount of bits to store the information since you have less frames to store. So, all in all, near 10000 bits for such a low frame rate is such a big amount of "space" to encode the information.
Posted by Joe Wein (Member # 6216) on December 29, 2017, 01:58 PM:
Hi Pere - do you happen to have any raw test footage from the 1080 version of the wolverine? I'd love to see the quality of those. Thanks!
Posted by Steve Thurlow (Member # 6240) on December 29, 2017, 02:04 PM:
I have just bought the new Wolverine Pro with 1080P. I have made 4 videos so far from Super8. All looks good and I happy with the quality. However I get memory card errors from time to time when recording. The machine stops and I restart and all is well for a few more minutes until it stops again with same error. This is a little annoying.
Any idea how to fix this?
I have tried several SD cards all formatted by this machine. I can stitch the videos together in software I know.
Posted by Joe Wein (Member # 6216) on December 29, 2017, 02:21 PM:
Hi Steve - Is there any footage you would feel comfortable sharing - I'd love to see the quality of a clip? Also, are the SD cards you're using the largest size and hit the speed recommendations?
quote:
I have just bought the new Wolverine Pro with 1080P. I have made 4 videos so far from Super8.
Posted by Steve Thurlow (Member # 6240) on December 29, 2017, 02:34 PM:
The cards I am using are 8GB SDHC Class 10
Posted by Joe Wein (Member # 6216) on December 29, 2017, 06:33 PM:
Hi Steve - While I haven't used the Wolverine, I believe it can take up to 32G cards and may use additional memory while creating the video file. I would try a bigger card...
Posted by Steve Thurlow (Member # 6240) on December 30, 2017, 09:19 AM:
The memory error seems to have gone away since I scanned a 5in reel which took about 3 hours.... all in one take. I created a 1GB file. I just sat and watched it and am thrilled with the video that I got.
Posted by Bill Pritchett (Member # 6234) on January 07, 2018, 06:02 PM:
Hey Steve, I have about 9k feet of film to convert and ready to order the Pro version in a week or so. How is it working for you now? Are you watching the digitals at the 20 fps or converting?
Posted by Steve Thurlow (Member # 6240) on January 08, 2018, 09:48 AM:
It is working well. I am pleased with the results. 20 fpm is so close to the original speed that it is hardly worth changing it but it is easy to do on the pc if you want to.
Posted by Stacey Henderson (Member # 6139) on January 08, 2018, 04:11 PM:
Greetings: After reading the topic since September, In late December I, bought the Woverine MovieMaker Pro. So far, I am getting good results, (I think). This is all new to me. I inherited a box of old 8mm film of my family from my uncle. I was viewing the films on the projector he also left to me, until the light bulb burned out on the third film. I learned getting a new bulb was going to be both difficult and expensive. So I bought the wolverine and plan to convert the whole box and send it out in digital form to the extended family.
What I'm looking for is help preparing the film for the scanning. It keeps getting stuck in the light table and stops. I've learned how to fix a bad splice by doing a new splice. (I did my first splice 3 days ago, and it worked well.)That is not the only issue when the film stops. Sometimes it seems to be sticky enough with this yellow stuff to stop the process. The last 400 foot roll I scanned stopped 41 times during the process!
I tried and can't seem to order the filmguard. It seems to be the best choice for a cleaner and preservative, but Amazon says it can't be sent to California, where I live. I do have denatured alcohol, but I'm scared to use it for fear of damaging these old films. Suggestions? Any help is appreciated!
Posted by Alan Taplow (Member # 4702) on January 08, 2018, 04:41 PM:
I run everything through an editor to be certain the splices are clean, sprocket holes are not torn, and to cut out any long black or clear sections. Then I rewind through a frame counter on all 5" or 7" reels so I know what to charge folks, as well as through a hand held lint free paper with a very inexpensive home-made cleaning solution consisting of 20% Mineral Oil and 80% of a 99% Isopropyl Alcohol (well shaken not stirred :-) Treated many thousand feet this way and no damage -- the very thin film of mineral oil keeps it feeding smoothly through the gate of a projector as well as the Wolverine. I think there is another forum topic on cleaning film you may also wish to view.
Posted by Gian Michele Soddu (Member # 6108) on January 09, 2018, 06:20 AM:
Hi Stacey Henderson, you may find most interesting the results of Kodak's research work regarding best solvents for
cleaning films: https://www.kodak.com/us/en/motion/support/people_and_planet/produc t_use/film_cleaning_solvents/default.htm
The last three members in the list are judged as excellent and not hazardous. Their content is pure isoparaffins=isoalkanes in the range C9-C11. For sure it is not easy to buy the cited solvents, especially if one cannot afford to buy a 200 liter barrel or live in countries like mine... BUT... we are smart people, are we? In facts, we can find an equivalent chemical composition in the best (= top quality class) liquid fuels for living room stoves! So here in Sardinia I found this at the supermarket, in a 5 litres bottle: http://www.tecnoairsystem.it/it/prodotto/petropur/petropur-platinum-348.html.
Here is an equivalent from The Nederlands, Firelux Clear, so pure because it has been sinthesized directly from gas: https://www.firelux.nl/en-us/use Cheers! gms
P.S.: Hi Alan Taplow, I humbly wish to point out that isopropyl alcohol, when not thoroughly removed from the film, serves as a water-absorber from air. And water accelerates the decomposition of acetate films (the dreadful, so called, vinegar syndrome). Wishing to be helpful. Cheers. gms
[ January 11, 2018, 04:46 AM: Message edited by: Gian Michele Soddu ]
Posted by Bill Pritchett (Member # 6234) on January 09, 2018, 08:22 AM:
Thanks for the response Steve. I'm in the same situation as Stacey...all new to this. Projector bulb blew when I first turned it on and then found DLJ bulbs expensive for the hours they last. This lead me to setting up to digitize the films.
The film prep and cleaning info is really helpful. I just bought an editor and splicer and plan on cleaning and reviewing the film before converting.
Thanks to all for the helpful info. Being that I'm totally new to the 8mm film world I'm soaking the info up like a sponge.
Regard,
Bill P.
Posted by Gary Schreffler (Member # 5945) on January 09, 2018, 08:49 AM:
I have been using a product from Urbanski Films called Filmrenew for many years, with excellent results. Also, this from Urbanski sums up well how to clean your films:
FILM CLEANING TECHNIQUES AND TIPS
By Larry Urbanski
Urbanski Film
Many collectors and archivists have asked for basic instructions how to clean and preserve their motion picture films.
The most common method of film cleaning is accomplished by wiping films with a cloth soaked in film cleaner while rewinding the film using hand rewinds.
The film cleaning procedure requires some equipment all film collectors/archivists should have.
Youll need a set of hand rewinds, film cleaner, cloths, and rubber gloves if desired.
Hand rewinds are made to accept film reels. By turning a handle the film is wound from one reel to another. These are usually mounted on a board or directly on a table. For film cleaning, table mount is recommended.
Cloths required should be 100% cotton cloth. Soft fluffy t-shirt or sweatshirt material works well and you can launder them when dirty. Rolls of film wipes can be purchased if desired.
There are several film cleaners on the market. We will discuss applying Filmrenew, which is a cleaner and preservative. Other film cleaners can be applied (Solvon, Renovex, RTI, Ecco, Edwal) using this same method. Other film cleaners are fast drying, and will dry immediately. Filmrenew is a slow drying product, taking several days to thoroughly dry.
Rubber gloves should be used if you are averse to getting chemicals on your hands.
Use all film cleaners in a well-ventilated area.
Films should be inspected and repaired before cleaning. Loose splices, nicks, and sprocket tears can snag the cloth when cleaning, tearing the film.
We are in front of our set of hand rewinds, one on the right, and one on the left.
Put your reel with film on the left side. I like the film coming off the top of the reel. Put your steel take up reel on the right side. The film should be wound off the top of the reel, clockwise, like this diagram. (Left reel 0***0 Right reel)
Moisten the cotton cloth in Filmrenew. Fold the cloth over the film. I create a jaw that covers the film in cloth, so that your thumb and fingers put pressure on both sides of the film. Wind the film slowly applying light pressure and evenly applying Filmrenew. Keep checking your cloth for dirt buildup. When the cloth starts to show dirt move your cleaning cloth to another position. Built up dirt and grit may scratch film! Re-apply more Filmrenew as necessary to keep the cloth and film moist.
Once the Filmrenew has been applied and is wound on the steel take-up, allow it to dry. Filmrenew has a long drying period, depending on your climate (usually a couple days). Once dry, rewind back to the original reel. Do not put the film in a can until completely dry.
If necessary, the drying process can be speeded up. You can immediately rewind back onto the original (steel) reel while buffing off excess Filmrenew with a dry cotton cloth.
If your films are on plastic reels use steel reels for the cleaning process. When the Filmrenew is dry, wind back on the plastic reels.
In some cases Filmrenews penetrating capabilities may loosen tape splices.
If you are using fast drying film cleaners (Solvon, Renovex, RTI, Ecco, Edwal), these products will not affect tape splices. It is recommended when cleaning film with ANY brand of film cleaner to use steel reels. Plastic reels may be used with Filmrenew if steel reels are not available for cleaning, but expect the plastic reel to become discolored.
Plastic reels may be used with fast dry cleaners if steel reels are not available for cleaning. Caution: When using a plastic reel with a fast dry cleaner, do not apply the fast drying cleaner too quickly. If the film is still wet while winding on to the plastic take-up reel, the film could stick to the sides of a plastic reel, damaging the film.
There are film applicator units that can be mounted between your rewinds to make the film cleaning process neater. Film cleaner is put in a bottle with an adjustable flow rate that wets cloths in a spring-loaded jaw. The film is pulled through the wet cloths by your rewinds, cleaning the film. The Ecco Model D Applicator can be used with any brand film cleaner.
Clean your films every couple years or more often if you notice dirt, warping, or noise while projecting. Clean films are less prone to damage. Your collection will retain its value, and your films will project better if you clean and maintain your prints.
Filmrenew is the only film cleaner you can use for soaking.
How to soak a film print in Filmrenew: After cleaning your film wind it tightly tails out (reverse wind) on a steel reel. Fill a lab can with Filmrenew and submerge the print. Let it sit in the closed can for a few weeks. Take the print out and let it dry for several days before rewinding. This process helps curl, shrinkage, and brittleness.
Filmrenew immediately kills mold and fungus. To remove mold and fungus soak the print for a minute or two to totally kill the mold and fungus. Immediately clean the print with a cloth moistened in Filmrenew as outlined in these instructions to remove dead fungus. If the film is on plastic reels it is recommended to replace the contaminated plastic reels. Steel reels, if not rusty, can be reused.
Filmrenew can be applied with a brush directly on the sides of a film for a quick protection application. The film may be immediately projected wet or allowed to dry. Obviously dirt is not removed from the film using this method.
**FILM CLEANING TIP. There is less chance of damage to very old archival sound film while hand cleaning with rewinds if you fold over your cloth on the sound side (not the sprocket side). If you are using square/square reels this can easily be done. This minimizes the possibility of the rag catching on a damaged sprocket and tearing the film while cleaning.
**FILM CLEANING TIP WITH FAST DRY CLEANERS. When using fast drying cleaners like Solvon, Renovex 2, RTI, Edwal, and Ecco care must be taken to make sure the film is completely dry when it is taken up on the rewind. If you apply a fast drying cleaner too quickly, and the film is still wet while winding on to the take-up reel, the film may stick together or the film could stick to the sides of a plastic reel, damaging the film.
**Filmrenew is safe for all film gauges and film stocks including but not limited to 8mm, Super 8mm, 16mm, 35mm, and 70mm. Filmrenew has tested safe for professionally applied magnetic soundtracks, such as Kodak sound stripe films or entertainment films sold by distributors. It is always recommended to spot clean a small section of a magnetic track if it may be an after market add on track.
Posted by Alan Taplow (Member # 4702) on January 09, 2018, 09:53 AM:
I apologize for helping to get this Wolverine thread off topic.
Those interested in cleaning may want to go to: http://8mmforum.film-tech.com and do a search on "film cleaning", where there are dozens of relevant postings. This thread should probably get back to discussing Wolverine.
Posted by Werner Ruotsalainen (Member # 6217) on January 10, 2018, 12:41 AM:
quote:
but I have observed that also as it has been doing some, reels, begin the unrest and instability, that cough you have noticed in the Wolverine ...
I've found out the following: this mainly happens after splices and similar stuff. With the no-splice long films I've scanned so far (for example, some of the GDR DEF "Heimkino" travel stuff - for example the one (12.5 min at 20 fps) at https://www.youtube.com/watch?v=I-Yl20Ayg4s ), nothing similar has happened.
The way I scan my home movies is as follows: just stop scanning at every splice, remove the film from the track and, after cleaning the dirt falled on the white screen below with a strong vacuum cleaner, place the film in the track again, but now just after the splice.
This has greatly reduced the cases I had to re-scan a given film because of the instability. (It still happens in about 20% of the cases. Nevertheless, it's now much rarer than previously, when I tried scanning entire 7" rolls in one step. The latter approach was also inferior in that the white diffusor screen also gathered a lot of dirt, falling from the film above, at the end of scanning, and this visibly deterioriated the output.)
Posted by Werner Ruotsalainen (Member # 6217) on January 20, 2018, 05:17 PM:
MacOS folks wanting to change the framerate of their files (Windows users: let me know if you need a similar tutorial for Windows as well!),
I've written a small shell script that iterates over the *.??4 files (meaning it'll match both .mp4 and .MP4) in the current directory, remuxes them with the fps 16 (you can, of course, use 18 instead by changing 16 to 18) and stores the results in the (previously-created) "output" directory.
1. Copy the following four rows in a text file ending at .sh (any name can be used). I assume the name "conv.sh" below. Copy it to your work directory.
#bash
for f in *.??4
do
./ffmpeg -y -i "$f" -c copy -f h264 tmp.avc
./ffmpeg -y -r 16 -i tmp.avc -c copy "output/$f"
done
2. In Console, in the same directory, issue the "chmod a+x filename" command; for example, in my case, "chmod a+x conv.sh". This will make it executable.
3. if the ffmpeg executable isn't in your path, copy it there or in the current directory. You can obtain the file directly from, say, http://ffbinaries.com/downloads (just click the "Download" button in the "ffmpeg" (first) column next to the "OS X (64 bit)" (last) row.) (Previously, I used the files at http://ffbinaries.com/downloads . The site is no longer maintained, it seems.)
4. Copy your source MP4 files in the directory and issue the "./conv.sh" command in Console. (Note the leading ./!)
This is by far easier for mass-transformation than using any GUI app.
Posted by Laurent Bellier (Member # 6286) on February 13, 2018, 04:13 PM:
Hi to all of you,
And first of all, a big Thank You! Indeed, it has been realy so great for me to have been able to learn and benefit from your so wide experiences!
A few words about my story:
I was in november 2017 at the point to convert an old second hand Heurtier 8mm/super 8 projector in order to convert some 8mm/super 8 family movies with my HD Cam. Then, a friend told me about this relativly new alternative of low cost scanner he's rent for a week end to proceed with a few reels scan. Finding this genius forum thanks to Google, I've been reading most of your previous posts (tough job, several long evenings....), and I've been convinced to change my initial plan, and invest in a Somikon HD XL 8mm film scanner 1080.
I've purchase a second hand 1 month old scanner on ebay, and ... its motor failed during the first reel scan... (Thanks to what I've lernt here, I was not fully surprised ....).
The original 2nd generation motor has been replaced by the 3rd generation motor by the initial vendor under its one year leagal warranty (PEARL near Paris in France), and I've finaly started scanning a dozen of reels.
Posted by Laurent Bellier (Member # 6286) on February 13, 2018, 04:21 PM:
Hi to all of you,
And first of all, a big Thank You! Indeed, it has been realy so great for me to have been able to learn and benefit from your so wide experiences!
A few words about my story:
I was in november 2017 at the point to convert an old second hand Heurtier 8mm/super 8 projector in order to convert some 8mm/super 8 family movies with my HD Cam. Then, a friend told me about this relativly new alternative of low cost scanner he's rent for a week end to proceed with a few reels scan. Finding this genius forum thanks to Google, I've been reading most of your previous posts (tough job, several long evenings....), and I've been convinced to change my initial plan, and invest in a Somikon HD XL 8mm film scanner 1080.
I've purchase a second hand 1 month old scanner on ebay, and ... its motor failed during the first reel scan... (Thanks to what I've lernt here, I was not fully surprised ....).
The original 2nd generation motor has been replaced by the 3rd generation motor by the initial vendor under its one year leagal warranty (PEARL near Paris in France), and I've finaly started scanning a dozen of reels.
Then my question:
I'm now in stand-by mode on this scan project, because wondering if my scanner is working properly. I've noticed that the scan picture are relativly "noizy" (I mean by "noizy" the picture random disturbance resulting from the scann that reduce picture quality). I've notice that first when playing the scan movies, then I've looked deeper picture by picture trying to understand, and comparing with results from other on this post or on youtube.
My temporary conclusion at that point:
the focus seems to be OK,
the picture contrast and luminosity are quiet good,
changing from low quality to medium or high quality on the device menue do not change significantly the problem.
Looking again on the internet, I feel there are two different kinds of scanned movies:
Some looking very close to my own results (whatever coming from Somikon, Wolverine, or Reflecta devices) , i.e. whith rather high level of digital noize, like original scans.
Some with very low level of digital noize, but also I feel with not sosharp pictures. My understanding is that to obtain that, they have using digital post processing of the scan movies (reducing digital noize, and also unfortunately loosing picture details)
In order to illustrate, I will try uploading here two differents samples extracted from the scan movies (obtained directly by screnn copy on my PC, and I'm trimming the sample picture in order to keep the resolution, whil complying to the 555 pixel wide picture rule of this forum:
First picure is an extract of a family movie I've scanned:

The second sample is what I'm obtaining when scanning just the empty scanner windows (i.e. just after the reel tape has escape from the scanner at the end of a scan run):

I've been surprised to visualise the same noizy effect on the empty picture I was expected to be completely white (the strange unexpected pattern visible here is different from one picture to another within a scan file, resulting in moving pattern when playing the empty movie. I've never observed anything like that with my Sony Full HD Camcorder, except in very very dark conditions.
So, am I really expecting too much from this 8mm/super 8 scanning method, or is my device different than yours, or should I wait one or two more years for the equipement/technology to improve?
Posted by Dan Esmond (Member # 3975) on February 14, 2018, 05:21 PM:
Hi Laurent,
That noise you are seeing is compression artifacts from the too-low MP4 bitrate these devices use. People have complained about it ever since these were first introduced in late 2016. Unfortunately, there are no real solutions, as Wolverine etc. claim that it is impossible to increase the bitrate any higher to reduce the noise.
The High/Medium/Low setting you speak of I believe is the sharpness control, not picture quality. I and others have found that using the Low setting reduces the prominence of the noise artifacts (they are still present but adding sharpness makes them more visible). The side effect of that is a "softer" looking movie.
An ideal solution would have been for these machines to have an option to just write out each frame as a JPEG image on the SD card. Then, users could compile those images back into a movie on their computers at whatever bitrate/format/frame rate they choose. Of course that would not be user friendly for novices.
I spent several years trying to devise a telecine device to transfer my parents' & grandparents' films, but never had the time and expertise needed to get it done and working acceptably. Meanwhile, the Wolverine device came onto the market and I just decided that it was more important to get the films digitized so that I could share them with my family.
I have done that now, and am putting each film on youtube. Some of the films are over 70 years old and it is providing my family members so much joy to re-live those old times.
However, I remain quite dissatisfied with the picture quality of the Wolverine. So even though I have transferred all of the films with it I have committed to myself that I will scan them again once a better device is available.
With technology now it really would be possible to come up with a much "smarter" scanner--one that uses the optics to achieve precise alignment by lining up the edges of each frame (and then no need to use a claw at all which would allow scanning of films with torn sprockets and/or warping due to vinegar syndrome). It could also overcome the dynamic range problems by using an HDR technique--scanning each frame twice (once with underexposure, and then again with overexposure and then combining the two). Professional-level telecine devices are already using these techniques. With the success of the Wolverine/Somikon devices maybe they will work on making even better scanners.
I think the reason the Wolverine gets good reviews on amazon is because people are just amazed to be able to watch their old movies again--they aren't concentrating on the detailed image quality. Plus, compared to all previous DIY methods or sending off your films to a service, the Wolverine is very cheap and easy for a perfectly watchable result.
Aa a film aficionado, I know that there is more quality in these 8mm/Super-8 films that the Wolverine isn't capturing. When I was working on capturing via DSLR and an enlarging lens I was able to see the actual film grain--the Wolverine doesn't show that. Not to mention the problems the Wolverine has with auto-exposure (another issue which cannot be adjusted nor disabled).
So is the Wolverine a worthy method of archiving these old movies forever? My answer to that is no. To me, archiving means capturing digitally all of the analog quality that is there, and the Wolverine does not do that.
But it is (relatively) cheap and easy to use. If I waited years for a more archival quality transfer, some family members who would really enjoy seeing those films may die or lose their sight, etc. So for me, I decided the Wolverine was a decent compromise for now so that I could share these memories with loved ones (none of whom have even noticed the deficient picture quality). Hopefully someday I will get another transfer that satisfies my high standards.
Posted by Werner Ruotsalainen (Member # 6217) on February 14, 2018, 05:42 PM:
Laurent, are you absolutely sure you have the latest firmware, with the bumped-up, 9 Mbps bitrate and 20 fps?
With it, you shouldn't see THIS much compression artefacts when shooting with NO film (not even a transparent area of the film). An example I've just digitized - a 1:1 crop of a framegrab, without any kind of resizing; that is, one pixel corresponds in this image to one pixel in the original video:

Note that I deliberately selected an area with some dirt fallen from the previously-scanned film. As you can see, my results do exhibit some artefacts but the frame is definitely cleaner than in your crop.
These kinds of compression artefacts (in both images) are more likely attributable to the extremely high (automatic) contrast the firmware tries to apply to extremely homogenous input (resulting from only shooting the white diffusor under the film gate) like this. For example, the dirt speckles aren't at all noticeable in the digitized film (that is, when there's some actual film in the digitized footage) showing the contrast bump wasn't that huge there. The artefacts you see there are more like plain film grain and can easily be cleaned up with, say, Neat Video. (See my and Berend De Meyer's examples at 8mmforum.film-tech.com/cgi-bin/ubb/ultimatebb.cgi?ubb=get_topic;f=1;t=011636 ) IMHO, Neat Video is a must if one scans film and wants to get rid of the grain.
Posted by Mike Spice (Member # 5957) on February 15, 2018, 04:14 AM:
I am very tempted to try the homebrew firmware upgrade for the wolverine.
I am thinking of the 1440x1080 16000 bitrate version.
Has anyone tried this yet? any advice welcome, as to if it is better than my default firmare.
thanks
I can't afford to 'crash' my machine as I have just been given 85 50ft reels to scan.
firmware page from retromania
Posted by Antoine Orsero (Member # 41) on February 15, 2018, 08:25 AM:
I don't trust all these machines to scan super8 movies.
I use: a foot for camera, the projection screen, my GS1200 and a Canon camera that can also film. See the result after passing on Power Director 15. What do you think?
https://www.youtube.com/watch?v=C_G8KqfppaU
Posted by Mike Spice (Member # 5957) on February 15, 2018, 10:12 AM:
I think that looks very good.
My only criticism would be the frame size, compared to what I get from the wolverine.
You have done a really good job reducing the shutter flicker.
Lovely vivid colours.
It's nice to see some home movies keep thier colour after all of these years.
As for not trusting 'these machines' to scan your films, they do do a very good job, here is a super8 example of films I have scanned with the wolverine.
892 squadron navy lads on the beach in St Thomas. 1978. HMS Ark Royal.
However, it's clear to see the compression artifacts in my example, which are absent in your clip
wolverine example at you tube
Posted by Werner Ruotsalainen (Member # 6217) on February 15, 2018, 11:23 AM:
"It's nice to see some home movies keep thier colour after all of these years."
Fortunately, home movies are far better than commercial stuff released after 1950'ish. I've scanned tons of different amateur stock (ORWO 15 Std8, Agfachrome 18 S8 and Kodachrome S8, the oldest (Kodachrome) having been shot in 1967); all of them had proper colors.
Posted by Dan Esmond (Member # 3975) on February 15, 2018, 11:41 AM:
Neat Video and other software plugins can help lessen the prominence of the compression artifacts. But they can never recover the detail lost to those artifacts in the first place. It's a garbage in->garbage out type situation. The problem with these machines is they produce mp4 files that are bitrate-starved. Compression artifacts are the result when there is too much detail for the capture settings to reproduce accurately. Yes you can make them look a little bit better but that does not fix the actual underlying problem: that detail was never captured by the wolverine in the first place--it's permanently lost.
It would be like copying a master audio recording onto an old cheap cassette using a tape player with dirty, worn heads. You could import that cassette into a computer and try to clean it up, but much of the original sound quality has been permanently lost due to the transfer method.
Software plugins can actually improve on the *original* when you have a high quality reproduction to work with (in the above analogy, like a studio remastering a recording). Some of the results I've seen from VideoFred's avisynth plugins are incredible. But the Wolverine gives you an inferior starting point. Thus any tweaks you are making are mainly to attempt to lessen the flaws the Wolverine itself introduced.
I have not had the guts to try a hacked firmware either, though I am very glad people smarter than I are working on it. Because aside from the jittery/wobbly capture issue, the bitrate is the primary problem with these devices. It would also be wonderful if the auto-exposure and auto-white balance could be turned off but that's not useful without controls to adjust them manually through the UI.
Mainly, I just hope this becomes a profitable market for the manufacturer(s) such that they invest the resources to keep making them better. It's an ingenious design but there is so much room for improvement.
By all means, buy one and use it to get your footage digitized so you can share it with friends and family. These old films do no one any good sitting in their canisters unwatched. If you have a discerning eye though, do yourself a favor and hold onto the original films so you can give them a better transfer when a better method becomes available. The Wolverine/Somikon machines are not capturing all of the detail 8mm/Super-8 has to offer.
Posted by Antoine Orsero (Member # 41) on February 15, 2018, 11:43 AM:
I have not changed the framing but I can do it easily with the Virtualdub software provided that the video is in AVI.
Here's the result with Virtaldub. The black bars you see it's Youtube that put them.
https://www.youtube.com/watch?v=qW38buYsJr4
Posted by Mike Spice (Member # 5957) on February 15, 2018, 11:56 AM:
virtualDub is the most amazing video tool
But as you say, avi.
I spent 18 months on a timelapse project.
Nothing to do with 8mm.
I could not have done it without VirtualDub
VirtualDub video
Posted by Werner Ruotsalainen (Member # 6217) on February 15, 2018, 03:52 PM:
quote:
I am very tempted to try the homebrew firmware upgrade for the wolverine.
I am thinking of the 1440x1080 16000 bitrate version.
Has anyone tried this yet? any advice welcome, as to if it is better than my default firmare.
Firmware flashing etc. went without a hitch. The GUI differences from the latest (20 fps) Somikon version:
- no waiting before fast forward starts - this is great
- no countdown on-screen any more during scanning - this is pretty bad as, unless you have an external clock, you won't know how much film has already been digitized.
For example, I took advantage of the clock a lot to keep track of the next split so that I know when I should come to overwatch the scanner whether everything is OK after the split. Most of my films are just joined-together std8/super8 films, meaning splits are at regular, highly predictable intervals.
To be able to do the same with this firmware, I need to use an external clock now.
A definite advantage of the hacked firmware is it being 30 fps, which is natively supported by FCPX. This means no framerate conversion will take place (meaning additional frames added by FCPX and introducing stuttering) if you don't want to change it but, say, only clean up noise / crop / stabilize etc. For the same to be done with the original 20 fps videos, you will first need to repack the h.264 stream first - via, say, my ffmpeg script above. Doing this with the latter is very fast and simple (without any quality decrease) but still requires an additional step.
With regard to the image quality, I couldn't discern much quality difference between the two versions. I'd say they're on par. Feel free to check out framegrab pairs of exactly the same input frames. They're from the following two scans:
20 fps (original FW)
30 fps 16 Mbps hacked
These are both original, out-of-scanner files (the 20fps has been trimmed by QuickTime. No quality changes as simple trimming doesn't re-encode the video.).
Posted by Laurent Bellier (Member # 6286) on February 15, 2018, 04:28 PM:
Thanks a lot, it's wonderful to receive so accurate and documented answers to my question,
Dan:
I will then probably arrive to the same conclusion as yours: in this case, not putting to much effort (or any effort at all) in trying to correct something that in not feasable, but continuying scanning as it is in order to share with my brothers and they children movies, the oldest from the 50's showing my great-great father....
(And I'm also afraid that whith post treatment, improving one parameter if often obteined by loosing one anoter one, i.e. reducing efficiently noize created by compression artifact, might result in visible picture detail losses).
Werner:
Might differences between our results be also the result of a different light intensity setting? Despite your picture is more white and mine gray, the pixel size looks the same to me, the contrast of the noize pattern being much higer for mine.
The properties ot the video files I've obtained are 1440x1080, 9724 Kbits/s, 20,00 frames/s (when checking the file properties with microsoft windows): is there anything else to check?
Mike:
I share the same tentation as yours with the firmware upgrade to 16000 bitrate version (But my scanner is Somikon branded, not wolverine as yours, I'm not sure is the firmaware beahviour can be the same....?)
Antoine:
Your picture quality in term of noize level looks perfect, just as I would expect if using my Sony Full HD Cam corder. Have you applied some noize filter, or is it just as scanned? (I don't know Power Director 15 ).
On the other hand, we can observe some resulting flicker that is not obtained when using the picture by picture scanner.
I can share with you below another sample, that I've obtained around 10 years ago, with a different process: the famous converting box with a 45° etche glass, with the projecteur at one side, and the camcorder a 90° located other side. I was using at that time only a 8 mm DV video camcorder (ie picture definition= 720x576 pixels/picture):
I'm feeling Flicker is horrible (of course not visible on this still picture ;+)
Pixel size is visible because of the lower definition
(But the noize level was however lower than with the Sominkon HD 1080 scanner)
Compare with that, I feel that despite compression artefact, Somikon scanned picture will give a much higher quality video...

Posted by Pere Pasqual (Member # 5906) on February 15, 2018, 04:33 PM:
Dan Esmond, I don't mean to be rude, but I think you are misleading people with some of your comments. The bitrate limitation has been sorted out months ago both with homebrew firmwares (like the ones I posted) or with the original Somikon update. You don't need any guts for testing them - apart from being already tested by many using thus being safe, there's no way your machine can be broken as even after flashing your machine with a non-working, defective or corrupted firmware will let you to flash it again with your original firmware (I did it dozens of times while experimenting).
And, as Werner already noted, those artifcats are not only due to compression, as they still exist somehow in 9 Mbps firmware. That's such a high bitrate that it proves it coudln't be due to compression at all.
In my opinion, the capture example by Antoine is of much less quality than what you can get with the Wolverine. Didn't anyone notice that big amount of flickering?
Posted by Werner Ruotsalainen (Member # 6217) on February 15, 2018, 05:18 PM:
quote:
In my opinion, the capture example by Antoine is of much less quality than what you can get with the Wolverine. Didn't anyone notice that big amount of flickering?
Agreed. Antoine's YouTube video is of MUCH lower quality of what is achievable via the Somikon/Wolverine.
BTW, I've just uploaded some new scans. The first is the full version of the Austrian flypast (flyover) (shot in the 1970's) film I've already posted some scans of (to Google Drive), with additional 60p optical flow and stabilization in FCPX.
Link
Note: due to the excessive dirt on the film, I scanned this in two steps (cleaning the gate in between). This is why there's a temporary jump in the auto color temperature at around 01:48.
EDIT:
And here's a Finnish film scan of the same subject (shot around 1980), demonstrating whether my PP attempts were successful (in this case, nope):
1. directly the scanner's output at 18 fps (framerate changed by my ffmpeg script above):
Link
2. the same with an added 60p Optical Flow in FCPX 10.4 to make the framerate much-much better:
Link
As you can see, as opposed to the Austrian 60p + stabilized scan above, not even this has worked. The results are sometimes absolutely awful with major artefacts.
3. and, finally, a 60p Optical Flow (see previous step) + stabilized version:
Link
This version is atricous with some MAJOR cropping - again, the FCPX results of the Austrian one is orders of magnitude better.
The Finnish example shows in some cases Optical Flow can cause awful results. In those cases, it's just safer to stick with the original 18p framerate.
Posted by Janice Glesser (Member # 2758) on February 15, 2018, 06:20 PM:
You can actually edit file formats other than AVI in VirtualDub if you use Avisynth.
Here is the Avisynth scrip to open a .mp4 file in Virtualdub. Install AviSynth. Create a text file with the script I show below substituting your actual file path name. Name it something like VirtualDub-MP4.avs
DirectShowSource("C:\[directory-pathname]\[filename.avi]")
Drag the .avs directly onto the VDub icon if you have it on your desktop or open Vdub and drag the .avs file into Vdub.
Posted by Dan Esmond (Member # 3975) on February 15, 2018, 10:22 PM:
Pere Pasqual there is no need for any of us to be rude, as we are all just sharing information and opinions on this web site. Perhaps I left you and others with the impression that the Wolverine produces extremely poor results--if that is the case then I apologize for not being clearer. Let me state it equivocally:
The Wolverine (I have not tried the Somikon or anything other than stock Wolverine firmware) produces files that are perfectly fine for sharing on youtube, etc. with friends and family. My transfers have been shared with many people and so far no one has said anything other than that they are amazed to see these old films again after so many years.
Compared to old VHS telecines, filming off the wall or mirror boxes like Laurent mentions, the Wolverine is quite an improvement indeed. The classic flicker problem inherent in the inability to sync frame rates is solved and there is finally an easy, cheap method for the end user to do a frame-by-frame scan, which is how film should be digitized.
My point was that the noise/compression artifacts/whatever is created by the Wolverine unit--it is not film grain and it is not present in the film itself. Whatever is causing it (I maintain it bears all the hallmarks of low-bitrate compression) it is causing a reduction in picture quality on the resulting transfers. To someone who is eyeing detail it is obvious and distracting. You have admitted yourself that the resulting movies from machines running hacked firmware still show artifacts, so I'm not sure why you think my complaints are unjustified. The artifacts (whatever their cause) are a deficiency/limitation of these units that up to now have not been fully resolved by yourself or anyone else. So my point to Laurent (and others reading who are considering buying one of these) are that for now you just have to accept that your videos from these machines will have those artifacts in them. You can try to reduce them using software plugins but (as Laurent mentioned) but you will not eliminate them completely without causing other problems.
And that's not even mentioning the other issues afflicting these units--the jumpiness/wobbly issue which has been widely discussed here is a big one. Some films I had to scan 3 or 4 times to get a transfer that was stable. The auto white balance has also been an issue (although I think it has been improved in more recent firmware releases), where colors shift in the middle of a scene. Along those same lines, the auto-exposure in these machines can also easily get fooled and you end up with alternating dark and light frames in a single scene.
My hesitation with the firmware situation is that with the Wolverine machines at least, the different hardware revisions use different firmware files. My friend has one of the oldest belt-driven models and mine is the model that used gears instead. Wolverine sent me a firmware update last year that worked fine on my unit but caused my cousin's to lock up hard. Fortunately I was able to flash it with the correct firmware file after Wolverine sent it to me. But it made me quite hesitant to flash anything unofficial because I'm sure Wolverine would not support it in that case. I do not know if the hacked firmwares can be used on all the hardware generations of the Wolverine but I was not prepared to risk my warranty to take a guess.
My overall point here (perhaps missed in all my wordiness) is that 8mm and Super-8 films can look incredible with a very high quality frame-by-frame transfer using low compression in both the luma and chroma layers. In my opinion, the Wolverine unit does not give such a. high quality transfer. But no consumer-level product does (and some professional transfers may even be worse) with perhaps the exception of the $1000 Reflecta Super 8 scanner--but it is much more expensive, can't do Regular-8 and has its own reliability issues.
I think people should buy the Wolverine and use it to transfer their films so they can be enjoyed, especially by lay people who have lower expectations. But if you are an aficionado and lover of the inherent beauty of film (which I think many people who come to this site are), you should not expect the Wolverine unit to give you results that fully capture everything the film has to offer. My hope is that someday such a transfer will be readily attainable with more innovation, but we are not there yet.
If you feel differently than I do, that's fine. To some degree this is subjective. But I do not think I am misleading people at all by pointing out the flaws with these machines. To the contrary, I have done a great deal of research and everything I shared was my personal hands-on experience. Hope it helps someone.
Edit: I think this video (https://www.youtube.com/watch?v=vj9rApV_Yx4), which shows a side-by-side comparison of a professional transfer vs. the same film transferred by the Wolverine shows quite clearly that the Wolverine doesn't capture all of the quality in the original film. Is it good enough for most uses? Absolutely, especially for the price and ease of use. But I think eventually we will have machines that will capture with quality comparable to professional frame-by-frame transfers.
Posted by Morgan Evans (Member # 6321) on February 20, 2018, 07:20 PM:
I wanna thank everyone for this thread been learning a lot.
I've successfully flashed my Wolverine (the newer one, with the fan) using the Retromania tools.
I was curious as to if anyone has any advice... I've been shooting a lot of Kodak 50D which is a color negative film when I scan the film it's VERY red, and obviously negative when I invert, I'm not getting an accurate color pallet instead it's insanely blue. Like a film over everything I can color correct a bit, trying to find true white (I'm using Adobe Premiere and Resolve) but it ends up just looking horrendous.
I know it's not the camera itself because I've gotten these rolls scanned at Pro8mm and they look fantastic and really well color balanced.
I partially feel this is happening because the light on the Wolverine just isn't bright enough, and also probably because I'm not great a color correcting.
Just wanted to see if anyone who is shooting Color Neg has any pointers for how to get accurate color after scanning on the wolverine.
Thanks!
Posted by Janice Glesser (Member # 2758) on February 20, 2018, 09:32 PM:
Hi Morgan and welcome to the forum. I've done a lot of color correcting with Premiere. The type of correction depends on the colors of the scan itself. It might be easier to offer suggestions if you could post some sample pics. Also describe the process you are doing now.
[ February 20, 2018, 11:50 PM: Message edited by: Janice Glesser ]
Posted by Werner Ruotsalainen (Member # 6217) on February 26, 2018, 01:31 PM:
quote:
Along those same lines, the auto-exposure in these machines can also easily get fooled and you end up with alternating dark and light frames in a single scene.
Incidentally, does anyone know of an exposure pumping remover plug-in / process for any video editor (preferably FCPX, but anything else will do)? This kind of exposure pumping is indeed a serious one with these scanners. For example, in the video https://youtu.be/S5682D__zB4 (60p, cropped version with FCPXs Optical Flow processing; original out-of-scanner one, with 18p header: https://youtu.be/_rIMal9dll8 ), there are several scenes with pumping.
For example, the one starting at 03:08, of which the original scanner output is the following:
https://drive.google.com/open?id=16kXnEA7rsjTFTFAUhkjgNCsQ77dFd3uz
and the original of the second one, where no less than three(!) scenes suffer from this problem and starting at 07:50,
https://drive.google.com/open?id=1vs93FbIenWs4fL12aFFovagCdtQ8kRPE
Ive searched high and low but to no avail. (Found https://forums.creativecow.net/thread/8/1217300 but nothing else.)
Posted by Werner Ruotsalainen (Member # 6217) on February 27, 2018, 11:41 AM:
The constant dirt buildup on the white light diffusor under the gate, necessiating frequent scan stops, film gate cleans and scan restarts, got me thinking.
Certainly the way standard projectors work should be used - or, for that matter, the only scanner I know of to have a vertically-aligned light source (the $900 Reflecta one). What about making our Somikon / Wolverine's diffusor vertical, then? Easily (the two shots also show my other tweaks: strong clips and blocking the take-up reel NOT to add additional tension to the film, making the insecure film transportation even worse):
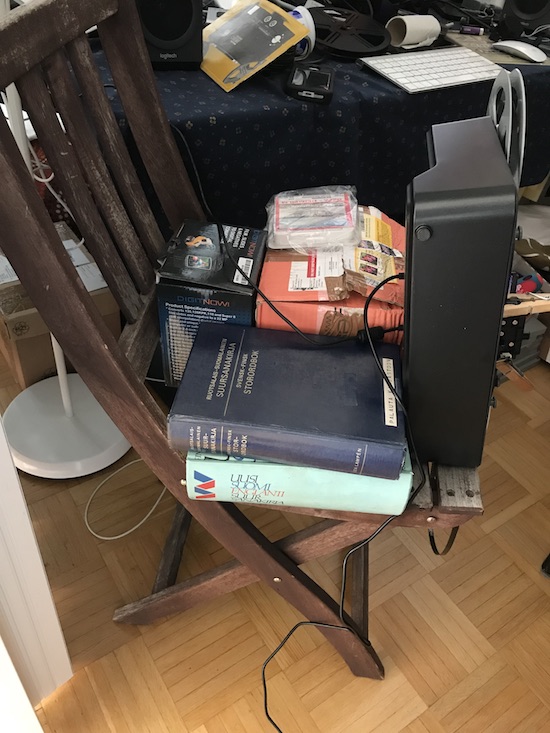
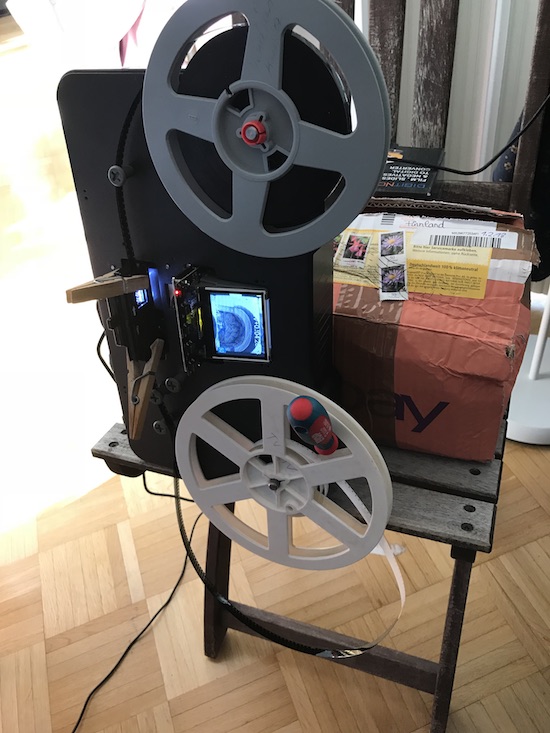
I'm happy to report that dirt buuildup is almost entirely gone.
EDIT: I've already mentioned the take-up reel should be disabled for as wobble-free scanning as possible. SOme other people have done exactly the same observation. An excerpt from the now-latest review at amazon.de :
"Vermutlich durch den zu starken Zug der Aufwickelspule ruckeln die produzierten Videos zum Teil grauenhaft. Ich habe deshalb den zu scannenden Film nicht aufwickeln, sondern in eine Plastikwanne laufen lassen. Das hat das Ergebnis verbessert, es ist mir aber trotzdem nach zahlreichen Versuchen niemals gelungen, einen vollkommen ruckelfreien Film zu erzeugen."
That is, "Probably due to the strong strain of the take-up reel, the scanned videos jerk sometimes horribly. That's why I did not made the film to be taken up by the take-up reel but let it run in a plastic tub. This has improved the result, but I have still NEVER managed, after many attempts, to create a completely smooth film."
[ February 27, 2018, 02:14 PM: Message edited by: Werner Ruotsalainen ]
Posted by Mike Spice (Member # 5957) on March 01, 2018, 10:29 AM:
I get around the dust on films with a very soft natural hair brush, and a blob of blu tac to hold the brush in place.
I also dust out the gate between each movie..
This works a treat
As for the take up issue, I would be inclinded to put a switch on the take up motor lead so you can physically turn if off rather than strain it and just let it get hot for a few hours while scanning.
I don't have a problem with take up tension, seems fine on my wolverine......
I have done two anti clockwise turns on the gate screws to increase the pressure on the film, as advised by wolverine, that seems to work.... However I am not completely jitter free.
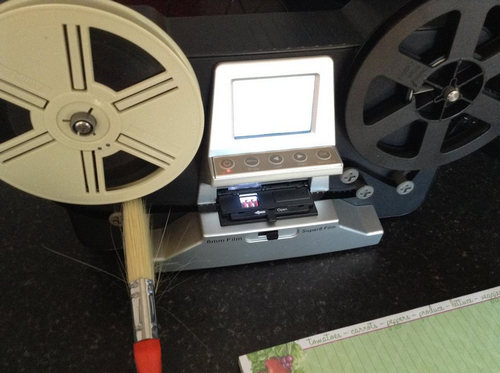
Posted by James Christie (Member # 6377) on March 12, 2018, 12:08 PM:
Hi, this my first post so hoping Im not going against any forums rules. Just looking for some advice from the collective minds on the thread.
Ive just ordered a Wolverine from AmazonUS. My aim is to digitise my Grandpas old 8mm reels (around 20 or so) My Grandma turns 90 this year and it would be great for her to see them again.
Suppose what Im looking for is best practice. How can I achieve the best results without too much experimenting. For instance Ive read through the thread regarding the firmware mods. Do they genuinely improve the quality and is it worth doing? Also what are the best settings when it comes to capturing the footage? Are you better using low sharpness and adding in Final Cut later?
And when it comes to the reels, they have been stored in a cardboard box but have been in an attic for a long time. The earliest date Ive found on one is 1968...but there could be earlier. Am I best attempting to clean them before scanning? Ive watched videos on YouTube of people using a tmicrofibre cloth and cleaning solution (Ive already ordered a bottle from eBay) and running it through the cloth. Is this best way? Can I damage it doing this?
Thats all the questions I have...for now 😀
Any advice greatly received
James
Posted by Mike Spice (Member # 5957) on March 12, 2018, 02:18 PM:
I would use the default settings for the first scan of reel one.
Keep a soft hair brush handy to keep the gate area clean.
I also place a soft hair brush in the film path to take out any debris on the way thro the scanner.
Do not use the scanner to rewind if you have a projector handy.
The wolverine struggles to rewind, and does not apply enough tension to get a decent rewind.
Scan a movie at default settings, then give us your thoughts and questions...
Good Luck!
Posted by Dan Esmond (Member # 3975) on March 12, 2018, 03:06 PM:
Hi James,
Mike Spice provided good advice. What cleaning solution did you buy? I'm sure there are several that will work, and as long as it says it's meant for (and safe for) film it should be fine. I used Edwal Anti-stat and had very good results with it. Only caveat I would say with most cleaning solutions is that they're highly volatile so I would do it in a very ventilated area. I did it at the bathroom sink with the fan on--I also kept the lid on the container of fluid except for when I was soaking the cloth.
I cleaned most of my films using an old cotton t-shirt (make sure it's 100% cotton) cut into strips, but you can also buy PEC Pads pretty cheaply on Amazon. Those are meant for cleaning film so you can bet they won't scratch it. The key with either is to keep adjusting it as you go so you're not re-depositing dirt on subsequent sections of film. Might not be a bad idea to keep the cloth saturated with solution while cleaning on a forward pass, then for the rewind use much less so that your cloth can soak up any solution that remains on the film. The Edwal I used evaporates very quickly so I never had that problem.
I think cleaning is really important if you want a good result. Because 8mm film frames are so small, even a single speck of dust can and will show up. You might think "oh well that's just one frame", but the way the Wolverine works, if that speck of dust falls down onto the light table it will show up in lighter scenes of every subsequent frame. This happened to me on several films even though I cleaned them all. People have posted on previous pages some unique methods to prevent this problem (holding the machine up vertically or positioning a brush to gently rub the film right before it enters the gate--wish I had thought of that!
I think a near-essential purchase for anyone using the Wolverine is a set of manual rewinds. You can find them on ebay or just buy an old vintage film editor (you may or may not want to use the editor part of it, but it has rewinds built in). That's what you will use to clean and inspect the reels (more on that in a sec) but as Mike said it's also the best way to rewind each film after it's done transferring. Not only does the wolverine have kind of a wimpy motor, rewinding on it is a PITA because you have to swap the reels around. You could of course use a projector to rewind but it's better to just get a set of rewinds.
I can't comment on the hacked firmware as I never tried it, and I actually finished my transfer project fall of last year before there was much progress on that front. But even if you don't go that route you might email Wolverine support and find out if there are any official firmware updates for your machine. They released two updates during the year last year and their web site doesn't mention anything about them. You have to email them, unfortunately. But they were very responsive every time I sent them an email.
As for the sharpness setting, that's going to come down to personal preference. It defaults to Medium so maybe transfer a small section of film at Medium, High and Low and see what each one looks like to you. For me, the Low setting minimized the noise artifacts and the other settings emphasized them, so Low is what I went with. I tried adding a bit of sharpness back via FCPX but not much. One other note on that (maybe it's been fixed in newer firmware) but my machine would not stay on Low sharpness after a power cycle. Every other setting would stick, but unless I went into the menus and re-selected Low sharpness, the films would end up at Medium... which was so annoying because I wouldn't know until after the film had already transferred. Then I'd have to re-scan it. I ended up putting a Post-It note on my machine to remind me to reselect the sharpness setting.
Another good use of a set of rewinds or an editor is examining the films for sprocket damage, bad splices, etc. The Wolverine absolutely will choke on torn sprocket holes. It will get stuck and just scan the same frame over and over again until you pull the film forward with your fingers. I had several films with such damage and chose to "fix" them using Kodak splice tapes. Those tapes are meant for joining tape edits/cuts together but they have pre-perforated sprocket holes so you can also use them to reinforce torn sprockets. They're meant to be applied to both sides of the film (and you should do that if joining film segments) but for fixing the sprockets enough for the claw in the Wolverine to detect them I found that just applying them to one side worked fine enough.
If your grandpa's films have old tape splices in them it's highly probable they'll have lost their adhesion and will break. Or if they were carelessly applied in the first place the wolverine might choke on them and get stuck. So unless you want to just deal with that by babysitting the machine and moving the film forward when it gets stuck you may want to buy a splicer and a bunch of Kodak PressTapes (easily found on eBay--make sure you get the right type for your film--is it 8mm, Super-8 or a mix of both?)
This is up to you but you may want to explore the Frame Adjust feature in the menu to widen the captured area to include the entire image. I was amazed that my Dad's Kodak Escort 8 camera exposed the film almost all the way to the left edge (between the sprocket holes). It may not seem like a big deal but by including that area in my finished films I am actually able to achieve very close to a 16:9 image, which better fits today's screens. You can always crop it back out later, but I felt it was better to get the entire visible image in the capture.
The only caveat with doing that (especially with Regular 8's huge sprocket holes) is that including them in the capture can throw off the auto-exposure in these machines and darken the image a bit. I usually adjusted the exposure compensation to +1 on my dad's films which I had zoomed out to capture the entire film width. You will just need to experiment with it.
I assume you already know the regular wolverine can't do 8" reels. The new Pro model can, or you can rig something up to do them on the smaller machine, or break the big reels down into several smaller ones.
Well that's probably quite enough for one post. I think it's awesome you're doing this for your grandma--she's going to love it. And you'll probably love it too, even though this kind of project ends up taking a lot of time and quite a bit of money. It's totally worth it though. Hope you'll keep us updated on your progress and feel free to ask any other questions you have.
Posted by Werner Ruotsalainen (Member # 6217) on March 13, 2018, 01:55 PM:
quote:
I was amazed that my Dad's Kodak Escort 8 camera exposed the film almost all the way to the left edge (between the sprocket holes). It may not seem like a big deal but by including that area in my finished films I am actually able to achieve very close to a 16:9 image, which better fits today's screens. You can always crop it back out later, but I felt it was better to get the entire visible image in the capture.
The only caveat with doing that (especially with Regular 8's huge sprocket holes) is that including them in the capture can throw off the auto-exposure in these machines and darken the image a bit. I usually adjusted the exposure compensation to +1 on my dad's films which I had zoomed out to capture the entire film width. You will just need to experiment with it.
Yes, several Kodak models did the same; for example, the Brownie. I too made use of the exposed area between the sprocket holes and continuously used +1 exp. compensation. The blacks on the Wolverine easily get "crushed", unlike the highlights, which not that easily burn out (compared to blacks crushing); +0.5EV is, therefore, a standard setting for me. When scanning Brownie material, to account for the global exposure value's decreasing because of the large-area white holes, I dialed in another +0.5EV.
An example of such footage:
my own scan:
16p: https://youtu.be/9z7Cd9A44a0 (direct, non-cropped scanner output with 20->16p framerate header conversion via my ffmpeg script; huge overscan with w=0)
60p ("Optical Flow" in FCX 10.4 + vertical crop): https://youtu.be/at6F70cUihs
Phil Vigeant's scan (it might be a Brownie too; note that he hasn't used as large overscanning as me): https://vimeo.com/238321856/
quote:
My aim is to digitise my Grandpas old 8mm reels (around 20 or so)
If you meant Standard and not Super8: Note that originally Double-8mm film (99% of the currently available Standard 8mm footage) was slit in half, which is inherently a non-precise process. Therefore, your films may get stuck. You will, if this often happens, need to either send in the device to Wolverine so that they widen the film channel or you do it yourself. See my lengthy post on the fourth page of the Somikon topic ( http://8mmforum.film-tech.com/cgi-bin/ubb/ultimatebb.cgi?ubb=get_topic;f=1;t=011449;p=4 ) for more info.
[ March 13, 2018, 05:26 PM: Message edited by: Werner Ruotsalainen ]
Posted by John Richard Almond (Member # 2939) on March 14, 2018, 06:03 PM:
I am reading this thread with great interest, I have not posted on here for quite a while but I always bob in now and then.
I have attempted to copy some of my own films from the 70s and the results have been ok but I would like to try the wolverine or the other scanners that are or look the same.
The thing is I have only about 9 50 foot reels to copy and I dont really want to buy a new machine so if anyone in the UK are willing to let one go then I am in the market to buy and when I have done I am willing to sell on the machine to anyone else that is in the same situation I am in.
Many thanks guys.
Posted by Mike Spice (Member # 5957) on March 15, 2018, 11:42 AM:
John Richard Almond you could always send them to me.
I have been charging £2 per 50ft reel plus P+P
Send me a blank disc to burn them to, as mp4 files, not a 'dvd'
I am in west sussex.
You can find my facebook group via my youtube page if you are interested, and see work I have done for others.
Scroll down to the links on the you tube page to find my Super8 Rescue group
Mike Spice You Tube
Super8 rescue FB group
Posted by Laurent Bellier (Member # 6286) on March 15, 2018, 04:51 PM:
Hi to all of you,
While understanding we canno't expect more frome this device than what it can delivered, I've however tried to chalange the assumption that the observed noize level is a consequence of the too low bitrate. So I've done exactly the same trial as Werner Ruotsalainen posted February 15, 2018 03:52 PM applied to the same family movie sample that I've poste before:
My first post posted February 13, 2018 04:21 PM was using the Official Somikon Firmware for my somikon scanner (the one issued on October, 17th, 2017, i.e. the Somikon release delivering a 20 frames/s 1440x1080 mp4 movie at 9843 kbits/s)
In the today post, I'm dowloading the modified firmware for the wolverine scanner ( delivering a 30 frames/s 1440x1080 mp4 movie at 16370 kbits/s) (One funny thing: the Somikon device now claim he is a «Wolwerine» scanner when starting)
I've the same conclusion as Werner Ruotsalainen: I cannot really observe that one is better than the other, but I let you making your own opinion.

So I'm wondering if the noize level observed could be also just the illustration of the sensor capability itself? (I mean: Somikon sensor quality looks much much lower than my 10 years old Sony Full HD camcorder)
Based on this trial, I think I will probably come back to the original Somikon Firmware, that will give me smaller files for the same observed quality
Other option: I've seen one another web site (http://letransfert.soforums.com/t1163-mon-t-l-cini-base-de-Raspberry-et-arduino.htm?q=pearl&start=30 ) some recent home made telecine results that seems to give interesting results to me. If you want to have a look, please check on this web site to the post «Posté le: Dim 14 Jan 2018 18:56» by «Balzac_40 », an open (an zoom inside) the baby face picture sample: what do you think about it?
(It's just a pity for me that I will probably not find the time for now to try to do that myself.... The scanning time obtaine is presently close to 1 fps, so two time less than with somikon/wolverine scanners)
Posted by Werner Ruotsalainen (Member # 6217) on March 16, 2018, 05:28 AM:
quote:
Other option: I've seen one another web site (http://letransfert.soforums.com/t1163-mon-t-l-cini-base-de-Raspberry-et-arduino.htm?q=pearl&start=30 ) some recent home made telecine results that seems to give interesting results to me. If you want to have a look, please check on this web site to the post «Posté le: Dim 14 Jan 2018 18:56» by «Balzac_40 », an open (an zoom inside) the baby face picture sample: what do you think about it?
You mean http://img110.xooimage.com/views/0/2/8/img06217-53c6c14.jpg/ ? It's a pretty low-res image; at least I couldn't make it higher-resolution.
Posted by Laurent Bellier (Member # 6286) on March 22, 2018, 05:16 PM:
Yes, sorry, you're right, I'm trying to get in touch with the author to understand if it's a crop part of original picture, or a downsized version ....
Meanwhile, I've found another exemple which make me dreeeming about (The guy here seems to be really skilled in several areas optic, mechanic, electronic, sofware ....):
- Amazing still picture 1388 × 1036 extracted from a super 8 movie: http://www.cine2digits.co.uk/wed1.png
- video sample here: https://vimeo.com/49963017 and here: www.vine.me.uk/downloads/florida01.avi
(All tehcnical details here: http://www.cine2digits.co.uk/)
Well, I'm now wondering if I can find some time for trying building an home made machine, it seems such good quality can be achieved ....
Posted by Dale Allen (Member # 6392) on March 22, 2018, 05:37 PM:
Just got a Wolverine. After 3 days, I like it. After reading the post here, I am much more informed. Thanks for all the informative postings!
Posted by Mike Spice (Member # 5957) on March 23, 2018, 10:03 AM:
Good luck Dale.
my top three tips for these beasts:
Don't use it to rewind (unless you have no choice that is)
Invest in a soft hair brush or air blower brush and keep the gate clean before and after every scan.
Don't 'snap' the gate open and closed. Work out how to use the lever to assist when opening and closing, to create less wear on the catch.
Posted by Mark Davies (Member # 6249) on March 23, 2018, 10:17 AM:
Also, you may find that the default setting do not suite the current film, and cut off edges etc.
I will run a film until I get a good picture, check out the exposure, and adjust any x,y & z settings if required etc. and then run from the beginning.
Kind Regards Mark
Posted by Mike Spice (Member # 5957) on March 24, 2018, 04:43 AM:
I have also found that the focus settings make a huge difference, I have had some excellent results on the lowest setting.
Posted by Werner Ruotsalainen (Member # 6217) on March 24, 2018, 10:06 AM:
Folks, I've done some VERY important experimenting with my Somikon now that I've run into a VERY contrasty, B/W scene (a road sign) in one of the films I've digitized. (The original film is available in its entirety at https://youtu.be/SIhQNZcyaXg (60p processed with FCPX 10.4) / https://youtu.be/UQwxYlMbLHE (18p original). Note that I also provide a link to an archive containing all the test scans & framegrabs below - in order to review the results, you will want to prefer that one to the entire film.) This problem MAY affect Wolverine-branded (non-European) units too (or, for that matter, Reflecta ones) - I don't know.
Basically, I wanted to find out whether I can reduce the JPEG compression artefacts of the contrasty sign with the hacked 1440x1080 16 Mbps firmware ( http://retromania.pandelground.com/wp-content/uploads/2017/12/FWDV180N_1440x108 0_24fps_8000.zip linked from http://retromania.pandelground.com/wolverine-reels2digital-moviemaker) and how the sharpness settings affect the image quality.
During this, I've made a very important discovery: the now-latest (Oct/17; NX4294_12_163534) official firmware does NOT support sharpness changing at all. ALL the three settings result in exactly the same output! You can freely check this out in the following archive file:
https://drive.google.com/open?id=1qSoS5wrfKWEPurYfARtJduaxXGlahu7z
To see the scans I've made with the official firmware, look into the two subdirectories of "FW sharpness compare/ORIGINAL". They have three (in subdirectory "1") / two times two (in "2 power cycling between altering the setting") samples: the original (unaltered) scans themselves and the framegrab of exactly the same frame from these videos as .png files while playing back in QuickTume. If you look at the latter, you can see there is basically no difference between them, regardless of the sharpness settings I've used. (The filenames also contain the value of the setting.) The (very similar) file sizes also prove this. (The sharper (sharpened) the image, the bigger the filesize.)
Now, compare all this to the contents of the two subdirectories of "FW sharpness compare/HACKED", which has the "hacked" scans. Between these tests, I've even re-flashed the original firmware to be absolutely sure there is a difference in how the "Sharpness" setting is handled, as is also explained in the directory name "2. test after a full re-flashing (installing the original FW for testing and, then, again tha hacked)". Also note that the second subdirectory has separate subdirectories for English and German as the GUI language. (My scanner was, at first, set to German; I then re-set it to English after a bunch of tests to see whether the bug is language-dependent but, say, the English version is properly implemented. (It isn't.)).
As you can see, there is some major difference between the hacked version's files. This is pretty perfectly visible from the framegrabs' filesize too: 6, 7.2 and 8.1 Mbytes for the low / normal / high sharpness settings, respectively. That is, the low-sharpness version indeed has a lot less (false) information as the sharper ones.
The explanation for the (earlier) hacked version to work, unlike the (later-released) official one? Easy: the latter firmware wasn't properly debugged before release. The developers simply didn't notice Sharpness isn't at all working any more. This problem is very common in the world of programming.
All in all: at least if you have a Somikon with the latest (20 fps) firmware and do want to disable all kinds of in-scanner sharpening (that is, want to use the Low Sharpness setting, as recommended), do check whether the different sharpness settings indeed result in visibly different in-scanner sharpening. If you have the same results as me, just install the hacked firmware.
[ March 24, 2018, 01:20 PM: Message edited by: Werner Ruotsalainen ]
Posted by Dan Esmond (Member # 3975) on March 24, 2018, 01:11 PM:
Interesting findings Werner. I reported to Wolverine middle of last year the bug in their firmware that Sharpness always defaulted back to Medium after a power cycle (which was present in both of the official firmwares I used on my machine). I finished my transfer project not long thereafter so I haven't followed or installed any of the subsequent official or hacked versions. I was hoping though that they would actually fix the bug, not make it worse. I left a small note on my machine to re-set the sharpness to low before each transfer. But it sounds like now, medium sharpness is being used even if you set it to low before each transfer?
I hope Wolverine/Somkion wil fix that bug pronto, because to my eyes medium and high sharpness are unacceptably noisy. If they don't then it's a good reason to try to flash an older firmware without that bug present.
Posted by Werner Ruotsalainen (Member # 6217) on March 24, 2018, 01:22 PM:
quote:
But it sounds like now, medium sharpness is being used even if you set it to low before each transfer?
At least with the Oct/17 firmware and on Somikons. (I'm not sure of other-branded models.)
Posted by Werner Ruotsalainen (Member # 6217) on March 25, 2018, 07:58 AM:
BTW, let me elaborate on another slight advantage of using the hacked firmware caused by FCPXs not allowing one to process 8mm films with their native speed (16/18 frames per second). Up until now, in order to avoid creating intermediate frames, we needed to re-pack (essentially, change the fps header nothing else!) the 20 fps output of the scanner into a (bogus) 24 (or 30 etc. - anything natively supported by FCPX) video file and import it instead. (Again, with my ffmpeg scripts above, its very simple; however, its still a separate step we ALWAYS needed to do.)
Now that the hacked firmwares outputs framerate is 30fps, which (unlike the 20fps of the latest official and Sharpness-buggy firmware) is natively supported by FCPX (and all the other video editor apps), we can directly import these files into FCPX: no intermediate conversion (re-flagging to 24(...anything supported) fps) needs to be done. This is certainly an advantage.
Of course, if you do want to export the file in native 16/18 fps, it isnt possible in FCPX.
Actually, I only know of DaVinci Resolve (as of v12.4+) to support these two standard 8mm framerates see https://vimeo.com/248538512/description . And, AFAIK, even it doesnt support 12fps, which some R8 shooters did use back then (for example, the soldier that made these, for army admirers/devotees, pretty interesting shots in 1964: https://youtu.be/xKidGxNgn14 / https://youtu.be/ntez1LH-bYE (12p)) to save some film.
You need to slow the video down (to 60% for S8 and 53,33% for R8) from inside FCPX. Unfortunately, my ffmeg scripts will NOT work for FCPXs output; that is, you cant just export the file with the native 30 fps and just use ffmpeg to re-flag it to 16/18 fps. If you try doing this, there will be some heavy stuttering in the stream: ffmpeg will swap previous and next frames, making the output useless. This is a major problem.
This is why you must do the slowdown from inside FCPX. This, however, will still physically export a 30 fps file (or the framerate youve explicitly chosen when creating the project), meaning slowdown will introduce doubled frames to be displayed (A.K.A. pull down). You can always change the default Normal Video Quality setting (the one just inserting dumb doubled frames) to, say, Optical Flow. (This is what I personally do for all my FCPX-processed files. Plus, I create the project at 60p to allow for as fluid movement as possible. After all, if, because of FCPXs limitations, I do need to insert computed intraframes in between original frames, I try to make use of this to make the movement much-much fluider. (This is especially important with 12fps footage. The pans (or, for that matter, any camera movement) in the two 12fps army films Ive linked to above look absolutely horrible at 12fps. At 60fps, apart from the artefacts, its much-much more eye-friendly, as you can also check out at https://www.youtube.com/watch?v=h3XBthKlNPs / https://www.youtube.com/watch?v=rBGSCtX4xo4 .)
This is why I always upload Optical Flow-processed 60p 8mm scans in addition to the direct scanner output (12/16/18fps) on my YouTube stream: https://www.youtube.com/channel/UCSJ3JqZMyf0LDLNofpBtzow/videos .
Speaking of frame interpolation problems, the Frame rate conversion at http://www.thebattles.net/video/8mm_restoration.html also explains the problems youll face when you use Optical Flow.
Posted by Jaeson Koszarsky (Member # 6403) on March 28, 2018, 12:51 PM:
quote:
Werner Ruotsalainen
I've written a small shell script that iterates over the *.??4 files (meaning it'll match both .mp4 and .MP4) in the current directory, remuxes them with the fps 16 (you can, of course, use 18 instead by changing 16 to 18) and stores the results in the (previously-created) "output" directory.
I'm using a Wolverine Moviemaker Pro.
I currently have a troublesome reel that I'm going to scan backwards. Maybe the claw will get a better grip on the opposite side of the sprocket holes. For some reels with small areas of hole damage, I've found splice tape to work well.
Is there a modification for this fps changing Mac script that can also reverse the MP4 at the same time?
Thanks,
Jaeson
Posted by Werner Ruotsalainen (Member # 6217) on March 29, 2018, 02:29 PM:
quote:
I currently have a troublesome reel that I'm going to scan backwards. Maybe the claw will get a better grip on the opposite side of the sprocket holes.
Yup, I also do the same, particularly with spools that, otherwise, I couldn't scan without wobbling in 5-6 attempts. Then, generally, a reverse scan saves the day.
quote:
Is there a modification for this fps changing Mac script that can also reverse the MP4 at the same time?
There surely is, but, unlike my simple fps changer script, it also reencodes the video (takes a LOT more time & decreases quality):
ffmpeg -i inputfile.mp4 -vf reverse reversed.mp4
Therefore, I wouldn't use it as a separate step if I planned to another step of post processing; for example, vertical flipping. (At least in QT under MacOS, flipping is very CPU-intensive.) I can post my FCPX workflow for reversed scans if interested.
Posted by Mike Spice (Member # 5957) on March 30, 2018, 05:47 AM:
The biggest problem with the Wolverine and frame jitter (of which we all suffer with these machines at some point in a reel) is the take up motor.
This morning I am trying out a badly damaged 50ft reel dropping in to a clean box. The take up tension will damage it even more, and increase the jitter...
Last night I did a 50ft and instead of the Wolverine take up, I threaded the film to my movie viewer and hand wound bit by bit.
I have to say the difference is dramatic in terms of frame stability in the scan....hand winding take up would be impossible for 200 and 400ft reels! no one has that much patience do they?
I couldn't do this with a 200 or 400ft reel but thought of an idea to reduce to the 'pull' of the take up reel.
I think I have to find a way to add a potentiometer in the motor circuit to slow it right down.
I am not sure how to work out what value pot I would need to add, I guess I need to take a meter to the circuit and see what the voltage and ma rating is then do some maths.
I think if the take up motor could be slowed down to 'just about take up' it would solve a whole lot of issues.
If you have the electrical knowledge to help me work out what value pot to add to the take up motor I would be grateful.
I have the electrical knowledge to do the motor mod, just not the math to work out what pot to install, log or lin and value....
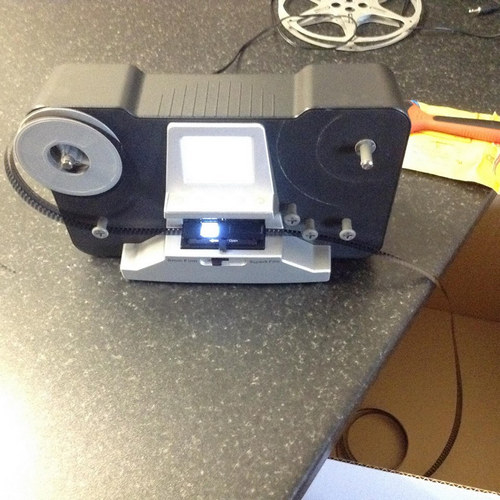
Posted by Mike Spice (Member # 5957) on March 30, 2018, 11:43 AM:
MyMP4Box GUI and Bitrates
I have been using this tool to get my scans down to a decent framerate but today for the first time I notice a significant bitrate change during the demux
A scan file from the wolverine comes out at around 14760 kbps
I notice the muxed files are coming out at anywhere between 7371 kbps at 15fps to 8356 kbps at 18fps
Does half the framerate (aprox) equal half the bitrate?
How much quality do you suppose I am losing, if any?
Is there something I can use to keep the higher bitrate or am I just confusing myself?
Posted by Werner Ruotsalainen (Member # 6217) on March 30, 2018, 06:59 PM:
quote:
I have to say the difference is dramatic in terms of frame stability in the scan...
Yup, the same is my experience - and also some of Amazon users. See my previous posts / photos on exactly this matter.
quote:
Is there something I can use to keep the higher bitrate or am I just confusing myself?
While i haven't tested the app, I assume it's just re-muxing the video files (just like my ffmpeg scripts) but does not recompress them. Then, the figures you posted are perfectly normal: let's not forget that the higher figure is for 30 fps, while the lower one is for 15/18.
For example, the just-uploaded 16p video at https://youtu.be/ID9aRrAOrdY is 8,74 Mbps after the simple 30->16 header conversion (via my ffmpeg script), while the 30fps original is 16,38 Mbps. The ratio between the two bitrates is exactly that of the framerates.
All in all, don't be afraid.
(Again, this assumes the app really doesn't reencode anything.)
Posted by Mike Spice (Member # 5957) on March 31, 2018, 06:07 AM:
Many thanks Werner
Posted by Mike Spice (Member # 5957) on April 02, 2018, 11:22 AM:
Inspite of the huge amount of negative comments the Wolverine gets, and the problems I have had with the darn thing, I have to say, todays 1966 standard 8mm scan is just beautiful!
Rescuing someone's home movies before it's too late, is a huge pleasure.
So it's not going to look great on a 50" tv set, but on my laptop? wow....
Standard 8 footage from today's scan
Posted by Dino Motti (Member # 6415) on April 05, 2018, 04:06 AM:
I own a somikon XL. I am struggling to understand why the compression artefacts are so severe.
I read here that some believe it is a MP4 compression issue, some instead a JPG compression problem of the single frames.
I also read that extracting the card from the machine, before the video file is saved, will preserve the single frames of the scan and allow me to process them on a computer. Is this true?
If somebody tried that approach do we know if the problem is with the JPG or MP4 compression?
Has anyone contacted the hardware producers to see if we can improve the quality of the compression of the frames/video? I would be happy to sacrifice speed if that helped to reduce the artefacts that are so severe sometimes faces are unrecognisable in some videos...
Thank you for the effort you have been making here to improve the firmware and get to the bottom of the issues with the wolverine and the somikon.
Posted by Werner Ruotsalainen (Member # 6217) on April 08, 2018, 03:56 AM:
Welcome Dino Motti,
1, I've tried removing the card while in use. No sign of individual JPG images.
2, you will need to scan in "Low" sharpness mode to minimize compression artefacts. Note that it may NOT produce different images from that of the default Normal mode. (See my earlier post on this.) Then, you'll need to install the hacked Wolverine FW, which does indeed enable it (and has no "forgetting sharpness setting during power cycles" bugs).
Posted by Mike Spice (Member # 5957) on April 10, 2018, 07:27 AM:
I did a focus and exposure test this morning which you may like to see.
This example is Low and High focus and exposure adjustment on a daylight and very dark indoor scene.
I purposely used a bit of out of focus film to see how it would cope.
Wolverine setting tests at YouTube 1080p
[ April 10, 2018, 09:58 AM: Message edited by: Mike Spice ]
Posted by Kev Morrison (Member # 6338) on April 10, 2018, 10:12 AM:
Mike, nice job on your comparison video, and the other information you've provided on the Wolverines. This is valuable stuff to us newbies that are in the process of doing a film-to-digital conversion.
I've just spliced together my first 400 ft reel of Super 8 film to convert via my Wolverine Pro (Janice, thanks for an excellent how-to video for the Kodak Universal Splicer!). I'm going to tinker a bit more with the settings before I start an estimated 216 minute conversion run....
Posted by Mike Spice (Member # 5957) on April 10, 2018, 10:41 AM:
Good Luck Kev, and thank you for the kind words....
The default exposure is probably the best bet, but worth trying the focus settings.
In my focus setting test, my Facebook super8 group decided the sharp setting gave the best blacks, but some slighly jagged edges.
I still consider myself a newbie in this film scan malarkey......
400ft! good luck. I hope your take up motor copes, if not, I can lend you a very nice cardboard box!
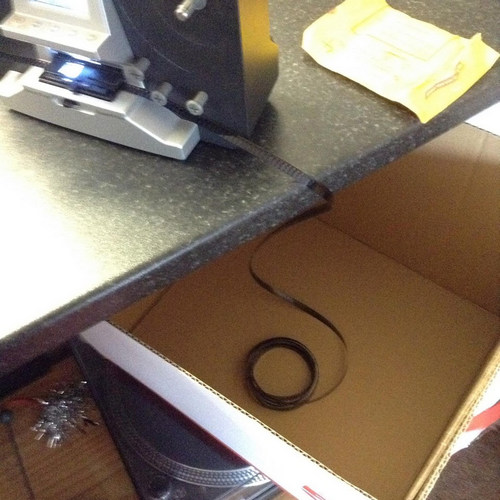
Mike's super8 rescue at Facebook
Posted by Berend De Meyer (Member # 5856) on April 11, 2018, 05:08 AM:
Mike
I just saw your exposure test on your YouTube channel: https://www.youtube.com/watch?v=E_2kf2uQjYE Clearly the -2 exposure has much more details in it. Thanks for sharing.
Your -2 exposure doesn't have the blueish color cast like in my exposure test for the SOMIKON HD-XL: https://youtu.be/BKzIzcnspJs Did you do any color corrections in this test-cilp?
I'll repeat my test for -2 / -1 / 0 / +1 / +2 with some actual 8mm footage and post the comparison very soon on YouTube
Kev
quote:
I've just spliced together my first 400 ft reel of Super 8 film to convert via my Wolverine Pro (Janice, thanks for an excellent how-to video for the Kodak Universal Splicer!). I'm going to tinker a bit more with the settings before I start an estimated 216 minute conversion run....
Good luck with your first 216 minute scan run, I'm very curious what your results and findings will be with/about the PRO version of the Wolverine.
[ April 11, 2018, 02:46 PM: Message edited by: Berend De Meyer ]
Posted by Mike Spice (Member # 5957) on April 11, 2018, 09:41 AM:
Berend the test clips had nothing done to them other than being put side by side in a video edit and exported as 1080p mp4
I also notice some strobing effect on the focus test at six seconds, on the sharp focus, that is not there on the low focus side.
I did intend to do a -2 and +2 exposure, but the +2 was so washed out it was pointless.
Posted by Berend De Meyer (Member # 5856) on April 12, 2018, 03:56 AM:
Mike Thanks for your reply!
Werner Thanks for all your input here in this thread. I'm now experimenting with your FCPX - 60p Optical Flow - settings. Your clips look really amazing, thanks for sharing.
Posted by Werner Ruotsalainen (Member # 6217) on April 12, 2018, 10:49 AM:
quote:
I'm now experimenting with your FCPX - 60p Optical Flow - settings. Your clips look really amazing, thanks for sharing.
I'll keep posting additional reports after testing the other motion estimation-enabled video editors. Prolly there are even better ones (given that FCPX often produces unnatural-looking results).
Posted by Kurt Froberg (Member # 5922) on April 12, 2018, 11:18 AM:
Hi guys,
Did anyone test this software Film9 which I think is amazing and can do nice smooth interpolations from 18 fps to 50 and lots of other things too, and it´s free. It uses Avisynth and VirtualDub but with a userfriendly interface.
http://contact41766.wixsite.com/film9/home-1
Kurt
PS I sold my Somikon HD-XL and went for a RetroScan Universal 2k from Moviestuff. Much more money, but...
Posted by Berend De Meyer (Member # 5856) on April 12, 2018, 03:30 PM:
Kurt
Thanks for the link!
quote:
PS I sold my Somikon HD-XL and went for a RetroScan Universal 2k from Moviestuff. Much more money, but...
Yes, that's the way to go! Great machine, but way out of my league... Congrats and good luck and enjoy it.
Posted by Berend De Meyer (Member # 5856) on April 14, 2018, 05:38 AM:
Kurt
Would you be so kind to start a new thread for the RetroScan Universal 2k from Moviestuff here on the 8mm film-tech forums? I'd love to read your - and others - review(s) and be able to watch some sample footage - raw and edited - from that scanner. It would be a great additional contribution to the forums.
Thanks in advance and much appreciated!
Posted by Werner Ruotsalainen (Member # 6217) on April 14, 2018, 04:26 PM:
Just posted some (prolly) interesting examples of the different legacy color film stocks to http://8mmforum.film-tech.com/cgi-bin/ubb/ultimatebb.cgi?ubb=get_topic;f=1;t=011449;p=5 .
Posted by Dino Motti (Member # 6415) on April 15, 2018, 04:41 AM:
Hi everyone,
Still haven't read an answer to my questions... is there a way to extract the single frames from the scanner before they are blended together into a movie?
I would be very interested in knowing if the compression happens at the single still frame level or when the video is encoded.
If we could prevent the step from happening we could possibly also export the pictures (JPGs?) to a computer and encode the video at better quality with lower artefacts.
Does anybody know? I read somebody reverse engineered the firmware.
DM
PS: as an alternative if at a certain point it became apparent that the above is limited by hardware... one could also consider plugging in a different camera... even a cellphone camera would certainly do better then the present one... and save the images directly into a solid state drive. The lens would probably be alright...
Posted by Mike Spice (Member # 5957) on April 15, 2018, 07:06 AM:
Kurt I have been using Film9 for a couple of weeks now. I love it.
Dino I really don't think it will be possible to extract individual frames
I would like to explore using the GoPro to capture and image sequence.....
Posted by Dino Motti (Member # 6415) on April 15, 2018, 02:23 PM:
Why do you think it is not possible? The device clearly has to cache still frames before composing the whole video... it is certainly a question of saving them separately and interrupting the video rendering routine before it starts...
Posted by Dan Esmond (Member # 3975) on April 17, 2018, 04:41 PM:
Dino, Werner replied to you on 8 April (right underneath your post) saying that he had tried pulling the card during a transfer and there was nothing written on the card.
I think many of us had this same thought when these devices were first announced. I remember before I bought my unit in April of 2017 reading discussion about whether individual jpegs existed and people saying they do not.
I agree with you it would be interesting to know if the compression artifacts were due to the MPEG4 bitrate or were present on the images before they were even assembled into the mp4. Given the experience of those running the hacked firmware which increased the mpeg compression bitrate substantially (their findings are that artifacts are reduced but not eliminated) I would speculate that perhaps both the underlying still images and the mpeg compression codec are contributing to the problem.
I do not have enough technical understanding of the chip used in these units to know exactly how they create the movie file. But it seems quite possible that it doesn't write out each frame as an image and then assemble the movie. Rather it writes out the current image (probably to memory) and then the mpeg compression process immediately processes that image--thus it builds the mp4 file as it goes, not at the end of the process. I'm not sure but I think that's how most digital cameras which shoot movies work. I know that on my DSLR, if I shoot in video mode, at no point are there any individual frames on my memory card, and the finished mp4 file immediately appears on the card after I stop the camera.
Believe me, I really wish these devices could give us a folder of jpgs like the moviestuff devices and the Reflecta Super-8 scanner. But unfortunately I very much doubt that we will ever get that ability from them.
Posted by Berend De Meyer (Member # 5856) on April 18, 2018, 03:37 AM:
FWIW: I recently sent Winaid an e-mail about the MP4 compression and artifacts and asking for the possibility to save each frame as a JPG. To be continued...
Posted by Mike Spice (Member # 5957) on April 18, 2018, 10:18 AM:
Berend if they give you a half decent solution I will buy you all the champagne you can drink!
In other news, I have now added an on/off switch to the take up motor on my Wolverine.
My drop box/hand rewind from said box, for the films is proving such a success, I think having the take motor running is pointless, so now at the flick of a switch.....
I have yet to work out what value potentiometer to use, but that will be seen to soon, so I can 'turn down the volume' on the take up motor as well as turn it off.
Fully modded Wolverine! photo's when I get the time..
Posted by John Milano (Member # 6430) on April 18, 2018, 02:02 PM:
Hi everyone. Just purchased the Wolverine MovieMaker Pro, and did my best to read all the posts on this thread. Some great advice and tricks. My question is in regard to the hacked firmware. Will it work/improve/be beneficial on the moviemaker pro version, or just the original? Sorry if this was answered and I missed it. Again, it was a lot of reading. Thank you.
Posted by Berend De Meyer (Member # 5856) on April 19, 2018, 02:50 AM:
John Welcome to the forums! I own the Somikon and I am still using the original firmware - 30 fps - because of what I've read from others regarding that the sharpness setting is overruled and not adjustable anymore. My advice to you is to just scan some reels and get accustomed to your new scanner. What post processing software are you using so you can adjust the framerate and perhaps do some color grading and cleanup? Good luck and enjoy your new scanner!
Mike
quote:
if they give you a half decent solution I will buy you all the champagne you can drink!
Haha, even without the champagne it would be mind blowing
Fingers crossed so they'll at least send me a reply to my questions and requests.
quote:
I have yet to work out what value potentiometer to use, but that will be seen to soon, so I can 'turn down the volume' on the take up motor as well as turn it off.
That is a great idea! Love to see the pictures of your Wolverine 3.0. Good luck on the engineering!
UPDATE: reply from Winaid:
quote:
Good day,
1. this one is home use one , not profeesional
2. for the format can not change, it is only can be MP4, so the quality of video will be compressed
3. by not can not change the effect of vidoe out put format
Disappointing...
[ April 19, 2018, 04:57 AM: Message edited by: Berend De Meyer ]
Posted by Mark Davies (Member # 6249) on April 19, 2018, 08:24 AM:
Ask him for the source code and we'll do it ourselves.
I did have a thought, but I am pretty sure that it stores the individual scans in memory before building the MP4 and then saving it to media. I think this is proven by removing the card before the scan is finished and there is nothing there.
But I wondered if there was such a thing that could plug into the Scanner and into a card reader / port on a PC at the same time. So the scanner would actually use a file system on the PC. I don't know if such a thing exists, also there may be complications if the PC did anything with the file system at the same time. I don't know.
I do suspect that the hard ware inside 'maybe' based on the Raspberry Pie. I say this because I was looking at the files for my Reflecta's firmware and noted something called Platform=PIE, again, only guessing at the moment.
Kind Regards Mark
Posted by Werner Ruotsalainen (Member # 6217) on April 19, 2018, 03:18 PM:
quote:
1. this one is home use one , not profeesional
At least they answered you - they didn't bother answering my Standard-8-related mail sent back in December.
You should mention to them they could consider producing a professional model for, say, $1000...$2000. Obviously without wobbling. No need to be sprocketless (as long as there's no wobbling). RAW support is a must. And preferably a better sensor with better dynamic range.
I'd gladly pay even $2000 for a really professional scanner. But no more - after all, this is a 8mm scanner, while the Moviestuff can also scan 9.5 / 16mm and, being based on post processing-based frame identification, can be inherently better at eliminating wobbling and the likes.
Posted by Mike Spice (Member # 5957) on April 19, 2018, 03:53 PM:
Oh well, No still frame 'image sequence' is to be expected.
I bet it could be written in to firmware, to tell the camera to output at least a jpeg image....
I am loving my 'take up reel' switch.
0630 this morning I was drill in hand, wolverine in peices, with wire snip...black coffe...
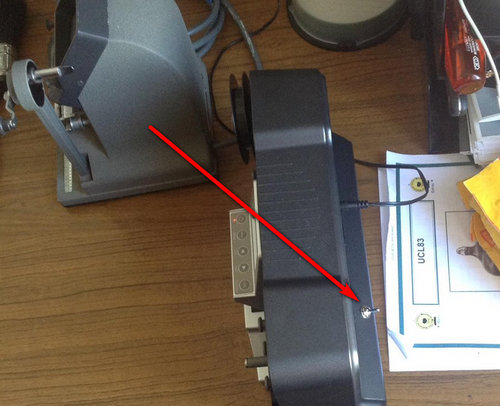
[ April 20, 2018, 03:29 AM: Message edited by: Mike Spice ]
Posted by Berend De Meyer (Member # 5856) on April 20, 2018, 05:04 AM:
Mark
quote:
Ask him for the source code and we'll do it ourselves.
I send in a reply requesting for the source code! For the Somikon there's also a new firmware update for the 20 fps tweak: https://www.pearl.de/support/product.jsp?pdid=NX4294&catid=1301
Werner I'm convinced they won't ever make a $1000 - $2000 device based on the Wolverine/Somikon.
Mike I'm also afraid NOT! Nice little switch btw. Glad you like it and is worth the trouble.
Posted by Werner Ruotsalainen (Member # 6217) on April 20, 2018, 09:52 AM:
quote:
For the Somikon there's also a new firmware update for the 20 fps tweak: https://www.pearl.de/support/product.jsp?pdid=NX4294&catid=1301
Just remember sharpness setting doesn't work in this version. Therefore, as a lot of us recommend scanning in the "Low" sharpness mode, I recommend the "hacked" firmware.
Posted by Mike Spice (Member # 5957) on April 20, 2018, 04:23 PM:
It's 22.20 Friday night, and the Wolverine has been chugging away since 10am.
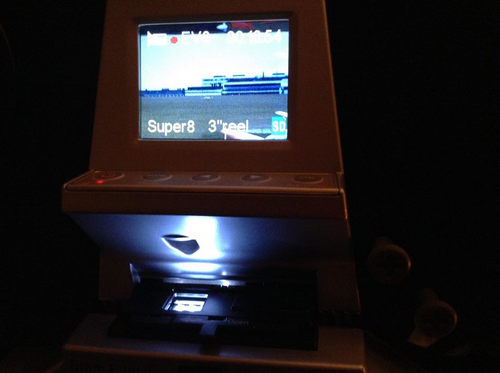
[ April 21, 2018, 02:54 AM: Message edited by: Mike Spice ]
Posted by Dino Motti (Member # 6415) on April 21, 2018, 04:23 AM:
quote:
UPDATE: reply from Winaid:
quote:
Good day,
1. this one is home use one , not profeesional
2. for the format can not change, it is only can be MP4, so the quality of video will be compressed
3. by not can not change the effect of vidoe out put format
Disappointing...
Disappointing indeed, but as someone said, if they sent us the source code we could try to make the change ourselves... I was wondering if the frames are saved as invisible files, I do not see the machine having such a large internal cache to be able to store them elsewhere.
I still am not an expert of how a MPEG/MP4 file is produced, I know the compression operates on the relation between previous frames and successive frames, to reduce the amount of new information to record and just create a set of instructions on the changes that occur between frames. This makes me think that there must be either a "working file" that is produced looking at the previous frame only, with no predictive compression, or the frames are stored as invisible/temp files and assembled at a later stage.
I truly hope the second case is true so there can be hope to reverse engineer the compression and operate a true frame by frame uncompressed video from the stills.
Posted by Mark Davies (Member # 6249) on April 21, 2018, 04:59 AM:
With regards to reading the card while the machine is working. There are such things called Wi-Fi enabled MicroSD Cards. I was wondering if such a thing would enable you to see what was on the card in real time, or if there was such a lag nothing would show up, or as we suspect the frames are held in memory and then the MP4 is constructed. Possibly each frame is concatenated into the MP4 in memory/or stored as it goes along.
I may go buy one today.
Posted by Dino Motti (Member # 6415) on April 21, 2018, 05:07 AM:
Not sure you can look at an eyeFi SD card while it's in use... but it may well be the case... the picture must be temporarily stored somewhere while the file is being built, even if for a fraction of a second, the idea would be that of taking it away.
Unless it is just built like a very slow shutter video camera system... at that point one may need to replace the camera and circuitry altogether.
Posted by Mark Davies (Member # 6249) on April 21, 2018, 05:33 AM:
Yes, looking at youtube examples, it seems slow to recall the images. I was actually looking for a physical device, say MICROSD connector to USB/MICROSD but could only find that.
Annoying part, I cannot image it being hard to do, at the point of frame capture just store as an image and then continue to build (or whatever it does) the main MP4. I would rather it be stored in uncompressed format which may help speed.
The only thing I could see is the timing, but what controls that? Does it move on to the next frame after it has stored/concatenated the file, it must do. It would be mad to have a timer and try and fit jobs into that timespan.
Posted by Dino Motti (Member # 6415) on April 21, 2018, 05:45 AM:
It should have some sort of feedback of the sort "job done" before moving to the next frame scanning, but from using it I noticed no lag whatsoever, so the processing time may well be much less than the time gap, so it ALWAYS manages to fit that into the time available... the guys at winait did not give me the impression of having built an extremely complex device... which also reassures me as it means there are very simple levers to tweak it, like a timer, a saving routine, etc etc... probably also seeing how the card drive I connected and seeing whether there is a way to connect a USB out or something like that, at that point one could monitor the drive in real time or make a raid version of it that does not involve the processing.
I would honestly first try extracting the card halfway a scan and see if there are some invisible files, I would do it myself, but the scanner is with my father atm.
Posted by Berend De Meyer (Member # 5856) on April 21, 2018, 05:56 AM:
I've been reading - Synalyze HEX Editor - the .BIN file for the latest firmware for the Somikon.

The chip seems to be a Novatek NT96650. The firmware version is 2017.10.17 PL11P-D (German)
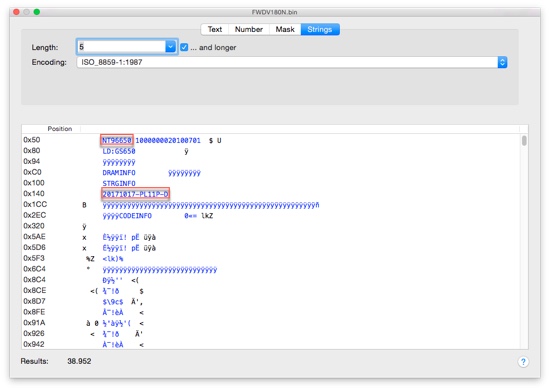
EDIT: Seems to me, that this chip is terrible crippled by the use of the firmware in our decks.
quote:
NT96650BG is a high image quality, high performance, power saving and cost effective digital still
camera (DSC) and digital video camera (DV) controller with excellent digital still image capturing and
video streaming capabilities. It is targeted for the application of VGA to 50M pixel DSC/DV resolutions.
It can be easily adapted to many high speed CMOS and conventional CCD image sensors with on
chip programmable interface timing approach. The controller provides sophisticated video processing
methods with built-in hardware acceleration pipeline. This is essential for achieving high performance
for per-shot, shot-to-shot, and continuous shooting pictures. The controller provides flexible
mechanism for auto white balance, auto exposure and auto-focusing in order to better tradeoff
hardware and software efforts over the performance. Embedded H.264 video CODEC supports video
recording up to full-HD 1080p30. The HDMI 1.3 Tx is also equipped for HDTV output. Rich storage
interfaces are supported to make it ideal for the storage of still pictures and video streaming data. The
USB2.0 high speed interface can upload/download the audio/video data efficiently to/from PC
Found a PDF with additional info's on the net:
https://dashcamtalk.com/cams/mobius/Novatek%20NT96650.pdf
Perhaps the more tech savy members here will be able get some more info's about the chip, writing JPG and converting to the MP4 file.
EDIT: Seems that the chip is terrible crippeled by the use of the firmware for our decks.
Posted by Mark Davies (Member # 6249) on April 21, 2018, 06:08 AM:
Has anyone mounted the .bin file?
Posted by Berend De Meyer (Member # 5856) on April 21, 2018, 06:10 AM:
Please explain mounting?
Never mind, found the answer already!
Posted by Mark Davies (Member # 6249) on April 21, 2018, 06:35 AM:
OK, just removed from a scan, plugged SD card into a LINUX machine, and there are no hidden files and no hidden partitions..
Must be memory stored then.
[Edit] As a point to remember, I'm using a reflecta, I think they should all be similar though.
[Edit - Edit] Berend, do you see anything in the hex about updating the firmware or reading the bin?
Posted by Berend De Meyer (Member # 5856) on April 21, 2018, 07:52 AM:
Mark - thanks for your feedback about the SD card!
No, I can't find any reference for updating the firmware.
Pere Pasqual - post #260 - has already tried to successfully hack the firmware for bitrate and fps:
quote:
Hi Kurt,
The thing is that my modifications, although uploaded later, where done *before* the Somikon firmware was released. So now my firmwares are mostly unnecessary, as what most of people was demanding was 1080p resolution and higher bitrate. Once the Somikon firmware was proven compatible with the original Wolverine, both goals were accomplished without further "hacking"... :/
Anyway, I'm sharing them so people can choose mainly between different capture resolutions.
The original bitrate of the Wolverine was about half the new one, and yeah, compression artifacts were highly noticeable. The current bitrate is a very high one, so I'm sure no one would ever notice any improvement going from near 10000 to 20000. Also note that bitrate will unavoidably decrease with lower frame rate - you need a less amount of bits to store the information since you have less frames to store. So, all in all, near 10000 bits for such a low frame rate is such a big amount of "space" to encode the information.
https://www.goprawn.com/forum/novatek-cams/2056-novatek-command-line-tools - post #18
I really don't have any clue what hacks are needed to get the scanner to save JPG files on the SD in stead of only the MP4...
[ April 21, 2018, 10:03 AM: Message edited by: Berend De Meyer ]
Posted by Mark Davies (Member # 6249) on April 22, 2018, 06:33 AM:
Neither do I until we get that source code.
Currently I strip the MP4 into individual frames using ffmpeg, edit and re-compile. I'm sure though some quality is lost.
Hey Ho Pip and Dandy...
Posted by Werner Ruotsalainen (Member # 6217) on April 23, 2018, 04:16 PM:
quote:
I have yet to work out what value potentiometer to use, but that will be seen to soon, so I can 'turn down the volume' on the take up motor as well as turn it off.
I'll get a 100Ohm 4W one as soon as my new Somikon arrives. (I ordered another one as, it seems, widening the film gate with some 0.2mm to allow for (inherently) imprecisely-slit Double8 scans result in genuine Super8 footage to wobble a lot horizontally. Now, I'll keep my present scanner as a Double8 scanner (both DS8 and Std8), while the new will be a strictly S8 (not DS8!) one.)
I'll experiment with resistors in the latter to really reduce the strain on the gate. Will keep you posted.
Posted by Mike Spice (Member # 5957) on April 24, 2018, 09:03 AM:
Werner do keep us posted, a 12v motor can't draw more than a few milliamps, so should be easy enough to put a pot on it.
The PSU is 12v 0.5amp
I think a variable pot would make more sense than a fixed value resistance, for different reel sizes/hub sizes.
I really do think if the motor can be turned down to just about keep up with the scan speed, the frame jitter will vanish completely.
I am so far proving this by turning the take up motor off, and letting the film drop in to a clean plastic box.
Perfect scans time after time.
This week alone I have scanned 72 50ft (over 3000 ft) reels and all came out great using this method.
I have done it with a 200ft but not really what I want to do, and A 400FT would be out of the question, to drop in a box.
Turning the take up motor down to just about take up, would be something worth trying for sure.
[ April 24, 2018, 11:45 AM: Message edited by: Mike Spice ]
Posted by Kev Morrison (Member # 6338) on April 24, 2018, 09:45 AM:
Mike Spicer,
Since you stated a while back that you were interested in my following project
A few days, I successfully completed my first 400 ft (eight 50 ft reels spliced together) Super 8 to digital conversion with my Wolverine Pro.
Setup:
- After cleaning all of my films with Filmguard (none of which had ever been shown in a projector before), I edited & spliced together the reels using my Kodak Universal Splicer and original Kodak Presstapes. I used Pec Pad wipes to wipe off any excess Filmguard from the film ends before I applied the splices. Smart move, because I suspect that the splices may not have held otherwise.
- I had a digital timer ready to keep track as to when the end of a 50 ft reel of film (and subsequent splice) was about to occur, so I would be present to take action if a splice either jammed or came apart in the light table (see below). 28 minutes was a good base time to use for unedited reels.
- After reading some concerns in this forum regarding how loosely the Wolverine takeup reel was in winding on the scanned film, I used a 600 ft reel to take up the film from my 400 ft input film reel. Surprisingly, I think the Pro did a decent job in firmly winding the film onto the takeup reel.
- Prior to starting my run, I did some testing to determine what Wolverine Pro scan settings I would use. I had my family members watch the digitized sample films, and we all concluded that overall, the standard settings looked best for our purposes.
- I kept a licensed Mike Spicer film catching box handy just in case the takeup reel malfunctioned, and I could drop the scanned film into the box.
- Lastly, I placed the Wolverine unit on a homemade ramp that had about a 30 degree grade, with the left side of the unit on the high side of the ramp. Why? Two reasons: 1) I figured that it may help the takeup reel in taking up the scanned film as the reel filled, and, 2) If dust or whatever started to accumulate on the light table, the raised angle may help in moving it off instead of staying in place.
Did this idea help? I dunno.
Processing:
- The entire reel was successfully scanned. We reviewed the digitized film, and it looked pretty good. I may attempt to experiment in enhancing a copy of this digitized film, but for now, were grateful to have a copy of our movies that we now can share with the family.
- All of my Kodak Presstape splices held well and had no problem going through the light table and scanning, however, I noticed that starting at the splice for the third reel, the spliced film was starting to encounter some problems threading its way through the rollers after the light table and to the takeup reel. It appears that these particular splices make the film a bit inflexible and more difficult to weave through the rollers, and since the takeup reels motor doesnt exert that much tension to pull the spliced film areas through without hesitation, the takeup process starts to stall to the takeup reel.
So I lightly coaxed these areas through with my fingers without a problem. Id think that for those folks who have used another method of splicing instead of Kodak Presstapes (ex., cement, other types of splice tape), you may not encounter any problems in the splices.
- By the time that the scanning reached the splice for the 7th 50 ft reel, it appeared that the takeup reel may have been starting to get a bit slow maybe it was just my perception that it was. In any event, I completed the entire 400 ft digital conversion just fine, but I would not be comfortable attempting a 600 ft scan with my machine unless I was either dumping the scanned film into a box, or perhaps not threading the digitized film through all of the Wolverines takeup rollers.
I have five more 400 ft reels to splice together and scan. Its a slow and time consuming process, but its worth the effort. In the future after I complete this project, I may consider using a good quality Super 8 projector and a quality telecine converter with my Sony HD camcorder to see if I can produce even higher quality copies of our movies.
And, Ive already informed my family & friends that now want me to perform the same conversion process for all of their ancient movies that they can either, 1) Pay me to have their movies converted, or, 2) That, after I've finished converting my films, Ill be more than happy to sell my collection of viewer/editors, Wolverine, splicers, etc. to them so they can do it
.
The silence is deafening. HA!
[ September 24, 2018, 08:11 PM: Message edited by: Kev Morrison ]
Posted by Mike Spice (Member # 5957) on April 24, 2018, 10:44 AM:
Kev. Very well done. Really good to hear you had a positive experience.
I assume the cheque for my patented drop box is in the post! ![[Razz]](tongue.gif)
I have just completed 3850 feet! (all 50 foot reels) (phew)
Posted by Kev Morrison (Member # 6338) on April 24, 2018, 07:04 PM:
Mike,
The "cheque is in the mail"....
3850 feet????!!! I've never heard of anyone processing that much movie film through a Wolverine. You must be doing something right!
Thanks to you and others for posting your thoughts, suggestions & experience in these forums. I've been learning a lot from the 8 mm movie Jedi knights here, and the information I've acquired you just can't find anywhere else.
Posted by Ken Abruzzo (Member # 6188) on April 25, 2018, 08:29 AM:
Kev,
I have the Pro model and yes, it does seem to slow down as a 400 foot reel gets closer to the end. Also, good call on using a 600 foot reel as take up. I've found that it does wind it rather loosely and what fits on the supply reel doesn't always fit on the take up reel.
I had similar experiences with splices. Most would go through without a hitch. Some though did get stuck and needed help. I've had some stock that was really finicky about going through and I found that skipping one of the pegs sometimes helped. Also had some stock that my grandfather had used bargain bin stuff and it was so worn that the machine didn't want to take it. I was able to get it to go through backwards.
I've found that the low sharp setting works better. If only I had discovered that earlier on....... I will eventually go back and rescan everything (with better framing settings too). For now, I was just glad to get it all done and onto DVD. We had a lot of footage. I finished my project and it came in at about 14,000 feet (19 at 200', 4 at 300', 16 at 400' and the rest at 50'). I've since fixed some of my initial editing mistakes and gotten everything where it belongs.
I now have a bunch of neighbors and family friends that want me to scan their old footage.
Posted by Mike Spice (Member # 5957) on April 25, 2018, 09:48 AM:
Ken I am surprised to hear you put your content on dvd.
May I ask how you did that and how the DVD looks compared to watching the mp4 files on a computer?
I refuse to put any content on DVD as I consider it a step backwards in quality, but then I don't have any decent software to create a dvd these days.
I would love to see an HD example of the Wolverine Pro.
Does anyone have a clip at youtube or vimeo please?
I am considering purchasing a Pro in the future, I am sure my Wolverine's days are numbered, and I would like to see what the Pro scans look like
Posted by Kev Morrison (Member # 6338) on April 25, 2018, 10:01 AM:
Ken,
I have the Pro model and yes, it does seem to slow down as a 400 foot reel gets closer to the end. Also, good call on using a 600 foot reel as take up. I've found that it does wind it rather loosely and what fits on the supply reel doesn't always fit on the take up reel.
*********************
KM - Im now thinking that we may be seeing a bit of an optical illusion when we sense a slow down as a film reel becomes full. When the takeup reel has little film on it, it will appear to rotate a bit faster to take up the scanned film as needed, however, as the reel becomes full (and the circumference of the roll of scanned film is much larger), the reel will not appear to rotate as fast to take up the film as needed. I think. Or maybe the weight of the film on the takeup reel actually does slow down the rotation. Maybe I need another cup of coffee.
******************
I had similar experiences with splices. Most would go through without a hitch. Some though did get stuck and needed help. I've had some stock that was really finicky about going through and I found that skipping one of the pegs sometimes helped. Also had some stock that my grandfather had used bargain bin stuff and it was so worn that the machine didn't want to take it. I was able to get it to go through backwards.
*********************
KM - In this case, the Kodak Presstape splice tape makes the splice and surrounding film rigid (and long) enough that it has some difficulty weaving its way through the Wolverine's serpentine path of rollers (after the scan table) and up onto the takeup reel. Note that the splices all went through the scan at the light table flawlessly the issue is with the splice running the gauntlet afterwards. I cleaned my film with Filmguard, and use Pledge to lube the Wolverine rollers, but Im still not surprised at this minor glitch. Maybe Ill experiment with threading the film through the Wolverine rollers differently so I omit a roller or two, and that may solve the stalling problem with the glitches.
*******************
I've found that the low sharp setting works better. If only I had discovered that earlier on....... I will eventually go back and rescan everything (with better framing settings too). For now, I was just glad to get it all done and onto DVD. We had a lot of footage. I finished my project and it came in at about 14,000 feet (19 at 200', 4 at 300', 16 at 400' and the rest at 50'). I've since fixed some of my initial editing mistakes and gotten everything where it belongs.
********************
KM - Im going to tinker with my settings before I proceed with my next batch. The good thing about having our movies spliced together is that were ready to go for another scan.
But 14k FEET? Man I knew I should have taken more movies of the family!
Posted by Ken Abruzzo (Member # 6188) on April 25, 2018, 11:14 AM:
Mike, yup, DVD. Sent out a bunch of disks to family members. Surprisingly, I didn't notice any real drop off in quality. Maybe it's just my eyes. I tried saving hi-def files to my cloud drive and viewing them on my TV. Comparing the files and the DVD on the same screen, I really don't see a difference. I have yet to try creating a blu-ray disk of the same footage. That would be the true test.
I use Cyberlink's Powerdirector to create the movie. I drop in music clips (used recordings of my dad singing for my parents wedding/honeymoon footage). I use the crop and stabilizer tools in PD as needed. Then clean it up with Colordirector (denoise, sharpness, etc).
Kev,
I had the same thought about an optical illusion with it slowing down. I still think it is slowing down a bit from the weight though.
It's been a while since I did the scanning. I know I had some splices that were a different brand and seemed thicker. Those sometimes had trouble making it through the gate. Since I switched to the new version of the Kodak press tapes (white package), I wasn't having trouble. I know what you mean about the film being more rigid. I just can't remember if it was older splices (the other brand) or if it even had something to do with 400' reels (as more weight was on the take-up). Something to keep an eye on for the future.
Hmm....... Hadn't thought about "lubing" the rollers. Something to experiment with (assuming I remember that when I break it out again). LOL!
Definitely try to tinker with the sharpness settings. I liked the end result better.
Yes, 14k feet. Some of it was crap though so I probably won't bother with it when I get around to redoing the project with better framing.
Posted by Kev Morrison (Member # 6338) on April 26, 2018, 08:39 PM:
Ken,
Regarding a recent comment I made about "lubing" the Wolverine rollers with Pledge....
I need to clarify that suggestion - you should use Johnson's Lemon Pledge furniture wax (NOT the Pledge furniture oil). That's the stuff in the yellow Pledge spray can.
Posted by Jean-Pierre Labus (Member # 6090) on May 01, 2018, 02:26 AM:
Bingo ! Eurêka !
One year using REFLECTA SCANNER D8/S8mm (WOLVERINE-SOMIKON clones)
and many searches to best HD movies results,
for me only RAW is the best way and no MP4 compressed from the way of these manufacturers
By using WINDOWS EXPLORER we only access to USB drive computer files FAT 32
Film scanner
MOVIE
xxxx.mp4
By using a Memory SD Card Recovery software we can access to
Film scanner
MOVIE
xxxx.mp4
Raw Files
JPEG Graphics File
File 001.JPEG
MP4 Multimedia File
xxxx010.mp4
xxxx009.mp4
xxxw008.mp4
xxxx007.mp4
xxxx006.mp4
xxxx005.mp4
xxxx004.mp4
xxxx003.mp4
xxxx002.mp4
xxxx001.mp4
ShockWave Flash File
File001.SWF (File SWF to be used to modify in other HD video Format and compression)
System Volume Information
WPSettings.dat
IndexerVolumGuide
SWF file probably must be repaired
You can use this way
Best Regards
JP LABUS
Posted by Dino Motti (Member # 6415) on May 01, 2018, 03:26 AM:
That is great news! Could you detail your procedure?
Thank you! So excited to hear you have found a way to get the raw files!
Posted by Jean-Pierre Labus (Member # 6090) on May 01, 2018, 04:18 AM:
Very simple ....
I use iCare SD Memory Card Recovery v.1.1.1.
(Free of charges by GiveAwayOfTheDay company 2 Days ago
or register)
I transfer the recovered files to computer ....
For me only file SWF is used to transfer final HD movie.
http://8mmforum.film-tech.com/cgi-bin/showpic.cgi?dir=uploads0503&file=8mmForum.jpg[/IMG
Posted by Mark Davies (Member # 6249) on May 01, 2018, 04:44 AM:
This is super news.. well done Jean.
Posted by Berend De Meyer (Member # 5856) on May 01, 2018, 10:21 AM:
Thank you Jean-Pierre for sharing your info!
I tried the same using EaseUS SD Card Recovery on Mac OS X for my Somikon HD-XL. No luck retrieving any .JPG image from a scanned 8mm film.
Did you see any .JPG files on your SD from a scanned 8mm film?
[ May 04, 2018, 04:41 AM: Message edited by: Berend De Meyer ]
Posted by Jean-Pierre Labus (Member # 6090) on May 01, 2018, 01:22 PM:
I have used some recover file softwares
It is necessary to use a SD recover file software
example : ------------
http://8mmforum.film-tech.com/cgi-bin/showpic.cgi?dir=uploads0503&file=Capture20180430-100939.jpg
http://8mmforum.film-tech.com/cgi-bin/showpic.cgi?dir=uploads0503&file=8mmForum1.jpg
Posted by Dino Motti (Member # 6415) on May 01, 2018, 05:45 PM:
So, just to clarify, you ran a scan from beginning to end, you took the card and put into a recovery program and managed to find data banks that had not been erased containing ALL the RAW JPG frames?
If you managed to do that it'd be just amazing!
Could you also post an example of a JPG to be able to check the quality of the image?
Thank you again so very much!
Posted by Jean-Pierre Labus (Member # 6090) on May 01, 2018, 09:54 PM:
JPEG recovered details :
http://8mmforum.film-tech.com/cgi-bin/showpic.cgi?dir=uploads0503&file=Capture20180502-041424combinnndnntails.jpg
It is not the way to recover movies.
It is necessary to use SWF recovered file to have RAW File result which can be used to be modify
by another video software
MP4 movie scanned#055 final REFLECTA file :
323.820 Ko
SWF Raw flash movie file :
1.278.617 Ko
I try to understand software details for:
System Volum Information
WPSettings.dat
IndexerVolumGuid
To avoid erase period of first Raw files at the final mp4 register on SD card.
Posted by Mike Spice (Member # 5957) on May 02, 2018, 01:36 PM:
Reading the last couple of posts about exploring the memory card for jpg files has me riveted and excited.
keep up the amazing work, I wish I had the knowledge to contribute to this exciting development....
Crossing my fingers and toes for you...
Posted by Dino Motti (Member # 6415) on May 02, 2018, 02:31 PM:
Indeed Mike, indeed! :-)
I cannot wait to try it myself... and if we managed to modify the software to skip the deletion of JPG and SWF raw files that would be amazing!
Great work!
Posted by Berend De Meyer (Member # 5856) on May 03, 2018, 04:19 AM:
Hi all,
I got a reply from Winait - Richard - stating that they're not willing to give me the SDK for my Somikon HD-XL. Well at least I tried, but still very disappointing.
Posted by Dan Esmond (Member # 3975) on May 03, 2018, 02:18 PM:
Indeed exciting if it pans out. I'm puzzled by the presence of a Flash file (SWF) since it seems to be an unnecessary intermediary between jpg and mp4, but maybe there is some reason for it.
Jean-Pierre can you please upload one of the recovered jpegs and also upload the swf to youtube so we can compare the compression artifacts with the mp4 file?
Thanks!
Posted by Janice Glesser (Member # 2758) on May 03, 2018, 04:21 PM:
Jean-Pierre Labus can you clarify? Are you using the Reflecta or the Wolverine model scanner? You mention viewing files from the Reflecta SD card with the file recovery program. The Reflecta unit may have a different file structure than the Wolverine.
[ May 03, 2018, 06:12 PM: Message edited by: Janice Glesser ]
Posted by Dino Motti (Member # 6415) on May 07, 2018, 08:36 AM:
Hi Janice, as far as I know the Reflecta is identical to the Wolverine and Somikon, it is just a branding/franchising issue, but you are right in saying there may be differences in the firmware and file structure of the 2/3 scanners...
Posted by Janice Glesser (Member # 2758) on May 07, 2018, 09:02 AM:
The Reflecta appears to be an entirely different unit than the Wolverine/Somikon/Hammacher Schlemmer models and costs about twice as much. This is more than just a branding issue. Although possible....it's highly improbable that the Reflecta uses the same software scanning and coversion system as the Wolverine type units.
Relflecta Super 8 Film Scanner
https://tinyurl.com/yb5e6ywu
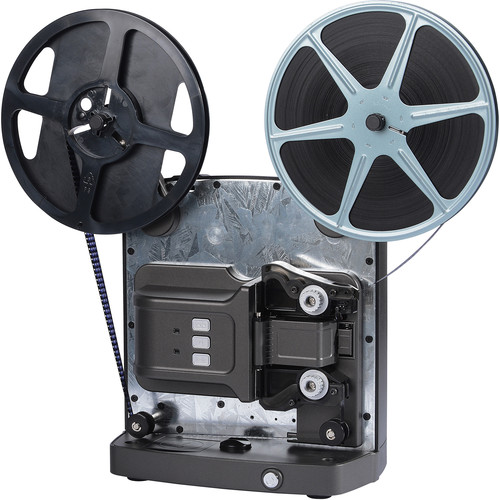
Posted by Werner Ruotsalainen (Member # 6217) on May 07, 2018, 09:57 AM:
Reflecta has two scanners: the one you linked to (the older one) and the rebranded Somikon / Wolverine one (the new one).
Posted by Kurt Froberg (Member # 5922) on May 07, 2018, 10:16 AM:
https://www.photospecialist.com/reflecta-super-8-normaal-8-scanner?gclid=CjwKCAjw8r_XBRBkEiwAjWGLlDkI_pDxT0Ide7mB8b-OsQswkHeHmnqo4r1Ud0lMnDfBNWywLSz0UxoCafMQAvD_BwE
Posted by Janice Glesser (Member # 2758) on May 07, 2018, 11:03 AM:
Thanks Kurt and Werner... Interesting...I hadn't seen the Reflecta Wolverine clone I had only seen reviews on the original Reflecta...and the reviews weren't all that good
I don't own these units...I use the original MovieStuff 8mm and 16mm frame by frame scanners...however I'm always interested in telecine technology. Has anyone other than Jean-Pierre located hidden frame files on their SD Cards with the software he recommended?
Posted by Mike Spice (Member # 5957) on May 07, 2018, 11:45 AM:
Janice you are a legend!
I'm not sure what made me type that, but you really are something special!
Posted by Dino Motti (Member # 6415) on May 07, 2018, 02:41 PM:
Indeed, "the Reflecta" comes also in this flavour, no worries Janice, I myself have got confused a few times and was worried that we were referring to another scanner altogether on reading this.
Posted by Paul Adsett (Member # 25) on May 07, 2018, 02:51 PM:
Mike you will have to get in line with the rest of us here who think Janice is really special!
Posted by Alan Taplow (Member # 4702) on May 07, 2018, 03:07 PM:
Appears to be a clone of the original model Wolverine with a 12.7cm (5") reel capacity. Anyone notice any spec. enhancements?
Seems sort of pricy for a Wolverine clone.
Posted by Werner Ruotsalainen (Member # 6217) on May 08, 2018, 02:16 AM:
No custom additions / enhancements in the Reflecta rebrand, unfortunately. Prolly it's only WRT local (Germany-based) warranty that MIGHT be better than with Somikon - at least if one is in Europe.
I myself purchased two pieces of the Somikon scanner instead because of the significantly lower price (at pearl.de) and the 7" support.
Posted by Mike Spice (Member # 5957) on May 12, 2018, 04:26 PM:
This Wolverine thread has turned in to something quite special.
I found this thread via a Google search when mine broke down a few weeks in, around a year back.
Here we are 16 pages and some 393 posts
[ June 02, 2018, 05:04 AM: Message edited by: Mike Spice ]
Posted by Jean-Pierre Labus (Member # 6090) on May 15, 2018, 10:03 AM:
For your information,
I am not programmer.
I was born on 1950
I make cine movies from 1962 (Double 8mm and Super 8 mm colored and sounded
I use computers from 1978 and be beta tester and software translater (Amiga materials and softwares
and after with microsoft)
I am owner of 4 sound cine projectors
HEURTIER Stereovox Super8
HEURTIER Stereovox Super 8 telecine SD & HD video
HEURTIER Duo 942 prototype synchro ORDINASON & OPTOPILOT
HEURTIER P624 sound 8mm & Super 8mm
For me it is the best way to capture HD video from 8/S8 mm cine movies.
For Reflecta (Wolverine-Somikon clones) these systems are based on cine film viewer.
No sprocket wheels, no pinch rollers
No capstan, no idle pulley
No claw, dew claw ...
only 2 frames per second stepping motor and 4 rubber anti return pulley.
Inside it is an Aduino cpu
At this time 1 work to search how flashing internal software (same solution for my 3D printer intern software)
As I work on 3D printer since Six monthes I print some spare parts to modify this Reflecta scanner;
The recovered files on SD card are hexadecimal language and I work on.
Waiting for new discoveries
and possible discoveries of others forum members ....
Best regards
JP LABUS
Posted by Jean-Pierre Labus (Member # 6090) on May 20, 2018, 03:17 AM:
To flash internal Wolverine-Somikon-Reflecta EPROM you can use
this way :
https://www.renesas.com/en-in/doc/products/mpumcu/apn/rx/002/r01an3294ej0103_usb.pdf
Posted by Mark Davies (Member # 6249) on June 02, 2018, 04:48 AM:
OK, So, I am sure many people have heard about the Rasberry Pi, the small ARM based computer on a board.
Well this months magazine MagPi had an interesting article that caught my eye.
Joe Herman has produced a film scanner based on a Pi & a bolex.
This if I am reading correctly uses a Pi + Pi Camera and exports directly to another machine in real time.
First page a link to the git hub project.
Git Hub
Next page another git hub link with more info.
Second Git Hub Page
Finally a link to his youtube page, which looks good.
You Tube Page
The software on this looks really good, and I always suspected these commercial scanners where Pi based.
Posted by Kev Morrison (Member # 6338) on June 04, 2018, 10:51 AM:
Mark,
The Raspberry PI camera videos are interesting!
This is one of the best comparison videos I've seen out of this group of Raspberry PI videos - the video on the right is (to me) the preferred version. Fascinating that it's in 720p versus the original 1080p:
https://www.youtube.com/watch?v=zeYRGvWeYXo
Posted by Mark Davies (Member # 6249) on June 04, 2018, 03:48 PM:
That Kev.. is DAMN awesome!! You can really see the difference, only one thing and it may be my mind playing tricks, but the blue car looks more colourful in the left.. saying that, the right maybe the real colour.
Posted by Kev Morrison (Member # 6338) on June 06, 2018, 08:04 PM:
Mark, I agree - the blue car is a '58 Ford, pretty rare to find nowadays, but the color is dead on.
There's also a '60 - '61 Corvair (I absolutely love watching old movies just to see the old cars!), and the color shown in the second screen for the Corvair is also quite accurate.
These Raspberry PI PCs are amazing, but I've never seen these used for digitizing film. I'm impressed!
Posted by Mike O'Connor (Member # 6526) on July 20, 2018, 03:24 PM:
Hello
I have been reading this thread with great interest and wanted to share what I have learned concerning access to the individual images that make up the Mp4 files that the Wolverine scanner and its clones produce. Of course an Mp4 is simply a container and of course the individual Jpegs that make up the video files are there. I cannot understand why folk have been scratching their heads concerning this process.A quick google search for a utility to achieve this took about 10 seconds to suggest the following program which does the job very quickly and very effeciently. It unpacks the Mp4 to give you the thousands of images that make up the video file. I hope this is helpful to the guys and gals that use the little Wolverine or one of its clones. I recently purchased a Winait derivitive and have to say I am so far very pleased with results that I have achieved thus far with it. It is of course a tool for the hobbyist and for the money I have to say I think its pretty darned good. With a little post processing I am amazed at what can be achieved. Anyway the program I am talking about can be found here
https://www.dvdvideosoft.com/products/dvd/Free-Video-to-JPG-Converter.htm
Meant to say when you launch the program simply load your Mp4 file and check the little 'Every Frame' button to extract all frames.
Posted by Mike Brantley (Member # 6275) on July 21, 2018, 12:18 AM:
If you extract jpeg images from the already highly compressed mp4 movie file, wouldn't the frames be of lesser quality than the original frame scans grabbed before the compressed movie file was created? Or do I understand the problem wrong?
Posted by Mike Spice (Member # 5957) on July 21, 2018, 02:52 AM:
This program does not extract the original image sequence but as mentioned, just takes stills from a video file, which is already compressed.
The fact you could put any video file in to this software, (and there are many other variations of this software) doesn't mean it will extract the original uncompressed image sequence, (which is what we are hoping for one day) just a series of images of a video file, along with whatever compression was used to make that video file.
Once a compressed video file is created it is not possible to pull out original uncompressed still images from that file, and it's those images that would be so valuable to have.
thanks for the post however. We'll get there one day.....
ps: the point of wanting the original still frames before compression is so they could be put in to software like VirtualDub and one could then apply your own compression/codec/bitrate/framerate and obtain much better results than the Wolverine compression and ridiculous framerate.
here is an example of what I mean, albeit 1080p stills from a gopro camera. I made a timelapse of a construction project over 18 months, taking up to 30,000 still images a week at different frame rates depending on the subject, but mostly 1 frame every six seconds.
Imagine a 1080p Wolverine still image sequence made in to video this way, would be amazing. Even 720p Wolverine still images would look smart.
I put those still images in to VDub to create video files with compression/codec/framerates of my choice.
youtube has applied it's own compression but it still looks good
still image time lapse example HQ
Still image time lapse example LQ
Here is a still image taken from a Wolverine 720p scan, the compression artifacts are quite visible, so one wouldn't want to compress that again in to a new file.

[ July 21, 2018, 06:06 AM: Message edited by: Mike Spice ]
Posted by Mike O'Connor (Member # 6526) on August 05, 2018, 08:42 AM:
Ah of course the jpegs are compressed as the mp4 is created. Silly me...I must remember to think before posting. Still like the little scanner though. I constructed my own years ago from a modified Eumig 610D and plano condenser lens. Have to say the Wolverine is comparable and a heck of a lot easier to use :-)
A first attempt at using the scanner..pretty happy with the results. Some Kodak Tri X footage shot for inclusion in my first attempt at shooting a music video :-)
https://www.youtube.com/watch?v=H7P-YGCHrvs
Here's the final effort :
https://vimeo.com/45965952
Posted by Pere Pasqual (Member # 5906) on August 06, 2018, 04:40 AM:
quote:
Ah of course the jpegs are compressed as the mp4 is created.
And there is another wrong assumption, in the sense that an MP4 is *not* "a sequence of JPG files", but frames are grabbed in their "raw" format (or whatever format the are being given as, but I'm assuming they arrive in their raw format from the scanner senstor to the compressing firmware in the Wolverine) and then a different, own compression method is applied to them, different to the one used in JPEG files, having inter-frame compression and many other differences. It can share some compression techniques with JPEG but definitely is not the same compression method.
In fact, there was a compression method, MJPEG, which actually consisted of and arranged set of a series of individual JPEG files, and it was used in analog capture cards from the late 90's, first 00's, notably the Miro DC 10 plus, DC 30 plus and so on:
https://en.wikipedia.org/wiki/Motion_JPEG
Quality was great, but its data usage or bitrate was huge compared to the current, far more optimized compression method. Anyway, it's still used in some areas because it makes sense for quality preservation while editing.
quote:
Here is a still image taken from a Wolverine 720p scan, the compression artifacts are quite visible
Maybe in that capture there are some certaing compression atifcats. But in this thread we saw some examples of captures at great bitrate and easy to compress, plain background color images, which show similar artifacts and compression couldn't be blamed for causing them. Maybe it's just sensor noise or the Wolverine is not doing things as it should...
[ August 06, 2018, 07:22 AM: Message edited by: Pere Pasqual ]
Posted by Werner Ruotsalainen (Member # 6217) on August 11, 2018, 05:03 AM:
quote:
Some Kodak Tri X footage shot for inclusion in my first attempt at shooting a music video :-)
https://www.youtube.com/watch?v=H7P-YGCHrvs
Excellent footage. Kodak FTW! I still admire how the old Kodachrome 8mm (and other) films show absolutely no fading / tinting / resolution decrease, unlike a lot of alternatives. Examples of the latter are for example Agfa, which terribly ages (I've digitized hundreds of Agfa films and ALL of them are terrible), even in as little as 27 years. I only wish current color Kodak films aged as nicely as Kodachrome (I have mixed results with their non-Kodachrome-branded, old films)... Interestingly, the (back then) supercheap, East-German ORWO ages much-much better (no fading etc.) than Agfa and a lot of other, much more expensive Western alternatives.
BTW, WRT the maximal resolution gainable from Super8, which has been widely discussed on the net (see e.g. https://forums.anandtech.com/threads/super-8-film-what-resolution.2062635/ http://www.cinematography.com/index.php?showtopic=2083 ), indeed even Kodachrome footage shot in the 60's / 70's with a proper camera & technique easily exceed SD.
Posted by James Fountain (Member # 6649) on October 07, 2018, 10:33 AM:
I really awnt to thank everyone who has contributed to this thread over the past years. I have long wanted to digitize the memories that my grandfather so meticulously documented, everything from driving APCs in the National Guard, to the buildings my great grandfather built, to birthday parties, to garden tilling, to the family members who are only names without these videos. Taking the leap to buy a Wolverine and then improve the quality of the video for proper viewing was really bolstered by this thread. So thank you. I've begun to compile a few thoughts and questions I would like to add, but before I start that I just wanted to let all of you know that you have been a huge help.
Posted by James Fountain (Member # 6649) on October 07, 2018, 02:58 PM:
I thought it might be useful to compile what a few of the highlights I dug out of the 17 pages of comments. I know this is far from everything but I felt like this was the minimum I needed to get started with collecting the data:
Firmware:
Custom Firmware to unlock high bitrate data storage with a resolution increase from 720p to 1440p can be installed on many machines. In general this thread doesn't seem to show anyone that had issues with either firmware (I did but that's for the questions below)
1) Pierre has developed several firmware options that all collect at 30fps, the can be downloaded from http://retromania.pandelground.com/
2) The firmware for the Somikon units can be downloaded from Somikon.de (use google translate). This firmware will unlock a 20fps 1440p resolution higher bitrate data log
Frame rate and bitrate:
1) The default recording frame rate is 30fps, this doesn't correctly reflect the 16 or 18fps frame rate expected from our 8mm and super 8mm film. The higher frame rate results in unnatural movement and ~50% reduction in run time.
2) Bitrate is surprisingly low and well below what should be achievable. As a result images introduce electronic noise in our images and reduce overall quality.
2) Several options exist to modify the frame rate but the use of the open source program ffmpeg allows for simple command line options to batch convert the frame rate
3) Using just a -r 16 (for %%a in ("*.*4") do ffmpeg -i "%%a" -y -r 16 "newfiles\%%~na.mp4") will change the frame rate but it leaves the run time shortened still.
4) By decoding and then recoding the file you will create a file with the correct frame rate and run time but you risk further decreasing the quality of your recording.
5) If you want to decode to h264 then recode to 16fps you can take the batch file I created below, paste it into a text file, save the text file and change the file type from .txt to .bat, place the .bat and ffmpeg.exe in the same folder as the files you want to convert. When you run it you will have your original files, the h264 files, and recoded 16fps mp4 files.
if not exist %cd%\converted md %cd%\converted
copy ffmpeg.exe %cd%\converted\ffmpeg.exe
for %%a in ("*.*4") do ffmpeg -y -i "%%a" -c copy -f h264 "converted\%%~na.h264"
cd converted
if not exist %cd%\16fps md %cd%\16fps
for %%a in ("*.h264") do ffmpeg -i "%%a" -y -r 16 "16fps\%%~na.mp4"
echo All mp4's in this folder have been converted to 16fps
pause
Image reprocessing
1) I don't see a lot of information on program suggestions for reprocessing and cleaning up the files. I'm not looking to create perfection but I would like to optimize the files a bit. Avisynth looks like a decent option.
My questions:
1) I bought a used wolverine and it turns out my unit is pre mass production 2016 (no vents I suspect belt driven). The price was right and it appears to be in incredible shape, but the modified firmwares do not work on my unit. They all result in a solid blue screen after reflashing. I was lucky enough to get a copy of the old firmware from Wolverine and I've got my unit running again but I would love to limit the compression. Does anyone know of a firmware that may work with this unit? Would there be a good place to host this version in case someone else runs into my problem? Does anyone want to crack this firmware open and see if they can modify it to unlock the resolution/bit rate?
2) How much quality loss can I expect from using my ffmpeg script. I can't see it but it is also difficult to compare a film running at 30fps and 16fps. If it is significant can anyone suggest a better way to convert fps and runtime without losing quality?
3) Any software suggestions with a relatively simple learning curve? I would like to get my sons involved with collecting and processing this data as a Christmas present for my grandmother/grandfather. I'm not opposed to more complex software but if I could get something in there learning path I would love it.
Thanks again everyone, I find myself getting more and more excited about this project. Now if I can keep it from becoming a short term obsession...
[ October 08, 2018, 11:58 AM: Message edited by: James Fountain ]
Posted by Mike Spice (Member # 5957) on October 08, 2018, 10:33 AM:
James in my opinion the only simple quick effective way to change framerate on any Wolverine scan, without any re encoding, is to use MyMP4 Box.
It is mentioned in the thread, it's free, safe to use on windows and will correct the frame rate in a few moments.
I could not live without it.
If you need a more detailed tutorial let me know, but it's use is covered further back in this thread, in a nut shell....
go to the demux tab, 'open' a video and hit demux.
Once done (progress bar in the bottom of the window) go to the mux tab, add the H264 file the demux generated, it will be in the same folder as the video you added.
Change the frame rate in the option box at the bottom of the screen and hit mux, job done.
There is no preset for 18fps but if you go to the 'view' menu before your first mux and choose 'view command line' leave the fps box alone and hit the MUX option.
The command line will open and you can insert your choice of fps in the right part of the command line directly after the fps command.
Hit save and run
The software will do a few other things but for Wolverine owners a quick demux and re mux at a different framerate is all you should need.
It will also join videos seamlessy which is handy for those scans that need to be stopped part way thro for what ever reason and you end up with mulitple video files of one reel.
Use the 'join' tab to add the segements of a dodgy scan and then do the demux/mux ........ job done.
I have taken to muxing everything to 15fps, which I know is not correct, but I happen to like the results.....
MyMP4Box
[ October 09, 2018, 11:30 AM: Message edited by: Mike Spice ]
Posted by Werner Ruotsalainen (Member # 6217) on October 14, 2018, 07:48 AM:
BTW, Kodak offers scanning 40 original (for S8, 3-minute) rolls of 8mm film for $560. Does anyone know whether the quality of the scanning is any good?
More info (also with my ("Menneisyys") comment): https://www.dpreview.com/news/5517199130/kodak-digitizing-box-service-breathes-life-into-old-media-with-minimal-effort#comments
Posted by Kamel Ikhlef (Member # 6667) on October 23, 2018, 12:23 PM:
Dear users of the wolverine, reflecta, somikon scanners ... would any of you have thought about changing the optics of this scanner?
not the complete block but just the lens of the camera. you have to see the type of mount. if it is the M12 (mount S) in case there are better optics megapixel low distortion that could cleanly improve the resolution while waiting for a more evolved firmware. Even if mp4 compression is low from a scan with good optics would be a plus.
it would be nice to have in the future a firmware with a menu and a choice of output: low definition (default) that currently exists. another medium definition choice (1 image / sec) with a better quality of compression and a high quality choice (1 image / 2 sec) with a high quality or without compression (raw file). It would be really great. sorry for my english...
Posted by Patti Mathews (Member # 6706) on November 11, 2018, 03:57 PM:
Hello, I got the Winait Film Scanner DV-180N, it looks a lot like the Wolverine,,,
Anyway, I lost the included (or never got) the FPS Converter software that can simply change the frame rate, does anyone here have it or have a link to it?
I asked Richard at Winait and he seem to be too busy to actually help me out
Posted by Ken Abruzzo (Member # 6188) on November 12, 2018, 05:32 AM:
Patti Mathews - There was never any software included. You didn't lose anything. The framerate software is called MyMP4Box. Mike Spice included a link to it a few posts up from this.
Posted by Mike Spice (Member # 5957) on November 12, 2018, 10:20 AM:
here is the link
it only runs on windows pc's
My Mp4 Box
Basic instructions once installed:
go to the demux tab, 'open' a video and hit demux.
Once done (progress bar in the bottom of the window) go to the mux tab, add the H264 file the demux generated, it will be in the same folder as the video you added.
Change the frame rate in the option box at the bottom of the screen and hit mux, job done.
There is no preset for 18fps but if you go to the 'view' menu before your first mux and choose 'view command line' leave the fps box alone and hit the MUX option.
The command line will open and you can insert your choice of fps in the right part of the command line directly after the fps command.
Hit save and run
My own preference is to set fps to 15, I like how that looks.
The software will do a few other things but for Wolverine owners a quick demux and re mux at a different framerate is all you should need.
It will also join videos seamlessy which is handy for those scans that need to be stopped part way thro for what ever reason and you end up with mulitple video files of one reel.
Use the 'join' tab to add the segements of a dodgy scan and then do the demux/mux
Posted by Nantawat Kittiwarakul (Member # 6050) on November 12, 2018, 07:25 PM:
Or if you don't mind plain old/boring UI and some learning curve,I suggest VirtualDub for frame rate conversion.
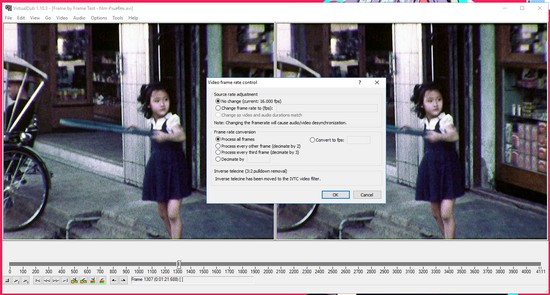
After importing the clip into Vdub,choose direct stream copy. No re-encoding/recompression required hence lightning fast operation.
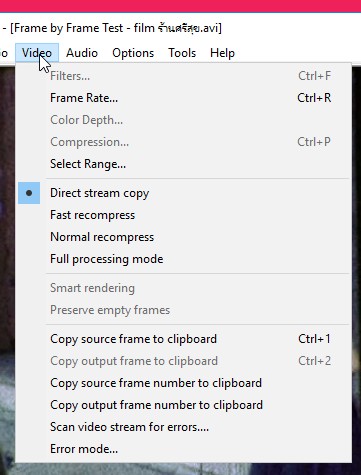
Then just dial in the framerate of your choice. Btw 16fps is the standard speed for Regular8,18fps is for Super8.
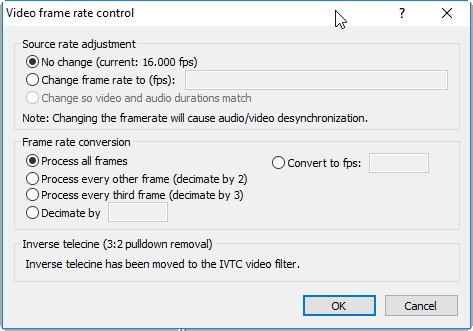
The resulted file will be in *.avi extension although the actual video stream inside will remain the same. So there should be no problem playing it.
Actually it could do much more than just framerate conversion,but that's another story.
Posted by Mike Spice (Member # 5957) on November 13, 2018, 10:35 AM:
VirtualDub is the most incredible bit of software.
I spent 18 months doing a time lapse for work.
I couldn't have done it without VD
That said, not all versions of VD will work with mp4 video so make sure you get the right version.
I was using image sequences (jpgs) to compile a weekly total of some 60Gb of images to turn in to video.
A steep learning curve for a new user, a genius bit of free software.
VD will always be on my laptop, but for wolverine work I have to say MYMP4BOX is much easier for simple frame rate and joining jobs.
Posted by Jan Schoonenberg (Member # 6725) on December 09, 2018, 08:06 AM:
Hello! I live in Holland and just registered for this Forum. Have perused it at length. Am puzzled about the sequence of messages here.
I have - for the time - just ONE - question. Will post more, a.o. about the European Reflecta.
Question: The Wolverine can be had from B&H and the very large international Mailorder houses. Can someone tell me wether these now (still) have the cogwheel takeup-with-mechanical-stepper instead of the belt (O ring)? this mopdification was provided by the American distributor of the Wolverine late 2017. The European distributor Reflecta still has the early equivalent of the 1917 version with the belt.
AND there were reports of mechanical troubles with the stepper.
So did Wolverine go back to the belt?
If there is interest I will post photo's later. Thanks.
Posted by Alan Taplow (Member # 4702) on December 09, 2018, 04:28 PM:
I'm certain there are folks who don't think this is a great idea, however it works for me. I found that using the takeup reel in any of the models causes the image to jerk around. I see in the new pro model they put an extra turn in the takeup path to try to reduce the pull on the film, but it was not successful for me.
Instead of using the take-up reel at all,I have been letting the film go into a large waste basket, which causes no pull whatsoever on the film. If you don't move the basket around while the film is going into it, it seems to rewind quite well with no tangles. This way, it doesn't matter if you have an old machine or a new one, belt or direct drive --- running 50 feet or 400 feet, my results have been smooth since starting this practice. I have an old editor I use for rewinding - much faster than the rotation on the Wolverine take-up mechanism. So, don't sweat the take-up, just bypass it and seems to work much better.
Posted by Jan Schoonenberg (Member # 6725) on December 09, 2018, 04:43 PM:
Thanks for the repy. I use this method already and it works. But I would rather not have to do that. With statics it collects dust. And it is inconvenient. My question: does the present Wolverine again uses a belt or the cogwheel/stepper still remains.
Posted by Phil Cross (Member # 6747) on December 11, 2018, 06:16 AM:
Hi,
I have the Wolverine Pro and have started converting a number of 8mm reels. I think I might have put a mark/smudge where picture is taken as a mark is appearing on the digital movies.
What would be the best approach to clean this smudge? Cloth or would I need fluid of some description?
Thanks in advance.
Cheers
Phil
PS Thanks to all who have contributed to this post, has been a great resource.
Posted by Mike Spice (Member # 5957) on December 12, 2018, 11:48 AM:
A dry cotton bud gently on the led white cover followed by a shot of air or soft brush is what I would try
Avoid any fluids of any kind.
Can you see a similar mark on the white LED lamp cover with no film in it?
Does the mark on the film show up on the LCD screen when there is no film in the scanner?
Posted by Phil Cross (Member # 6747) on December 13, 2018, 04:34 AM:
Thanks Mike, will try that out.
Posted by Kevin R Sexton (Member # 6774) on December 30, 2018, 09:03 PM:
I've just got the Pro version, and test run one reel so far. With the small LCD screen it's hard to judge exposure and sharpness, so I left them on default.
I'm disappointed in the quality of the output, looks like it is captured at less than 1080, highly compressed, then upscaled to 1080. It's not just that there are artifacts, but the size of the artifacts that are wiping out detail.
I've read through about half the posts here, one thing I'm seeing is to set sharpness to low, but are there any other things I should do?
Getting firmware updates from wolverine, and using modified firmware are mentioned here, but seem to only refer to the original model, not the pro.

This is a cropped screenshot from the video I've converted so far.
Posted by Mike Spice (Member # 5957) on December 31, 2018, 02:37 AM:
Kevin, is that a still from the original scan on the memory card, untouched by video edit?
Are you able to upload a 20 second clip to you tube for us to see?
I can imagine your disappointment in that quality but I don't have an explanation.
I have seen much better examples from the Pro, as have you.
Posted by Werner Ruotsalainen (Member # 6217) on December 31, 2018, 03:07 AM:
@Kevin R Sexton:
quote:
it's hard to judge exposure and sharpness, so I left them on default
Dial sharpness to minimum to minimize compression artefacts. It's possible the setting has no effect: a firmware version was buggy in this respect (see my earlier posts on this matter in this thread).
quote:
looks like it is captured at less than 1080, highly compressed, then upscaled to 1080
Note that not even the best possible film stock + camera combination can even reach the resolution of 720p. The best one can realistically expect from quality(!) stock like Kodachrome is something a little bit over DVD quality, and that's with the best possible scanning methods (the $5000+ MovieStuff gear). The Wolverine has a little bit worse resolution and significantly worse dynamic range than the 15-times-more-expensive MovieStuff scanner.
Posted by Mike Spice (Member # 5957) on December 31, 2018, 10:13 AM:
QUOTE:
Super 8 film has a maximum horizontal resolution of around 900 lines.
9.5mm has 1070 lines '
16mm film has a maximum horizontal resolution of around 1800 lines.
Standard definition video is limited to 576 lines.
Posted by Werner Ruotsalainen (Member # 6217) on December 31, 2018, 12:55 PM:
quote:
Super 8 film has a maximum horizontal resolution of around 900 lines.
Yup; in practice, however, even the best-quality stuff I've bought off eBay and scanned can just surpass the DVD WRT resolution. It's a long way away from 720p. (Of course, it's way better than anything consumer low-band analogue video (VHS / Beta / V8 etc.), and better than even high-band consumer formats like Hi8 or S-VHS, particularly because of the very high color resolution.)
(I don't list the stuff I've shot myself because, back in the day, I shot on AgfaColor Super8 and (because of their very low price) ORWO/Fortepan Std8. AgfaColor is trash compared to Kodachrome (too bad Agfa was more widely available here in Europe than Kodak and, consequently, I shot Agfa back then). And while ORWO produced way better quality than most people think, the format - Std8 - just doesn't have much resolution.)
Posted by Paul Adsett (Member # 25) on December 31, 2018, 04:00 PM:
Werner, was Agfacolor the same as Gevacolor (Agfa-Geavart)? I shot a few rolls of Gevacolor on double 8mm back in the 1950's, and its now all completely pink, whereas my 1950 Kodachrome's looks like it was processed yesterday.
Posted by Werner Ruotsalainen (Member # 6217) on January 01, 2019, 03:49 AM:
Yup, it uses the same tech as Agfa - https://en.wikipedia.org/wiki/Gevacolor
Interestingly, Agfa's earlier color tech ages much better than the one they produced in the 50...80's. For example, I have several rolls of East-German Std8 Agfa films shot in 1955 and 1956. (GDR used the "Agfa" trademark up until 1964 - https://en.wikipedia.org/wiki/ORWO -, when they switched to "ORWO".) Those films still use Agfa's 40's color technology and show no color swifts. (Of course, their resolution is significantly worse than B/W film produced by the same factory.) ORWO, fortunately (as, back in the day, I shot a lot of color Std8 rolls on ORWO), later has always produced decently-aging film.
Some examples of these GDR films (look for the 1955/1956 films; about half of them are color): https://www.youtube.com/playlist?list=PL4_1cuziVtq9GS95obZZnNCfD7ol_M8XM
Posted by Gary Schreffler (Member # 5945) on January 01, 2019, 11:55 AM:
I have the Pro model. I only convert home movies filmed aboard Navy ships. A LOT! I do all conversions with the exposure (shutter/f-stop) set to the minimum -2.0, and sharpness set to low. That seems to largely minimize the artifacts discussed elsewhere. The only issue I have experienced is a flicker effect, as scenes go from dark to bright, or worse, dark foreground with bright background.
I discussed this at length with the Wolverine technical support folks, and we came up with an idea that has 100% eliminated the flicker problem; shining a light at the camera. Not directly, but enough to trick the sensor.
I am attaching a photo, demonstrating this. I simply use my iPhone (while plugged in!). I haven't seen any other comments on the flicker issue, also maybe strobing, but decided to chime in anyway, in case it helps someone else...
Gary
PS:.I can't seem to load a photo. Contact me directly, and I'll happily provide one.
Posted by Werner Ruotsalainen (Member # 6217) on January 01, 2019, 02:47 PM:
Sure I'd be interested in the photo. info AT winmobiletech DOT com; I can then repost the image here for the others.
Posted by Gary Schreffler (Member # 5945) on January 01, 2019, 03:32 PM:
Just sent.
Posted by Werner Ruotsalainen (Member # 6217) on January 01, 2019, 03:49 PM:
Here it is:
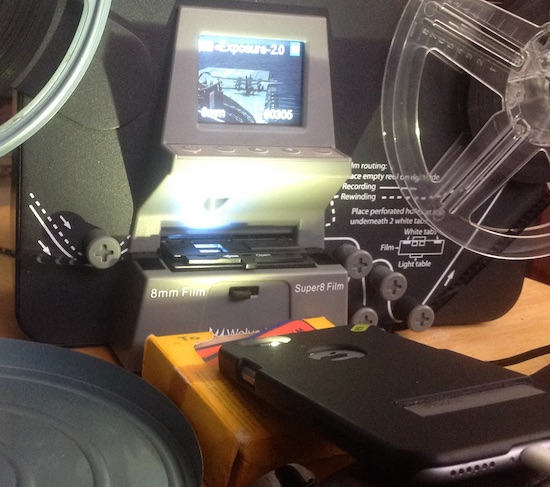
Posted by Gary Schreffler (Member # 5945) on January 01, 2019, 04:22 PM:
My point with the photo is to show where I am pointing the illumination, and also show that the captured image is not impacted. But the flicker/strobe effect is completely eliminated. The iPhone is till I come up with something permanent.
If interested, the film is a home movie from USS Leyte (CVS-32), launching a S-2F Tracker in 1956.
Posted by Bill Sherren (Member # 6743) on January 02, 2019, 09:06 AM:
Gary, do you use the light on all the footage or just bits that might strobe? Also I see you miss the top two roller guides when lacing the film. Was that to improve steadiness of the image?
Posted by Gary Schreffler (Member # 5945) on January 02, 2019, 09:29 AM:
Bill,
Yes, I keep the light on for the entire run. For my purposes (i.e., amateur films constantly panning from dark to light, etc, with the bright ocean as a backdrop), that works best. As for skipping the pegs, yes; that seems to eliminate the hurky-jerky issue.
Posted by Bill Sherren (Member # 6743) on January 02, 2019, 01:09 PM:
Thanks for the info Gary. I also notice on your machine it suggests it just had two tabs to fit the film under both on the sprocket hole side. My Pro has three tabs one in the middle of the sprocket hole side. And the two on the other edge of the film.
Posted by Gary Schreffler (Member # 5945) on January 02, 2019, 01:51 PM:
Bill, that's interesting; that third tab could be very useful with film suffering from vinegar syndrome, where it is wavy, but salvageable.
I also own a Moviestuff RetroScan. Surprisingly, as is, my Wolverine handles wavy film better than the RetroScan. I like the Wolverine mostly because it isn't tied to a computer. And since I only deal with home movies filmed by sailors, the difference between the two scanners is negligible. I do use the RetroScan for films showing unique or historic events, or scenes filmed in very low light.
I have seen a lot of posts bashing the Wolverine, but I haven't experienced the issues. But I also know not to expect broadcast quality video from 8mm film!!!
Posted by Jim Elder (Member # 6780) on January 02, 2019, 04:45 PM:
Jan Schoonenberg asked what version of the Wolverine 8mm movie scanner is currently being shipped by B&H. I received a unit from B&H in Dec; here's what it looks like inside:
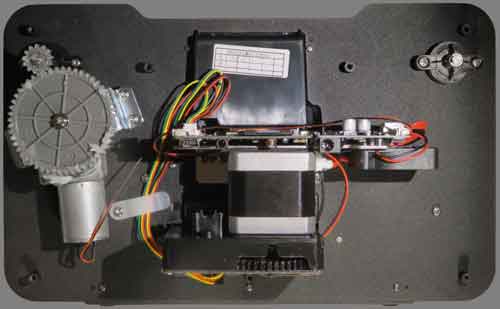
The black rectangle at the right is a small fan (viewed here edge-on) which activates when the scanner is scanning. The back cover (removed here) has four sets of small vents.
The version it reports is 20180419-ZS09
(Wolverine calls this unit a 'Wolverine 8mm and Super 8 3" and 5" Movie Reel to Digital MovieMaker')
[ January 03, 2019, 10:43 AM: Message edited by: Jim Elder ]
Posted by Jan Schoonenberg (Member # 6725) on January 02, 2019, 05:31 PM:
Thank you. This is very helpful. Question: is this now called the Wolverine PLUS? And can handle larger reels than the non-Plus?
I received a catalog from B&H last week but it does not have the Wolverine. Different catalog for Europe maybe?
Posted by Jim Elder (Member # 6780) on January 03, 2019, 10:46 AM:
Jan, Wolverine calls the unit a 'Wolverine 8mm and Super 8 3" and 5" Movie Reel to Digital MovieMaker'. AFAIK, they make two models, this one and another that can mount larger reels and has a higher resolution scanner. Check their website (www.wolverinedata.com).
(I also edited the earlier posting to include the product name)
Posted by Jan Schoonenberg (Member # 6725) on January 03, 2019, 11:12 AM:
I just downloaded the Version 3.0 of the manual from Wolverine. 14 pages. It is the moviemaker PRO . For up to 9" reels. Image sensor 2304H x 1636V. Warranty in the US only. 1 Year or 200 reels (every stop counts for a reel). So glue small reels together
Interesting: reverse reels for rewind. Should go faster thanks to the steppermotor.
Posted by Gary Schreffler (Member # 5945) on January 03, 2019, 12:07 PM:
Jan, I have a Pro, and while the motor does a good job advancing the take up reel during captures, it really sucks for rewinding. Very slow. I simply use another projector for rewinding...
Posted by Bill Sherren (Member # 6743) on January 03, 2019, 12:37 PM:
Gary I have just tried another scan missing those two top pegs and this one has on the whole be far steadier. I did need to do a frame adjust as the frame was visible. I had pressed the default setting before scanning which on earlier scans gave a full frame. But not this time! This particular reel does suffer a lot of flickering but don't have a light source such as a mobile to use at the moment. In the Wolverine instructions it calls the exposure auto/manual. But guess even the manual setting is still adjusting the light levels as I would have expected using manual to solve the flickering issue . Will need to see if the altered film path stops this damage to the sprockets or not. As that is the most important issue to eliminate! Thanks for your help...
Posted by Werner Ruotsalainen (Member # 6217) on January 03, 2019, 01:03 PM:
@Jim Elder:
quote:
The version it reports is 20180419-ZS09
That is, there is a newer firmware version out there than the one most of us have. Does anyone know where to download it from? Could please somebody mail the Winait folks and ask if they could make the firmware public?
This thread also mentioned somikon.de as the source of the firmware, which is the same as pearl.de (with the link below). Unfortunately, the pearl.de firmware at https://www.pearl.de/support/product.jsp?pdid=NX4294 is the currently only official and downloadable firmware I know of. It is buggy as Ive explained in the 13th post (posted March 24, 2018 10:06 AM) on page 13 ( http://8mmforum.film-tech.com/cgi-bin/ubb/ultimatebb.cgi?ubb=get_topic;f=1;t=011395;p= 13 ) of this thread.
Therefore, I use and currently recommend the 30 fps 16 Mbps hacked one at http://retromania.pandelground.com/wp-content/uploads/2017/12/FWDV180N_1440x108 0_24fps_8000.zip . It has the internal version of 20170511-ZS04. That is, it's about a year older than the one you've posted about.
Posted by Kevin R Sexton (Member # 6774) on January 05, 2019, 07:50 PM:
Here's a clip from the file, hopefully I got it cut without changing quality, of course then youtube does their own thing with it. https://youtu.be/kKACsgEHCAU
Going to try redoing it tomorrow with the low sharpness setting, along with trying to find what firmware version it's on.
If it was recording beyond the limits of the original film, I'd expect to see grain. This looks more to me like pixelation, then resizing up with poor interpolation combined with an excessive sharpening filter.
Posted by Werner Ruotsalainen (Member # 6217) on January 06, 2019, 12:33 AM:
Yup, sharpening MUST be dialed down. BTW, if it's the 20fps firmware, it might have a non-working sharpening setting. (No matter what you set, it captures with the default sharpness.)
BTW, your footage seems to overcapture between the sprocket holes - something pretty common, with, for example, the Kodak Brownies. This essentially makes the footage "widescreen". This is why I scan footage like this fully zoomed out (W=0) so that I can also include the "overcapture" area in the scanned footage too.
Posted by Kevin R Sexton (Member # 6774) on January 06, 2019, 06:04 PM:
Firmware is 20180323-ZS08
As far as we know the film was recorded with an Argus camera, image does go halfway through the sprockets. I'm running the transfer right now on low sharpness. Once it's dark I'm going to try to get a still captured off a projector screen to compare.
Posted by Werner Ruotsalainen (Member # 6217) on January 07, 2019, 04:07 AM:
Thanks! That is, there are at least two 2018 firmware versions: 20180323-ZS08 and 20180419-ZS09. Is anyone here in email conversation with the Winait folks so that we could ask them to make these new firmware versions public?
Posted by Bill Sherren (Member # 6743) on January 08, 2019, 10:21 AM:
My Wolverine Pro has the 20180323-ZS08 firmware which I am assuming is one of the buggy ones? Since getting the unit I have always set it to low and it appears to keep this between power ups. It only changes if I click on default. But I them reset to low. However of my 25 recordings so far only two are obviously less noisy and using the low setting. All the others much more noise and these include further scans of the ones that look better. Is that typical of the buggy firmware that sometimes it works but usually not?! Can't Wolverine get anything right?
Posted by Rob Young. (Member # 131) on January 08, 2019, 11:24 AM:
Why would anyone buy one of these things??
Posted by Mike Spice (Member # 5957) on January 09, 2019, 10:59 AM:
ROB YOUNG
This is why!
Super 8 scanned with a Wolverine
[ January 12, 2019, 05:30 AM: Message edited by: Mike Spice ]
Posted by Rob Young. (Member # 131) on January 09, 2019, 12:35 PM:
Hi Mike, I take your point.
But I read of so much hassle with these machines both here on the forum and elsewhere that maybe I just wished they worked better.
Posted by Bill Sherren (Member # 6743) on January 09, 2019, 11:44 PM:
Wolverine scanner made in China designed by Heath Robinson!
Posted by Werner Ruotsalainen (Member # 6217) on January 10, 2019, 01:46 PM:
quote:
But I read of so much hassle with these machines both here on the forum and elsewhere that maybe I just wished they worked better.
Yup - you get what you pay for. The other alternative producing even better image quality would be the MovieStuff scanners. At more than ten times the price, particularly if you're outside the US (additional customs and stuff).
Posted by Kev Morrison (Member # 6338) on January 10, 2019, 09:53 PM:
Mike,
Thanks for your web link to your Royal Navy movies - VERY cool!
Posted by Gary Schreffler (Member # 5945) on January 11, 2019, 09:08 AM:
Mike,
Did you serve in the Royal Navy?
Posted by Bill Brandenstein (Member # 892) on January 11, 2019, 05:05 PM:
Mike's film is both amazing and not what it should be. So long as nobody expects a definitive-quality transfer off of this thing, then fine. But a professional 2K scan of that footage would look strides better. PLUS $$$.
Posted by Mike Spice (Member # 5957) on January 12, 2019, 04:48 AM:
KEV you are welcome.
Not all the footage on my youtube is mine, quite a lot of it is from reels sent to me to scan for other Navy lads.
Those reels are watermarked.
All the 8mm footage on my Utube has been made with the 720p Wolverine, with the exception of one DVD rip of cine film.
Most of the examples at UTube are only 576p for ease of uploading
GARY yes I did serve in the RN. 1974-1986 A cook.
BILL Funny you mention that, over the xmas break I have gone through my reels and edited every Ship and flying shot down to two reels, around 600ft.
The Ark Royal footage most certainly deserves a professional scan, it is historical footage indeed.
I am now choosing which of two companies I am going to send the reels to for a proper scan.
I am almost certainly sending it for a 2.5K Retroscan here in the UK, but I am also considering the reels going to a company who use a Muller HD scanner.
I expect to pay between £100 and £200 but a few bills to pay, so it is coming in the next few months hopefully.
I wish I could afford to have all my reels scanned that way, I have some lovely shots of my late mum & family members and sisters kids growing up.
[ January 12, 2019, 06:26 AM: Message edited by: Mike Spice ]
Posted by Bill Sherren (Member # 6743) on January 12, 2019, 08:41 AM:
Mike Spice- Are the bulk of your films you scan Super 8? Do you do many Std 8mm? All mine are STD 8mm but I did find an old Super 8mm which I shot in the 80's. When I scan this while it was still unsteady did not show any damage to the sprocket holes unlike the STD 8mm scans. So perhaps the possible erratic width is to blame. When you use the box for collecting the film I guess you miss out all the rollers on the Wolverine?
Is one of companies you are considering Gauge Films?
Posted by Gary Schreffler (Member # 5945) on January 12, 2019, 09:03 AM:
Mike: I flew as a Seaking helicopter crewman in the U.S. Navy. We loved delivering mail to you guys. The bag was always returned with good food and generous amounts of beer!!!
Now to the Wolverine. Maybe what I'm going to say here is from Captain Obvious, but... When discussing image quality, one really must first consider the image on the film being scanned, as well as the condition of the film, etc. I see folks converting 'boxes of home movies' talking to folks who are converting professional home movies, as in feature films that were purchased. Needless to say, there is a world of difference there.
My point here is that if your 8mm film is grainy, or filmed in poor lighting, or over exposed, or on poor quality film stock (or developed overseas with substandard chemicals), etc., no scanner will make the film look like a broadcast quality video.
You can put lipstick on a pig, but it's still a pig. You can use a scanner on film of less than optimal quality. The quality of the image will remain less than optimal.
Again, I realize I am probably stating the obvious here, but there it is...
Posted by Mike Spice (Member # 5957) on January 12, 2019, 09:42 AM:
BILL My own films were all Super8 but I have scanned many hundreds of feet of Standard 8 for other folk.
An example of Standard 8mm from 1959
I found the standard 8 held it's colour up much better over the years, in some cases, looking quite beautiful.
Using a box to collect the film, yes, the film exits the scanner gate, goes over the top of the first roller, and then over the edge of the work surface to a box below.
Gauge films is one of the two I am considering, the other being Penny Lane who have a 2.5k Retroscan
GARY My films are in reasonable condition, as much as I enjoy the 720p scans, I do want to see what can be pulled off the film with a proper scan, hence only putting the Navy clips in to one reel to save costs.
I certainly am not looking for broadcast quality from S8 but it would nice to be able to see my Phantoms without so much pixelating in full screen and have the chance to see a full overscan of the frames
Posted by Gary Schreffler (Member # 5945) on January 12, 2019, 09:48 AM:
Mike, for my better films, I use a Workprinter XP (made by Moviestuff). I also have access to a Moviestuff scanner. I do Navy films all the time. I also convert home movies for fellow vets free of charge. I would not mind doing yours for you, if that helps...
Posted by Mike Spice (Member # 5957) on January 12, 2019, 09:53 AM:
Cheers for the offer Gary, that's very kind of you, but sending my reels to the USA is not something I want to do. Other than the cost, I don't want to risk them going astray
Posted by Bill Sherren (Member # 6743) on January 12, 2019, 11:43 AM:
I see that Gauge Films are getting the latest Muller HD+ scanner in the next month or so.
Not sure who did the scan but saw a 2K wetgate scan of an amateur Standard 8mm film which was filmed on a basic Eumig camera. It was screened at the BFI and looked glorious. And showed just how much detail is contained in a 8mm frame. It was taken during the filming of The Prisoner tv series. And when shown along side sequences from the series which were filmed using 35mm really just looked like out-takes!
Posted by Mike Spice (Member # 5957) on January 12, 2019, 03:17 PM:
BILL I saw that too, on the FB page.
I don't know if I want my Super 8 going thro' a wet gate...
I would like an overscan, which I am not sure the Retroscan does, so Gauge are my first choice at the moment.
Posted by Werner Ruotsalainen (Member # 6217) on January 14, 2019, 11:27 PM:
quote:
Did you serve in the Royal Navy?
Talking about the Navy / Army... Recently, I've purchased several rolls of private S8 footage; some of them having army-related stuff. I've scanned them all.
The most interesting are as follows: Vietnam, around 1970 (the films stock's manufacture date was between 03/1969 and 10/1969):
Roll 1: https://youtu.be/jXD1UQIGZtU
Roll 2: https://youtu.be/N97tVjdF4RE
Roll 3: https://youtu.be/CzeaFzNz1U8
(Note that Roll 2 and 3 have some 7 and 0.5 minutes (respectively) shot elsewhere (UK and Australia), when the soldier in question had a holiday there.)
Several Military Police companies have been filmed: 630th, T-3938, T-2090 etc.
This footage has never been scanned / published anywhere (I've looked thru the Vietnam-specific S8 archives).
Other, army-related stuff, which may also interest you: Marine Corp Days 1970 1971 1972 USMC:
https://www.youtube.com/watch?v=A4WSAghq0TA
This film, among other things, has some kind of a celebration at Rock Creek & Potomac Parkway.
(Note that I've also purchased another roll of the same subject ( https://www.youtube.com/watch?v=bWwWHkDMfeo ) but it doesn't seem to have official stuff (celebrations etc.), "only" having a good time, presumably - based on the labels of the films) with other ex-Marine Corp members.)
Also, you may also want to check out my older but still VERY interesting uploads (I've previously posted these links to Page 13 of this thread so you may already have seen these):
Original 12p(!!!) versions:
In the German Army, 1964 - 1 https://youtu.be/xKidGxNgn14
In the German Army, 1964 - 2 https://youtu.be/ntez1LH-bYE
60p (processed) versions:
1: https://www.youtube.com/watch?v=h3XBthKlNPs
2: https://www.youtube.com/watch?v=rBGSCtX4xo4
Posted by Stan Jelavic (Member # 6822) on February 02, 2019, 01:06 PM:
I am new to the forum. Lots of interesting evening reading and thank you for that. I have a Wolverine Pro Model and not happy with the level of compression. Contacted Wolverine Data and they replied that the Novatel chip is in a time lapse movie mode i.e no intermediate images saved.The chip takes stills at programmed intervals and creates the MP4 on a fly. The stills are not saved
(my guess). I tried yanking the sd card out while recording and the SD recovery software and indeed detected a corrupt MP4 file that was not properly closed. If this all is indeed true than we do not have much hope of getting the raw stills. Unless we develop our own patch that would access the cam and save images at regular intervals.... That is a big job. I have done it in my younger years and not sure if I have enough patience for that. Another idea. Pull the cam out and install another one like the RPI cam. Set RPI cadence to match the step motor... I kinda like that.
Posted by Kevin R Sexton (Member # 6774) on February 02, 2019, 07:13 PM:
I had that thought about using a raspberry pi to modify this hardware. There are several projects with posts online that either use a raspberry pi with projector hardware or custom hardware. It should be possible with the camera in the wolverine, or a rpi camera, to get a silly high resolution capture that would show all the film grain.
I think that's actually something that the manufacturer intentionally is avoiding. What looks like compression seems to be they are smoothing the grain out, and then running a sharpen filter on the image. On low sharpness the sharpen filter is barely noticeable, the variations that look like compression and sharpening appear to be originating from the grain.
The newer firmware goes back to high sharpness setting after power off/on, but displays the sharpness setting you had it on. I've been turning sharpness to high, then back to low each time I start, so that's a bug they need to fix.
But again, I don't think it's really compression that's the issue, since I've looked at the same frames through a projector, and it really doesn't look sharper and even put the film across a microscope and seen how big the grains really are.
Better could be done with true high res images, that could be lined up to remove jitter in software, along with making corrections in color, contrast etc frame by frame. Some of those RPI projects appear to do this, but it seems like it would be a lot of work getting from what's posted to a working setup.
Posted by Kevin R Sexton (Member # 6774) on February 02, 2019, 10:52 PM:
Here is one of the videos I've just got up, 1967 rose parade, one of the few times my grandfather apparently used a whole reel at one location.
https://youtu.be/8l5IutSp0W8 full frame
https://youtu.be/IkvpJoAD7e8 zoomed out
Once I get everything captured, most of them are going to have to be cut up and reassembled to separate family stuff from other stuff that may be of interest to others that can be published publicly. On a 5 minute reel it may go from landscapes seen on vacation, to family shots, to flowers, to one of my uncle's childhood birthday parties.
Posted by Stan Jelavic (Member # 6822) on February 02, 2019, 11:23 PM:
Compared my Wolverine capture against the machine that I put together with a Pen SLR. The jpg tiling is definitely visible in the Wolverine frames:
https://photos.app.goo.gl/nMdrbeUQSg2S4xMq9
Posted by Kevin R Sexton (Member # 6774) on February 03, 2019, 01:22 AM:
I think that image you captured is showing one of the things the wolverine is set to avoid. On your image, there are red and green blotches on the pavement. On the wolverine, the pavement looks grey. The same effect is on the grass, and to some extent the curb. The blotches are probably from the film grain, look at the film frame itself with enough magnification, and you'd see the whole image is made up of crystals of these colors.
I think they intentionally are processing the image to reduce the effect, and somehow the wolverine image looks more detailed except in the areas of grass that look smoothed or blurred.
Posted by Brian Fretwell (Member # 4302) on February 03, 2019, 03:54 AM:
In that case the Wolverine image looks less like the original. I think most people here would like have the raw output and be able to control the amount of picture processing in post production adjustment.
Posted by Mike Spice (Member # 5957) on February 03, 2019, 02:06 PM:
I would walk over hot coals to have an image sequence from a wolverine.
Posted by Nantawat Kittiwarakul (Member # 6050) on February 03, 2019, 08:40 PM:
From Stan Jelavic's post
quote:
Novatel chip is in a time lapse movie mode i.e no intermediate images saved.The chip takes stills at programmed intervals and creates the MP4 on a fly. The stills are not saved
So it's hardware compression process,which means camera's raw data goes directly into the encoding chip. Then forget forget about "raw" output hack,it weren't even exist right from the beginning.
This literally seals of any of my consideration to this Wolverine unit. Wouldn't worth the investment.
Posted by Stan Jelavic (Member # 6822) on February 04, 2019, 08:53 PM:
I would not completely rule it out. Maybe they still cache the images somewhere in the memory. Would need a terminal access and do the memory dump. Then search for image headers. A few more crazy ideas:
- Grab images with a tube microscope and 45 deg mirror - have one and will try that.
- Grab tv video out... run through usb pc capture. Probably lo rez?
Posted by Werner Ruotsalainen (Member # 6217) on February 04, 2019, 10:56 PM:
quote:
Grab tv video out... run through usb pc capture. Probably lo rez?
The built-in TV out is SD (Standard Definition); that is, far inferior to the 1440*1080 native resolution of the scanner. (Now, it's another question very few films have actually better luminance resolution as SD. Color resolution can certainly be better than that oif PAL / NTSC.)
Posted by Stan Jelavic (Member # 6822) on February 07, 2019, 07:19 AM:
Tried the microscope and it did not work. The issue is that it is not possible to get close enough to the film to get adequate magnification. Will try the TV out capture next.
Posted by Roberto Paoli (Member # 6821) on February 08, 2019, 11:32 AM:
[ February 08, 2019, 10:20 PM: Message edited by: Roberto Paoli ]
Posted by Roberto Paoli (Member # 6821) on February 08, 2019, 11:33 AM:
[ February 08, 2019, 10:06 PM: Message edited by: Roberto Paoli ]
Posted by Stan Jelavic (Member # 6822) on February 10, 2019, 03:09 PM:
The TV output will not work as expected. It is lower rez and it has text on it.
https://photos.app.goo.gl/bKBY7PMBpG6EJXo48
Oh well. Has anyone managed to get the terminal working with Wolverine? I saw some guys did it with the dash cams. With debug console it may be possible to get the memory dump and check for image content. Once we know where the frame resides in the memory it can be extracted. But at 115kbps uart and large frame and 0.5 sec time lapse between the frames this could be an issue. Would have to slow the machine down. Ouch.
Posted by Nantawat Kittiwarakul (Member # 6050) on February 10, 2019, 06:50 PM:
Speaking about usb microscope...
Duh,forgot that I already have a usb webcam with removable lens (probably standard M12 lens) lying around somewhere in my attic. Will try that out someday.
Posted by Stan Jelavic (Member # 6822) on February 10, 2019, 07:05 PM:
Found the UART port. It is 38.4 kbps and I can see the data coming out on the Tx pin. Pin 2 from the left looking from the back of the unit. Assume pin 3 is Rx. Pin 1 ground and pin 4 +3.3V supply.
https://photos.app.goo.gl/d45DhopRHK5NkSxMA
https://photos.app.goo.gl/C3nV73fckoktFiUZ8
Have to get the uart to usb converter. They are pretty inexpensive.
Here is some more news. I managed to pull the complete transport with the gate and leds out of the unit. It is a bit fiddly but not too hard. Please don't try it by yourself before I put the instructions here. You risk breaking the led connector. Everything still works OK. So I plan to do my own arrangement of the components with my own better cam. I would still let their sw drive the stepper.
https://photos.app.goo.gl/7qAp1ZVhPAD9Y6FfA
Posted by Stan Jelavic (Member # 6822) on February 11, 2019, 09:00 PM:
Reinstalled the transport back in and pulled the camera and the display out so that I can get close to the gate with the Teslong microscope. Here is the comparison.
https://photos.app.goo.gl/LqUEN5QEuD6CxL3P9
The microscope image is in the right hand side.
Posted by Mike Spice (Member # 5957) on February 12, 2019, 09:03 AM:
Stan Simply amazing!
Carry on the great work, it is really nice to see someone going under the hood.
I will be following this with great interest.
Thanks for sharing the images and the research with us.
Posted by Stan Jelavic (Member # 6822) on February 12, 2019, 08:23 PM:
Thanks Mike. Doing it in the evening a bit. Supposed to be retired but went back to work. Still have a few hours in the evening to play with some cool stuff
Posted by Mike Spice (Member # 5957) on February 13, 2019, 10:41 AM:
There's no point in being retired and having that test equipment sitting there doing nothing!
Please keep up the amazing work, I have thoughts of doing this to my Wolverine, but would probably try and use a better quality image sensor, I favour a Go Pro with some kind of macro lens but triggering it would be very difficult as there is no remote to speak of with a go pro.
Being retired is great, it means you can wipe the floor with wolverine data and show them how it should be done.
Thanks again for your tireless work in pulling the darned thing apart and finding out what the heck is going on inside.
Really good work there.....
Posted by Kamel Ikhlef (Member # 6667) on February 13, 2019, 05:12 PM:
Great job! I think it is possible to improve the quality a lot by just changing the optics of the camera without changing the sensor. it looks like it's M12 of f12mm. a m12 macro lens of 12mm (scorpion vision). just replace the original one which is a low end. What do you think ?
Posted by Stan Jelavic (Member # 6822) on February 13, 2019, 11:39 PM:
Thanks again Mike and Kamel. The gopro is a possibility. Mechanically it should fit ok.. see the picture.
https://photos.app.goo.gl/Uhxjh4i8F34PuQQQ6
I am a bit concerned changing the lens. Any recommendations?
The film gate is roughly 40mm from the Wolverine camera lens. Super8 film diag is 7mm and the gopro hero4 sensor is 11mm. So the lens focal length would have to be around 25mm.
I don't think the remote control is an issue. Could use the camera API and write your own python control code.
Posted by Kamel Ikhlef (Member # 6667) on February 14, 2019, 05:04 AM:
an M12 macro lens F12mm
http://www.scorpionvision.co.uk/Catalog/Machine-Vision-Lens/m12-lenses/near-field-far-field-m12-lenses/s-mount-12mm-f2-8-macro-lens
Posted by Mike Spice (Member # 5957) on February 14, 2019, 07:12 AM:
Stan You only went and put a Go Pro in there!
I have great faith in the GoPro as I spent 18 months doing a time lapse, the Go Pro and VirtualDub produced the most amazing results.
If I could apply that same quality to my 8mm scans, life would be perfect.
I know nothing about Python, except Monty Python
I wouldn't know where to start to make a GoPro trigger in time with the gate of the scanner.
Thanks again for your brilliant research in to this.
Kamel great idea about changing the lens too
Posted by Stan Jelavic (Member # 6822) on February 14, 2019, 07:53 PM:
Happy to hear that the gopro would be a good choice and that you are happy with it Mike. I put it there just to see if the film gate would align with the gopro so that I could use the unchanged transport. It looks doable. So here is what I am thinking:
- Replace gopro lens with the macro lens, possibly 25mm
- design a bracket for the gopro
- Replace Wolverine controller with RPI
- Python code controlling the camera and the stepper
- Interface board for the stepper + LEDs etc
Python became very popular programming language and I have been using it for almost 4 years on different projects.
Here is one example of the gopro python library.
https://goprohero.readthedocs.io/en/latest/
Posted by Nantawat Kittiwarakul (Member # 6050) on February 15, 2019, 04:16 AM:
Just got an idea. Instead of remotely controlling the Gopro from external device...
Would it be simpler to set it in photo/still image mode,and hard-wired its shutter release switch to the mechanics. Then let it taking the still image sequence of each film frame (will be TONS of them of course). Pop the memory card out when done,copying them into pc. And finally stitch them back together via your NLE of choice,done.
(Essentially,more or less the same in principle as most DIY Super8 scanners I had seen)
Posted by Mike Spice (Member # 5957) on February 15, 2019, 09:55 AM:
I do wonder about timing the remote of a go pro over http and still get precise timing with the gate.
I would have thought it needs a camera that can be instantly triggered per frame, presumably using the same triggering circuit as the Wolverine uses....as Nantawat suggests
[ February 15, 2019, 01:17 PM: Message edited by: Mike Spice ]
Posted by Nantawat Kittiwarakul (Member # 6050) on February 15, 2019, 07:17 PM:
That's EXACTLY my point.
Hardware wired-shutter release = simple,reliable,and least latency trigger operation.
Posted by Stan Jelavic (Member # 6822) on February 15, 2019, 07:50 PM:
It is a valid concern but since the frame stays still for a few hundred ms it may be ok. Guess will have to try it. The gopro will have to be modified for macro lens. Possibly use the ribcage air?
The wolverine lens is a system of two coated lenses. Seems pretty good quality but would have to do the tests to be sure. Possibly test it with the gopro. I did some lens calculations before I pulled this one out and concluded that it must be a two lens system. Pretty simple basic geometry.
Posted by Stan Jelavic (Member # 6822) on February 15, 2019, 08:13 PM:
It is a valid concern but since the frame stays still for a few hundred ms it may be ok. Guess will have to try it. The gopro will have to be modified for macro lens. Possibly use the ribcage air?
The wolverine lens is a system of two coated lenses. Seems pretty good quality but would have to do the tests to be sure. Possibly test it with the gopro. I did some lens calculations before I pulled this one out and concluded that it must be a two lens system. Pretty simple basic geometry.
Posted by Stan Jelavic (Member # 6822) on February 16, 2019, 10:34 AM:
Regarding the gopro, Couldn't it be used in time lapse mode and triggered only once.
Did some more browsing and found some info on the optics used on the Wolverine.
Sensor:
https://www.onsemi.com/PowerSolutions/product.do?id=AR0330
Lens very similar to this (it is 12mm):
https://www.lensation.de/product/B5M12028/
Just for the heck of it focused the lens to infinity and checked the scenery shot quality and was not very impressed. But then again it is a small cheap display. Will see if I can grab the image. BTW with the motor disconnected the sw goes into a preview mode and the buttons are not active. If we can get the frame then could run a lens quality test.
Posted by Stan Jelavic (Member # 6822) on February 17, 2019, 07:18 AM:
Regarding the gopro, Couldn't it be used in time lapse mode and triggered only once.
Did some more browsing and found some info on the optics used on the Wolverine.
Sensor:
https://www.onsemi.com/PowerSolutions/product.do?id=AR0330
Lens very similar to this (it is 12mm):
https://www.lensation.de/product/B5M12028/
Just for the heck of it focused the lens to infinity and checked the scenery shot quality and was not very impressed. But then again it is a small cheap display. Will see if I can grab the image. BTW with the motor disconnected the sw goes into a preview mode and the buttons are not active. If we can get the frame then could run a lens quality test.
Posted by Stan Jelavic (Member # 6822) on February 17, 2019, 06:50 PM:
Got the console working but cannot switch it to the command mode. So it is not of much use at this point:
NPT
DV180N Loader NT96650 Start ...
650DDR3_300_1024Mb 07/23/2015 15:56:42
MID=000000C2TYPE=00000020,SIZE=00000016
RFlsh
R
PL
RCPU/OCP/APB = 432/432/80 Mhz, DMA = 300 Mhz
Clk verify PASS
=========================================================
NT96650 SDK
Copyright (c) 2012 Novatek Microelectronic Corp.
=========================================================
Hello, World!
> Enter DSC
bind - begin!
bind - end!
event loop - begin!
ERR:ramdsk_setParam() No Implement! uiEvt 1
[LOAD-FW]
Total Sections = 2
Section-01: Range[0x80000000~0x800AB000] Size=0x000AB000 (LOAD)
PL_begin
Section-02: Range[0x800AA824~0x803DDCB8] Size=0x00333494 (LOAD)
PL_end
---------------------------------------------------------
LD VERISON: LD650
FW --- Daily Build: $Date: 12/09/24 6:56p $
---------------------------------------------------------
ERR:pll_setClockFreq() Target(4) freq can not be divided with no remainder! Result is 24750000Hz.
ERR:DrvLCDState() state=0x06 not support!
[DOUT1]: device = [Display_LCD], state = [STOP], mode = [0x00, 480x240]
[DOUT2]: device = [N/A], lockdevice = [N/A]
ERR:PStore_OpenSection() Section not found, name: DEFAULT, op: 0x1
ERR:SectionRead_Header() HEADER open to read FAIL
----------MBMA150_Init----------
ERR: open I2C driver sucess!!!!!!!
ERR: Error transmit data1!!
ERR: Error transmit data1!!
ERR: Error transmit data1!!
ERR: Error transmit data1!!
ERR: Error transmit data1!!
ERR: Error transmit data1!!
ERR: Error transmit data1!!
ERR: Error transmit data1!!
ERR: Error transmit data1!!
ERR: Error transmit data1!!
ERR: Error transmit data1!!
ERR: Error transmit data1!!
ERR: Error transmit data1!!
ERR: Error transmit data1!!
ERR: Error transmit data1!!
ERR: Error transmit data1!!
ERR: Error transmit data1!!
ERR: Error transmit data1!!
ERR: Error transmit data1!!
ERR: Error transmit data1!!
ERR: Error transmit data1!!
ERR:Ux_GetRootWindow() wnd not created
ERR:PStore_OpenSection() Section not found, name: ONLOGO, op: 0x1
ERR: Section PS_BG_LOGO open fail
ERR:PStore_CloseSection() Invalid handler 0
ERR:Ux_GetRootWindow() wnd not created
ERR:fs_ParingDiskInfo() Parsing PBR FAIL
.ERR:fs_StorageDrvInit() Parsing Disk info fail.
ERR:FST_CMDSysInit() File system init fail and will idle. -259
ERR:Ux_GetRootWindow() wnd not created
ERR:Ux_GetRootWindow() wnd not created
KENPHY SHOW MovieExe_OnColor:0
WRN:_GxSound_Play() Snd Data Size Not Word-Alignment=75670
ERR:aud_addBufferToQueue() buf size not word align: 0x12796
ERR:DrvNANDState() state=0x03 not support!
ERR:DrvNANDState() state=0x03 not support!
FL_CardStatus=0
Mode {MOVIE} Open begin
MODE -1->2
DrvSensor_GetObj1st
ERR:Init_AR0330() ^GOTPM v5
ERR:Init_AR0330() Chip version is 0x2604
ERR:ChgMode_AR0330() ChgMode_AR0330 to 4...
ERR:AF_Open() #Register AF event table.
ERR:IPL_SIEClkCBFlowC() SIEclk = 120000000
ERR:pre_open() PLL6 selected but not enabled...
ERR:IPL_SIESetCAVIG_FCB() CA VIG Setting not ready
ERR:AF_Tsk() #Entered AF_Tsk
KENPHY SHOW NEG:0, TARGET:2880
KENPHY SHOW NEG:0, TARGET:2880
KENPHY SHOW NEG:0, TARGET:2880
no CB2222222
ERR:IPL_FCB_Alg3DNR() ^G3DNR on..
ERR:IPL_FCB_AlgWDR() ^GIPL_FCB_AlgWDR = 6..
ERR:pwm_pwmDisable() not opened yet!
ERR:FileDB_CurrFile() u32TotalFilesNum=0
fileid:0
KENPHY SHOW INIT:0
KENPHY SHOW MovieExe_OnColor:0
ERR:IPL_FCB_AlgIE() ^GWDR OFF..
[BMA150DThresHoldSet][212] Thres:1000
KENPHY SHOW NEG:0, TARGET:720
KENPHY SHOW NEG:0, TARGET:720
KENPHY SHOW NEG:0, TARGET:720
KENPHY SHOW NEG:0, TARGET:720
Posted by Stan Jelavic (Member # 6822) on February 18, 2019, 08:46 AM:
Here is the lens calculation.
https://photos.app.goo.gl/WcGtQiMWWWvHFAXi6
Note that with the 12mm lens only half of the sensor is used.
Since the sensor rez is 2304(H) x 1536(V), that is ok to create the 1080P video. Similar cropping will happen with the gopro hero4 sensor. So I will look into how close I can get to the sensor with the gopro. Even if the transport is taken out the stepper is in the way...
Posted by Mike Spice (Member # 5957) on February 18, 2019, 09:40 AM:
Using the go pro in timelapse mode would not work, the wolverine transport moves at 2fps and the go pro does not do 2fps.
Even if it did, there would be no guarantee things would stay in sync for the duration.
Perhaps a different sensor, triggered from the Wolverine circuitry is the way to go, but it would need to be able to write an image sequence to a memory card and keep up with 2fps for up to 4 hours for a 400ft reel.
Posted by Stan Jelavic (Member # 6822) on February 18, 2019, 09:26 PM:
Valid concern about syncing the gopro. Possibly use the motor shield and control the stepper. Not sure what type of gopro you have Mike but my Hero4 does 0.5 sec time lapse. Not saying that I will go that way but definitely want to test that. Here are some preliminary shots with the gopro and timelapse set to 0.5 sec.
https://photos.app.goo.gl/F8UK8mUmS4sjmA516
Obviously a new lens is needed. I am waiting for my ribcage mod. Plan to use the wolverine 12mm lens initially and do some tests with it and the gopro. Ultimately get a new lens.
One more thing, note how well aligned is gopro with the gate. It sits right on top of the stepper so it will be pretty easy to come up with the mounting bracket for it.
Posted by Colin Simpson (Member # 6872) on February 22, 2019, 12:47 PM:
I have one of these units (the winait) and it's very frustrating. It's so close to all I need for most of my historic films. Such a shame that the decent resolution of the camera and ease of use is lost by bad mpeg encoding.
I (as imagine others have) contacted Winait and asked if they could have an expert mode to save high quality jpegs of each image. They said it "it can not scan out the raw frame".
I'd be surprised if the chipset/controller used stopped you doing this, but I guess it's possible that this can't just be fixed in software. Even if it ran at a slower rate. I'd be interested if anyone ever manages to hack a new firmware or designs a new controller board to improve this.
Posted by Stan Jelavic (Member # 6822) on February 22, 2019, 08:33 PM:
Here is a brief update from my man's cave. Looks like my ribcage order will take a few weeks before it gets here. In the meantime will try to control the stepper from my RPI. It looks like the stepper has an encoder with only two wires so maybe it is just a position indicator in oppose to having three wires or more for a true angle detect. Maybe that contributes to the jitter issue.
Posted by Mike Spice (Member # 5957) on February 23, 2019, 04:19 AM:
Interesting point about the stepper motor Stan but I have managed to get jitter free scans by not using the take up reel and allowing the film to drop in a box, so the accuracy of the step seems to be ok.
I think the biggest problem is the awful take up mechanism and cheap clutch on the take up, along with trying to make a rubbish little motor do rewinding and take up.
Keep up the splendid work.
Posted by Stan Jelavic (Member # 6822) on February 23, 2019, 03:29 PM:
Glad to hear that these is a solution to this big issue Mike. Should say one of several big issues. I started working on the stepper and figured out how they provide the feedback for the stepper. There are two optical detectors implemented. They are under the gate and close to the claw. Each one has 4 wires (2 for led power and 2 for optical switch). One detector is used to sense the claw end motion and the other for the 8 - super8 switch. I wanted to know at what point of the claw movement the picture is taken and it is at the start.
https://photos.app.goo.gl/WHjvcccfqEHwHMis7
Once I have the control of the stepper and the takeup motor there may be a better way by shutting off the takeup and then turn it back on after the pict is taken. Will need some experimenting.
Here are a few picts of the optical detectors:
https://photos.app.goo.gl/aeCsxEer66u9AQ3c8
https://photos.app.goo.gl/pUURJ68GP3atmmy78
Posted by Mike Spice (Member # 5957) on February 24, 2019, 04:38 AM:
Excellent work.
Interesting photo's too, thanks Stan.
Posted by Stan Jelavic (Member # 6822) on February 24, 2019, 08:25 AM:
Thanks again Mike. Got the motor control working with RPI. Used the motor shield. Two issues. The shield is only 600mA and the motor is 1.5A. The second issue is noise due to the pulsed control. Ordered a 3A sine wave controller (Toshiba). Should be much quieter. Here a short video of the test:
https://photos.app.goo.gl/8qoCqvqnFuuc3SCx6
Posted by Mike Spice (Member # 5957) on February 24, 2019, 03:20 PM:
That video is quite something.
How I wish I had your knowledge and experience.
Posted by Stan Jelavic (Member # 6822) on February 24, 2019, 06:47 PM:
Actually the motor part is not very hard Mike. Can share the instructions and the parts list. If this works out I will keep it open source. I have three versions of the machine in my mind:
1. Simple version. RPI intercepting the optical trigger signal and running its own camera:
https://www.robotshop.com/eu/en/arducam-noir-8-mp-sony-imx219-camera-module-m12-lens-ls1820.html
12mm lens:
https://www.bhphotovideo.com/c/product/1409672-REG/marshall_electronics_cv4712_0_3mp_12mm_f_1_8_m12_3mp.html
The camera could reuse the existing camera mount bracket with an adapter board.
Control the takeup motor. Need some advice here. At what point from trigger to engage it and when to disengage it.
I will have this version very soon (have to receive the cam first)
2. Same as 1 but with the gopro. Gopro triggered by RPI in time lapse mode.
3. Same as 2 but with the stepper control.
Any other ideas?
Posted by Mike Spice (Member # 5957) on February 25, 2019, 09:49 AM:
any other ideas?
Oh yes, I have an idea that I will be pulling my wolverine apart when you get this sorted, sounds just what we all need for our wolverines, to finally get a half decent result.
excellent work Stan, thanks as always, this is just what is called for.
I am unable to offer any useful technical input but I really enjoy the work you are doing here.
Posted by Bill McCormick (Member # 6877) on February 25, 2019, 10:45 AM:
Hi,I'm new here and am curious to see if there is a way to capture somewhere from the camera directly to an output before the wolverine compresses the video. I might be way off base on this as I am not an elecronics person other than basic soldering etc.
I really have not had to many problems with extreme jitter,or
stuck film with my unit and I would guess I have done about 60,000 ft of film with it.
The problem like everyone else has is the MP4 compression.
Posted by Bill McCormick (Member # 6877) on February 25, 2019, 10:46 AM:
Could a moderator please delete this as it was a double post.
Thank You
[ February 25, 2019, 06:21 PM: Message edited by: Bill McCormick ]
Posted by Stan Jelavic (Member # 6822) on February 25, 2019, 10:50 PM:
Some more testing tonight:
https://photos.app.goo.gl/5RG7JD2xTRHugwtt6
Nothing special. The screen shows the motor pulses and the sync pulse when the claw triggers the optical detector. Looks like the motor does not stop at all. It keeps going and the camera system relies on the sync pulse to start the time lapse. With the takeup running all the time no wonder that we have jitter. Possibly tap into the sync signal and use it to turn on the takeup motor after the picture is taken. Keep it on for a while to allow for the claw to move the film all the way to the right and then turn it off again. Will need some experimenting.
Posted by Stan Jelavic (Member # 6822) on March 02, 2019, 09:30 PM:
Received the ribcage gopro mod kit and wow, this is some pretty serious micro surgery.
https://photos.app.goo.gl/LYsM4AHTVQyy4TyN7
I did pretty good with it but became a bit impatient and tired in the end and damaged one of the sensor flex connectors. Should have left it for the next day.
https://photos.app.goo.gl/ksPhTbgczp7bpqBZA
Sent an email to back-bone support to see if they would send me a new flex. Tried to repair it under the microscope and will check it tomorrow. It might work.
Checked the new stepper driver and ran it in half step mode.
https://www.amazon.com/gp/product/B0191BM6RI/ref=ppx_yo_dt_b_asin_title_o01_s00?ie=UTF8&psc=1
The heatsink gets pretty hot if it is run continuously. The noise is lower than in full step but still annoying. Ordered a Toshiba microstepper (3A) and I think this one should do the trick.
https://www.robotshop.com/en/velleman-tb6560-3a-stepper-motor-driver.html
The noise is not that bad:
https://www.youtube.com/watch?v=4DP-RXqHfh8
The Wolverine stepper has 200 steps for 360 degree turn of motor shaft or 50 steps for one full cycle of the film claw (1:4 gear ratio). So if you want to do 1 sec time lapse you would have to run 50 steps per second or 50 * 8 (1/8 microsteps) or 50*16 (1/16 microsteps).
Posted by Mike Spice (Member # 5957) on March 03, 2019, 03:43 AM:
You have been busy...
Once again the research you are doing is really quite something.
Way over my head but again, thank you for the pictures and the time it takes. I love seeing this come together.
Posted by Stan Jelavic (Member # 6822) on March 03, 2019, 04:50 PM:
Thanks Mike. It is a slow progress but these things take time. Will get there eventually.
Posted by Jim Elder (Member # 6780) on March 06, 2019, 09:51 AM:
Here's a summary of my experience with a Wolverine 8mm scanner purchased in Dec 2018 from B&H, with some tips on how to use the scanner (not included in the brief manual):
Using this scanner eventually gave me better results than
using a video camera to recording an 8mm projection, but I had to work with Wolverine to overcome some shortcomings; this device needs more product development.
The scanner is very sensitive to the write speed of the SD card used. If the SD cards write speed is not fast enough, the recorded MP4 will likely have periods of what looks like frame jitter and rolling shutter effects, caused by the scanner getting behind while waiting for writes to complete (meanwhile, the film advances and it is late taking the photo of a frame, or taking it while the film is moving).
The manual doesnt talk about this critical dependency, but I eventually learned of it from Wolverine support people. Given the importance of the SD card performance, I believe Wolverine should include a suitable card with the device (but probably doesnt to keep the price down).
I was able to make the scanner work (barely) using a SanDisk Extreme 32GB SD card rated at Class 10, U3, V30, A1 (many hi-speed cards are larger than 32GB, but 32GB is the maximum accepted by the scanner).
In addition, the card MUST be formatted by the scanner, and one must not delete files from the SD card (just read them), using only format to clear the card. Otherwise recordings will likely have periods of jitter.
It would seem much better if the scanner were to simply run slower, so that it would work with any SD card and never introduce jitter. I would prefer quality over scanning speed.
The scanner seems to do some white balancing, which sometimes causes colour casts. Unfortunately there is no way to control that.
The tension provided by the take-up reel may also to be a factor. I had best results when using the take-up reel provided with the unit. The (plastic?) clutch on the take-up reel was a source of occasional squeaking sounds, suggesting wear. Wolverine warranties it for 200 scan counts or one year (in USA only). It took me about 70 scan counts to scan about two-dozen 5-inch reels.
To handle a 7-inch reel, I mounted it on a pencil to the left of the scanner and scanned it in two halves.
I found that the frame position within 8mm films shifts. Rather than trying to track that with the scanner (using zoom and frame adjustments), I recommend zooming out a bit such that the field of view always encompasses frames, including wandering. This means youll capture frame borders (and even slivers of adjacent frames) but I found that to be acceptable, and if not, more easily handled using post-processing software on a computer.
I believe the scanners resolution of 960x720 pixels is more than sufficient to capture the detail in a 8mm frame. I tested this by looking at the spatial frequencies in a recording, using an FFT analysis (ImageJ). Even with a slight zoom, I was satisfied with the resolution provided by this scanner. (Higher resolution and empty magnification would just make the output file larger, for no benefit.)
Once a successful process was obtained, scanning went fairly smoothly. The scanner chugs along at 2 frames per second. Its best to be nearby when it is scanning, so that youll notice (usually by a change in sound) if it jams on a splice or whatever.
The device can rewind, but I used an 8mm projector to rewind, which is faster and saves wear on the possibly fragile scanner.
I used the scanners USB interface to read MP4 from the SD card (taking care not to delete any files; see above), and processed the files using software on a computer, eg., VirtualDub, Handbrake, After Effects, VLC. I experimented with AviSynth for dust removal and stabilization. Inexplicably, the frame rate setting on the scanners MP4 files is set to 30 fps, even though 8mm/Super8 is usually 16 or 18 fps; the file setting can be changed later using computer software.
Wolverine includes a brush to clean dust from the sensor, but I found it ineffective. It is much better to use a can of compressed air, which can blow dust out of the light-well.
Apparently the scanner is made by Winait in Shenzhen. Wolverine is the US distributor; other companies distribute the same product in other regions. The core of the product is apparently a dashcam, which could explain some of the peculiarities described above. It appears that Winait makes gradual improvements; the model I had, purchased in Dec 2018, had a motor-driven take-up wheel.
In summary, I was tempted to return the scanner as unacceptable, but decided that after overcoming problems the scan quality was good enough. Now Ive got digital versions of the movies. As film degradation wasnt as severe as I expected, perhaps in the distant future, if technology is even better, Ill scan them again. I have a similar thought regarding the digital versions; I think Ill wait for better, easier to use image processing/restoration software. Meanwhile, I kind of like the 8mm-projection look of visible frame boundaries, dust, and handheld instability.
My thanks to posters in this forum; many posts were quite helpful.
Wolverine, if you're lurking, thanks for your help too, and for trying to serve the low-cost market segment.
Posted by Stan Jelavic (Member # 6822) on March 08, 2019, 11:54 AM:
I am still going ahead with my mod. If nothing else, it is fun. Ran into a few snags. My gopro is still not up and running. Discovered a ripped sensor flex - ouch.
https://photos.app.goo.gl/6u7fBToA4oswVE2v8
https://photos.app.goo.gl/ZahFa1jWqC9E6DCeA
Will try to fix it in the lab today. If not will order a new sensor. Not that expensive at $29.
Got a new motor driver with Toshiba chip. Capable of 256 micro steps. Should be pretty quiet.
https://photos.app.goo.gl/mXZtsSNsakK7rGNJ7
Looking forward to trying the new camera setup and getting a few sample videos. Probably in a few weeks.
Posted by Stan Jelavic (Member # 6822) on March 08, 2019, 11:55 AM:
I am still going ahead with my mod. If nothing else, it is fun. Ran into a few snags. My gopro is still not up and running. Discovered a ripped sensor flex - ouch.
https://photos.app.goo.gl/6u7fBToA4oswVE2v8
https://photos.app.goo.gl/ZahFa1jWqC9E6DCeA
Will try to fix it in the lab today. If not will order a new sensor. Not that expensive at $29.
Got a new motor driver with Toshiba chip. Capable of 256 micro steps. Should be pretty quiet.
https://photos.app.goo.gl/mXZtsSNsakK7rGNJ7
Looking forward to trying the new camera setup and getting a few sample videos. Probably in a few weeks.
Posted by Mike Spice (Member # 5957) on March 08, 2019, 12:51 PM:
Sorry to hear about the ripped cable.
Lets hope some crafty soldering will bail you out.
Looking forward to see what you do with the stepper motor in time.
Still very much looking forward to see what you come up with
Posted by Stan Jelavic (Member # 6822) on March 10, 2019, 11:10 AM:
Could not fix the flex (shaky hands). Ordered a new one. The new motor controller works pretty good but the ST instructions were wrong. Took me a few hours to figure it out.
https://photos.app.goo.gl/idSUsp6gRYvNtwVv7
I am running the motor at 1/4 turn per second (1 frame per second).
This is the controller spec:
https://www.st.com/resource/en/user_manual/dm00441590.pdf
Posted by Alan Taplow (Member # 4702) on March 11, 2019, 09:55 AM:
Need an ALARM SYSTEM to let me know when the machine is hung up on a bad splice. I think this may be a universal problem with all Wolverine users --- I'm away from the machine while it's running and it's stopped because of a bad splice. When I return and happen to notice it, I pull the film past the splice and it resumes. I then pay careful attention when editing to remove those frozen frames.
Needed --- a way of setting off a loud bell or whistle when a bad splice freezes a frame. I'm hard of hearing so currently need visual contact to realize it's stopped. Would love something which set off a loud noise or lit a flashing light. Anyone know of such a signal device or how to make one???
Posted by Mike Spice (Member # 5957) on March 11, 2019, 11:38 AM:
There is no way I would walk away from a film being scanned.
EVER
I watch every frame go past, with it connected to a 20" tv so I can keep an eye on the framing, while it sits on the side, or stop it to go and do something more pressing......
#justsaying
Posted by Alan Taplow (Member # 4702) on March 11, 2019, 12:22 PM:
Wish I had the time, Mike, and interesting film subject matter to do that, however as the sole caregiver of my wife with stroke debilitation, there are many times when I have tons of film to process and don't have the ability to watch every frame to say nothing of the patience to watch another set of 2 year-olds splashing around in the bathtub.
So the question is still out there ---
Looking for a loud or flashy signal system to alert me that the film has hit a nasty splice. Has anyone done this? Is there a commercial setup which can be adapted? Any thoughts about building something?
Many thanks --- this is one of the most useful forums I've run across.
Posted by Stan Jelavic (Member # 6822) on March 11, 2019, 09:29 PM:
Hi Alan.Yes it is possible to make an alarm system. One of the wires that comes out of the transport mechanism is the claw detect. The wire is connected to the controller and used as a time lapse trigger. You can make a small intercept board with the trigger connected to it and then bridged back to the controller. The new board then can have a small alarm circuit on it that senses the loss of pulses. If you are not technically savvy then I suggest wait for the mod that I am coming with using the RPI. I can implement the alarm code in the RPI. It is a good idea to have that in addition to the camera control code.
It may be possible to have something even simpler, possibly a small mirror on the takeup reel and use the IR sensor with arduino:
https://www.youtube.com/watch?v=LuX_ZGIRCzo
The TCRT5000 can be mounted on the top of Wolverine close to the takeup reel and sends the pulses to the arduino board every time the mirror passes by it. The arduino can count the pulse rate. If the rate drops below a certain threshold an alarm can be triggered. Hope this helps.
Posted by Alan Taplow (Member # 4702) on March 11, 2019, 10:37 PM:
Many thanks, Stan,
When I posed the question I sort of figured I'd hear from you.
I'm understanding what you're suggesting but not savvy enough to construct it --- will wait to see your results.
The take-up reel option is out for me since to reduce jiggling I just let everything run into a large deep carton that my flat screen tv came in --- perfect for letting the film go back & forth without tangling. I rewind with one of the cranks from an old defunct editor. Not pulling the film has made a noticeable difference - no longer have jiggles.
However wondering which wire it is that trips the claw detect and what electrical signal passes thru it. Might a less elegant solution be as simple as tapping a connection off it to a relay to power a buzzer or other signal?
Posted by Stan Jelavic (Member # 6822) on March 12, 2019, 08:45 AM:
The signal comes from an opto-detector. It uses a solid state switch and it may be capable of driving a relay. But to be safe I would use a relay driver such as:
https://media.digikey.com/pdf/Data%20Sheets/Sparkfun%20PDFs/BOB-09118_Web.pdf
You will also need the connectors. Can send you the part numbers. Alternatively, could use the cell phone for motion sense. I can do a small app for you based on:
https://github.com/jjoe64/android-motion-detection
The additional code is needed for lack of motion sense.
Posted by Alan Taplow (Member # 4702) on March 13, 2019, 10:38 AM:
Thanks Stan, am off on a large order so unfortunately no time right now to work on an alarm signal, however will come back to it later.
One more item on my Wish List for the Wolverine would be a way of adjusting the exposure setting while running. That way, on a large reel, when it shifts from an underexposed scene to a normal or overexposed scene, I could make the adjustment on the fly.
Posted by Kev Morrison (Member # 6338) on March 13, 2019, 03:31 PM:
Alan,
I think the solution that Stan has come up with is what you need, but as a workaround for the time being:
I recently converted 2400ft of Super 8 using a Wolverine Pro. After observing the time it took to process a 50ft reel, I used a timer to alert me when a film splice was imminent. If the film appeared to slow, I could 'nudge' it through.
Since I did very little editing to my film, the timer technique worked pretty well since to processing time per reel stayed mostly the same. I did note that as the take up reel filled (I used 400ft reels), of course, the tendency for it to slow and pause has a splice moved through the gate noticeably increased.
Just a thought!
Posted by Stan Jelavic (Member # 6822) on March 14, 2019, 08:04 AM:
On a second thought the claw detect signal will not work because the claw never stops even when the firm is not advancing. My bad. But the motion sense should work. Compiled the app framework last night and it ran on my phone. Now have to do the necessary mods. The app runs on android phones only.
Once I get the camera working it should be possible to detect the frame update and signal an alarm if there are none after a timeout.
Posted by Alan Taplow (Member # 4702) on March 14, 2019, 08:45 AM:
Will be a great use for my old LG android which is sitting here useless for phone, but still picks up internet --- FAN-TASTIC !!!
Posted by Stan Jelavic (Member # 6822) on March 19, 2019, 11:14 PM:
Got the app working. Here is the demo. Every time I wave my hand in front of the phone the phone vibrates and displays the time in seconds from the last motion detect. If there is no motion for 40 seconds the alarm sounds.
https://drive.google.com/file/d/1JCzppC_s4m5FOfXLcuacMprlIVtV-11U/view?usp=sharing
The app is based on an existing motion detect app done by a German speaking developer. I left that part as is but had to add the lack of motion detect.
The settings are hard coded for now but I plan to add the settings menu that will have sensitivity values. The default is pretty sensitive and will trip on a slightest motion in the scene.
The apk is available here:
https://drive.google.com/file/d/1VLHhCvSKQvlj9sp5EDS1D4U5nfvxSUPA/view?usp=sharing
You will have to change the phone security to allow unknown app installation and also open up app manager and then allow the app to access the camera. Can provide more detailed instructions if needed.
The app is safe and I will be posting the source as well.
Have fun.
Posted by Kevin R Sexton (Member # 6774) on March 21, 2019, 12:57 AM:
on the stepper motor, maybe something else would be a better solution?
They are using a stepper motor and a clutch to just provide some limited tension on the take up reel, to keep the film rolled up. The advancing of the film is fully done by the claw advance.
In fact, if you rewind on the wolverine, following the instructions, the completely loose supply side, going under the first roller(though they are not rollers, don't turn) and directly to the takeup, the tension is so low, a reel may overflow.
My thinking is possibly a better motor and better clutch system might help with take-up related problems people are reporting. A geared down motor and a clutch with more precise tension and longer life?
If writing at 2 frames per second is hitting the limit on SD cards, that's something to consider with any rebuilds/mods. Other devices are going to have to deal with the same write speeds, if you are capturing a better, higher resolution or less compressed image, things might have to be slowed down considerably, even with a better card.
Posted by Stan Jelavic (Member # 6822) on March 21, 2019, 12:40 PM:
Good thoughts Kevin. Although I am trying to do a full custom version of Wolverine I still want to use the takeup motor but control it from my own board. And that gives me a headache just thinking of how to solve it. I think in my version I will turn it on the off at strategic times. They run it continuous and the picture is taken while the claw is still pulling the film. I confirmed that by taking the video of the claw with their camera (camera loose).
https://photos.app.goo.gl/t4GUWwtVpwh2hbVKA
That can cause a jitter problem because if the takeup tension during the film advance overtakes the claw the film will jitter towards the other side of the hole.
I will try to turn off the takeup motor during film advance and then turn it back on or similar solution. And yes the frame rate will be slower. Can't win them all.
BTW - hit another snag with my gopro mod. Managed to damage another flex cable. This is the buttons flex and it is very delicate. Ifixit don't have any left. Thinking of using the back connector as a workaround. My RPI cam order from China is still in transit somewhere. Its been 3 weeks.
https://photos.app.goo.gl/iXwJjWPfJuVwakc36
Posted by Stan Jelavic (Member # 6822) on March 21, 2019, 08:10 PM:
If still interested Alan, here is the new version of frame jam detect. It uses the default ringtone and the back camera. The phone starts ringing when the film jams. To stop it you have to close the app. Pretty primitive for now.
https://drive.google.com/file/d/1QOL1i4XoGB4hISMYn7WXmL9XwLBLCecf/view?usp=sharing
Posted by Alan Taplow (Member # 4702) on March 23, 2019, 09:45 PM:
I am not at all familiar with how to add an app which isn't already listed in the play store. Any help in doing that would be appreciated. Looked over settings, but didn't see anything which looked like a way of adding private apps.
Posted by Stan Jelavic (Member # 6822) on March 23, 2019, 10:13 PM:
This should work:
Connect your phone to the WiFi router in your place. They in the phone browser go to the link that I posted.
https://drive.google.com/file/d/1QOL1i4XoGB4hISMYn7WXmL9XwLBLCecf/view?usp=sharing
The phone should prompt you if you wanted to install the app. Say yes to that. You may also get the warning that this is an unknown app or similar warning and it may instruct you how to enable installation of unknown apps.
Generally there is a setting for unknown apps installation.
Settings -> Application -> Unknown sources (Allow installation of non-Market applications).
Let me know if you manage to install it because once it runs you may have to do a few more minor setting changes.
GOPRO update. Not dead yet. Working on the back connector control. That way I can control the cam fully from my RPI. Got the connector but need a smaller soldering iron tip. Bought a set of 5. Should do the trick.
Posted by Stan Jelavic (Member # 6822) on March 31, 2019, 10:59 PM:
Finally got the RASPI cam. Tried it with the Wolverine using the Wolverine lens mounted on the RASPI cam:
https://photos.app.goo.gl/ZQ2NAhTtNff53veR6
This was just a quick test so no fancy hardware for now. Just wanted to see what the frame grab looks like. The Wolverine original frame grabbed from the mp4 file looks sharper and brighter but looks like too much of sharpening applied (maybe my settings). The RASPI image looks blurry. I tried adjusting the focus but this was the best I could get. The edges are out of the focus because I do not have a solid lens mount yet.
https://photos.app.goo.gl/t5YVvaHAz8GaHGCDA
RASPI is on the right.
I also noticed that they must be doubling up the frame digitally. With the similar optics setup (my sensor is actually smaller) I get only half of their frame size after cropping.
Posted by Stan Jelavic (Member # 6822) on April 01, 2019, 11:28 PM:
Did some work on the lens mount. Now it is nice and parallel to the film. The reused the Wolverine lens.
https://photos.app.goo.gl/zPaHtoEBP9rznFJp8
Applied unsharp mask to the captured image and I believe I got it to match the Wolverine pretty close. Surprisingly the Wolverine image shows very little compression. I say this because my image has no compression at all. It is a BMP cam capture. But there is lots of sharpening applied and that is not good. Possibly the scene details are such that the compression artifacts are not visible but you be the judge. The red tinge in my image is from the RPI led - will fix that. Also considering a new lens that would give me the full HD size frame. Wolverine lens is 720 x 480 and they resize it and then sharpen it. Pretty sure of that. Can provide more detail if interested.
Posted by James Wilson (Member # 4620) on April 07, 2019, 07:05 AM:
Hi,
can anyone give me any details on the Somicon. Have they improved from the early versions. Are they more reliable, is the coding any better, are they direct drive. Just asking this because I`m now thinking of getting one, please help if you can.
Many Thanks,
James.
Posted by Stan Jelavic (Member # 6822) on April 07, 2019, 11:38 PM:
Finally got the camera and the stepper working together. The python control code advances the frame and then takes the picture and stores it and then back to stepper...
Here is a short clip generated from the images:
https://photos.app.goo.gl/5cG4qCWCRVQnQDbk8
Posted by Alan Taplow (Member # 4702) on April 19, 2019, 11:30 AM:
Since Wolverine misses the boat with regard to a built-in capability to output a file at normal 8mm speeds and at an acceptable mp4 quality, a certain amount of post-capture work is required to get acceptable movies. I developed a work flow and am wondering whether others are doing something simpler or better than my workflow.
I've been:
1-Setting up 4 folders on my C:\ drive: Raw, Muxed, Enhanced, and Final.
2-copying files from the sd card to the Raw folder on C:\drive.
3-Using MyMP4Box, de-mux each raw file, and then muxing it at either 16 or 18 fps. Save results in Muxed folder.
4- Using the enhancing part of AnyMP4, enhance to smooth out the
Wolverine visual noise and get rid of inherent speckling. Save the results in the Enhanced folder.
5. Do an edit in NCH VideoPad. Here is where I run through to eliminate the sections hung up on the Wolverine as a result of bad splices, make any other needed crops, edits, whatever, and save the results in the Final Folder.
I imagine that each of us doing a reasonable number of Wolverine transfers has developed a work flow routine. Perhaps this fits in this Wolverine thread, or perhaps it could be a separate thread --- up to the moderators. Anyway it's an important part of using this good, but incomplete Wolverine machine if a quality output is required.
Posted by Mike Spice (Member # 5957) on April 20, 2019, 08:58 AM:
Stan that is quite simply amazing!
well done. Look how rock steady the image is too, and I really like the overscan. brilliant.
Posted by Stan Jelavic (Member # 6822) on April 20, 2019, 09:57 AM:
Thank you Mike. I am pretty happy with the results as well. I even did not tweak the cam settings at all. I am currently on a hiatus for a few weeks visiting my aunt but when I get back plan to do the following:
- Finalize the design. Will share the results here. Things like lens selection and different settings.
- put together a mod kit for Wolverine with all instructions and BOM and code source for the DIY guys. This will be totally free.
- Offer a complete kit with instructions for people with less hw and sw experience. Obviously will have to charge for this but not planning to make money doing this 😀 At least recover my cost.
Posted by Kev Morrison (Member # 6338) on April 20, 2019, 10:03 AM:
"- Offer a complete kit with instructions for people with less hw and sw experience. Obviously will have to charge for this but not planning to make money doing this 😀 At least recover my cost".
Stan, sounds perfectly fair to me! You've put the time & effort into it, at least cover your costs.
Gee - wonder if the Wolverine folks monitor this forum....
Posted by Mike Spice (Member # 5957) on April 20, 2019, 11:45 AM:
Stan I am most certainly up for doing some mods on my wolverine now I have stopped doing my 'super 8 rescue'
Take your time, real life places demands on us which means we have to stop the fun bits we enjoy messing about with.
I am currently wearing my 'matron hat' for a very poorly partner.
No time do anything other than dispense meds, cook, and do domestic chores for the last two weeks.
I would certainly use your mods to re scan my own footage again.
I would be very happy to help you recover any costs to mod my wolverine.
Kev it is quite likely because I sent an angry email to Wolverine during my early motor failures and sent a link to this forum so they could see I was not the only person with issues.
Wolverine data also watch my you tube channel and 'dislike' my Wolverine failure videos
Posted by Stan Jelavic (Member # 6822) on April 20, 2019, 07:15 PM:
Looks like my posts got out of sync... not a big deal. Anyways as Mike says the real life takes precedence. My aunt is 95 and I am her only relative.
I will get the PCB done that will contain the interface circuitry and it will completely replace the Wolverine controller. The only thing reused from the controller is the lens. I plan to have an alternative lens that has more optical magnification but that is optional. May not be needed. I will use this forum to post the results with different lenses and settings and will let you be the judge. The bottom line is that this project will be fully open source. You will be in full control. That is the best way in my opinion to get something that really works. As I said I will offer fully assembled kit fully programmed for those that want to go that way.
Posted by Kev Morrison (Member # 6338) on April 21, 2019, 08:39 PM:
Kev it is quite likely because I sent an angry email to Wolverine during my early motor failures and sent a link to this forum so they could see I was not the only person with issues.
Wolverine data also watch my you tube channel and 'dislike' my Wolverine failure videos [Eek!] [Smile] [Smile]
Mike.... why is it that I'm not surprised? ![[Confused]](confused.gif)
When Wolverine stops using it's customer base for beta testing it's equipment, well, then they won't have anything to 'dislike'!
Posted by Richard Thomas (Member # 6962) on May 03, 2019, 08:53 AM:
Hi all-I'm a new poster to this forum, though I have been following it for a while. I had some trouble with the Wolverine Unit I bought in January 2017, so this week I took delivery of a new until. Based on my reading here, I thought everyone might be interested to know there have been changes to the film path. There are now three tabs instead of two, spaced out across the film path. The new manual says its to cut down on jitter. Ran a few films and it seemed to help.
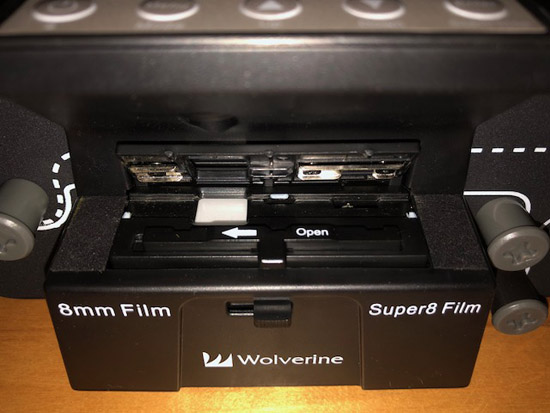
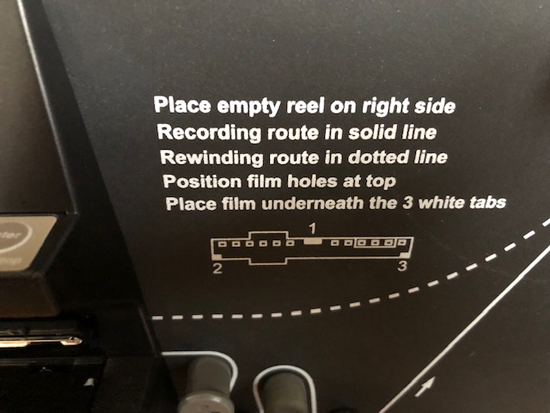
Posted by Bill Sherren (Member # 6743) on May 03, 2019, 11:45 AM:
My Wolverine had the three tabs and was totally jittery and unstable! With film sprocket damage as well. So guess their quality control is rubbish and you either strike lucky or not!
Posted by Stan Jelavic (Member # 6822) on May 13, 2019, 07:58 PM:
My Wolverine has 3 tabs as well and has a jitter issue with the stock setup.
Started working on the new controller. Have some issues with the M12 lens mount. Hard to get the right size so ordered a bunch of them all different sizes from M12lenses. Also ordered a new lens from bh photo. It is a 12mm lens and according to my calculations it should give a better optical resolution but the proof is in the pudding - right. Will see how this new combination works out.
Posted by Kamel Ikhlef (Member # 6667) on May 15, 2019, 04:58 AM:
Hello Stan,
congratulations for your work this will help a lot of people like me. I am impatient and I will be very interested in your module. for the lens mount, I do not know if the hole spacing is 18mm or 20mm. for the camera lens I found a 12mm macro scorpion that seems very good. We will end up making this machine a good telecine.
M12 lens support : https://fr.aliexpress.com/item/M12-Lens-Mount-ABS-Lens-Mount-Camera-Lens-Mount-the-ABS-Lens-Holder/32567879004.html
M12 macro lens :http://www.scorpionvision.co.uk/Catalog/Machine-Vision-Lens/m12-lenses/near-field-far-field-m12-lenses/s-mount-12mm-f2-8-macro-lens
Posted by Kamel Ikhlef (Member # 6667) on May 15, 2019, 04:59 AM:
Hello Stan,
congratulations for your work this will help a lot of people like me. I am impatient and I will be very interested in your module. for the lens mount, I do not know if the hole spacing is 18mm or 20mm. for the camera lens I found a 12mm macro scorpion that seems very good. We will end up making this machine a good telecine.
M12 lens support : https://fr.aliexpress.com/item/M12-Lens-Mount-ABS-Lens-Moun t-Camera-Lens-Mount-the-ABS-Lens-Holder/32567879004.html
M12 macro lens :http://www.scorpionvision.co.uk/Catalog/Machine-Vision-Lens/m12-lenses/near-field-far-field-m12-lenses/s-mount-12mm-f2-8-macro-lens
Posted by Stan Jelavic (Member # 6822) on May 19, 2019, 09:47 PM:
Hi Kamel,
Thanks for researching the lens alternatives.
I bought several M12 holders and checking them now.
http://www.m12lenses.com/M12-Lens-Holders-s/61.htm
PT-LH008P works good with the Wolverine lens and RASPI cam
but the optical magnification is not enough as you can see from my previous posts. It covers only 50% of the HD image. Not sure if 12mm is too much. Did a spreadsheet and it says 12mm should be OK but will have to test it since I have several lenses here.
The camera mount is a bit tricky. It requires standoffs. Should have something tomorrow and will send an update.
Posted by Kamel Ikhlef (Member # 6667) on May 20, 2019, 09:02 AM:
Thank you for sharing. I am not as competent as you but I look forward to your advancement. I would like for the moment to replace the original lens support to put another lens of better quality. I will print the support in 3D. I have to do tests too, I have f8, f12, f16 ... The focus distance is very important. I can not measure it.
Otherwise we can calculate the lens on the sunex web site: http://www.optics-online.com/register.asp
Posted by Stan Jelavic (Member # 6822) on May 20, 2019, 10:02 PM:
Managed to fix the camera mount:
https://photos.app.goo.gl/n81SPStUWHdfCiUK6
Used the 8mm lens with the new holder and the optical magnification is still not enough:
https://photos.app.goo.gl/EjYGqaqFxSXsRw959
12mm lens should be pretty close. Here is my calculation:
https://drive.google.com/file/d/1-hXTxF7eOxKUawaIUkLS4dvfP0YH8TbK/view?usp=sharing
I tried your link Kamel but it seems to be limited to 8mm FL and lower.
The stock Wolverine lens seems to be around 4 - 6 mm. Will measure it by focusing to infinity and then measuring the distance from the lens to the sensor.
Posted by Kamel Ikhlef (Member # 6667) on May 21, 2019, 11:11 AM:
ndeed, the calculation of optics is not simple. for now I would just replace the stock optics to improve the quality. the sensor is a 3.53 MP cmos. 2304x1536. But the recovered image is in 1440x1080.
the cmos is a 1/3 '' and measures 4.8mmx3.6mm.
the useful dimensions of the cmos of stock are 2.99mmx2.53mm.
The distance from the cmos to the film plane is about 45mm. the format super8 is 5.79mmx4.01mm. a focal lens of f10 would be good but it is difficult to find in M12. or play with long rings ... To test.
Posted by Stan Jelavic (Member # 6822) on May 21, 2019, 07:22 PM:
Looks like a pretty good plan. One issue that you may have is the fixed distance from the film to the sensor. A 12mm lens will focus at around 18mm (focuses at 12mm for infinity). The lens that you are planning to get has minimum focusing distance at 28mm according to the spec. So, 28mm + 18mm is 46mm which is too close for comfort. I plan to use 12mm but in my case I can change the sensor to film distance.
Posted by Kamel Ikhlef (Member # 6667) on May 22, 2019, 07:41 AM:
Yes you are right. I wanted to simplify my mod for the moment. but I would like, as you, disassemble all and slow down the system to avoid jigs and skipping pictures (great disease of these scanners units). Of course, I would also like to record the frames one by one to maintain the maximum quality ... I do not know how to disassemble the camera board support to become independent of their system ?... that's why I'm very interested in your work and the kit you are preparing. Have you made a disassembly guide ? I need help. sorry for my english.
Posted by Stan Jelavic (Member # 6822) on May 22, 2019, 01:02 PM:
Hi Kamel,
The Wolverine camera and the controller are all on one board and there is no way of separating the camera. That is why I removed the camera/controller/display unit and slowly building my own. I still reuse the transport mechanism with the stepper and the LEDs and the main mechanical assembly including the housing and the mounting brackets.
I do not have the instructions yet because it is still work in progress but it is in the plan.
The main issues that I have are:
- Select proper IR filter to remove pinkish tinge in the image
- Try 12mm lens (on order)
- Drive LEDs from 3.3V source on RPI
- Detect sync pulses from the transport in RPI
- 12V relay for the takeup motor
- Update sw to sense the sync and drive the stepper
The main issue now is the pink color in the image - see:
https://photos.app.goo.gl/2nRmSDpbsds7hXFo6
Found the root cause:
https://www.ccdcmoslens.com/pink-glow-caused-difference-lens-cra-sensor-cra/
https://www.raspberrypi.org/forums/viewtopic.php?t=196297
Will try the correction mentioned in the links above. This could limit the amount of optical magnification. Alternatively go with a different cam.
Posted by Stan Jelavic (Member # 6822) on May 26, 2019, 10:05 PM:
Tried the 12mm lens.
As I mentioned before the sensor to film distance is large and the lens will not work with the stock Wolverine. See my rig:
https://photos.app.goo.gl/buEnuFdfz4qj6tQYA
Here is a test capture:
https://photos.app.goo.gl/txnZBY1hdMeJrjuG7
The optical magnification is significantly larger than with the stock lens bit there is some blurring around the edges cause by wider FOV. Possibly better lens might have better fringe focus. Another issue is pink glow as I already mentioned. I think I can fix that.
Posted by Kamel Ikhlef (Member # 6667) on May 27, 2019, 03:56 AM:
your progress is very promising and encouraging. I did not go much further. I am doing curved pulleys for the training of the film to print in 3D to improve the scrolling of the film. I do not dare to disassemble everything yet but it will come when you propose your modification kit.
Posted by Stan Jelavic (Member # 6822) on May 27, 2019, 02:30 PM:
The Scorpionvision 12mm macro lens that you suggested Kamel seems to be better suited for these close distances and may have better focus than the Marshall lens that I am using. I will get one and compare. If you happen to have 8mm you can try it with the stock setup but I don't think you will see much difference because Wolverine are doing image doubling and sharpening and then on top of that jpeg compression so the details where you could notice the difference are no longer there (but we want to see those details). Additionally, due to low optical magnification and larger older sensor they use only the center portion of the sensor so that a better lens will not help that much.
Posted by Kamel Ikhlef (Member # 6667) on May 27, 2019, 02:52 PM:
yes, I totally agree. with the scorpion M12mm macro lens, it is better to use a better quality sensor and become independent of their wolverine system. I had smpte hit test on a super 8 movie outside Wolverine unit, and the quality could be really better. the goal is to get the best of our movies.
save a series of compressed or uncompressed frames and then create the final movie after post production.Finally, that's what I would like to get
Posted by Stan Jelavic (Member # 6822) on May 27, 2019, 09:29 PM:
The Scorpionvision 12mm macro lens that you suggested Kamel seems to be better suited for these close distances and may have better focus than the Marshall lens that I am using. I will get one and compare. If you happen to have 8mm you can try it with the stock setup but I don't think you will see much difference because Wolverine are doing image doubling and sharpening and then on top of that jpeg compression so the details where you could notice the difference are no longer there (but we want to see those details). Additionally, due to low optical magnification and larger older sensor they use only the center portion of the sensor so that a better lens will not help that much.
Posted by Kamel Ikhlef (Member # 6667) on May 29, 2019, 05:13 PM:
My telecine of dreams and that could have been possible. the wolverine unit with an independent camera. opportunity to change it for a better one HDMI video output for a high quality monitoring on a larger screen.
mp4 or frame-by-frame recording, choice of compression.
a scroll of the film by capstan to pass the films a little damaged.
We can always dream !... I would have paid more, Wolverine could have proposed this unit by naming it "pro" because my wolverine pro has only the name!...with our mods, I hop the dream this becomes reality...
Posted by Stan Jelavic (Member # 6822) on May 29, 2019, 11:17 PM:
That is a nice dream Kamel But I believe that it is definitely possible to have an independent camera that we control the way we want to. It is a slow progress but we will get there.
Posted by Kamel Ikhlef (Member # 6667) on May 30, 2019, 05:12 PM:
I recovered a camera imagingsource : camera with a M12mm optics lens and a low distortion 16mm of very good quality. I can print a 3D support for the camera board. but I do not know how to slow down the wolverine scrolling and I also need the 3,3/5v signal at each frameto trigger the camera. the software is freely downloadable and allows the recording of videos or image by image. It may be a good track.
Posted by Kamel Ikhlef (Member # 6667) on May 30, 2019, 05:17 PM:
I recovered a camera imagingsource : camera with a M12mm optics lens and a low distortion 16mm of very good quality. I can print a 3D support for the camera board. but I do not know how to slow down the wolverine scrolling and I also need the 3,3/5v signal at each frame to trigger the camera. the software is freely downloadable and allows the recording of videos or frame by image (ICCapture). It may be a good way. https://www.theimagingsource.com/products/board-cameras/usb-2.0-color/dfm72buc02ml/
Posted by Stan Jelavic (Member # 6822) on May 30, 2019, 09:43 PM:
That sounds exciting Kamel. Can you post the pics. How close were you to the object? Any pink glow?
The trigger signal is available from the Wolverine.
It is a 3.3 V pulse:
https://photos.app.goo.gl/jasjZTjiDkdrzV1k6
Will post the connector pinouts. I suggest using the motor shield. Then you don't depend on Wolverine controller at all and can set any speed you want.
Posted by Kamel Ikhlef (Member # 6667) on May 31, 2019, 08:29 AM:
for the moment, I did not yet to disassemble the Wolverine. I do not know how to do. I am waiting for your guide. I do my tests outside Wolverine. I'm 50mm distance from the image. The frames are really better. no pink tone. but the imagingsource camera board are little expensive. ICcapture software is very complete and is free but only works with imagingsource cameras.
first picture is wolverine capture, the second is imagingsource capture. 
Capture with imaging source camera board with F16mm (distance 50mm)
it is clear that wolverine accentuates the video by an electronic reinforcement and mp4 compression degrades much captured image.
I think that we can do better because the lighting of my 2nd images is not uniform. and the flatness is not good. more blurred on the left.
Posted by Stan Jelavic (Member # 6822) on May 31, 2019, 11:00 PM:
Nice work Kamel. The images that you posted clearly show the difference. I will work on disassembly instructions this weekend so that you can try the lens with the actual unit. BTW - where did you get the test clip. They are pretty expensive.
My update.
Reworked the camera mount and made sure that all sides are properly aligned:
https://photos.app.goo.gl/9pfQBZ2uGojDu5RcA
Also rotated the board so that now the image does not require any rotation. This gives a more uniform focus.
Added an IR filer and here is the test picture:
https://photos.app.goo.gl/YauGq3Qst5oh5kcu6
Posted by Stan Jelavic (Member # 6822) on May 31, 2019, 11:03 PM:
Nice work Kamel. The images that you posted clearly show the difference. I will work on disassembly instructions this weekend so that you can try the lens with the actual unit. BTW - where did you get the test clip. They are pretty expensive.
My update.
Reworked the camera mount and made sure that all sides are properly aligned:
https://photos.app.goo.gl/9pfQBZ2uGojDu5RcA
Also rotated the board so that now the image does not require any rotation. This gives a more uniform focus.
Added an IR filer and here is the test picture:
https://photos.app.goo.gl/YauGq3Qst5oh5kcu6
Ran shadowing compensation and this pretty much fixed the pink glow:
https://photos.app.goo.gl/paqSYbRAnFioKnSi6
Posted by Kamel Ikhlef (Member # 6667) on June 01, 2019, 06:23 AM:
The test film :
test patterns are branded wittner SMTE super8 ordered in germany. they are very expensive, unfortunately. But it's more convenient to see the definition of the captured frames.
http://www.wittnercinetec.co m/epages/WittnerCinetec-Super8-16mm-Film.sf/en_GB/?ObjectID=628763&ViewAction=FacetedSearchProducts&SearchString=smpte
I can give you a small piece of 10cm / 15cm because I do not have a lot but it may be enough for testing. We can agree on the terms privately Tell me
[ June 01, 2019, 10:03 AM: Message edited by: Kamel Ikhlef ]
Posted by Stan Jelavic (Member # 6822) on June 01, 2019, 10:56 AM:
Yes I am interested Kamel.
BTW - when choosing the lens we should get higher F stop. Possibly even f/8.0. You get less light in but the depth of field is larger and this will ensure that the whole frame is in focus. The test picture I posted was taken with the 12mm Marshall lens:
https://www.bhphotovideo.com/c/product/1409672-REG/marshall_electronics_cv4712_0_3mp_12mm_f_1_8_m12_3mp.html
It has f/1.8 which is very wide and shallow depth of the field. That is why the edges are slightly out of focus.
Here is the test Wolverine shot (posting it again):
https://photos.app.goo.gl/XdUo2tAvgwnKhspT7
Imagingsource 12mm lenses are f/2.8 which is better than what I have but still pretty wide.
Posted by Stan Jelavic (Member # 6822) on June 01, 2019, 05:57 PM:
Here are the disassembly instructions. This is my first stab at it. Will need cleaning up.
https://drive.google.com/open?id=1M3yqKHqYuxwxKJMxtIkyrWgPbcyXOBzR
Posted by Mike Spice (Member # 5957) on June 02, 2019, 05:11 AM:
Stan
Many thanks for your continued work, the PDF instructions are most generous of you.
Stripped mine down a few times, but for users who have never attempted to do this, to this level, the PDF is of great value.
Keep up the good work chaps!
[ June 02, 2019, 08:05 AM: Message edited by: Mike Spice ]
Posted by Stan Jelavic (Member # 6822) on June 02, 2019, 09:59 PM:
Thanks Mike,
We are getting closer to the ultimate goal of having fully custom Wolverne. Have several camera and lens alternatives and a few more coming up shortly.
The stepper controller that I used is pretty good and quiet. Looks pretty good so far.
Posted by Kamel Ikhlef (Member # 6667) on June 06, 2019, 04:23 AM:
can I slow the scrolling of the wolverine ex: 1 image every 2 seconds and get the signal to each frame to trigger another camera ? I would like use the original motors and led. Just replace the camera with trigger. I do not know how to recover the signal at each frame stop.
I'm not an electrician but I want to tinker with my wolverine to have the best quality.
Posted by Stan Jelavic (Member # 6822) on June 06, 2019, 08:47 PM:
The mod kit that I am working on uses the existing Wolverine stepper and the LED. If you want to put the stuff together fast for testing I suggest the following:
- Use the new camera that you bought and the new lens. Mount with the proto board and some standoffs or long screws.. similar to what I did.
- Get the stepper shield.
https://www.hackster.io/voske65/arduino-stspin820-stepper-driver-2ae2d4
or
https://www.digikey.com/en/product-highlight/s/stmicroelectronics/stspin-motor-drivers-and-motor-driver-solutions
- Run the LED from the existing controller
Do not use the trigger for now. Just match the camera acquisition rate to the stepper rate. It will be a hit and miss but should work.
I am working on the interface board that will drive the existing LED and run the trigger interface. So that is coming up.
Posted by Kamel Ikhlef (Member # 6667) on June 07, 2019, 05:48 AM:
with your advice, I will wait a little for your advancement. I have a trigger input on the imaging source camera. it needs 3.3v or 5v at each frame stop and the software saves automatically to the hard drive. but I do not know or recover on the Wolverine the impulse to each frame.
Posted by Stan Jelavic (Member # 6822) on June 07, 2019, 07:59 AM:
The trigger signal is 3.3V and may be able to drive the camera directly. But you do not want to cut the connector off to get access to the signal. On my board I have the proper mating connector and then wires that come out that can be connected to the camera. Using Eagle PCB tool but the library does not have the JST part so creating my own...
Posted by Kamel Ikhlef (Member # 6667) on June 08, 2019, 04:15 AM:
It is very easy on the source imaging camera to record the frames. the capture software exists and it is free. you just have to send an impulse at the moment of the frames stop. it would be necessary to divert the signal of Wolverine towards my new camera. but I do not know how to do it.
Posted by Stan Jelavic (Member # 6822) on June 08, 2019, 09:16 AM:
You can get one of these:
https://thesaberarmory.com/product/4-pin-micro-jst-connector-pair-male-and-female/
Not sure if it is 1mm spacing because I never used this particular one. They do not provide the specs.
If it works you plug in the sync cable (pics coming up) and you have the lose wires coming out. Will send you the pinout description and connection details shortly.
Posted by Kamel Ikhlef (Member # 6667) on June 08, 2019, 10:36 AM:
I already have a trigger connector for my imagingsource camera board. But, I do not know where to put it on the Wolverine board. you are more competent than me for that.I will order several connector of different sizes to test.Thank you very much for your help and your advice.
Posted by Stan Jelavic (Member # 6822) on June 08, 2019, 03:35 PM:
This is what you need to do.
Locate the trigger connector. Check the following picture:
https://photos.app.goo.gl/LFUEeKjdT2GKVEx59
Unplug it.
Plug the disconnected connector into the new adapter cable. Like the one I mentioned in the previous post.
Wire up the interface as shown:
https://photos.app.goo.gl/5m8jsykGVw8QNDzL9
You will need 3.3V supply.
Alternatively, if you have a male connector with wires for the receptacle on the Wolverine board, you just connect the blk to blk wire, yel to yel and grn to grn. Then connect the blk wires to you camera gnd and the yellow to the camera trigger. No external supply and components needed.
Posted by Kamel Ikhlef (Member # 6667) on June 08, 2019, 03:55 PM:
Ah! Thank you very much Stan. With your good advice, I will be able to advance in my tests.
I keep you informed of the continuation of my work
Posted by Stan Jelavic (Member # 6822) on June 08, 2019, 09:09 PM:
Correction:
The JST connector info that I posted earlier is not correct. The Wolverine connectors are most likely Molex Picoblade. Very similar to JST 1.25mm connector but not compatible with them.
This should work:
[URL=https://fr.aliexpress.com/item/10pcs-1-25mm-PicoBlade-4Pin-Male-to-Female-Housing-Connector-Extension-wire-JST-1-25mm/32814247145.html?spm=a2g0w.search0204.3.14.751f2dc6AJAIh3 &ws_a]https://fr.aliexpress.com/item/10pcs-1-25mm-PicoBlade-4Pin-Male-to-Female-Housing-Connector-Extension-wire-JST-1-25mm/32814247145.html?spm=a2g0w.search0204.3.14.751f2dc6AJAIh 3&ws_a[/URL] b_test=searchweb0_0,searchweb201602_10_10065_10130_10068_10890_10547_319_10546_317_10548_10545_10696_453_10084_454_10083_10618_10307_537_536_10059_10884_10887_321_322_10103,searchw eb201603_53,ppcSwitch_0&algo_expid=3cc7ede2-fc29-4df3-b642-724fd211cea2-2&algo_pvid=3cc7ede2-fc29-4df3-b642-724fd211cea2
Also available from digikey.com.
[ June 09, 2019, 08:11 AM: Message edited by: Stan Jelavic ]
Posted by Stan Jelavic (Member # 6822) on June 10, 2019, 09:37 AM:
Tried a cheap lens from dlscorp:
https://dlscorp.com/shop/ls-12020-1-3-0-m12-mount-lens/?attribute_pa_ir-filter=yes-ir-filter
Actually not bad at all:
https://photos.app.goo.gl/jTNQmSpojN5jHLNX9
Posted by Stan Jelavic (Member # 6822) on June 10, 2019, 04:00 PM:
Here is the test shot with the clip that Kamel sent me:
https://photos.app.goo.gl/1aCQXHwv735QZg7RA
Posted by Kamel Ikhlef (Member # 6667) on June 11, 2019, 08:12 AM:
Hello Stan,
it is already much better than the result with the original optics of Wolverine. moreover, wolverine reinforce the sharpness video signal. You have to see with macro lenses, you can still gain in quality, what do you think. If in addition we do not compress any more before recording, it will be all the better.
Posted by Stan Jelavic (Member # 6822) on June 11, 2019, 08:43 AM:
Hi Kamel,
This was a cheap lens. I have a better lens on order:
https://www.oemcameras.com/lens-tbl-12-2c-5mp.htm
Will try that also. Will also do a test video with the new setup and original Wolverine setup. Most of us no not like Wolverine digital artifacts in the captured video and the new setup should fix that. That, and the takeup motor control. BTW - I am almost done with the interface board design.
Posted by Kamel Ikhlef (Member # 6667) on June 12, 2019, 08:09 AM:
very impatient to see the rest of your work which is very inspiring.
Posted by Stan Jelavic (Member # 6822) on June 12, 2019, 09:23 PM:
Thanks Kamel,
Here is my first attempt at doing the schematic for the interface board. Working in the board mechanical now.
https://drive.google.com/open?id=1Kso39YDE_2g-rrsEjtLMh5yIh7zz3Nb_
and the BOM
https://drive.google.com/open?id=11N8s6HIyJXf_ewlIQzBoqw_f1w9ruF3j
Posted by Kamel Ikhlef (Member # 6667) on June 13, 2019, 12:08 PM:
it's very good work, but I admit that there, it goes far beyond my skills!
I ordered some small jst molex 1.25 connectors that you recommended. I am waiting for them to continue my tests.
Posted by Stan Jelavic (Member # 6822) on June 13, 2019, 11:30 PM:
Here is a little napkin sketch on how the trigger circuit works and why we need two resistors and a 3.3V supply. Hope it helps...
https://photos.app.goo.gl/byeMPUoq6uxpPBAq8
Posted by Kamel Ikhlef (Member # 6667) on June 14, 2019, 09:50 AM:
Great job Stan. For my part, I am creating new pulleys for Wolverine. The original ones are flat and scratch the movies. To improve the scrolling of the images I made them curved.
If some are interested, I will post on thingiverse and I will put links to STL files for those who want to print them in 3D.
The Links : https://www.thingiverse.com/thing:3691019
Posted by Stan Jelavic (Member # 6822) on June 15, 2019, 08:05 AM:
Cool design Kamel. Have you tested them?
Posted by Stan Jelavic (Member # 6822) on June 15, 2019, 12:47 PM:
My previous post:
Correction:
The JST connector info that I posted earlier is not correct. The Wolverine connectors are most likely Molex Picoblade. Very similar to JST 1.25mm connector but not compatible with them.
Update:
Just received a few picoblade 1.25mm connectors from Digikey and they fit perfectly Wolverine 4-pin and 2-pin connectors. JST are very close and visually look identical but DO NOT WORK. Picoblade are from Molex.
Posted by Stan Jelavic (Member # 6822) on June 19, 2019, 07:53 AM:
Here is the interface board:
https://photos.app.goo.gl/cnyCfdNtiiWXviTW7
A few details:
- mounts in place of the existing controller
- camera mount holes
- LED connector
- Fsync in and out connectors
- Takeup motor control
- RPI mount holes
Ordered qty 5 for testing.
Posted by Kamel Ikhlef (Member # 6667) on June 19, 2019, 08:32 AM:
Hi Stan,
ouah !!! Great work !
Great job. I think some people will be interested in your kit module. Me first!... For my part, I have not tested the pulleys because I would like to sand them more finely. I have ordered very fine sandpaper and would like to polish them to preserve our precious films.
Posted by Stan Jelavic (Member # 6822) on June 19, 2019, 08:32 PM:
Sure thing Kamel. Will keep you posted. May be able to do some testing this weekend. Also got the 12mm lens from imagingsource.com but this one has 2.8 F stop which should give more uniform focus.
Posted by Stan Jelavic (Member # 6822) on June 22, 2019, 01:53 PM:
The board should be here on Tuesday. In the meantime got the MT9P001 camera working (similar to the one that Kamel bought but much cheaper). Here is the test shot:
https://photos.app.goo.gl/5oGATxPF6N7EopTDA
Used this lens:
https://www.oemcameras.com/lens-tbl-12-2c-5mp.htm
This is the camera info (usb and can be run from windows or Linux):
https://dlscorp.com/shop/mt9p001-5-0-mp-m12-mount-camera-module-w-ls-6020-lens/
and the usb shield:
https://dlscorp.com/shop/arducam-usb-camera-shield/
Here is the test setup. Still using my old beat up mount:
https://photos.app.goo.gl/RgQC7ZZse67zzGhM7
[ June 22, 2019, 07:42 PM: Message edited by: Stan Jelavic ]
Posted by Jeff Self (Member # 7012) on June 24, 2019, 11:55 AM:
Hello all! I just joined the forum. I have a lot of 8mm and some Super 8mm film. I've had some reels converted in the past from Video Conversion Experts. They are expensive but do a very good job. But I've always wanted to do this myself. Last night I came across the Wolverine Movie Maker Pro and I was very interested. That's how I found this forum.
Anyway, I'm interested in getting it even with the concerns about the compression. I even emailed them about it and asked about firmware updates or even a new model that was a bit more professional.
Here is their response:
quote:
Our units were created for consumers to be able to scan their 8mm and Super 8 at a reasonable cost. The unit produce a very good quality videos. However, the unit cannot produce JPEG or PNG individual frames because it does not use a typical digital camera. It uses a Time-Laps camera. Compression was set to minimum and we cannot go lower.
So I wonder what time-lapse camera they are using that compresses so much. Seems more like something used for security cameras.
It seems like there is a major gap between this product and the similar products costing a lot more.
Posted by Stan Jelavic (Member # 6822) on June 24, 2019, 10:57 PM:
Hi Jeff,
Check the following forum:
https://www.goprawn.com
It has a section on NovaTek cams...
Essentially, Wolverine is based on a dashboard cam and the Novatek chip is programmed for the time lapse mode. That is why it is very limited.
Welcome on board.
Posted by Jeff Self (Member # 7012) on June 25, 2019, 07:03 AM:
Thanks Stan! I'll check it out.
Posted by Stan Jelavic (Member # 6822) on June 26, 2019, 08:29 PM:
Here is the new controller update:
- received the boards and installed it into the Wolverine together with the MT9p001 camera and 12mm lens from Imagingsource.
A small adjustment was needed and will have to run another board version with a few more tweaks.
https://photos.app.goo.gl/DzC4xUeB64eMrbs68
https://photos.app.goo.gl/gtRRjx8jyAJAtPZm8
Here is a cropped test shot. It shows that the camera alignment is pretty good (no rotation required).
https://photos.app.goo.gl/KRemY2LYsSsygHuc9
Next steps:
- mount rpi on the board.
- run camera from RPI.
- Install LED connector
- Add Frame Sync connector and bias components
- Install motor shield somewhere
Posted by Kamel Ikhlef (Member # 6667) on June 27, 2019, 09:55 AM:
Hi Stan,
I am appreciative of your work and I am waiting impatiently the next episodes of your project. I am testing several M12 lenses. I created a Camera support outside the Wolverine. I will put pictures as soon as possible.
Posted by Kamel Ikhlef (Member # 6667) on June 28, 2019, 05:12 AM:
here are the pictures of my 3d printing camera test. I will post the clip results later. I still have to test the external camera trigger . I have not yet dared to disassemble everything like Stan, but I will do it soon.
it works also with day light :

Posted by Stan Jelavic (Member # 6822) on June 28, 2019, 05:35 PM:
Cool work Kamel.
I can send you one of the boards with the trigger connectors on it.
You should get a few of these cables. This will give you access to the trigger output:
https://www.digikey.com/products/en/cable-assemblies/rectangular-cable-assemblies/450?k=picoblade+cable+assembly&k=&pkeyword=picoblade+cable+assembly&sv=0&pv88=6&sf=0&FV=ffe001c2&q uantity=&ColumnSort=0&page=1&pageSize=25
Posted by Kamel Ikhlef (Member # 6667) on June 29, 2019, 10:53 AM:
Thank you very much Stan, it's nice of you. But I will wait for you to advance in your RPI project (module Kit).
I can buy you your module when it is ready.
It will be much more interesting because my camera will not be able to record the frames at the cadence of the Wolverine (2 frames/seconds) but rather 1 frame every 2 or 3 per seconds if we do not compress the captured frames(bmp or tiff). for the moment I will test the trigger of the camera with an external 3.3v switch manually to see how long it takes to process an frame save it then move on to the next. for my optical tests. here is the best result obtained with the 12mm lens (distance of film 55mm). I think the focus can still be improved but we are getting closer to the 63 lines of resolution and sometimes 80 in the center. I continue my tests...
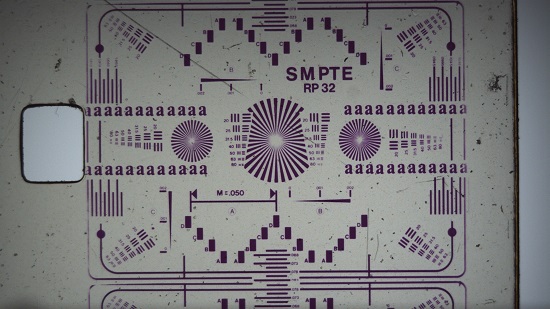
12mm Lens capture 1920x1080
[ July 01, 2019, 03:39 PM: Message edited by: Kamel Ikhlef ]
Posted by Ian McAfee (Member # 7013) on June 30, 2019, 06:45 AM:
I have been watching this post for years and it's finally where it should be, modding of the wolverine base model.
I too am weary of the artifacting and haven't yet bought one, i have been waiting for someone to overcome this issue, and i think you guys are very close.
If you get all the bugs worked out, i would be more than willing to buy a kit or assembled mechanism for sure.
I read a few pages back something about mjpeg format which my blackmagic intensity video capture card uses, i was thinking maybe there was a way to mod the moviemaker to get a 3.5mm jack or RCA to transmit to a capture card which would make an MJPEG video that could be edited, i was going to do that with the 20mp F2D but that would have literally taken forever... Maybe using the moviemaker to passthrough and mechanize the F2D which has a 3.5mm video out jack for tv viewing is a solution... pump it to a capture card instead of a tv using the F2Ds 20mp video camera...
Keep up the good work.
[ July 01, 2019, 01:19 AM: Message edited by: Ian McAfee ]
Posted by Jeff Self (Member # 7012) on July 01, 2019, 09:11 AM:
Stan & Kamel,
You guys are doing some amazing stuff! I was thinking about building my own scanner utilizing a Raspberry Pi 4 and one of the cameras for it. It looked simple enough to use Python to capture the images. But if you guys can produce a kit that allows us to modify the Wolverine, I'm all in. I may go ahead and order one now.
Posted by Kamel Ikhlef (Member # 6667) on July 01, 2019, 02:10 PM:
still some tests. with the stock M12 lens of the wolverine mounted on my camera imaging source - Full sensor 2592x1944 :
??F Wolverine Stock Lens - Full sensor 2592x1944
12mm imaging full sensor 2592x1944.
We can see the difference in quality. but especially that of original lens of the Wolverine does not cover the full sensor. it is clear in the center and reaches the 63 lines but very blur on the edges. I can not define the focal length of the wolverine stock lens ( maybe F6 or F8mm). Very difficult to cover an HD image in 1920x1080. With the 12mm imaging source ($ 30) we have the large margin. it should try a better macro M12 8mm. I will order one and I will repeat the tests because the more we move away from the image less depth of field.
This is the maximum image I can have with the stock wolverine lens with the sensor 1/2.5 of my camera board. I continue my tests...
Posted by Stan Jelavic (Member # 6822) on July 01, 2019, 11:38 PM:
Got the basic setup working. The motor runs at around 4 frames per second and the camera is triggered by the sync pulse. Still do not have the takeup motor control. The part needed for that just came in.
Jeff, I do use RPI3 and python code for motor and camera control but thinking of simplifying it by use a PIC. It may be possible. Will post a video of the setup tomorrow some time after work.
Kamel, I tested the Wolverine lens and it is around 8mm. I think you are putting it too close to the film. Try to put it at the same distance as in Wolverine. That will give better focus but the optical magnification of the 8mm lens is still around 50% of the HD image so they double the image and sharpen it and that gives lots of unwanted artifacts. Possibly worse that the MPEG compression after that. They should have left it at low rez.
Posted by Kamel Ikhlef (Member # 6667) on July 02, 2019, 04:58 AM:
Thank you for your good advice Stan.
Yes, indeed, I am stuck to move back the lens of the film because the support of my camera imaging is too high (16mm high). I have to find another one for the lens to be closer to the sensor. Here is a table of correspondence of the sensors.
The fixing holes of the support are of 18mm (difficult to find) I will go to design the part so I will be able to test several heights and transform my optics in macro (tube lengthen).
[ July 02, 2019, 08:34 AM: Message edited by: Kamel Ikhlef ]
Posted by Stan Jelavic (Member # 6822) on July 02, 2019, 09:17 PM:
Here is a short video covering my project. Used two boards because the camera mounting holes needed a tweak. So used one board just for camera mounting and the other for all other electrical connections. When done, obviously it will be only one board. In addition to the interface board I have the RPI3 controller, Arducam and ST stepper controller. Hopefully when it is finalized I will have less components. Possibly a PIC controller driving the wolverine stepper control and the takeup. The camera can be connected to a pc or a linux machine and will be triggered by my interface.
https://photos.app.goo.gl/HTR374exjan1pmwC7
Here is a sample video created with ffmpeg from captured frames. No post-processing or cropping done:
https://photos.app.goo.gl/cSnqgtny1Y9YehDx8
[ July 02, 2019, 11:42 PM: Message edited by: Stan Jelavic ]
Posted by Kamel Ikhlef (Member # 6667) on July 03, 2019, 06:52 AM:
Ah! yes great work ... We start to see the end of the tunnel as we say in France. The stability of the image is excellent. quality looks very good. it's very promising and gives hope. Congratulations Stan. I am very far from achieving this result.
[ July 03, 2019, 09:20 AM: Message edited by: Kamel Ikhlef ]
Posted by Jeff Self (Member # 7012) on July 03, 2019, 08:44 AM:
Looks awesome Stan! Are you streaming the images to another PC and then processing them on that PC? Or are you letting the raspberry Pi do everything?
I was reading up on what Joe Herman did with a projector and Raspberry Pi. He wrote a separate client and server piece for his setup. He was streaming the images in order to keep the frame rate up.
Posted by Stan Jelavic (Member # 6822) on July 03, 2019, 09:09 AM:
We are getting there Kamel slowly. A light at the end of the tunnel. We say that here also. Played with ffmpeg a bit and it is quite powerful. Maybe better keep the camera at lower settings so that the images look a bit washed out so that the original content is not saturated and not lost. Then fix it with ffmpeg or other video editing sw. The guys here probably have tons of experience with that. Any good guides on how to use ffmpeg? Would like to fix the white balance. Found an article on how to do it with photoshop and ffmpeg.
Posted by Kamel Ikhlef (Member # 6667) on July 03, 2019, 09:21 AM:
Stan, what size do the jpg files (resolution and Megaoctet). how do you think you crop the captured frames ?
Here You Find a great free software for clip post production :
https://contact41766.wixsite.com/film9/home-1
Posted by Mike Spice (Member # 5957) on July 03, 2019, 02:46 PM:
I have to say Gents, the work you are undertaking between you is truly amazing.
I did wonder for a while if it was worth modding the wolverine, going to all that trouble to try and make the best of what is a pretty poor film transport system to create a system of capture to beat the factory rubbish.
I am truly impressed with what is slowly coming together and send you rapturous applause for the work you are all doing.
Talk of Stan not making a sutiable take up assembly?
Even if you did, I would not use it, I actually prefer to let the film snake in to coils in a large plastic tub.
Keep up the amazing work, really quite something, coming together. Thank You too for the time it takes to upload evidence of progress, in the way of notes, stills and movie clips.
In other news, I just scanned 11 50ft reels for a friend, for free and it came out as per usual, grainy, but steady, by NOT using the pathetic wolverine take up and instead, relying on my fancy pants plastic box.
BZ!
Posted by Stan Jelavic (Member # 6822) on July 03, 2019, 11:19 PM:
Thanks Mike for the positive feedback. I will implement the takeup control this weekend.
Thanks Kamel for the link. Tried it. Here is the result. Keep in mind this is my first attempt. Looks like I overexposed the frames. Will have to turn the camera gain down a bit.
https://photos.app.goo.gl/dytc3J5xT8FEcHXP7
Here is that same clip taken with the original Wolverine.
https://photos.app.goo.gl/he2mgvNPapM7W57W6
These are some of the ffmpeg examples that I used before you sent me the video editor link:
ffmpeg -start_number 6 -i image%d.jpg -vcodec mpeg4 -b:v 8M test.avi
ffmpeg -i test.mp4 -vf "crop=1291:953:550:540" test_cropped.mp4
ffplay -vf eq=brightness=0.4:saturation=4:contrast=2.0 test.avi
Posted by Kamel Ikhlef (Member # 6667) on July 04, 2019, 03:07 AM:
Stan, thank you for sharing your experiences...
I have the impression that the post production has degraded the original quality of the image. You have to do tests to refine the film9 settings. Because this software is known to improve our movies and not the opposite.but for a first test it's promising !
Posted by Stan Jelavic (Member # 6822) on July 04, 2019, 08:53 AM:
Agree. I used auto settings which is not very good. It takes time and experience. Will try again.
Posted by Jeff Self (Member # 7012) on July 04, 2019, 01:25 PM:
Stan,
How do the jpegs look before you run them through FFmpeg? Are you applying any sharpening or noise reduction to each image during capture? If you can get the jpeg's to be sharp then the post processing is really secondary. I, for one, would probably just import all the images directly into Final Cut Pro.
Have you considered taking multiple exposures of the same frame? Maybe -1, 0, +1 exposure. This would help with underexposed or overexposed film.
Posted by Stan Jelavic (Member # 6822) on July 05, 2019, 07:35 AM:
Good suggestions Jeff. I started looking at the problem frames. I adjusted the exposure so that the saturated areas are no longer saturated. Then in video editor I will try adjusting the gamma which will boost the dark areas without increasing the white. If that does not work then will try bracketing as you suggested. The nice thing about this approach is that the individual frames are available.
Posted by Kamel Ikhlef (Member # 6667) on July 05, 2019, 09:01 AM:
I tried manually to capture individual frames with my imaging source camera board. my jpegs are 1.5 MB and 5.6 MB in uncompressed tiff and bmp, for a resolution of 1920x1080.
So it takes a while to save them on the pc hard drive. but it remains the best solution to have the best quality and especially the greatest flexibility of post production: stability, denoising, etc ... the best is to directly frame the original image because the crop and the resize too degrade the final image .
Posted by Stan Jelavic (Member # 6822) on July 05, 2019, 09:32 PM:
Here is another attempt. Reduced the camera exposure and increased the gamma in Film8. Also added some sharpening.
https://photos.app.goo.gl/5Qc2XuFB8rfTn9pG6
It is pretty good in my opinion. Similar to Wolverine but without annoying artifacts. But anyways, although I would like to spend more time on video editing, my prime intention here is to come up with the mod kit and since the camera and lens selection looks pretty good I will spin another version of the interface board and include the mounting holes for both imagingsource and arducam cameras.
Will also check if the Wolverine motor controller can be reused. That would make the kit much simpler.
Posted by Kamel Ikhlef (Member # 6667) on July 06, 2019, 02:11 AM:
Yes Stan, this 2nd test is definitely better! indeed, the movies can be corrected in post-production with dedicated softwares. it's not really a problem.
But the result you get is already very encouraging.(Better wolverine stock) it is certain that the main thing is to improve the wolverine and to bring a independence of scan with the choice of the camera and its capture compression. (frame by frame : jpg,bmp,tiff...with flexibility of compression)
Your kit project is great and will be of great interest to those looking for quality.
Your idea of including the holes fixation for the imaging source and arducam cameras is excellent and makes your module more open. make it simpler for people like me, that's fine.
Another idea would be a scroll of the film by capstan to pass the film whose perforations are damaged ... But that's another story ...
Posted by Stan Jelavic (Member # 6822) on July 06, 2019, 07:35 AM:
Question Kamel,
Do you manually set your camera gain? The arducam that I use has all manual settings, RGB gain and exposure.
Posted by Kamel Ikhlef (Member # 6667) on July 06, 2019, 08:26 AM:
No, for the moment I only used the automatic settings. the ICCapture Software is very complete it is free but I do not know if it works with the camera arducam.
Settings examples :

Posted by Stan Jelavic (Member # 6822) on July 06, 2019, 10:15 AM:
Thanks Kamel. I just bought the 72BUC02-ML camera. I think it is more flexible than Arducam.
One note, using the auto exposure may give you flicker. Have you tried it for a number of frames?
Posted by Kamel Ikhlef (Member # 6667) on July 06, 2019, 12:43 PM:
No Stan, I have not tested yet with the progress of the film. my tests are outside Wolverine. I have to make a switch to manually remote control the camera but for the moment I do not have the cable for the external trigger yet. I'll let you know as soon as I move on the project. for the caméra it's a very good choice.
I just finished printing my cameras support of different heights.
Posted by Stan Jelavic (Member # 6822) on July 06, 2019, 11:27 PM:
Let me know Kamel if you have problems getting the cable. I bought several. These are picoblade 4 pin with connectors on both ends.
Got some pretty exciting news. Checked the Wolverine power board and figured out which stepper controller it uses. It is this one:
https://www.onsemi.com/pub/Collateral/LV8728MR-D.PDF
Found the clock pin. It runs 12.8kHz clock which gives 2 frames per second. So I am now planning to add a small MSP430 micro controller that will be able to control the stepper speed using the existing controller. That eliminates the need for RPI and extra stepper. Pretty happy about that.
Posted by Kamel Ikhlef (Member # 6667) on July 07, 2019, 02:54 AM:
Thank you very much Stan. I ordered the connectors picoblade I wait for them. For the controller step by step, this is a very big and good news because it was my main problem with the imaging source camera : it was to slow down the engine to allow the camera software to have time to record uncompressed frames. with your discovery and your progress, I think that project will become reality. it's really super. you do a great job.
Posted by Stan Jelavic (Member # 6822) on July 07, 2019, 01:12 PM:
Here are some thoughts on capstan design.
Replace the first roller with capstan.
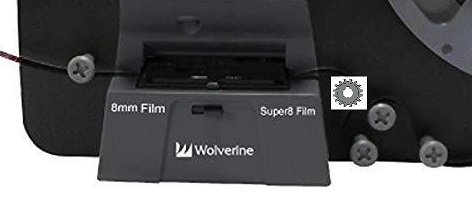
Here is one of the sprocket wheel designs:
https://www.shapeways.com/product/X9FHUQZRW/film-sprocket-super8-format-20teeth-001?optionId=13213109
Maybe Kamel you can look into designing one of these. Mount the wheel on a motor shaft. The motor has an encoder. The encoder can be connected to the MSP430 which can then sense the lack of pulses and give the motor a nudge. If the pulses are ok the power is cut off and the motor is just going with the flow
BTW - the MSP430 can also activate a buzzer...
https://www.amazon.com/uxcell-10000RPM-Encoder-Remote-Control/dp/B077WWHJRN
Posted by Kamel Ikhlef (Member # 6667) on July 07, 2019, 02:59 PM:
Cool, Stan ! I have a lot of film with damaged perforations. impossible to pass them with the wolverine. capstan can be a good solution. Thanks for the links. It helps me to think and actually, I will try to design a cogwheel. Your idea is very good and it is very inspiring. I'm a beginner and not very competent in electronics : Still bread on the board ... It says that in France.
Posted by Stan Jelavic (Member # 6822) on July 08, 2019, 10:10 AM:
No worry Kamel. We all learn every day. Here is the motor that I picked.
http://www.uxcell.com/micro-motor-12v-4300rpm- wire-high-speed-encoder-motor-for-diy-hobby-toy-cars-remote-control-p-1323950.html
I plan to mount it on a small pcb that can be mounted using the existing roller screws. I.e. remove the rollers, place the board with the motor at the back of the front panel and then remount the 3 rollers back using longer screws.
[ July 08, 2019, 01:08 PM: Message edited by: Stan Jelavic ]
Posted by Kamel Ikhlef (Member # 6667) on July 08, 2019, 11:12 PM:
Ah! very clever Stan!... I will even create a support designed in 3d printing, it will be easier for me. I will order the small motor. With your help and your kit module we will eventually make this wolverine machine a high-end film scanning machine.
Posted by Stan Jelavic (Member # 6822) on July 09, 2019, 08:13 AM:
Thanks Kamel. I ordered the motor. One concern may be the tug of the motor on the film when not powered up because of the permanent magnet used. In that case I can provide a bias power to the motor to reduce the back torque.
Posted by Kamel Ikhlef (Member # 6667) on July 09, 2019, 09:59 AM:
yes cool, but 4300 rpm is not too fast for the scrolling of the film ?. finally, I do not know enough about it. I'm learning, I'm documenting myself ...
I also ordered the mini motor, I should have it in two or three days ... Today, I work on the pin wheel which must be very accurate provided for perforations super 8 film format.
Posted by Stan Jelavic (Member # 6822) on July 09, 2019, 05:09 PM:
It is not the speed of the motor Kamel. If you take the dc motor and turn the shaft without powering it up you will notice a resistance because the magnet inside the motor. So under normal conditions the takeup reel will pull on the film but the capstan motor will resist somewhat. My concern is that that resistance may damage the film perforations. Hope I am wrong on that one. But even if that is true I can bias the motor a bit reducing the resistance.
Yes, the capstan design is very tricky. Also the material has to be very smooth and glossy. Check the notes on the link that I sent you.
Posted by Kamel Ikhlef (Member # 6667) on July 11, 2019, 05:41 AM:
here, I almost finished modeling the super 8 toothed pulley. I designed it in 3 parts for ease of printing 3d. diameter 18mm. remains to do tests. ABS printing for the moment. I will make available the model when I have a little more advanced.
Posted by Kamel Ikhlef (Member # 6667) on July 11, 2019, 09:24 AM:
I just got the little motor on stan's advice.
the axis is round, no flat for blocking. I must find a solution to put my toothed pulley.
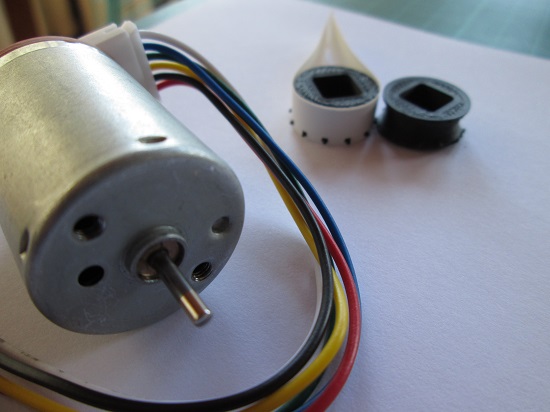
I made my first 3d print of the central part with pins, in draft mode, to go faster to adjust the right distance of the pins. it is necessary to calculate the retraction of the plastic (ABS).

not obvious, it's not bad for a first test but it's not yet that. I continue...
Posted by Kamel Ikhlef (Member # 6667) on July 12, 2019, 04:20 AM:
I found this link if it could interest someone :
http://www.drviragopete.com/film-scanner-maintenance.php
[ July 12, 2019, 06:52 AM: Message edited by: Kamel Ikhlef ]
Posted by Stan Jelavic (Member # 6822) on July 12, 2019, 09:08 AM:
Pretty impressive Kamel. Possibly add a threaded hole for a lock screw. Or make the center hole a bit smaller so that the part can be pushed on.
Posted by Stan Jelavic (Member # 6822) on July 14, 2019, 10:14 PM:
Got the Wolverine stepper controller working. Here is the demo.
https://photos.app.goo.gl/5fNX1amyt6PErfnx5
It runs one full turn in 16 seconds which is 1 frame in 4 seconds. That was actually quite a bit of work trying to figure out which pins go where. The controller is driven by the MSP430G2 controller (14 pin dip ic). Now, have to add it to the design and get the new version of the board done. All fun
Posted by Kamel Ikhlef (Member # 6667) on July 15, 2019, 01:11 AM:
Great ! Stan... Impressive Work !
Posted by Stan Jelavic (Member # 6822) on July 17, 2019, 10:50 PM:
Got the first proto put together.
https://photos.app.goo.gl/94TGbAXSxi1LNHjn9
1 frame in 4 seconds:
https://photos.app.goo.gl/7aFTXCVaoWutHFgg8
Takeup motor control
https://photos.app.goo.gl/cihFtcHgKc6xHQcc9
External camera trigger with auto image save.
https://photos.app.goo.gl/fceFrHVqXcrVxqoN9
Pretty close to getting the new board done.
Posted by Mike Spice (Member # 5957) on July 18, 2019, 04:45 AM:
that is really quite an achievement Stan.
My only reservation is that 1 frame every four seconds is really going to increase the scanning time.
I guess that is the trade off for the serious increase in quality.
My math is rubbish but a quick calculation suggests that one second of film (18 frames) would take around 1 minute 10 seconds to scan.
does that sound about right?
That said, I would be very interested in doing this one day.
[ July 18, 2019, 09:07 AM: Message edited by: Mike Spice ]
Posted by Kamel Ikhlef (Member # 6667) on July 18, 2019, 07:05 AM:
I renew my admiration to Stan who did an incredible job there.
The quality of this telecine will be such that time does not matter. .
Being independent of the choice of his camera and the choice of compression or not of his scanned frames is an unexpected advance. Again, congratulations Stan.
For my part, I fell behind the design of the capstan of my toothed pulley, (problems on my 3D printer).
I'm also thinking about creating a safer film guide rail so as not to scratch the movies. before and after the shooting window. maybe also a housing to avoid the parasitic lights ...
Posted by Stan Jelavic (Member # 6822) on July 18, 2019, 08:48 AM:
Thank you Mike and Kamel for you support and encouragement. This was quite a little project and work but it was fun. Not done yet but getting very close. Mike, you math is good and yes it is slow. But on the other hand I have not done any timing analysis on it. It is quite possible to speed it up. Will have to check that. I am adding two jumpers for speed selection. 4 selections will be available:
- 0.5 sec
- 1 sec
- 2 sec
- 4 sec
Other choices can be done by reprogramming the controller.
Also adding the connection for run/pause switch. For now I will use a small pcb that fits where the display was and mount the switch there. If Kamel makes a new front cover then could add a switch on it. There is a forward/reverse capability but we cannot use it because the it could damage the cam.
BTW - the takeup motor control is done by checking the frame start and it gets turned on while the claw is pulling the film. That way there is no force on the film when the claw is engaging and dis-engaging the film.
[ July 18, 2019, 07:13 PM: Message edited by: Stan Jelavic ]
Posted by Stan Jelavic (Member # 6822) on July 19, 2019, 09:35 PM:
Here is a quick update:
Got the new board version on order:
https://photos.app.goo.gl/gDwQhC1yJmX5NG1t6
Spoke to Imagingsource and got the new lens mount for their camera:
https://photos.app.goo.gl/g5MyTBfk9aca9xKi7
Works very well.
The part number is: TLH 10-2S
Tested the speed requirements. Looks like 2 seconds per frame is good for high quality jpeg images.
Here is the gizmo in operation running 1 frame per second.
https://photos.app.goo.gl/Q4wBhrh6tWjR2ubS7
Will post the video with 2 seconds per frame shortly.
Here it is:
https://photos.app.goo.gl/Ygh2hFg1sV4Lw9UX6
This is with Imagingsource cam
12mm lens
takeup pulsed control
camera gamma set to 69 (0.69)
camera auto white balance
manual exposure
camera sharpen set to 10
[ July 19, 2019, 10:56 PM: Message edited by: Stan Jelavic ]
Posted by Kamel Ikhlef (Member # 6667) on July 20, 2019, 03:43 AM:
Beautiful advanced Stan! We see very well the quality of the image is clearly better or excellent, curious to see on the clip SMPTE the number of line of resolution. for the camera hole on the new board why not make a rectangular hole ('I guess to predict more type of camera? What work accomplished from the beginning!...
I am far from reaching your result and I will already be very happy to obtain this quality with a scrolling reliability of the film. so, congratulations again.
Posted by Mike Spice (Member # 5957) on July 20, 2019, 04:26 AM:
Absolutely brilliant Stan
The final result is quite remarkable
The take up is without doubt, very clever too.
2 frames per second is excellent.
It just goes to show how stable the claw mechanism really is looking at how steady your film scan is.
Lovely result I would be very proud to achieve.
I want one!
Stunning.
Posted by Stan Jelavic (Member # 6822) on July 20, 2019, 07:06 AM:
Will check the lines of resolution Kamel. The rectangular hole is not as easy to do. Tried it but the pcb manufacturer auto tool does not do the cut. Will have to check with them. Maybe just a larger circular hole for the next spin.
The speed is 2 seconds per frame Mike. So that is 4 times slower than Wolverine. Not sure if that will work for you. If we implement the capstan then you do not have to be there all the time next to the machine and the speed is not as relevant but not sure if the film can get jammed.. It may be possible with the capstan. You have more experience with that. BTW, just received the capstan motor and the drag is very low and will not damage the film, which was my concern. The motor has a rotation activated switches that I plan to use to send an alert if the film is stuck.
Posted by Mike Spice (Member # 5957) on July 20, 2019, 10:01 AM:
2 seconds per frame.
I mis read your details.
Even so, for the quality achieved I think it is perfectly acceptable
Posted by Stan Jelavic (Member # 6822) on July 20, 2019, 10:31 AM:
Good to hear that. I will probably build and test 5 of them. I will also update the mod instructions.
Posted by Kamel Ikhlef (Member # 6667) on July 20, 2019, 05:34 PM:
maybe two round holes side by side or indeed, a bigger round hole if it's possible ... It's just for the aesthetics.
Finally it is not very important for the proper functioning of the super telecine that you are realizing ...
I'm late on my 3d prints ... I'll try to move forward next week.
Posted by Stan Jelavic (Member # 6822) on July 20, 2019, 07:49 PM:
Quite honestly looked like Mickey a bit Here is the larger hole version.
https://photos.app.goo.gl/BcoF6JX8TimHBKGF8
Believe it should work ok. Totaled the BOM and it came around $50 including the board. Obviously no camera included. Will have to figure out how much labor it is to solder all of it together. Willing to send out a few boards for free possibly one to Mike and one to you Kamel so that you guys can shake it and bake it.
For the brave souls I am including the link to design files so they can do it on their own:
https://drive.google.com/drive/folders/1MMmlUWHz7w44APn17G6LOgz58oBRpv1r?usp=sharing
BTW received your lens mount Kamel and will try it tomorrow. Thank you very much for your support.
Posted by Mike Spice (Member # 5957) on July 21, 2019, 05:15 AM:
It's a long way from Lauderdale to the UK Stan!
I would love to be able to mod my wolverine.
I meant to post you a photo back on July 4th from Lauderdale, I was there for the bi centennial in 76.
I have very fond memories of the place, and driving the alligator Alley over to Naples Bay Estate to stay with family.
I would happily pay postage for a board but I don't know if I would be able to actually bring it to life.
I have great soldering skills and understanding of what is being done here.
Suppose I have the board, what sort of cost am I looking at to complete the project?
Your work is remarkable, I hope someone from Wolverine gets to see the work you have done and hang thier heads in shame!
The photo I should have posted for you.
HMS Ark Royal alongside in Lauderdale.
So many visitors. July 4th. 1976.
I was a cook with 892 Phantom Squadron.

[ July 21, 2019, 07:04 AM: Message edited by: Mike Spice ]
Posted by Stan Jelavic (Member # 6822) on July 21, 2019, 09:13 AM:
Thank you for the nice photo Mike from the time passed. Probably have lots of good memories. Ft Lauderdale is still a nice place to come and see.
I can send you the board and the parts together with the test instructions. Should not be too hard.
In addition you will need the camera:
DFM 72BUC02-ML $125.13
The lens:
TBL 12-2 C 5MP - 12mm M12 Color Lens f/2.8 $39.95
and the lens mount:
TLH 10-2s
Around $20
all from oemcameras.com
or maybe you can get it direct from
theimagingsource.com (UK based)
Yeah it is a shame that Wolverine did not do a better job. It is OK to try to keep the costs down but they should have kept an open concept where people can easily add and enhance things.
Cheers
Posted by Kamel Ikhlef (Member # 6667) on July 21, 2019, 01:17 PM:
Ah! OK Stan, very well. A week to reach your home from France. it's a bit long, but the main thing is that it has arrived.
the lens support of 16mm can be used to directly frame the film (zoom in HD 1920x1080 - full sensor is too large for capture). Thanks to you for advancing our project of digitizing our movies with better quality. This weekend, I had my children at home, I will resume my 3D printing and the design of the capstan and housing case tomorrow.
Posted by Stan Jelavic (Member # 6822) on July 22, 2019, 08:31 AM:
Hope you had lots of fun with your kids Kamel. Family is always first.
I never tried the 16mm lens to improve the resolution. Will get one and try it. Have to use longer standoffs for the camera and the lens holder has to be longer. You tested the holder with the 16mm but ultimately we have to test it mounted in the projector. Additionally, the camera alignment becomes more critical.
BTW - added three switches to the board:
- Run/Pause
- Speed Select
- Fan
Posted by Kamel Ikhlef (Member # 6667) on July 22, 2019, 08:57 AM:
Great, Stan ! your system improves again and again for our greatest pleasure ...
For the 16mm, I'm not sure that the resolution is better. the depth of field is reduced and it becomes difficult to make a very precise focus.
The more you retreat from the surface of the film, the less depth of field you have? and harder is the sharpness. Finally, I think but I could be wrong ...
Posted by Stan Jelavic (Member # 6822) on July 22, 2019, 07:33 PM:
That is a very good point Kamel. The higher the focal length the worse the DOF (depth of field). To compound the problem the 16mm is darker and you need the smaller F stop (1.6 - lets more light in) but that reduces the DOF.
Possibly use:
[URL=http://www.scorpionvision.co.uk/Catalog/Machine-Vision-Lens/m12-lenses/near-field-far-field-m12-lenses/s-mount-16mm-f4-0-macro-lens]
But this one does not have the IR filter and at F4 will need longer exposure.
They say the proof is in the pudding.
Here is the Wolverine SMPTE test. Struggles above 40 lines of resolution.
https://photos.app.goo.gl/GJVkfoB1rbNirmbG6
And here is with the imagingsource camera and 12mm F2.8 lens:
https://photos.app.goo.gl/2Voabg9foB5mLD5k9
Over 60 easily...
[ July 22, 2019, 08:46 PM: Message edited by: Stan Jelavic ]
Posted by Kamel Ikhlef (Member # 6667) on July 23, 2019, 03:44 PM:
in France they say: it's day and night. That's why it is important to improve this telecine. Stan, you get a better result than the one I made by a super 8 professional transfer lab . You are not far from the limit of 80 lines of resolution!
We can even push further, with 4K. the source imaging camera has a 2592x1944 sensor. the 4K resolution is 3840x2160. for the super 8 we do not need the full width. so full sensor, we have almost the entire image. the image ratio is the same 4/3.To test...
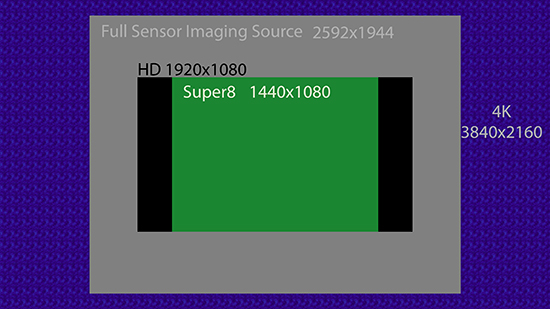
Object (film) is at a finite distance.
width Size of the object(mm): 5.46 or 5.79 full super 8 frame
width Size of the image(mm) imaging source camera sensor: 5.7
Object to image distance(mm): 48mm with a F12mm M12 Lens
The object distance: 24.2mm
The image distance: 23.8mm
For the moment, tests outside the Wolverine telecine.
I continue my tests and my 3D prints...
[ July 25, 2019, 03:49 AM: Message edited by: Kamel Ikhlef ]
Posted by Brian Fretwell (Member # 4302) on July 24, 2019, 02:21 AM:
The Wolverene picture also seems to show elements of edge sharpening ("ringing") around sharp changes of brightness.
Posted by Brian Fretwell (Member # 4302) on July 24, 2019, 02:22 AM:
The Wolverene picture also seems to show elements of edge sharpening ("ringing") around sharp changes of brightness.
Posted by Kamel Ikhlef (Member # 6667) on July 24, 2019, 04:33 AM:
yes, for wolverine, they make us believe in a better resolution by a digital video enhancement. But despite this, the 40 lines are barely reached. Stan's result is one of the best so far.
Posted by Stan Jelavic (Member # 6822) on July 24, 2019, 09:00 AM:
Good thinking Kamel. The issue may be DOF again. Since the lens will be closer to the object (film) the DOF will decrease as per the formula:
https://photos.app.goo.gl/eCBBvCPgRiBUa1CC9
In the formula "u" is the distance from the lens to the object. As you can see, the DOF degradation is proportional to the square of the distance. As you get closer the DOF degrades rapidly.
But I tried it and I think it is doable.
https://photos.app.goo.gl/bJoTmbWyVxwvzdeZ8
Had to bring the camera closer to the mounting plate and do not have the right standoffs so the camera may not be perfectly square and causes some blurring on the right hand side. Will try to get the right standoffs and test it again.
Posted by Kamel Ikhlef (Member # 6667) on July 25, 2019, 07:42 AM:
yes I totally agree ! Stan, you are close to a qualitative solution worthy of high-end telecine. I'm convinced.
now to fill the imaging source sensor (2592x1944) the most complicated is precisely to adjust the image frame of the film because there will be more tolerance to move the offsets. it's a shame because ICCapture software can capture an area of interest (for example 1440x1080 for S8) to not have files too large to save.
The 4K can be an option for improvement once everything is working well
Posted by Stan Jelavic (Member # 6822) on July 30, 2019, 07:39 AM:
Almost done:
https://photos.app.goo.gl/2S1iJX8tjpnQtGMs7
https://photos.app.goo.gl/JTnTsGz6bAFRTfnC9
The new PCB should be in this week. It will have better camera centering plus the power startup circuitry. Also getting a new front panel for the switch mount.
Tried the "4K" mode with the 12mm lens. Here is the result.
https://photos.app.goo.gl/M9LtuQpMPFfg9pjk7
So it seems that there is some rez improvement with the lens being closer to the object and higher optical magnification. The FOV degradation seems to be still OK.
Posted by Kamel Ikhlef (Member # 6667) on July 30, 2019, 08:18 AM:
Results obtained fantastic and even unexpected for a telecine. 63 lines in the corners! wow! I am impressed ...
I have never managed to do as well.
Posted by Stan Jelavic (Member # 6822) on July 30, 2019, 10:20 AM:
Yes this is better than I expected when I started the project
Posted by Mike Spice (Member # 5957) on July 30, 2019, 11:22 AM:
Stan that is amazing.
It seems the forum has been down for a few days, so to come back and find your Wolverine mod done is just fantastic news.
Might I ask how the images are captured to the computer?
I can't work out in my head how the computer captures the image as the capture is presumably done on the board by the camera, and triggered by the sensors in the Wolverine, so how does the computer capture the stills?
You mention software called frame sync? did I get that right?
I did google that but found nothing.
Amazing work
Posted by Stan Jelavic (Member # 6822) on July 30, 2019, 08:08 PM:
Thank you Mike.
So, the capture is relatively simple.
The camera that I use is DFM 72BUC02-ML from theimagingsource.com and has external trigger capability. So the new controller picks up the sync coming from the claw and sends it to the cam. Every time the claw starts going up, the camera gets triggered. Since the camera is connected via a usb to your PC the images are sent directly to the PC from the camera without controller direct involvement in image transport. You can read more here:
https://www.theimagingsource.com/products/board-cameras/usb-2.0-color/dfm72buc02ml/
Click on the documentation tab.
The capture sw is available here for windows :
https://www.theimagingsource.com/support/downloads-for-windows/
There is a linux support as well.
Let me know if you need more info.
Posted by Mike Spice (Member # 5957) on July 31, 2019, 01:33 AM:
Thank You Stan.
I shall take a look
Posted by Stan Jelavic (Member # 6822) on July 31, 2019, 08:37 AM:
Sure thing Mike.
Here is the V3 board version.

Functions:
- Interface Wolverine and camera sync
- Supply 3.3V
- Wolverine stepper control
- LED power and switch
- on/off switch
- speed control
- capstan control
- fan switch
- camera mount
Posted by Kamel Ikhlef (Member # 6667) on July 31, 2019, 11:24 AM:
Stan, you amaze us. What a beautiful job! Finally, we dreamed about it, and Stan did it ...
I really look forward to trying it!
Posted by Stan Jelavic (Member # 6822) on July 31, 2019, 08:27 PM:
Thank you Kamel and Mike for your support. I will be sending both of you the V2 version of the board with most of the components installed. V2 has most of the functions except for the led switch but that can be accomplished through proper wiring. Mike, can you send me your address via private email.
Posted by Kamel Ikhlef (Member # 6667) on August 01, 2019, 01:55 AM:
Thank you very much Stan, it's very nice of you. I know the amount of work this represents and I am very grateful
Posted by Mike Spice (Member # 5957) on August 01, 2019, 04:11 AM:
Thank You very much Stan.
That is very generous and really very kind.
The work you have achieved is quite remarkable.
I look forward to scanning my own films all over again!
My address is on its way
Posted by Stan Jelavic (Member # 6822) on August 01, 2019, 07:44 AM:
Got both addresses. The V2 boards will be in next Monday and will take me a few days to assemble them and do the test. I also have several reels of old film and looking forward to re-scanning them.
BTW the scanning speed is limited to 2 seconds per frame using the IC Capture sw from imagingsource. Since they also provide the SDK I will try to run the C code to see if I can speed it up.
Posted by Kamel Ikhlef (Member # 6667) on August 01, 2019, 08:15 AM:
2 seconds per frame is already very good (even 4s, it's good too) if it allows a better quality!
for my part, I have some difficulties with the motor for the capstan. The axis slides in the hole of my pulley printed in 3d. the axis is very short (8.4mm). once fixed inside the wolverine, there is not much left for the pulley. right now, I'm looking for a solution to extend the axis and block it.
I'm also thinking about a design for the front case to avoid external stray lights and protect electronic components...
Posted by Mike Spice (Member # 5957) on August 01, 2019, 10:54 AM:
2 seconds per frame? I really don't mind.
The thought of being able to re scan my royal navy reels in high quality is exciting.
I have a spare laptop that will run the capture software so it can sit and chug away for as long as it takes.
I may have to wait a month or so until I can buy the camera as the jolly old motor car is at that point of the year when it gets its service, and yearly road safety test, i know for a fact it's going to need some other work.
None the less I can't wait to pull my wolverine apart.
Stan, you Sir, are a true hero in this thread.
The hours you have dedicated, the money you have spent and the technical ability you bring to this thread is truly inspiring.
Thank you, Thank you.
Kamel, hello to you too, the 3D printing and work you are doing is pretty amazing.
I take great delight in logging here and seeing 28 pages of wolverine, and of late, what you two are up to to develop things and move things forward.
Between the two of you, there has been some significant work done towards the preserving of film.
That can't be a bad thing.
Cheers boys.
I do have one question for Stan, how do you achieve the right focus on the new camera?
Does the camera give a live output so one can set the focus?
[ August 01, 2019, 01:00 PM: Message edited by: Mike Spice ]
Posted by Kamel Ikhlef (Member # 6667) on August 01, 2019, 03:39 PM:
thanks Mike, our films are precious and everything is good to scan them with the best quality possible. Some transfer labs do a good job with 30,000 $ scanner. The quality that stan gets to get is equivalent and it's better to do your own scans. By bringing our skills. the wolverine type scanner may finally have an interest.
I also have a source imaging camera. the focus is quite simple because you have a live view if you want, the ICCapture software allows to set the camera fully. Stan is much more advanced than me in the tests and he can answer you better.
Posted by Stan Jelavic (Member # 6822) on August 01, 2019, 07:57 PM:
Thanks Mike. Enjoy you old jolly motor car. Yes, I think this mod will bring the new life to this low end scanner based on the tests done so far. Kamel's answer is correct. You can go live mode and do a deep zoom and then adjust the focus quite precisely. Which reminds me, have to start putting the instructions together for the kit installation. Cheers.
Kamel, possibly use a coupler
https://www.ebay.com/i/332576003650?chn=ps&var=541676503045&norover=1&mkevt=1&mkrid=711-117182-37290-0&mkcid=2&itemid=541676503089_332576003650&targetid=649162909327&device=c&mktyp e=pla&googleloc=9051808&campaignid=1689407462&mkgroupid=74365777588&rlsatarget=aud-412677883135:pla-649162909327&abcId=1140476&merchantid=113580229&gclid=CjwKCAjwm4rqBRBUEiwAwaWjjN z1Xscobehpa6HUApUCBCZIRFrtNrfwORwK9hx6WJDCKCj6U8fR1RoCBw0QAvD_BwE
or
https://www.amazon.com/Ochoos-Flexible-Coupling-Transmission-Connector/dp/B07MWDRZ54
or
https://usa.banggood.com/2mm2_3mm3mm3_17mm4mm5mm-Copper-Coupler-For-RC-Boat-p-943629.html?gmcCountry=US¤cy=USD&createTmp=1&utm_source=googleshopping&utm_medium=cpc_bgcs&utm_c ontent=garman&utm_campaign=ssc-usg-all-0627&ad_id=358240566646&gclid=CjwKCAjwm4rqBRBUEiwAwaWjjNUFLeSXdGRHPaWl9CltoGftYIqrEiyiYbH36-E6RHW2mxm0MuAyRRoCP7MQAvD_BwE&ID=516620&cur_wareh ouse=CN
attach the 2mm coupler to the shaft and then slide your wheel over the coupler other end (different sizes available) and use the second screw to lock you wheel in. You will have to change your print to match the coupler.
[ August 01, 2019, 09:09 PM: Message edited by: Stan Jelavic ]
Posted by Kamel Ikhlef (Member # 6667) on August 02, 2019, 10:16 AM:
Thank you Stan. I had thought of a coupler but it takes even more space. This may be the final solution but, I will try to find a blocking solution with my 3D model.
here is a test in draft mode, in the end it will smooth the pulley.
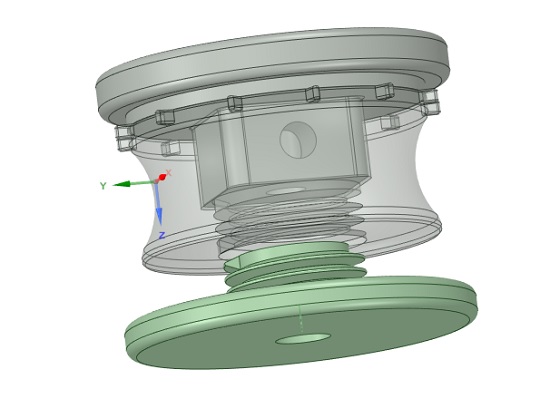
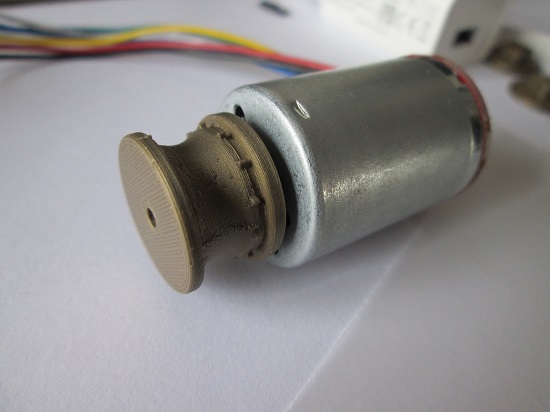
it's not quite that yet but it's getting good.
Posted by Mike Spice (Member # 5957) on August 02, 2019, 10:51 AM:
3D printing is amazing.
Posted by Stan Jelavic (Member # 6822) on August 03, 2019, 05:54 AM:
Great work Kamel. The threaded part will allow for distance adjustment. We will need some type of a bracket for the motor so that will add additional space between the motor and the pulley.Not sure if that will be a problem.
Actually not that bad. The pcb used for motor mount thickness is the same as the motor flange. Using the flathead screws will make the mount flush with the Wolverine front panel. So, the usable length of the shaft will be
0.35" (total shaft length) - 0.068" (panel thickness) = 0.282"
[ August 03, 2019, 12:20 PM: Message edited by: Stan Jelavic ]
Posted by Kamel Ikhlef (Member # 6667) on August 03, 2019, 12:17 PM:
The advantage with 3D printing is that we can do what we want to measure. I planned a space of 0.5 / 0.75mm so that the pulley does not rub against the wolverine case. The motor support that goes inside the wolverine is almost ready.
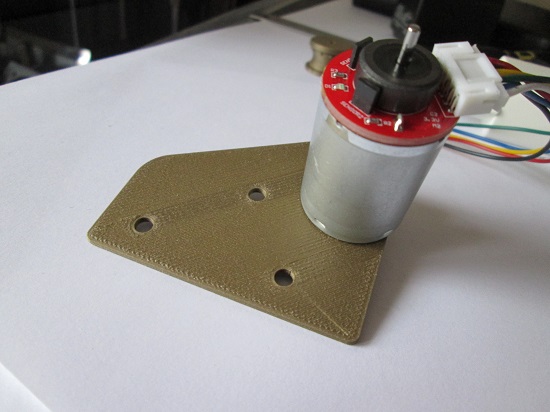
Some adjustments ...
Posted by Jeff Self (Member # 7012) on August 06, 2019, 10:23 AM:
Wow! I go away for a few weeks and I come back to this! Fantastic! Stan, when the instructions are finalized, I'd love to be able to build this.
Posted by Ken Abruzzo (Member # 6188) on August 06, 2019, 11:29 AM:
Loving how this is progressing. Great work Stan and Kamel.
I had been planning on redoing all of my scans (about 14,000 feet) at some point. I had learned some things towards the end that gave me better results. Seeing this.... I've decided to hold off.
Will you make it available as a ready to go kit? My soldering skills, umm... suck. LOL! Also, will this work with the Wolverine Pro? That's what I have.
Posted by Stan Jelavic (Member # 6822) on August 06, 2019, 09:31 PM:
Thanks Jeff and Ken, yes this will be available as a kit within 3 - 4 weeks, maybe sooner. I developed it on Wolverine Pro and that is a very good point. It may not work with the basic model. If someone sends me the picture of the basic model inside I could make an assessment.
Just got the V2 version of the board and finished the assembly and test.
This is what it looks like.
https://photos.app.goo.gl/NsG5V5JMZPdfMpnc7
https://photos.app.goo.gl/E8enLA7WuKbX38Dk7
Posted by Mike Spice (Member # 5957) on August 07, 2019, 03:15 AM:
Stan
I have uploaded some pictures to google drive.
hopefully they will be of use to work out if this mod will work with the original Wolverine.
These taken during my original take up motor failure and upgrade.
Fingers crossed your mod will work for both machines.
Wolverine pics
Posted by Stan Jelavic (Member # 6822) on August 07, 2019, 07:02 AM:
Thank you Mike,
Looks like it will be OK. As promised, will send you a board that you can test.
Posted by Mike Spice (Member # 5957) on August 07, 2019, 09:41 AM:
Cheers Stan.
I am very much looking forward to that
Posted by Mike Spice (Member # 5957) on August 08, 2019, 06:46 AM:
I have just been given a quote for the camera via the imaging source and a dealer in the uk.
£168 ($204) (inc tax shipping)
Next I need to find out which lens and lens mount to go with it.
I think it is a bit excessive as the quote also includes a 5m usb cable for £30 which I did not ask for.
I don't need 5m of it and I already have this type of connector.
Imaging source camera
[ August 08, 2019, 11:45 AM: Message edited by: Mike Spice ]
Posted by Kamel Ikhlef (Member # 6667) on August 08, 2019, 03:00 PM:
yes indeed, I find it rather expensive! It is necessary to solicit concurence ... For the cable, a standard usb goes very well. the lens holder is a special angle cutter, the standard are not suitable. I paid too much in france (french dealer), but I think we can find cheaper. I designed this support for 3D printing, when I finalized my tests, I will make it available on thingiverse...
at this moment I finalize the capstan motor support.
This 3D model is inspired by Stan's idea. thanks to him.
I also test different 3D printing materials : HDGLASS, PETG, ABS...
especially for the toothed pulley which is very small and must be strong and very precise. Which is not obvious in FDM 3D printing. But I have to try.
I'll post pictures when I'm more advanced ...
[ August 08, 2019, 05:44 PM: Message edited by: Kamel Ikhlef ]
Posted by Stan Jelavic (Member # 6822) on August 08, 2019, 09:36 PM:
Mike, that is very expensive.
I bought the camera from:
https://www.oemcameras.com/dfm-72buc02-ml.htm
Much cheaper. Not sure what teh shipping costs are to the UK but you can check it.
The lens that I recommend is:
https://www.oemcameras.com/lens-tbl-12-2c-5mp.htm
And the holder:
TLH 10-2s from oemcameras.com (will need to contact them)
Alternatively wait for Kamel's holder.
Posted by Ken Abruzzo (Member # 6188) on August 08, 2019, 09:46 PM:
Stan, that's great about the board/kit.
I just looked at the camera links you provided. It looks like from the one for the camera (assuming I'm reading it correctly), you can order the camera along with the lens and mount from a drop down list. It came up at about $185 for the three. Again, that's assuming I'm reading it correctly. Does that sound about right?
Posted by Mike Spice (Member # 5957) on August 09, 2019, 06:43 AM:
I have sent an email to oemcameras to see if they will ship to the Uk and asked for a price on the camera and lens and mount inc shipping, using the drop down menu suggested by Ken. Thanks for that.
Let's see what comes back.
Thanks Stan
Posted by Stan Jelavic (Member # 6822) on August 09, 2019, 08:38 AM:
The only issue may be the holder. It has a tab on the side with a lock screw and that interferes with the Wolverine bracket.
https://photos.app.goo.gl/SHPdQtbJw8T6Cd8u6
I will double check today. Believe it still works with the 3/8" (9.5mm) spacers but not with 6mm spacers. The 3/8" give a bit lower optical resolution based on my tests but the difference is so small that it may not be worth the trouble.
Alternatively, you can wait for Kamel's custom holder.
Board update:
- Still have to test the capstan operation.
- The interface to the Wolverine power supply is via small adapter board and planning to replace that with the connector but that requires very fine soldering so trying to get the assembly service set up and get it done professionally. The end cost will not be much different since it takes me more than 2 hours to complete the board. Will still handsolder the boards for Mike and Kamel.
Posted by Mike Spice (Member # 5957) on August 09, 2019, 09:34 AM:
Thanks for that information Stan.
If Kamel is able to print a mount I would be very grateful, and happy to any pay costs in sending one to the uk..
I am very honored that I shall receive a hand soldered board!
I have made it known in my Royal Navy forums that the people who have previously sent me 8mm film to scan and paid me, are invited to send me back the RN reels for a free re scan on the modified Wolverine.
I intend to share my good fortune with those who have previously trusted me with thier film.
There is some amazing aircraft carrier footage out that that deserves a better quality scan
I have said that will be towards the end of the year, possibly during the Christmas break, I shall be re scanning my reels first.
It seems only fair to share my good fortune with the veterans but I have left myself wide open to re scanning around 2500ft of film ... oh well, it will be worth it.
It won't be long before we can start a new Wolverine thread.
The "Jelavic/Ikhlef Wolf Scanner " review
Quote back from oemcameras:
comes to around £207 ($250) for the camera lens and mount & int shipping, so I may just buy the camera and lens in the uk and hope Kamel might be able to send me a mount.
I have asked the people who quoted me yesterday here in the uk, for another quote, for the camera and lens and no USB cable or mount and then I can compare prices.
The quote for the camera alone was around £120 inc tax ($144)from them, which is ok i guess.
oemcameras quote:

In the time I have written this I have had a quote back for the camera and lens supplied in the uk.
I don't think this unreasonable
[ August 09, 2019, 10:37 AM: Message edited by: Mike Spice ]
Posted by Kamel Ikhlef (Member # 6667) on August 09, 2019, 10:57 AM:
No problem Mike. As soon as I finish. still some tests.
It's quite long and I had some problems with my 3D printer, but it will be solved.
For the "new wolverine", it is especially Stan who realized this crazy and brilliant project, it is to him that returns all the merit. I only made a very small contribution.
I do not know exactly how tall it is for lens support. Stan can certainly give us more precision because he is very advanced in the camera test. I designed the most precise height to have the best focus. I think between 16 and 20mm of tube height ... To confirm with Stan.
Posted by Mike Spice (Member # 5957) on August 09, 2019, 11:18 AM:
Kamel, no hurry at all, but it is nice to know you are happy to help.
Yes Stan has made an enormous contribution without which we would be stuck in the hell of 720p mp4 video but you have been there too, So we are lucky to have both of you around to share your knowledge.
There is still a way to go before my Wolverine will be opened up so there is no hurry for the mount and, as you say, Stan is the man who has the knowledge of the size and depth it would need to be.
I hope the problems with your 3D printer are not needing an expensive solution and that you get it fixed.
Posted by Stan Jelavic (Member # 6822) on August 09, 2019, 11:33 AM:
Thanks again guys. We all contributed to this project from different angles. Happy with the way the things are going. I will check the holder height and also see if the imagingsource holder fits.Will post the results this afternoon.
Here is the update:
The (Elvitec.fr Stemmer Imaging Group : http://www.elvitec.fr/) holder that Kamel sent me is capable of HD resolution(1900x1300). The one from imagingsource is not. It only works with lower rez (1300x960).
I repeated the comparison tests this afternoon and found out that the lower rez is actually marginally better. Here are the results:
Lower rez:
https://photos.app.goo.gl/Z65uwfiAKn9F3pwMA
Higher rez:
https://photos.app.goo.gl/YxKwitGDzZ9R5Gnv5
So going with the complete camera package may not be that bad.
Here are the holder + lens work dimensions from Kamel:
https://photos.app.goo.gl/ZW2d5pzHco2rJYQo6
[ August 09, 2019, 04:31 PM: Message edited by: Stan Jelavic ]
Posted by Mike Spice (Member # 5957) on August 09, 2019, 05:47 PM:
So if I have this right, the 'factory' lens mount with the tab on it will fit and work?
Looking at your two test images I would be happy with both, So Kamel wouldn't have to print me a mount.
As long as it will fit the mod I am happy to buy a lens mount.
That said there is a substantial difference between 1900x1300 and 1300x960
The un modded Wolverine can do 1440x1080 albeit in rubbish mp4.
Looking at your test images I don't see a huge difference other than the overscan to include the sprocket hole.
I do like the idea of being able to scan the film from edge to edge to include the sprocket holes and edges.
-------------------------------------------------------------
I do have one question not related to the mod for Stan
During your work on the Wolverine are you able to tell me, for my own curiosity, what effect the super8/standard8 switch has on the gate and transport of the film.
I am not quite sure I understand what is going on there, does it just affect the distance and position that the claw pulls the film?
Does it also affect the camera for a different frame size?
There is a difference in frame size between the two, so how does the switch sort this out?
Will the mod be affect by differences between Super 8 and Standard 8?
Super 8 frame is 5.79mm 4.01mm
Standard 8 is 4.5 x 3.3mm
So I do wonder what happens when I flick that swich yet still see a full frame scan at the end of the process.
Posted by Stan Jelavic (Member # 6822) on August 09, 2019, 08:09 PM:
OK Mike, will try to answer your questions to the best of my knowledge: My answers are in CAPS.
So if I have this right, the 'factory' lens mount with the tab on it will fit and work?
YES, WITH STOCK HOLDER THE BOARD CAN DO 1300x960 WHICH IN MY OPINION IS ALL THAT YOU NEED.
Looking at your two test images I would be happy with both, So Kamel wouldn't have to print me a mount.
AGREE. I SUGGEST GO STOCK AND SEE IF YOU ARE HAPPY WITH IT.
As long as it will fit the mod I am happy to buy a lens mount.
YES IT DOES.
That said there is a substantial difference between 1900x1300 and 1300x960
The un modded Wolverine can do 1440x1080 albeit in rubbish mp4.
THEIR OPTICAL REZ IS 720 x 480 DUE TO THE 8MM LENS THAT THEY USE. THEN THEY DOUBLE UP THE REZ DIGITALLY...
Looking at your test images I don't see a huge difference other than the overscan to include the sprocket hole.
OOPS NOT SURE IF I CROPPED BOTH OF THEM.
HERE IS THE lower rez ORIGINAL:
https://photos.app.goo.gl/GpTnW44zp3W3vpy76
AND HIGHER REZ ORIGINAL:
https://photos.app.goo.gl/stfrLQThRvUnvn7y7
I do like the idea of being able to scan the film from edge to edge to include the sprocket holes and edges.
YES YOU CAN DO THAT - SEE THE ORIGINALS ABOVE
-------------------------------------------------------------
I do have one question not related to the mod for Stan
During your work on the Wolverine are you able to tell me, for my own curiosity, what effect the super8/standard8 switch has on the gate and transport of the film.
I am not quite sure I understand what is going on there, does it just affect the distance and position that the claw pulls the film?
Does it also affect the camera for a different frame size?
There is a difference in frame size between the two, so how does the switch sort this out?
Will the mod be affect by differences between Super 8 and Standard 8?
Super 8 frame is 5.79mm 4.01mm
Standard 8 is 4.5 x 3.3mm
So I do wonder what happens when I flick that swich yet still see a full frame scan at the end of the process.
OK, TWO THINGS HAPPEN WHEN YOU HIT THAT SWITCH. THE SWITCH ACTIVATES A MECHANICAL STOP AND THAT CHANGES TEH CLAW TRAVEL IF I RECALL THIS RIGHT. THE OTHER THING IS THE OPTOCOUPLER THAT SENDS TEH SIGNAL TO THE CONTROLLER. THAT IS WHAT THE SECOND CABLE BUNDLE IS FOR COMING FROM UNDER THE FILM GATE. THEY USE IT TO CONTROL THE FRAME CROPPING. WE REALLY DO NOT NEED IT BECAUSE WE HAVE A LARGER FRAME AND THE CROPPING IS DONE DURING POSTPROCESSING.
Posted by Mike Spice (Member # 5957) on August 10, 2019, 03:58 AM:
Thank You Stan
That all makes perfect sense.
Posted by Kamel Ikhlef (Member # 6667) on August 10, 2019, 05:18 AM:
for the capstan, the pulley that I designed is planned for the super 8 movie (step 4,235mm). But the capstan is an option for damaged perforations and I am planning a curved smooth pulley if the capstan is not used to protect the film from scratches. The wolverine's original ones are flat and scratch the film.
For lens holder, I design several heights because I do not know yet which height is the best to optimize focus and depth of field.
[ August 10, 2019, 07:04 AM: Message edited by: Kamel Ikhlef ]
Posted by Mike Spice (Member # 5957) on August 10, 2019, 05:46 AM:
That is very clever Kamel.
3D printing is a huge innovation
Posted by Kamel Ikhlef (Member # 6667) on August 10, 2019, 07:24 AM:
when I'm finished, I'll put the original STL files on thingiverse to share with the community. This will allow everyone to print themselves or someone else to print the parts what they want.
I also have to work on the front cover to avoid stray lights and protect the electronic components...
I will send to Stan the prototypes printed for testing.
[ August 10, 2019, 09:34 AM: Message edited by: Kamel Ikhlef ]
Posted by Stan Jelavic (Member # 6822) on August 10, 2019, 09:44 AM:
Glad it makes sense Mike. So yes, you will be able to do both 8 and super 8.
Thank you Kamel, the one that you sent me from Stemmer Imaging Group works for all resolutions.
I sent you the dimensions:
https://photos.app.goo.gl/ZW2d5pzHco2rJYQo6
Holder length including base = 20 mm
Thread depth (how deep the lens goes into the holder) for lo rez:
5.2 mm
Thread depth (how deep the lens goes into the holder) for hi rez:
3.34 mm
One note regarding the resolutions. In hi rez mode the lens gets closer to the object so the depth of the field gets narrower and the edges go slightly out of focus. The center has better rez that in lo rez mode but the edges get compromised.
At a higher level we can say that the lens is hitting its limits. A solution is to get the lens with higher F stop.
This might work:
https://scorpionvision.worldsecuresystems.com/Catalog/Machine-Vision-Lens/m12-lenses/2-3-format/s-mount-12mm-f4-0-far-field-lens
Posted by Kamel Ikhlef (Member # 6667) on August 10, 2019, 10:17 AM:
Thank you Stan for the calculations and dimensions, In fact I was wondering if a height a little bigger could help ex: 24mm height with the holder base. to avoid having to screw or unscrew the lens to adjust the focus. but, maybe I'm wrong.
I will look at your link for optics. the search for quality is my main goal because digitization will be very long. As much as possible to do the best.
While waiting for the progress of my tests, here are my best prints from the beginning with PETG filament and ABS. I will also try with nylon ... it is not perfect yet but it comes good... I am looking for solidity but also a good quality of finish (it will probably be a little sanding) ...
[ August 10, 2019, 11:48 AM: Message edited by: Kamel Ikhlef ]
Posted by Stan Jelavic (Member # 6822) on August 10, 2019, 12:19 PM:
Excellent work Kamel. If you are planning to have a longer lens holder the limit is at 23.32 mm total holder length according to the measurements I did yesterday. So around 22mm might do the trick.
Posted by Kamel Ikhlef (Member # 6667) on August 10, 2019, 12:46 PM:
I'm not a specialist in optics but if the lens holder is shorter (8,10,12mm) eventually it would improve the depth of field?...But it requires to advance the camera and change for an optical F8mm (Zoom in frame - if I understand correctly).
So we will stay on your tests Stan, that are excellent (very close to 80 lines of resolution). it is already a huge progress.
I will try to order a better F12 lens, mine is a low end... And I'm going to redesign a 22mm lens holder.
Posted by Mike Spice (Member # 5957) on August 10, 2019, 01:41 PM:
Excellent work Kamel.
I wouldn't know where to begin with 3D printing.
I certainly agree with you about quality in capturing film, if it is going to be a long process, the end result needs to be stunning, that is easy with an image sequence.
I spent 18 months making a timelapse with a go pro and a canon eos 600 a while ago.
That was a whole lot of still images. 18 months, two camera cards, typical fps 1 frame per 10s on the go pro and 1 fps on the canon for faster sequences.
Two 64gb memory cards every friday to process over a beer, the final project went to 1.6TB
18 months of a demolition/building site where I have worked for the last 31 years
One thing I am looking forward to with the modified scanner will be going back to VirtualDub again.
I am very handy at turning still images in to video using VirtualDub, with all the tricks it has up it's sleeve..
This is one thing I am really looking forward to with the mod.
I have tried to understand avisynth a couple of times but I just can't do command line with ease because of my dyslexia.
I am good with numbers, letters mess with my head unless it is english and not code..
Letters and numbers and symbols in the same sentence is too much for me to grasp
I have used Film9 too, I think that is an excellent peice of VirtualDub front end.
I am very proud of this 18 month image sequence project.
It also includes the BBC Question Time tv show which came in to my theatre recently.
I couldn't resist doing another image sequence video and add cheesy music, like an old cine film.
I run the A/V for the theatre in the Question Time timelapse.
my timelapse project made with VirtualDub
The final music edit
18 months in six minutes
[ August 10, 2019, 07:02 PM: Message edited by: Mike Spice ]
Posted by Stan Jelavic (Member # 6822) on August 10, 2019, 11:32 PM:
The board that I am doing Kamel allows for different holder/lens combinations so it is up to each individual user to pick the best combination for their use. I suggest going with the 9mm standoffs and 12mm f2.8 lens or 5mm standoffs and 12mm F4 lens. Both of these should work with your 22mm holder. The first one works with the stock holder.
Some fine footage Mike. Quite interesting to see the old buildings being torn down and the new ones being built.
BTW- I spend 1/2 day today getting the capstan sw running. Pretty close but have a few glitches. Will try to wrap it up tomorrow.
Looks like I need another board rev. The camera mount in the manual shows 24.5 mm spacing between the holes and in my foolishness I assumed that to be an inch... fooled me. It is pretty close but not exact and that could cause some issues with the corner focus.
Also want to add the flex connector so that the boards can be done in the factory.
So that adds a but of a delay for the boards to you Mike and Kamel. I could send you the ones that I have here for now if you want to play with them and then send you the new ones subsequently when they become available.
Posted by Mike Spice (Member # 5957) on August 11, 2019, 03:00 AM:
That's a very kind offer Stan but I am happy to wait.
I have a plenty to keep me occupied until the time comes to do my mod.
I'd like to be in a position whereby I have every component in front of me ready to go and only pull the scanner apart once.
Posted by Kamel Ikhlef (Member # 6667) on August 11, 2019, 04:07 AM:
Thank you Stan, it's like you want. I am very excited to test, but I am also late in my 3D prints and I can wait too. No problem.
We are close to the goal, it is only a few weeks. too happy with the progress of the project and it gives me a little more time to finalize on my side.
Mike, nice work of patience. interesting result.
Posted by Stan Jelavic (Member # 6822) on August 11, 2019, 07:40 AM:
OK perfect. I will clean the board a bit and get the assembly set up. There is a local company that provide PCB assembly service. Will chat with them tomorrow.
Here is the capstan demo:
https://photos.app.goo.gl/W1sMwP7PXDMZDjKW8
It gives the capstan motor a nudge at 10 second intervals if the film is not advancing (motor coasting along) and if the power switch is on.
[ August 11, 2019, 08:52 AM: Message edited by: Stan Jelavic ]
Posted by Mike Spice (Member # 5957) on August 11, 2019, 10:04 AM:
So close to the goal you can almost taste it.
The prospect of high quality frame by frame scans is palpable.
Loving the capstan test, particularly the 'molegrips' holding it steady.
Not something I would use but I can totally understand why Kamel sees fit to want it.
Probably a very sensible idea, along with the 3D printed guides that dont touch the film.
Posted by Stan Jelavic (Member # 6822) on August 11, 2019, 12:11 PM:
Ha ha they call them "vicegrips" on this side of the big swamp Mike.
You can still use the alert without the nudge. The circuit is there to connect the sonalert but obviously you still have to use the capstan and the motor, just do not connect the power to the motor, use the sensor part only.
Posted by Mike Spice (Member # 5957) on August 11, 2019, 01:46 PM:
vicegrips?
lol. sounds like a cheap 1980s Arron Spelling tv show.
What ever they are called, they did the job.
[ August 12, 2019, 03:46 AM: Message edited by: Mike Spice ]
Posted by Stan Jelavic (Member # 6822) on August 11, 2019, 02:13 PM:
Oops a spelling mistake.. Do it all the time.
Does not improve with age either
Trying to get the Hirose connector library for Eagle PCB but looks like will have to create my own. That is the fine pitch connector that connects to the Wolverine power supply.
Posted by Kamel Ikhlef (Member # 6667) on August 12, 2019, 06:32 AM:
As I said before: we dreamed about it, Stan did it!
I will soon finalize the toothed pulley of the capstan, the 22m lens holder and the motor mount. I'm thinking about the front cover. It should have 3 parts. I will use the wolverine holes for fixing it.
the central part will be mobile to be able to install the film and then to protect it from outside lights. The goal is to make a closed box.
it will be necessary to provide a hole for the usb of the camera.
Posted by Mike Spice (Member # 5957) on August 12, 2019, 06:39 AM:
Kamel, I was thinking about a cover last night.
Now that our scanning time will increase it means more chance of debris being attracted to the gate area.
I am thinking about a typical plastic see thro storage tub that will sit on top of the complete machine, with vent holes cut in to the rear.
Not as elegant as your idea but I think it will do for me.
The thought of the scanner with no cover, perhaps scanning for seven hours or more, it will need some kind of dust protection during a scan.
Posted by Stan Jelavic (Member # 6822) on August 12, 2019, 08:33 AM:
Definitely a good idea. We also have to watch the camera heat. The small fan inside can be turned on but it does not point towards the camera. Maybe rig up something so that the fan sits on top of the board towards the cam assembly. Or maybe just the vent holes on top and bottom of Kamel's cover.
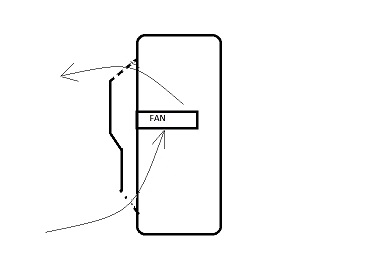
Board V5 on order:

Has better cam alignment and also the power supply FPC connector. I did not remove the adapter board pads used for manual assembly - just in case...
[ August 12, 2019, 03:41 PM: Message edited by: Stan Jelavic ]
Posted by Kamel Ikhlef (Member # 6667) on August 12, 2019, 05:09 PM:
yes, I thought about it. or maybe add a small fan 30mmx30mm above the camera because mine also heats a lot. I can design a support for the fan and the ventilation holes are a very good idea.
Posted by Stan Jelavic (Member # 6822) on August 13, 2019, 09:28 AM:
Yes, a small fan or remount the existing one.
BTW - found another interesting lens:
https://scorpionvision.businesscatalyst.com/Catalog/Machine-Vision-Lens/m12-lenses/2-3-format/s-mount-12mm-f2-5-far-field-lens
It is very expensive:
£122.40
Shipping alone to the US is £60.
This lens should work well with the HD image size and 5mm spacers.
Posted by Kamel Ikhlef (Member # 6667) on August 13, 2019, 03:54 PM:
Yes Stan, it's is very expensive! In addition, it has a lot of distortion (1.2%). For the small super8 frame, this distortion is too much. the low distortion imagingsource lenses have a distortion of 0.15 / 0.2% max
: https://www.theimagingsource.com/products/optics/board-lenses/tis-low-distortion/. the scorpion macro-lenses are at 0.15/0.25%. Scorpion vision are very expensive in delivery costs (40/50 for france).
But I agree that when you have a very good scanner, quality optics can greatly improve the quality of the frame by frame capture...
It is true ! quality is priceless ... but ... I'm willing to put a little more money if I'm sure there will be a real difference.
what is interesting is the lens aperture of F5.6 which improves the depth of field, most of the small M12 optics are at F1.8 to f2.8...
I watched your link on your google drive. the update is from 07/28
v2 of the PCB. will there be an update of version 5? is eagle file compatible with designsparkPCB software?
I started in pcb designing because I would like to create a small board to modify my 3D printer and have an automatic bed leveling.
I make my 3d models in designspark which is a great free software to modeling. designsparkPCB is also to create PCBs but I only start learning...
It's exciting and very interesting
BTW:
I will try to integrate a fan bracket and ventilation holes in my front cover design
Posted by Stan Jelavic (Member # 6822) on August 13, 2019, 08:30 PM:
Good point about lens distortion Kamel. I agree we have to make sure that the optics are done right. Spent some more time looking at that while waiting for the new board and it seems that 9mm spacers may not be optimal for the 12mm lens. My calculations are here:
https://photos.app.goo.gl/jDaaPkfTuDdPtCGw7
So, it seems that 12mm spacers(d = 50 mm) will give better focus and close to HD resolution. Will try that.
The board rev is V5.
I updated the the eagle.zip to V5.
Yes, the eagle files can be imported into sparkdesign:
https://designspark.zendesk.com/hc/en-us/articles/115000059845-Can-I-import-Eagle-Designs-in-DesignSpark-PCB-
Posted by Mike Spice (Member # 5957) on August 14, 2019, 10:40 AM:
Question for Stan please.
So that I am ready for the mod, can you advise me here or in email or pm exactly what other bits and peices I am likely to need before I start pulling the Wolverine apart please.
I am happy with the camera, lens mount and lens.
I will buy those from the supplier here in the uk.
I have the image capture software installed on a laptop
It would be helpful to know what other bits I am likely to need.
Of course, I read you are still doing board revisions so things may change between now and when I receive my board.
I read about spacers for the camera.
Typical 5v psu to drive the board you are sending me.
USB lead to the laptop.
Three switches, single throw single pole?
A board to mount said switches perhaps?
I would like to be all ready with everything I need to make this happen when the board does arrive from you.
Thank You Stan. I know it's a little way to go yet, which is not a problem, but I can get things ready to crack on once it does arrive.
Posted by Kamel Ikhlef (Member # 6667) on August 14, 2019, 11:33 AM:
while waiting to find the right height of the camera spacers. I designed a support for the imagingsourcecamera that can replace the spacers. this will put a precise height.
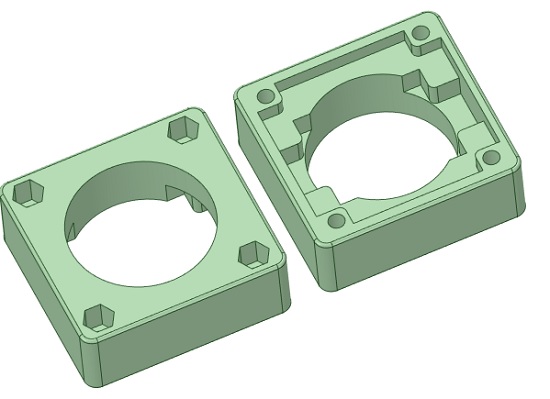
I think I can send to Stan, to test prototypes printed in 3d next week if all goes well..
Posted by Stan Jelavic (Member # 6822) on August 14, 2019, 11:44 AM:
Your list looks pretty good Mike.
- No need for the PSU. Uses the Wolverine PSU.
- Will send you the board to mount teh switches.
- Single pole double throw should be OK.
https://www.amazon.com/gp/product/B01JU6KBH6/ref=ppx_yo_dt_b_asin_title_o07_s00?ie=UTF8&psc=1
- Fan cable is too short and need the extender cable.
https://www.amazon.com/gp/product/B013JRWCBU/ref=ppx_yo_dt_b_asin_title_o02_s00?ie=UTF8&psc=1
- Will send you spacers and the screws for the cam.
- need the usb cable for the laptop.
Aaaaand I think that is it. The board mount uses the existing screws. Ah yes will send you the cables for the switches that plug into the board. Bought a bunch of those.
Cheers.
Posted by Mike Spice (Member # 5957) on August 14, 2019, 11:45 AM:
Stan thank You, you are very generous.
Kamel That spacer is a bit of genius indeed!
Posted by Kamel Ikhlef (Member # 6667) on August 14, 2019, 12:10 PM:
Mike, when Stan will have validated my 3D printing on the mod, I can send you too if you do not have the possibility to print. In any case, I will put my shared files on thingiverse.
Posted by Paul Adsett (Member # 25) on August 14, 2019, 01:52 PM:
Not being an owner of a Wolverine, I have only a rough idea of what is going on here in this thread. But I must say how very impressive is the level of engineering expertise being applied to the design of the circuit boards, the solid modelling of the new components, and the redesign of the optical system.
What are you guys going to charge Wolverine for all your efforts?
Posted by Kev Morrison (Member # 6338) on August 14, 2019, 03:51 PM:
"Not being an owner of a Wolverine, I have only a rough idea of what is going on here in this thread. But I must say how very impressive is the level of engineering expertise being applied to the design of the circuit boards, the solid modelling of the new components, and the redesign of the optical system.
What are you guys going to charge Wolverine for all your efforts?" [Smile]
Paul, I agree with you - I've become quite impressed with the brainstorming, testing and development of engineering fixes in this forum regarding Wolverine enhancements.
Maybe we have some folks here that have been working at Lockheed's "Skunkworks" out West in area 51....
That being said - regarding the question about "charge Wolverine for all your efforts?", personally, I'd tiptoe quietly past Wolverine's front door...
Some businesses can get real weird about stuff like this. Let's hope that they do not.
Posted by Mike Spice (Member # 5957) on August 14, 2019, 04:02 PM:
Wolverine do watch this forum so perhaps in three years time we will see thier pathetic attempt.
STAN copyright everything now!
Kamel don't let wolverine get thier hands on your 3D images.
Yes it has been AMAZING to see what has happened since I had my Wolverine, and three motor changes and a couple of hundred customers paying £2 per 50ft so I could recover the initial cost of the scanner.
I sit here in a navy forum this evening, with a cold beer, chatting way and posting a bit of 720p cine film of my Mum on my aircraft carrier in 1976, and talking about how in the coming months, I hope to improve on those scans.
Stan is an absolute techincal cine legend.
Really.
If I ever met him, he would be very tipsy very quickly.
Posted by Kamel Ikhlef (Member # 6667) on August 14, 2019, 05:07 PM:
If wolverine had produced a quality scanner with correct results, we would not try to improve it.
I was willing to pay more for better scanning quality, but the results with this scanner are too catastrophic with mp4 artefacts compression.
The "pro" version should allow a "pro" quality!... But this is not the case, and it is this disappointment that gives me the energy to try to do better.
Our films are precious!... In addition, it is a sharing of knowledge and non-commercial skills, just for enthusiasts who want to digitize their movies with the highest quality.
Posted by Stan Jelavic (Member # 6822) on August 14, 2019, 07:49 PM:
Ha ha Area 51. No, far from that but thank you anyways. Yes, we are just a group of film enthusiasts that are eager to learn and improve.
Thank for the offer Mike and may take you up on that the next time I am in the UK.
Regarding the lenses, the calc I did last night does not hold water. Moving the camera away from the film will reduce the magnification not increase it.
Soooo, in order to get the HD rez, the camera has to be moved in closer to the film. But then we have a DOF issue. Possibly use the scorpionvision F5.6 lens but then we have distortion issue.
[ August 14, 2019, 09:26 PM: Message edited by: Stan Jelavic ]
Posted by Kamel Ikhlef (Member # 6667) on August 15, 2019, 04:12 AM:
I made calculations on my side:
the imagingsource sensor is mm 5.7x4.28. the super8 frame is mm 5.79x4.01.
Full image of the sensor = 2592x1944 pixels. format 4/3.
For an M12 lens of f12, I find 48.05mm of Distance for full sensor capture.
if only one part of the sensor is used. for example HD (1920x1080). This brings to a useful sensor area at mm 4.2222 x 2.3777 for HD 1920x1080.
The calculation gives 51.35mm of Distance. (2.3777 > 4.01 S8 > 1080 pixels and 4.2222 > 5.79 > 1920 pixels). We can also use the Interest Area (for example 1440x1080) in IC Capture software.
In this case : sensor 3.1665 > 5.79 > 1440 pixels (HD cropped 4/3) gives 52.5mm Distance.
This lens is good : http://www.scorpionvision.co.uk/Catalog/Mac hine-Vision-Lens/m12-lenses/near-field-far-field-m12-lenses/s-mount-12mm-f2-8-macro-lens (but not IR Block, F2.8 aperture).
I think Imagingsource low distortion lenses are a good alternative.
An macro optical lens of f12mm would be perfect with an aperture of f5.6, an IR block and a low distortion (0.15%) of 10M pixels.
But maybe that exists?...
[ August 15, 2019, 05:37 AM: Message edited by: Kamel Ikhlef ]
Posted by Stan Jelavic (Member # 6822) on August 15, 2019, 08:14 AM:
You math is OK Kamel but the measurements that I did do not agree with it. The issue is that the effective focal length of the lens is not 12mm but very close to 10.5mm. For parallel light it is probably 12mm but we are very close to the object.
See my measurement results:
https://photos.app.goo.gl/K1GU6gZPuaLdym6r6
Your calc is in the first column and the rest is based on actual measurements.
The measurement was done by measuring the actual distance from the sensor to the film and then checking the rez of the cropped output frame.
That is why you have to go closer (d = 43mm) for HD rez and d = 3mm standoffs for higher than HD. At 3mm the camera is very close to the bracket and the edges get compromised due to DOF.
Regarding the lens distortion I ran distortion simulation at 1% and here is the result:
https://photos.app.goo.gl/8fKPBoXd8C6LSiFa9
It is definitely noticeable.
Kamel, the supports are a good idea but may not work with the stock holder which has a lock screw on the side.
[ August 16, 2019, 07:30 AM: Message edited by: Stan Jelavic ]
Posted by Kamel Ikhlef (Member # 6667) on August 16, 2019, 07:50 AM:
Yes, Stan it's possible ... I have planned for the round holder that you have or those I have designed.
For 3D prints, I'm a little late. the design is finished but my printer has some problems. It's the joys of 3D printing! lol.
There, I ordered a new, stronger 3D filament. So, hopefully, I hope to be able to send you the 3D parts, next week.
Posted by Stan Jelavic (Member # 6822) on August 16, 2019, 01:49 PM:
Thank you Kamel. It is no rush. I should be getting the new boards in today. Hopefully it all works out OK including the new connector and the new camera hole location.
Completed the V5 assembly and completed all of the tests except for capstan. Will do that tomorrow.
Here is what it looks like:
https://photos.app.goo.gl/8z8ebYgZy35UwSYA7
Here is the test frame. It is still a bit off because it is very touchy and it takes a fraction of a mm to throw it off center.
https://photos.app.goo.gl/vQ6PthuAgTCfChSY9
But this should be OK even for HD frame.
[ August 17, 2019, 09:21 PM: Message edited by: Stan Jelavic ]
Posted by Kamel Ikhlef (Member # 6667) on August 18, 2019, 08:46 AM:
As usual very great work, Stan !...
For the slight shift of the centering of the camera, maybe I will be able to correct with a printing specific support. Thinking.
My filament tests are conclusive.
I found a very good 3D filament (Verbatim Durabio) :
https://www.verbatim-europe.com/uk/blog/verbatim-launches-mitsubishi-chemicals-bio-friendly-durabio-in-3d-filament-form/
This is a new filament that is very precise and very strong. It is heat-resistant and better than nylon and easier to print.
But, It's a little expensive... It's the price of the quality.
I do some tests with...
Posted by Mike Spice (Member # 5957) on August 18, 2019, 10:16 AM:
anything with the Verbatim logo should be good.
I only use verbatim dvd or cd discs.
Good luck with the printer.
Posted by Stan Jelavic (Member # 6822) on August 18, 2019, 11:17 AM:
Thanks Kamel. The 3D spacer is a good idea. The alignment is very sensitive and maybe oversize holes could do the trick.
Posted by Kamel Ikhlef (Member # 6667) on August 18, 2019, 04:13 PM:
Stan, it seems to me that in the kit of development of the imagingsource camera there is a possibility of superimposing a cross to help centering.
https://www.theimagingsource.com/products/software/end-user-software/ic-measure/
"User define live overlay", "drawing script Menu" in the ICMeasurement software.
I will look at it as soon as I have a little time...
for example on your last test,we can see that the offset of the camera needs to shift left and up forward :
Horizontality and Verticality are perfect !...
Very good work, Stan !
[ August 19, 2019, 10:19 AM: Message edited by: Kamel Ikhlef ]
Posted by Stan Jelavic (Member # 6822) on August 19, 2019, 08:30 PM:
Looks like a really useful tool Kamel. I used the tool to estimate the correction required.
Drilled oversize mounting holes on the interface board so that I can shift the cam position and then measure the pixel and board displacements. I get 114 pixels per 0.022" as shown in the picture:
https://photos.app.goo.gl/ocMYeGDRgzofMcGfA
This is with your camera mount.
Then I measure the amount of shift required to bring the camera to the center horizontally.
https://photos.app.goo.gl/ziXvdXVtW1duM96s5
So the correction required is:
145 pixels / (114 pixels / 0.022 inch) = 0,028" = 0.71 mm
But there are other issues:
Your mount has different centering than stock mount. The stock mount just happens to be closer than yours for this particular configuration and requires smaller adjustment.
So, not sure how we meet both requirements at this point.
The other issue is with the vertical adjustment.
The lens is already very close to the panel and centering it more may cause to hit the panel. See the picture.
https://photos.app.goo.gl/CvfHrCGSJ9fmQ2LN8
So, I would leave that one alone for now.
Posted by Kamel Ikhlef (Member # 6667) on August 20, 2019, 03:45 AM:
Yes Stan,
My calculations are just theoretical. taking the pixel size of the imagingsource cmos (0.0022 x pixels number) my results were an offset of 0.2508mm vertically and 0.319mm Horizontally.
Your calculations are based on reality because you do the tests directly on the telecine, so they are much more reliable.
It's better to trust your results ... But, indeed, it's not obvious at all...
[ August 20, 2019, 05:03 AM: Message edited by: Kamel Ikhlef ]
Posted by Stan Jelavic (Member # 6822) on August 20, 2019, 11:58 AM:
Actually Kamel I use a vernier to measure the board displacement but that can have an error. The difference is only 0.01" (ten thousands of an inch) which is very tiny. A quarter of a millimeter. So I think I will go with your calc.
The mounting holes have some slack so I measured 4 positions i.e board pushed to the right, left, top and bottom. Then used the center of 4 measurements:
https://photos.app.goo.gl/tPMVy6XyrhD21s2SA
Based on that the cam mounting holes have to be shifted by:
Vertical: (1310 - 1252) pixels * 0.0022 mm/pixel = 0.1276mm
Horizontal: (919 - 714) pixels * 0.0022 mm/pixel = 0.451 mm
[ August 20, 2019, 09:54 PM: Message edited by: Stan Jelavic ]
Posted by Kamel Ikhlef (Member # 6667) on August 21, 2019, 02:02 AM:
OK Stan, it seems to me very correct! it's high precision watchmaking!
Speaking of precision, I get the parts I ordered for my 3D printer tomorrow.
Normally, hopefully I can print up to 0.02 mm resolution. More tests in perspective, but it takes a good direction.
[ August 21, 2019, 08:10 AM: Message edited by: Kamel Ikhlef ]
Posted by Stan Jelavic (Member # 6822) on August 21, 2019, 12:27 PM:
Tried HD (5mm spacers) and it will work OK. The lens is still within the notch as
https://photos.app.goo.gl/6PjMwRbsqyLGYWZ99
HD mountng hole ajustment:
https://photos.app.goo.gl/aTBvFHs3nLC4t3WX6
center:
960x540
offset:
1096x739
Adjustment:
Vertical: (1096 - 960) pixels * 0.0022 mm/pixel = 0.299 mm
Horizontal: (737 - 540) pixels * 0.0022 mm/pixel = 0.4378mm
The horizontal shift is pretty close to the lo rez.
The vertical is larger but it is not as critical because these is plenty of margin.
This is the lo rez from before to compare against.
Vertical: (1310 - 1252) pixels * 0.0022 mm/pixel = 0.1276mm
Horizontal: (919 - 714) pixels * 0.0022 mm/pixel = 0.451 mm
BTW - the HD focus looks pretty good:
https://photos.app.goo.gl/YGwV8eDbnmXg1t6WA
Posted by Kamel Ikhlef (Member # 6667) on August 21, 2019, 02:31 PM:
Stan, I see that you are very perfectionist!...
This is a very good thing because the final result will be better.
As I had already said in the previous pages, your results are better than the scanning professional laboratory that has made some capture tests of S8 movies in HD.
For your last test, you are close to the limit of 80 lines of resolution !
It takes time and a lot of work, but it's worth it!
Posted by Mike Spice (Member # 5957) on August 21, 2019, 03:50 PM:
I am just going to sit back and admire the detailed precision that's going on here, and look forward to the day my letter box goes bang.
The prospect of being able to re scan my Royal Navy cine film again, in quality that it deserves, is so exciting.
Posted by Stan Jelavic (Member # 6822) on August 21, 2019, 09:30 PM:
That is great to hear that we are beating some of the professional machines. I will readjust the holes and order a batch of 5 new boards. Then I will build the 2 for you guys and ship them out.
The project is drawing close to the end. No more fun. Or is fun just starting. Mike hope you share some of your footage at least a few clips.
Posted by Kamel Ikhlef (Member # 6667) on August 22, 2019, 04:46 AM:
On my side, I'm waiting for the parts for my 3D printer (normally today). Then I'll have mechanics, electronics and a lot of adjustments to make...
I'm late, but I also hope to send you the printed parts very soon.
At first, it will be the curved pulleys to protect the film from scratches, the toothed pulley and the engine support of the capstan (optional) for testing.
For the front cover, I wait for everything to be functional to better predict the design ( holes, buttons,...).
Stan, 3D printing is very fun, but take a lot of time...
(it can become very exciting and addictive !)
In all cases, you have done an exceptional work and will do many services.. It motivated me a lot and inspired me!
Thank you very much for that...
Posted by Stan Jelavic (Member # 6822) on August 22, 2019, 08:39 AM:
Glad you are having fun Kamel. I wanted to get into 3D printing myself but never had time to do it. Had a few projects before and used the 3D printing service for that but doing it myself would have been much more fun.
Posted by Kamel Ikhlef (Member # 6667) on August 22, 2019, 09:21 AM:
Stan, it's never too late. Just time and a little money too. But,3D printing has become much more popular in recent years.
Prices have dropped a lot.
Currently we can have a very good 3d printer not too expensive. And if we like to tinker, we can improve it ourseves.
This is no longer a problem for someone who loves electronics, mechanics,computers, firmware and software development...
If you like DIY you can find all this in 3D printing.
But it can very quickly become a passion. that's my case. the most complicated is to take the plunge... After, there are so many applications ... for example I make 3D parts for my son who is passionate fish and aquariums, other designs for my daughters, kitchen, bathroom, etc ... Not to mention improve the 3D printer and telecine! lol ... Do it yourself is more rewarding and more fun.
it's infinite...
BTW: I just got the parts for my printer, I'll be able to move forward a little bit.
Posted by Mike Spice (Member # 5957) on August 22, 2019, 09:53 AM:
Stan Without doubt my youtube channel will be full of the new scans.
I would like to make a video of the mod process once I have all of the parts together.
I can't really do that without your permission and credit to you in the video.
Would that be ok with you?
I'm happy to credit you just by first name or full name, your choice if you are happy for me to do that.
My youtube only has around 200 subscribers but there are many wolverine users out there who might like to see what you have achieved.
I have several thousand feet to re scan of my own, I will probably start a new thread here once the mod is ready to go, and document here too, with links to clips.
my youtube channel
Posted by Kamel Ikhlef (Member # 6667) on August 22, 2019, 10:46 AM:
Great idea Mike! it can help a lot of people and me first because a video is much more explicit. Of course, if Stan agrees ...
Posted by Stan Jelavic (Member # 6822) on August 22, 2019, 01:05 PM:
That is a very good idea Mike. Feel free to use any of the materials that I posted here.
Looking forward to seeing you posts with the rebuilt machine.
Ordered the V6 boards.
The change is very tiny -- see the overlay:
https://photos.app.goo.gl/VJQ6gqvxt7VMspFk8
Posted by Mike Spice (Member # 5957) on August 23, 2019, 02:36 PM:
I have posted a 12 minute video that documents the work so far by Stan and Kamel.
It is not 100% accurate in terms of dates and events but it does show the incredible amount of work that has been achieved by Stan and Kamel to date.
If there is anything you don't like about it, do let me know, I am more than happy to take it down and change it.
I have already spotted several spelling mistakes in my captions, oh well.
It will give the trolls something to comment about..too late now.
The Wovlerine scanner sounds good to me!
I wanted to post this so that the work to date can be seen, but as I mention, it's not strictly in sequence in terms of the photos and video clips being in the correct order.
Who put the V in WOVLERINE
[ August 24, 2019, 03:12 AM: Message edited by: Mike Spice ]
Posted by Stan Jelavic (Member # 6822) on August 23, 2019, 09:54 PM:
Pretty awesome Mike. Thank you very much for doing this. Enjoyed the video and the audio track that by some Mike's magic seems to be synchronized to the video. Had a few laughs as well. It is all good fun and also some serious learning.
Posted by Kamel Ikhlef (Member # 6667) on August 24, 2019, 05:12 AM:
Thanks Mike, a little relaxation it feels good. We're waiting for the next episode ...
Posted by Mike Spice (Member # 5957) on August 24, 2019, 06:48 AM:
I can only apologise for the spelling mistakes.
I am obsessive about spelling too.
That will teach me to try and edit while drinking beer.
At least it documents the amazing work you two are doing.
Must try harder next time, proof read twice
I also forgot to add a music credit, which is remiss of me.
It was Ron Goodwin and music from Monte Carlo or Bust.
Posted by Stan Jelavic (Member # 6822) on August 24, 2019, 08:09 AM:
Perfect selection of music.
Posted by Kamel Ikhlef (Member # 6667) on August 24, 2019, 09:09 AM:
For me, it does not matter for the spelling, I translate by google ... I still do not master English unfortunately.
Here are some pictures of my tests:
I encountered some adjustment difficulties by putting back the back cover (screws and notches). I started my design again but this time it's fine.
I still have to design a cable tie with a small screw (the original one is a bit big). for the pulley, I tried several 3D Filaments, but I have wobbles (small waves on the vertical
I have to change the firmware on my printer with all the hardware changes I'm doing. the Chinese manufacturer (Wanhao) must to provide me with the source code this weekend, but I'm still waiting for it.
if I can not get it fast enough, I'll go through an open firmware that I'll modify myself...
And hopefully I'll be able to send you the 3D parts as early as possible, I hope during the next week.
I also put small brass inserts to have easier to fix the pulley on the cabestan motor. It's not easy because it's very small (see the pictures).
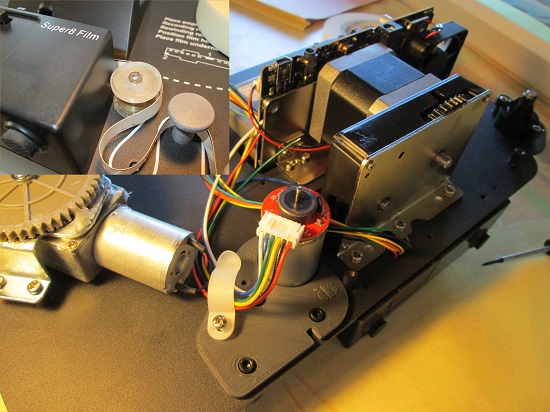
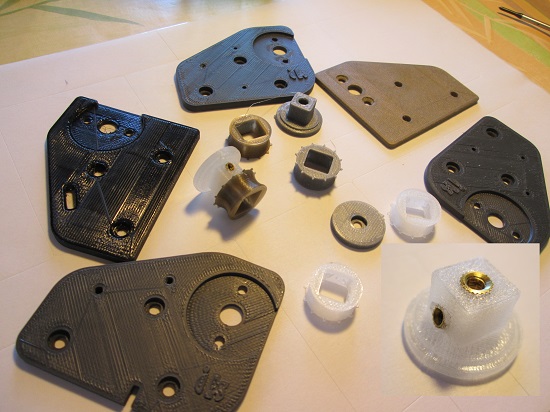
For the front cover, it's thinking. I started a little design (just the first part of the top) but I will have to change when everything will be functional.
I will try to design a small magnetic door to protect the frame of the film from the outside light. Still a little work.
what would have been good is also to use the USb back hole to pass the USB cable of the camera to fully close the hood. Thinking !
It's not over yet but it's getting good !
[ August 24, 2019, 12:48 PM: Message edited by: Kamel Ikhlef ]
Posted by Malcolm John Toye (Member # 4474) on August 24, 2019, 12:27 PM:
"Thank You" the three of you for the advancement you have made since I first purchased my Wolverine in 2017.I have followed you with eager eyes ,but unfortunately could not add anything that would improve the Wolverine in any way .I am sure when Mike completes his final video I will have a go at upgrading my Wolverine as I am sure many silent viewers will do the same. "Thank You" once again
Posted by Mike Spice (Member # 5957) on August 24, 2019, 12:36 PM:
Kamel you are very kind to offer to send me parts that you are printing.
I don't think you will need to send me anything as the only part I would need would be the lens mount.
I am not intending to go with the sprocket/capstan as you are.
If the factory lens mount will work, I would be happy to buy one, but if your lens mount is better, I would be grateful for one of those.
I am going to invent a cover to protect the complete machine and film reels, so your printed 3D covers won't be needed.
I am most grateful for your kindness.
That sprocket/capstan looks really cool!
I imagine testing different filaments must be very time consuming. The work you are doing is amazing.
Malcolm John Toye
You raise a very good point about other woVlerine users who might want to try this at home.
The biggest problem would be to find a way to produce the circuit board that Stan has designed.
Other than that it would be easy to make a shopping list of the other components that go on to the board.
From the pictures I am seeing that equates to a few resistors, a chip, what looks like a transistor, a diode and some connectors and switches and connecting wire.
Add to that the camera, lens and lens mount.
It would be quite a task for someone who does not have the technical skills to solder those components to the board, let alone wire it together.
Once I begin my mod I will do a video and step by step written guide and high quality still images to detail what is involved.
There is no reason in the future if I can help any UK users to achieve this, I will.
The problem would be getting a hold of the circuit board, once that is overcome;
I would be happy for someone to send me the parts and I would solder it together for them and return it for a very small fee, but they would then have to complete the mod on thier own using my video as a guide.
I consider myself incredibly lucky that Stan has offered to send me a fully soldered board so I have a duty to try and help UK users if I can.
Ballpark costs would be in the region of £250 I would think, including camera lens and mount, plus the other components to go on the circuit board.
The cost of the board is an unknown or even if it could be available in the UK.
The camera and lens, lens mount alone are £180 or there abouts.
Perhaps when things are finalised Stan could compile a complete list of every component on the board so we can cost it up in uk prices.
That said, I am not sure how the circuit board could be made available, that would be a question for Stan.
Perhaps it is possible to order one from the people who made them for him.
Before this mod of Stans' came about I was planning to have just my Navy footage scanned by a professional house, I worked out that would cost around £300 so this mod will not only make it cheaper, but in time, will allow me to scan films for other people to a much higher quality than before.
[ August 26, 2019, 08:58 AM: Message edited by: Mike Spice ]
Posted by Kamel Ikhlef (Member # 6667) on August 24, 2019, 12:57 PM:
OK Mike, no problem, I send to you as soon to possible just the 22 mm Lens holder and five curved pulleys for protect the film.
Posted by Mike Spice (Member # 5957) on August 24, 2019, 01:00 PM:
Kamel that would be very kind, the film guides would be very sensible to have, so thank you for thinking of that.
I will send you a postal address in a message.
I have just come to the end of a long summer holiday, I am about to return to University and I don't think I will have time to sit down to do this mod until at least October, but more likely my Christmas holiday, so there is no hurry.
First semester at University is going to be Non Stop....
I am lucky if I get a Sunday afternoon to myself after spending Saturday doing the chores, shopping and housekeeping.
In that time I can get the camera and lens and anything else I am going to need, so I am ready to go when I have some time.
Thank You so much.
Posted by Stan Jelavic (Member # 6822) on August 24, 2019, 03:01 PM:
That is pretty amazing work that you are doing Kamel with 3D printing. Hope you get your printer in working with the latest mod.
Mike, I am getting the boards done in China.
I pay $7.50 for 5 boards and $23.50 freight.
I can send you the details via email how to order the boards. You may save some cost by consolidating the order for a number of users.
I already have the parts list auto-generated by the PCB tool but will have to go through it one more time. Possibly this weekend.
As far as assembly goes, here are my thoughts:
You can do your own soldering and assembly but there is a tricky SMD connector that requires SMD soldering experience.
Another issue is the MSP430 controller that has to be programmed. I do that here. Not a big deal but if you want to do it you will need a small programming board. Again not a big deal but wanted to mention it.
There is an SMD 3.3V regulator that requires SMD soldering but that one in pretty easy.
The rest of the components are pretty easy but need a fine soldering iron tip.
Small qty boards I can do here possibly. If there is a larger demand then we will have to go with the assembly service. I already contacted one of the local companies here.
I am pretty flexible any which way you want to go. Just let me know.
Yet another possibility. Pre-populate the boards with tricky parts and you and/or end users do your own soldering and test.
Posted by Kamel Ikhlef (Member # 6667) on August 24, 2019, 04:03 PM:
Thank you very much Stan for these explanations.
I will be very interested in your work if you share it in open source, which is really very generous of you !
A very short time ago I bought myself a msp430g2 Launchpad card because I would like to program to modify my 3D printer and at the same time to learn Energia-CCS/Msp430G2.
I learn too Eagle and sparkdesignPCB software...
It's not easy, but I really like learning.
Are all your files on google drive up to date with the latest versions?...
For welds, actually it takes a little practice where the interest of ordering several cards for possible failures.
I am a beginner in this sector but I like to learn.
And do it yourself is so rewarding...
Posted by Mike Spice (Member # 5957) on August 24, 2019, 04:19 PM:
Stan Thank you for clearing up a few points.
It would appear one or two people might want to try this mod so this initial post explaining how things go together is a great help.
At this stage I was just putting a couple of thoughts out there as an initial response to Malcolm John Toye post.
I know for a fact if I was a reader in this thread I would certainly be interested in modding my scanner.
The reality of it is not easy by any means, but perhaps in the future it is something we can work towards together.
I am good with a fine tip and solder, I have been soldering for 45 years, audio patchbays are a specialty of mine....
But as you rightly point out, some elements do require specialist help and knowledge.
There is certainly no rush for anything anytime soon, but it is clear readers of this 32 page thread must be sitting back in amazement and wondering if they may be able to do this one day, and who wouldn't blame them for that.
I feel very special, as I am sure Kamel does, at the prospect of being able to receive a board and knowledge from you in the near future.
I would do as much as I was able to then go on to help anyone else once I am up and running and know what's what.
I wouldn't know where to begin to program a MSP430 so that is something I can look forward to learning
I can solder like a pro......
Perhaps once Kamel and I are up and running we can create a thread in the forum early in 2020 to offer advice and perhaps some kind of online help to people interested in modding.
I will certainly create a new thread for my modding when the time comes and document every move for people to read about.
Posted by Kamel Ikhlef (Member # 6667) on August 24, 2019, 04:59 PM:
Very good idea Mike ! No problem for me.
Of course with the approval of Stan, it is basically his creation for the most part !
Posted by Mike Spice (Member # 5957) on August 24, 2019, 05:18 PM:
Stan is going down in film archive history.
Stan will be very happy to know that his work will enable me to re scan my vintage Royal Navy films in top quality.
I have scanned a pile of veterans Navy film, I hope that in 2020, to have those veterans send me back thier Navy reels for another (free) scan.
[ August 25, 2019, 03:44 AM: Message edited by: Mike Spice ]
Posted by Stan Jelavic (Member # 6822) on August 24, 2019, 07:35 PM:
I feel honored Mike. I still have to update the google drive with V6.
Also will update the MSP430 sw with the latest.
BOM needs cleaning up a bit.
I will send the boards to you guys as soon as the V6 are in + a few days for assembly.
Doing that slowly while watching the football game. The season started today.
As I promised it is all open source - no secrets - no hidden agenda
Just updated EAGLE.zip with the V6.
The MSP430 sw is on the google drive in freq_gen2 folder. Drop this folder into your CCS workspace and compile it. Then you can flash the MSP430 using the launchpad.
I used this:
https://www.amazon.com/gp/product/B00HPLQS58/ref=ppx_yo_dt_b_asin_title_o00_s00?ie=UTF8&psc=1
The standalone part is:
MSP430G2231IN14 from Mouser.
Posted by Simon Hawketts (Member # 5756) on August 25, 2019, 01:08 AM:
Hi all
I've been following this thread for a while now after posting last year about the problems I has with my Winait scanner. If the upgrades you guys are doing get to the point of producing a kit for user modification I would be very interested in purchasing one.
Just thought I'd let you know in case you needed to know numbers of people interested in order to finalise costs etc.
Posted by Stan Jelavic (Member # 6822) on August 25, 2019, 09:42 AM:
Updated the BOM.
https://drive.google.com/drive/folders/1MMmlUWHz7w44APn17G6LOgz58oBRpv1r?usp=sharing
Simon has a good point. Consolidating the orders could save money.
Posted by Kamel Ikhlef (Member # 6667) on August 25, 2019, 09:57 AM:
Posted by Kamel Ikhlef (Member # 6667) on August 25, 2019, 09:58 AM:
Thank you very much Stan for your sharing !
Posted by Mike Spice (Member # 5957) on August 25, 2019, 10:38 AM:
I would suggest waiting until both Kamel and I have done our mods before we bring others in to the modding arena.
I will document my process so demonstrate what is actually going to happen.
I imagine Kamel will do something similar, altho his mod will be different to mine.
We could think about opening a new thread in the forum which will bring people together that are only interested in modding, and then we can find out demand and how we might be able to help other woVlerine fanatics
It is certainly a good few months away until this mod 'could' be made available.
A thread just for those interested in the mod would consolidate that aspect of things rather than confuse this thread.
Suggestions welcome.
Posted by Stan Jelavic (Member # 6822) on August 25, 2019, 02:51 PM:
Using a separate thread makes sense to me.
Posted by Mike Spice (Member # 5957) on August 26, 2019, 08:55 AM:
Stan, I have just seen your pm about the PCB
I did try to upload a file to the website, but I can't reply again to the pm to explain, until you reply.
No worries, no hurry.
A modding thread in the near future it is then, to consolidate interest
Posted by Mike Spice (Member # 5957) on August 28, 2019, 05:16 PM:
A stroke of good fortune today means I have everything in place to buy a camera and lens.
Very happy.
Posted by Stan Jelavic (Member # 6822) on August 28, 2019, 07:35 PM:
Good going Mike.
The V6 boards came in. Slowly putting together the two for you and Kamel.
Posted by Kamel Ikhlef (Member # 6667) on August 29, 2019, 04:27 AM:
Yes, Stan and Mike. I hope to be ready soon to send you also the printed parts !
Posted by Stan Jelavic (Member # 6822) on August 30, 2019, 08:54 PM:
V6 centering is pretty close to the center:
https://photos.app.goo.gl/E4iQFZexzKiP3qhCA
It does not have to be dead on but if really needed in the dead center opening up the mounting holes a tad will do the trick.
I will leave mine as is.
The board for Kamel is ready.
https://photos.app.goo.gl/H9t2Dkmmjdfp1zENA
Working on Mike's now.
Posted by Mike Spice (Member # 5957) on August 31, 2019, 03:27 AM:
Thanks for the update Stan
It looks good.
I hope you and your family are safe from Hurricane Dorian
Posted by Stan Jelavic (Member # 6822) on August 31, 2019, 08:46 AM:
Thanks Mike. Looks like it is heading more east away from us. Hope it stays that way.
BTW - you board is ready. Hope the mail service will not be disrupted.
Posted by Mike Spice (Member # 5957) on August 31, 2019, 08:50 AM:
I'm happy to wait until things calm down
Posted by Kamel Ikhlef (Member # 6667) on August 31, 2019, 09:50 AM:
Stan, glad to hear that you will not be affected by the hurricane. Mike, I do not have your address you can communicate it to me by private message please.
Posted by Mike Spice (Member # 5957) on August 31, 2019, 11:25 AM:
Thank You Kamel.
I did send a message but I have now sent another one in pm
Posted by Kamel Ikhlef (Member # 6667) on August 31, 2019, 02:08 PM:
Thanks Mike, It's good this time, I did not see your previous message. I send you as soon as it's ready. still some small adjustments and it will be finished.
Posted by Mike Spice (Member # 5957) on August 31, 2019, 02:55 PM:
Thank You Kamel, In your own time.
I am in no hurry.
Many Thanks.
Posted by Stan Jelavic (Member # 6822) on August 31, 2019, 04:41 PM:
Both boards shipped. $15 international shipping each. No tracking. Estimated arrival 2 weeks.
Did not ship the camera standoffs and cables. Can drop them in regular mail which is much cheaper.
Posted by Mike Spice (Member # 5957) on August 31, 2019, 05:10 PM:
Stan this is so amazing.
Please let me have a paypal in pm so I could at least cover the postage.
Your generosity is really special.
The work you have done and heavens knows what you have spent during the last few months on this project, I really do feel very privileged to have one of your boards coming my way.
I can't thank you enough.
If you do refuse the postage then I shall make a donation to a Royal Navy Charity on your behalf as a way of saying thank you so much.
I will let you know the moment the board is in my grubby paws.
Thank You for all your research and prototypes, it has been truly amazing watch you progress from messing up a go pro to where we are today.
Posted by Stan Jelavic (Member # 6822) on August 31, 2019, 09:41 PM:
Thanks again Mike. I will be happy to donate to a good cause.
Will start putting the instructions together.
Posted by Mike Spice (Member # 5957) on September 02, 2019, 08:36 AM:
Stan When you say camera standoffs and cables, is that something I can buy here?
I think you have done more than enough already.
If this is something I can get I am happy to do that as long as I know exactly what I need to get.
Posted by Stan Jelavic (Member # 6822) on September 02, 2019, 09:21 AM:
OK, here is what you will need Mike:
Spacers:
https://www.amazon.com/gp/product/B014KJX65W/ref=ppx_yo_dt_b_search_asin_image?ie=UTF8&psc=1
Switches to board cables:
https://www.digikey.com/product-detail/en/molex/0151340203/WM15251-ND/6198141
Switches to board and cam sync cables:
https://www.digikey.com/product-detail/en/molex/0151340403/WM15259-ND/6198149
Extension cable for fan:
https://www.amazon.com/gp/product/B013JRWCBU/ref=ppx_yo_dt_b_asin_title_o08_s00?ie=UTF8&psc=1
Let me know if you have problems getting any of these and I can send it via regular mail.
Posted by Kamel Ikhlef (Member # 6667) on September 02, 2019, 11:09 AM:
Thank you very much Stan for your PCB, I look forward to it.
In the end, I was more late than I thought with my printer mods.
I received today the new firmware from the Chinese manufacturer. This will redo the leveling of the heating bed. I think I will resume my printings tomorrow. I do my best to send you as soon as possible. Thanks again Stan.
Posted by Stan Jelavic (Member # 6822) on September 02, 2019, 12:36 PM:
Ok Kamel. No rush. I have one board set on the side just for capstan testing.
Posted by Bruce Davis (Member # 7072) on September 05, 2019, 12:09 AM:
Hi Stan, I am very interested in your project (thanks for perusing it and the huge amount of work you have put into this), it has been very interesting following its development.
Would you be interested in putting a kit together and sending it to Australia?
I do not have the Wolverine as yet but would only be interested in purchasing one if I could add your modifications (whenever they are ready for sale).
Thanks and regards - Bruce
Posted by Bruce Davis (Member # 7072) on September 05, 2019, 12:13 AM:
Sorry doubled up on the post, not sure how this happened.
Posted by Stan Jelavic (Member # 6822) on September 05, 2019, 08:05 AM:
I have one kit available Bruce. Really not sure how many people are interested so have to buy the parts in low quantities and the shipping costs for parts add up.
Also Mike and Kamel expressed interest in building these.
If interested put your name or pseudonym on the qty spreadsheet so that we can plan the parts procurement and possibly go for auto assembly to save the costs.
https://docs.google.com/spreadsheets/d/11ulozLsHAFLXWV3mcBSc-CuQRRfOLX6nDC3h63EVo9Q/edit?usp=sharing
Posted by Mike Spice (Member # 5957) on September 05, 2019, 11:01 AM:
That's a great idea Stan.
There will be interest for sure.
I am looking at the parts you mention, cables and stand offs.
What size stand offs do I need? I am hoping not to have to buy a whole box just for four.
Also the cables, how many would I need, I have a very good component shop around the corner and it's almost certain I can buy single molex pico connectors rather than a whole pile of them
Posted by Stan Jelavic (Member # 6822) on September 05, 2019, 08:00 PM:
Maybe it is better is I just drop them in an envelope just for testing now and you can get more later if you decide to build more boards.
- need qty 4 M2 8mm long standoffs and qty 8 M2 screws
- fan extender cable 2 pin
- on/off switch 2 pin cable
- fan on/off 2 pin cable
- speed control 4 pin cable
- 2pin to 2pin for 5V supply
- canera sync 4pin to 4pin cable
Posted by Mike Spice (Member # 5957) on September 06, 2019, 03:27 AM:
Your generosity is amazing Stan.
Once I am scanning I will do everything I can to help our UK folk try and achieve this mod, so I may well end up buying larger quantities of things needed to make it work.
Posted by Kamel Ikhlef (Member # 6667) on September 06, 2019, 04:36 AM:
Mike, for the fan extension cable,I can send you one (I have several). Your 3D prints are finished, (it remains to insert hot brass nuts).
It's pretty tricky, I'll do quietly that this weekend.
I can send you all this Monday or Tuesday at the latest (I will send at the same time as for Stan).
Posted by Mike Spice (Member # 5957) on September 06, 2019, 05:47 AM:
Thank You Kamel. Sounds like you have been busy.
I am most grateful but there is no hurry to post, so please, take your time.
Do not rush for me, I am happy to wait until you have time to work.
Thank You.
Posted by Stan Jelavic (Member # 6822) on September 06, 2019, 08:49 AM:
Thank you Kamel. No rush. I can probably make several boards for US and Canada users.
For now the demand looks pretty low. Possibly because of the cost.
- Wolverine unit - $394.99
- Camera - $185.13
- Interface bd - $70 (guesstimate)
- Shipping - $20
------------------------------------
Total $670.12
But, I don't think there is anything out there that will do the same quality in this price range. Could be wrong.
Posted by Kamel Ikhlef (Member # 6667) on September 06, 2019, 03:58 PM:
There may be a solution for those who wish to lower the price is to tbuy a basic Wolverine (non pro - 285 $). and a camera less expensive but with trigger. (maybe $ 150-180 less for all).
But, the quality has a price!... To study...
Posted by Stan Jelavic (Member # 6822) on September 06, 2019, 05:03 PM:
Well put Kamel.
For users that do not have the Wolverine, possibly get the one sold for parts. It may have a defective display or similar issues. It should still work with the board.
The camera is a critical component. I did test different cameras and lenses. The imagingsource one is the best so far.
Check the previous posts.
There is a unit out there sold for around $700 that is similar to the modified Wolverine but will do super 8 only and not sure if it possible to obtain individual frames from it:
https://www.youtube.com/watch?v=FA3Vn5Auh5w
The advantage is, no mods required...
Posted by Kamel Ikhlef (Member # 6667) on September 07, 2019, 03:00 AM:
Yes, but the reflecta S8 + poses a lot of problems. and the people who bought it made a lot of mods to get a good image and it will be worse than imaging source results. there is no possibility of framing or zooming in the super 8 frame.
the image is cut off. That's why I did not go on this solution (at the beginning of my research I wanted to buy this telecine but I read a lot of negative reviews.
I also saw the moviestuff telecine very well but really very expensive!
Your solution, Stan, is the best value for money at the moment!...
Posted by Mike Spice (Member # 5957) on September 07, 2019, 06:25 AM:
Busy scanning films this week for a friend who's father recently passed, and while clearing out, found a box of his cine going back to 1958.
All standard 8 and a couple of digests in black and white, which I am not scanning.
5 x400ft 5x200ft and 29x 50ft
I am down to the 400's, everything else done.
This is my quick and dirty method of getting a 400ft reel done.
Lay the viewer on it's side with the reel, and in to my famous drop box.
The weight of the reel is less on it's side for the claw to pull it along.
Once I have done the 'jelavic' mod I will have to split 400's to 200ft reels as I won't be able to leave it scanning like this for hours.
This reel will take around 4 hours to complete.
click, click, click, click, click,click,click......
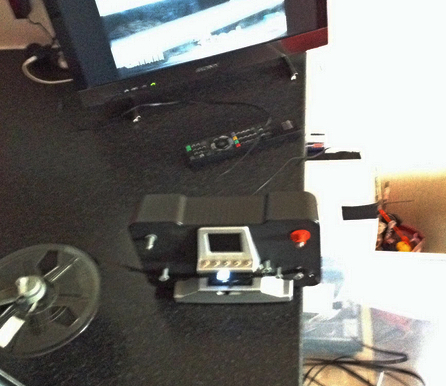
Posted by Stan Jelavic (Member # 6822) on September 07, 2019, 10:11 AM:
Never planned it that way Kamel. Just wanted to have some fun in my spare time. Mike, there may be a way of speeding up the transfer. With the image centered better it may be possible to crop the image right in the camera by selecting appropriate resolution. The transfer then becomes faster and the speed of the stepper can be increased. Will try that this weekend.
Posted by Mike Spice (Member # 5957) on September 07, 2019, 02:42 PM:
Stan, don't go to any trouble.
I am very happy with the way things are, it was just an observation about not doing quick and dirty 400ft reels.
I will splice and use 2 200ft reels so the scanner can be covered during a scan.
There is always a splice around 200ft that can be opened up with out harm.
And with your new take up motor mod stepping rather than pulling, I will be happy about that.
Speed is not critical, quality is.
I have learned to accept that during the time you have spent making this happen.
Really, don't go to any more trouble.
Posted by Mike Spice (Member # 5957) on September 07, 2019, 05:08 PM:
Over the last two weeks I have been scanning 8mm film with the 720p Wolverine.
I really enjoy finding Royal Navy cine.
Two gems recently, a pile of films from a veteran Navy chap who just lost his father, 50years of standard 8mm.
A digest of a cinema film called Phantom Ship.
that is my ship in 1976-9
To have that on my scanner is remarkable.
It is a very rare digest of a cinema 'propaganda' sign up movie.
It is on youtube with time code all over it...for sale.
I used to love my cine films, synced to music, with a reel to reel tape machine, put on a movie night for my dear old mum and aunty and uncle. trailers, soft lighting, a cartoon perhaps, interval snacks and cup of tea.
Turn the sitting room in to a cinema (1976-78 as a teenager)
These days (61yo) I scan cine, throw it in my video edit and pop on some easy listening music, and be frame accurate.
No more reed switch on the Eumig shutter sending a pulse tone to the spare track on the reel to reel.
The first 35s of this edit, I scanned today, thinking I would find Ark Royal cine.
It wasn't to be, instead I got a colossus class HMS Implacable!
How very rare, and in black and white standard 8.
Really special few feet of film.
Wolverine bought it to the internet for the first time ever.
I added some flight deck shots from the 'Phantom Ship' cine digest and a final colour shot from our tv series in 77.
Saturday Night Wolverine music cine edit
[ September 08, 2019, 07:09 AM: Message edited by: Mike Spice ]
Posted by Stan Jelavic (Member # 6822) on September 07, 2019, 07:28 PM:
Good point Mike.
Thanks for sharing. The music blends in very nicely and adding the color in the end is a nice touch.
I can see your takeup method works very well and the frames are rock steady. No more shoe boxes with the new controller, or maybe I should not speak now before it is all put through the proper Mike test.
Posted by Mike Spice (Member # 5957) on September 08, 2019, 07:11 AM:
'The Mike Test' I like that.....
I am really looking forward to the day I can post a before and afterwards scan with the new mod.
As soon as the board arrives I will buy the camera and lens before they change the price.
Then it will be time to gather any other bits I need.....
[ September 08, 2019, 09:11 AM: Message edited by: Mike Spice ]
Posted by Stan Jelavic (Member # 6822) on September 08, 2019, 10:59 AM:
I sent you the cables and the standoffs Mike.
You will need SPDT switches or you can just hardwire the speed an d fan controls.
The on/off switch is required because you have to turn off the stepped to adjust the camera focus...also handy if you want to pause the film.
A side by side video comparison would be great.
BTW - here are installation instructions. My first release.
https://drive.google.com/file/d/1bcm6rjnXfYDn5LWNQe1mK_jArB2KIQbG/view?usp=sharing
Will also post the original word doc.
Posted by Mike Spice (Member # 5957) on September 08, 2019, 11:47 AM:
Stan you are too kind Sir.
I can get the switches, no problem at all.
Thank You very much for taking the trouble to post me the odds and ends. Really big Thank You.
The first thing I will do is scan a 50ft reel and do a side by side video.
I am now off to have a read of the instructions, looking forward to that very much.
Thanks Stan.
EDIT: I have just enjoyed reading the instructions.
Very very well written and documented.
I will have NO PROBLEM in achieving the result...
I am so excited right now!
Posted by Ken Abruzzo (Member # 6188) on September 08, 2019, 11:54 AM:
Stan,
I didn't look at the instructions completely, but I did see something that caught my attention about the 8mm/Super8 switch wires.
Will the mod still work with both 8mm & Super8? Or is it just one? I have a mix of both, but more 8mm than Super8.
Posted by Kamel Ikhlef (Member # 6667) on September 08, 2019, 05:45 PM:
Well done Stan, I just read your documentation (a big good job). very useful.
For the capture mode, I do not understand why we have to start the timer. I thought that the external rigger was synchronized with the movement of the claw and controlled the camera that records the frames? I misunderstood something? ... I'm also looking for a possibility to integrate the usb connector inside the wolverine box ... maybe there are specific usb / usb extension connectors. I look for... Thanks for your great work and your sharing.
BTW : I send the 3D printed parts this Tuesday. it will take about ten days to arrive home.(For you : 5 Curved pulleys and their supports, Capstan Motor mount, capstan tooth pulley,... For Mike just the 4 curved pulleys and their support and a 22mm lens holder) with the new M3 corresponding screws and some Lens M12 clamping rings.
The front part of the case will be finalized later when the new PCB will be in place. It will be easier to finalize the design.
Posted by Stan Jelavic (Member # 6822) on September 08, 2019, 11:10 PM:
Glad you guys looked through the instructions and thank you for the comments. I will post the original and open up edit so that everybody can correct things as they run the installation.
Ken had a question regarding 8/super 8 capability. It will do both, no problem. The 8/super8 switch has to be set in the right position and that is it.
The switch changes the pitch of the claw mechanically. The original controller also used the sensor from the switch to change the frame crop. We do not need that because cropping is done during post-processing.
I received one order locally here and will ship it tomorrow. There may be a few more but looks like small quantities so for now I will stock up for around 5 units. In these small quantities the manual assembly takes 2 hours and 0.5 hours for testing.
Also bought a defective Wolverine unit for $60 but believe it will work ok with the new controller. So for local guys here this may save some cost:
- Wolverine - $60
- Interface board $100
- Camera + lens assembly $185
- Shipping $15 for USA
International shipping around $100 depending on destination. Still may work out OK.
Posted by Bruce Davis (Member # 7072) on September 09, 2019, 01:35 AM:
Hi Stan, I would be interested in that kit as long as the wolverine is not one of the very early belt driven ones. I assume the claw and film guide mechanism is still in good condition.
Let me know if you are interested in sending the whole kit to Adelaide South Australia - thanks
Payment with paypal
Posted by Stan Jelavic (Member # 6822) on September 09, 2019, 08:55 AM:
I will check the unit for wear and tear. If there is an issue, then will keep it just for testing. It is the pro unit so probably no belt. Will check.
Posted by Mike Spice (Member # 5957) on September 09, 2019, 09:32 AM:
There is nothing more depressing than a wet monday morning drive in the traffic and going back to to work after 6 weeks holiday.....yuk.....
Fortunately for me Stan Jelavic put a massive smile on my face once I got to the office and found this very unique and rare circuit board waiting for me.
Stan, I am so grateful, I am now off to order the camera.
I can't thank you enough!
Arrived safely.
EDIT: the camera and lens are now paid for, due in around 10/14 days.
Kamel raised a question I am curious about too Stan.
why do we need to tell the camera capture software 2 second intervals on the timer?
I also was thinking of some kind of USB extension lead to the scanner, so I do not have to keep disturbing the USB socket on the camera board.
Something like a very short USB lead to the top of the scanner from the camera board, not difficult to solder one up, held in place with Duct tape perhaps (lol) and then an extension USB lead from there to the laptop.....thus saving wear on the camera board USB connection.
Still a month or two until I can perform the Mod, a stack of films being scanned as we speak...

And here we see INVOICE PAID for the camera and lens.... hooray
[ September 09, 2019, 01:26 PM: Message edited by: Mike Spice ]
Posted by Stan Jelavic (Member # 6822) on September 09, 2019, 02:38 PM:
Ha ha like that smiling face Mike. Glad you received the board ok.
Forgot to answer Kamel's questions, sorry.
Did not spent much time analyzing why the timer is needed but that is where you specify the destination folder for the frames capture. The timer does not run on its own, it still waits for the sync... It does not do any harm so I left it like that.
The usb connector is a good idea. I will add it to the new version of the board. There are issues mounting the components to the edge of the board due to the size restrictions (free sw) but could use something like this:
https://www.sparkfun.com/products/9966
Then cut the standard cable and solder it to this adapter board. Mount the board onto the new version of the interface.
Or something like that. Will check.
Posted by Kamel Ikhlef (Member # 6667) on September 09, 2019, 03:31 PM:
You're lucky Mike! Mine will arrive very soon (our countries are close enough ...).
Stan, for the USB connector at the edge of the board, maybe use Kicad which is not limited, but I am a beginner in electronics and I do not master it yet. Just an idea ...
I also wanted to add a small power indicator LED that I will put on the front cover of the unit. But, here it is a flourish ... lol
Posted by Mike Spice (Member # 5957) on September 09, 2019, 04:14 PM:
Kamel the smile on my face when I walked from the post room to my office in the rain.
Like a cheshire cat smile.
(Walt Disney Cat smile)
I am looking forward to receive your 3D prints.
rollers that don't touch the film?
Amazing addition to my scans.
I will post a photo when they arrive.
I will certainly find a work around to the USB camera connection, so I take the stress from the camera board socket with each scan session.
[ September 10, 2019, 10:17 AM: Message edited by: Mike Spice ]
Posted by Bruce Davis (Member # 7072) on September 09, 2019, 07:17 PM:
Hi Stan , still new to this forum and did not see your private message dated 5th Sept until today 10th Sept. Other forums I have been on usually pop up a message / flag when a private message has been received does not seem to be the case here.
As I currently do not own a Wolverine your offer for the second hand unit would be much better for me. Thanks and regards Bruce
Posted by Stan Jelavic (Member # 6822) on September 09, 2019, 08:27 PM:
Thanks for the suggestion Kamel. Will look into it. What do you want the power LED to indicate? There are three power rails:
12V
5V
3.3V
They all come on when you plug the power in.
The ON switch is just an input to the controller to turn the stepper and the takeup on.
No problem Bruce. Have not received the unit yet. Will check the unit thoroughly. Do not want to send you something that may scratch up your precious film.
Posted by Kamel Ikhlef (Member # 6667) on September 10, 2019, 01:07 AM:
So let's be crazy! ... a blue 12v, a red 5v, a green 3.3v ! LOL
More seriously, I just wanted a small RGB led to indicate that the unit is powered on. I don't know, I am beginner...which is practiced in general (I also do this to learn and have fun)... Because I will use the switch of the original capture Led that I will only turn on while scanning.
While to do, on the new version of the PCB it would be fun and necessary (more important) to provide a 2nd switch for a 2nd fan to cool the camera board (5v or 12v - It is easier to find a small 30x30 fan in 12v, right?).
It is better to predict and use or not. What do you think ?
More fun for you, I hope ...for me this project is very fun ! Thanks again, Stan.
BTW :
Your 3D Parts are finished. A little sanding today (post-traitement). I'll post pictures a little later.
Also, I'm preparing a little doc for the details of installation ... And it goes to your home as promised.
[ September 10, 2019, 03:22 AM: Message edited by: Kamel Ikhlef ]
Posted by Bruce Davis (Member # 7072) on September 10, 2019, 03:24 AM:
Kamel Ikhlef Hi, would you be prepared to make the STL files available for the modified Wolverine, I have a 3D printer and that would be easier / cheaper than shipping the covers and rollers to Australia. I am happy to contribute for your time and effort in this project. Thanks very much - regards Bruce
Stan I would be happy to pay for your time to assemble and test the second hand Wolverine with new board and camera fitted before shipping (that's if you are willing to do so). Without the new covers in place (as I can print my own) the board and camera may have to separated from the Wolverine for shipping, not sure I would leave that up to you. Thanks & Regards - Bruce
Posted by Stan Jelavic (Member # 6822) on September 10, 2019, 09:54 AM:
Not a bad idea Kamel. If RGB led is used then if all is ok the light would be white. A color indicates trouble. I would have to add additional pads for the LEDs. Will put it on the TODO list.
The 12V pads are currently intended for the capstan motor and sonalert.
Can add an extra pad for the fan.
Bruce, let's wait for the unit to get in here first. I can put it all together for you and will add just a small fee to assemble the camera and test it.
Posted by Bruce Davis (Member # 7072) on September 10, 2019, 10:39 AM:
Stan Jelavic thanks that is very kind of you.
regards
Posted by Alain Gottschalk (Member # 7079) on September 10, 2019, 10:47 AM:
Hi Stan, Kamel, Mike
I'm sorry I did not put the post in the right place, but I do not know how to delete it.
I just signed up for this forum, so I'm new to you.
My name is Alain and I live in the south-east of France, department of Drôme, between Valence and Montélimar, a small town of 1000 inhabitants which is called "Eurre".
I am 69 years old, retired and like many people of my age with super 8 movies, I acquired in May 2017 a super 8 scanner brand "Somikon" bought from Pearl.fr for a sum of 450 euros.
And like many people, I am disappointed by the quality of scanning.
I put the latest firmware: (resolution 1440x1080, coils 3, 5 and 7 inches, 20 frames / second).
I looked on the net if there was a forum in which people proposed a modification and improvement of the scanner "Somikon", but I did not find my happiness.
Then one day, I came across your forum that spoke Wolverine strangely resembling my "Somikon".
I stayed taped from morning to evening (from page 1 to 20) so that it was rich in ideas and proposals. And now you're on page 34. Your project is coming to fruition and I'm giving you a big hat trick. You form a very nice team and I bring you my admiration for so much work as well as my moral support.
I hesitated to register on the forum for several reasons:
- 1: The barrier of the English language: I was a little lazy at school and learning English at the time was not my cup of tea. I regret it now.
- 2: I have no technical training, neither in electronics, nor in welding and even less in 3D, I worked in the administrative.
- 3: Impossible to propose ideas and even less solutions.
Then, I registered using a translator "Qtranslate".
A personal question: Do you think that the kit you make, will fit on my "Somikon"?
If so, I will be delighted, and I will apply for the purchase of this kit.
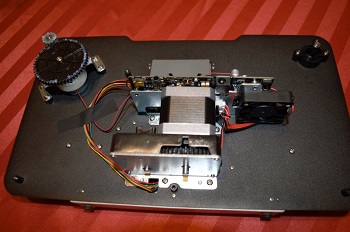
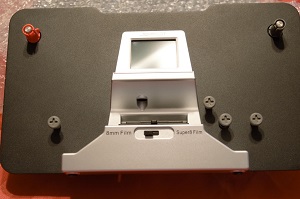
I am sure that thanks to you, the super 8 scanner owners will appreciate the work you have done, and thank you from the bottom of their hearts.
cordially
Alain
Posted by Stan Jelavic (Member # 6822) on September 10, 2019, 11:18 AM:
Wow, we are getting lots of activity in the forum which is awesome. Welcome on board Alain and your English is good enough. No worries. In my opinion that unit is the same as Wolverine. If you don't mind, can you take a detailed picture from the top of the controller board. Include the board and the power supply (two boards) and the connector between them.
Here is another suggestion. I have an older test board that I do not use.
I can send it to you for free. You just cover the shipping cost which is between $16 and $20.
Once you receive the board, I will send you the instructions on how to test it.
If it works, then you can get the camera and test that and if happy with it, possibly go with the new version of the board (probably from Kamel).
Posted by Mike Spice (Member # 5957) on September 10, 2019, 12:43 PM:
Welcome Alain
I hope you can translate:
If your problem with the scanner is unstable picture, try letting the film drop in to a container and not use the take up reel.
This may help for the time being.
I do this with all my cine reels.
I use a film viewer to carefully hand rewind the film from the container.
C'est bon de vous avoir ici
Stan you may yet make enough profit on this gig to buy that retirement house in the Bahamas....
I think it is only a matter of time before Winait steal your design and incorporate in thier next frankstein machine.
It also came to mind that perhaps anyone going for the mod should be advised that once done it will not be possible to use the scanner for rewinding films as the menu in the LCD is gone along with the control board.
I don't use mine to rewind ever, the motor is just not up to it, I can't imagine a wolverine pro rewinding 400ft easily!
Some people may not have access to a hand wound viewer or projector to use to rewind once modified.
Posted by Mike Kluz (Member # 7089) on September 10, 2019, 03:07 PM:
Hi All, I am new here and very excited for the mod project. My dad recently passed away and I would like to transfer a box of film we found. Thank you.
Posted by Stan Jelavic (Member # 6822) on September 10, 2019, 07:18 PM:
Not even that Mike. Maybe a square yard of the swampland he he.
But that is OK. Are we having fun or what?
It should be easy to add the rewind. Maybe another position of the speed switch. So it is just a sw change.
Welcome on board Mike Cruz. Sorry to hear about your dad.
Hope you have lots of fun doing the mod and scanning all those precious old memories.
Posted by Mike Spice (Member # 5957) on September 11, 2019, 09:00 AM:
I am happy to bypass the rewind mod you might do in the future.
I will never use the scanner for rewinding.
Posted by Stan Jelavic (Member # 6822) on September 11, 2019, 10:47 AM:
No problem Mike. You do not have to do anything different.
One note regarding the lens mount. The one that comes with the camera is somewhat offset to the left but still has enough margin. The mount that Kamel sent me (he bought from 3rd party) is closer to the center. Will see what happens with the holder that Kamel designed once I receive it. I guess these mounts are not exact. Hope they are consistent from batch to batch.
Here is another alternative for the camera. The board has an opening for the camera. You could get one of these camera stands:
https://www.bhphotovideo.com/c/product/483954-REG/Kaiser_205361_Repro_Kid_Copy_Stand. html
Set the Wolverine with the new board on the base on the stand and mount an SLD with a macro lens above that using the stand camera attachment.
The opening is wide enough to capture the whole film gate with the SLR. I could do a small mod to the board for SLR shutter.
Now you have a $4000 system. Well almost.. the film transport is not as good.
BTW the speed would also be higher... limited by the claw ruggedness and the SLR shutter rate.
Posted by Alain Gottschalk (Member # 7079) on September 11, 2019, 02:08 PM:
Hi Stan and Mike
Stan, here are some photos of the somikon seen from above and from below.
I hope it's identical to Wolverine.
I appreciate very much your kindness and your dedication to me.
[IMG] http://8mmforum.film-tech.com/cgi-bin/showpic.cgi?dir=uploads0503&file=somikon03.jpg [/ IMG]
[IMG] http://8mmforum.film-tech.com/cgi-bin/showpic.cgi?dir=uploads0503&file=somikon04.jpg [/ IMG]
[IMG] http://8mmforum.film-tech.com/cgi-bin/showpic.cgi?dir=uploads0503&file=somikon05.jpg [/ IMG]
Mike, thank you for your solutions; I already applied them when I had these problems.
That's why I read you with great pleasure on this forum friendly.
Thanks to you two.
cordially
Alain
Posted by Stan Jelavic (Member # 6822) on September 11, 2019, 08:05 PM:
Looks like it should work Alain. If you send me your address either here or in a private message I will send you the test board. The test board does not have all of the features implemented but enough to make sure that it compatible.
Here is one USB connector possibility. Use Sparkfun USB breakout and attach it to the modified board. That way the existing USB opening on the cover can be reused for camera connection.
The board on the bottom is the Wolverine controller as a reference to show how much the board has to be extended for the USB connector back cover alignment.
Posted by Mike Spice (Member # 5957) on September 12, 2019, 04:17 PM:
Not sure what my solution will be yet.
I did find a nice sturdy moulded Belkin USB cable in my box of junk today.
I may be taking the soldering iron out to make it shorter and find some kind of USB socket to glue on somewhere....
It is possible I might take a hole in the back case for it....
[ September 13, 2019, 02:36 AM: Message edited by: Mike Spice ]
Posted by Stan Jelavic (Member # 6822) on September 12, 2019, 10:28 PM:
Will be exciting putting all of this together Mike. I was very happy when the stuff started working. Going forward, here are a few things that came to my mind:
- Wait for Mike, Kamel and Robert to finish testing and get their feedback.
- Ordered Sparkfun usb board and cable. Will look into it when the parts get here.
- Low on 3.3V regulators and picoblade cables. Need to order some.
- Re-evaluate the material cost based on planned qty.
- Add bias resistors for Kamel's power LED.
- Capstan test once the parts get here.
- Received a big package tonight. Believe it is the used Wolverine. Will check tomorrow.
- 8 reels to do - family stuff - but when?
The fun never ends.
Posted by Kamel Ikhlef (Member # 6667) on September 13, 2019, 06:00 AM:
Friday 13! ... (luck or bad luck? ... Day of luck for me!
I received my PCB. Many thanks Stan. Everything is OK.Not yet tested, but what a job, very professional. Thank you very much, very much, you have done an outstanding job, I have been waiting for this for a long time. You have made two men happy this week !
Your 3D parts are gone, as well as those of Mike (a little later than expected, because a lot of very delicate post-processing work). waiting for their reception (according to the post office, they will be at your home, normally during the next week - mike will have it faster because his country is closer)...
Here is the content of the 2 packages:
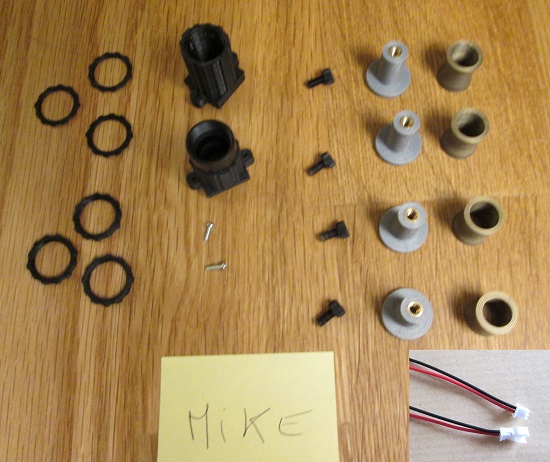
I also wrote a little documentation for the installation.
https://drive.google.com/file/d/1tQPAf4dRcasVtvULCWl9dKTxKCVz_rx-/view?usp=sharing
... What amuse you!
Regarding 3D files, I will put them on thingiverse free access to respond to Bruce Davis.
Where do you go for the changes you make on the new PCB?
(leds indication, usb, 2nd fan switch, etc ...).
How can I help you ?. Right now, I'm learning Kicad.
It looks a lot like Eagle but no limitations. I will use this software instead. I tried to import version 6 in kicad, it works well, some small adjustments to make.
Soon the super telecine! ... Have Fun !
[ September 13, 2019, 07:22 AM: Message edited by: Kamel Ikhlef ]
Posted by Stan Jelavic (Member # 6822) on September 13, 2019, 08:35 AM:
Wow great job Kamel. Thank you very much for all the hard work you put into this.
Will try Kicad. I will do the schematic change and you can try doing the board. I get the boards from:
https://jlcpcb.com/quote#/
Once done with the PCB design go to this site and upload the gerber. See if there are any errors reported and then just order the boards.
BTW - the $60 Wolverine came in. Will check it today for wear and tear.
Posted by Mike Spice (Member # 5957) on September 13, 2019, 09:15 AM:
Kamel you are a star!
I am very happy to see the photo and send you my grateful thanks.
The 3D printing is stunning!
Thank you for thinking to send me a fan extension cable, that is very thoughtful.
I am indebted to you and Stan for giving me these amazing gifts to my film scan work.
I will never be able to repay you both but I will take forward your kindness by re scanning films that I have done for my navy boys without cost to them again, and going forward will always offer free film scans to the Navy lads who still have films of thier time in the navy.
question why two lens mount?
what difference will I see between using a 22mm or 12mm lens mount?
Posted by Kamel Ikhlef (Member # 6667) on September 13, 2019, 09:36 AM:
Ha, Ha! wait to receive the 3D parts to be sure they are good! ...
After your tests there will surely be changes that I did not think. This is also where your contribution and your help are very useful! this improves the future Telecine system.
With your participation and the skills of each i'ts possible to make a great telecine with a good quality to digitize finally our precious films, in a faithful quality to the original film.
This is the ultimate goal... And, then we learn a lot of things in many domaines, mechanical, optical, electronic ... very interesting all that.
Thanks to you because it is by reading you that I wanted to join this project.
BTW : Mike, for lens mount, no difference just a copy in case... but the 12mm is for testing and can be used with the 7mm metal extension ring (finally 23mm : base 4mm+tube 12mm +extension metal 7mm).
the threads of the metal tube of the lens holder are less fragile.
https://www.amazon.fr/LaDicha-Lens-Extension-Metal-Cam%C3%A9ra/dp/B075N3KVB1
I sent you one because I do not use it. I print my parts to the desired size.
Personally I use the one that is entirely plastic printed in 3D. you just have to go slowly to screw it the first time, after that you're fine.
Thank you Stan for the PCB link.
I can not wait to see your new schematic !
Posted by Mike Spice (Member # 5957) on September 13, 2019, 09:38 AM:
You are very kind.
Thank you for explaining the different lens mount.
My camera and lens should be with me in a week...
Posted by Stan Jelavic (Member # 6822) on September 13, 2019, 12:30 PM:
Reading your posts Mike prompted me to design the new controller. So whether you like it or not, you started all of this. And thank you very much for that because it was (and still is) tons of fun.
Posted by Mike Spice (Member # 5957) on September 13, 2019, 01:14 PM:
Cheers Stan, you are too kind.
It certainly has been a journey for all of us.
Way back, one contributor began by trying to hack the firmware of the camera to get better results.
alas no luck but it was an exciting moment.
Then an app to warn of film stuck in the gate and now here we are on the verge of an image sequence.
I have found a new home for my scanner for when the mod is done, a place it can sit for hours and click away.
I am visiting the shop tomorrow to buy three switches, and tonight I am about to finish the last 400ft reel of the latest job.
Now comes my fun, hopefully the camera and lens will arrive end of this coming week, If I am lucky an envelope from florida and france will come too.
As soon as I have everything together and a free weekend, I will begin the transformation to a better video quality.
I don't have filmguard for my reels but they certainly will be getting a gentle microfibre wipe and edit check and made ready for the big day.
Seeing my Ark Royal film made with an image sequence will hopefully be amazing with a few clicks in VirtualDub.
Fortunately for me the last scan job will not require me to return the reels, so I have plenty of film I can use for testing until everything is ready.
If the new camera has a live preview, then it should be able to record video, how about just setting the stepper motor to 16fps and we'll make videos in H265 instead.....
Perhaps I should try and mount the camera on the front of my sankyo 500 projector, flash up VirtualDub live capture and give it a whirl, just for the sake of it.
[ September 13, 2019, 04:53 PM: Message edited by: Mike Spice ]
Posted by Kamel Ikhlef (Member # 6667) on September 13, 2019, 05:43 PM:
Mike, it reminds me of my tests with my 4k camcorder. I tried a lot of things. camera lens in projector lens, macro ...: problem of alignment, camera synchro ... I have a workprinter of moviestuff that I tried to modify without success. frame-by-frame capture gives the best result. Unfortunately it is very long to scan!
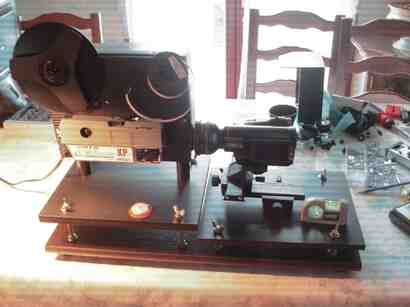
I wait for new Stan's schematic PCB and it will very right !
Posted by Mike Spice (Member # 5957) on September 13, 2019, 06:13 PM:
That's a great photo Kamel.
I have a space ready for the modded scanner.
it can sit for hours and take photo's
I look forward to VirtualDub movies.
I am looking at finding a small fan to put on spacers, above the camera.
Stan, how could I easily power a small computer type fan over the camera?
How hot do you think the camera will get doing 200ft reels?
One would guess I could dump the main fan and use that power supply to run a fan on to the camera from above, on some more spacers above the camera?
Posted by Bruce Davis (Member # 7072) on September 13, 2019, 07:36 PM:
Stan Jelavic "BTW - the $60 Wolverine came in. Will check it today for wear and tear" thanks Stan I am very happy to hear that it has arrived.
Kamel Ikhlef Thank you, I look forward to your release of the printed parts, another service that you might try for price
https://www.seeedstudio.com/fusion.html I have used them in the past for small boards and found them very reasonably priced.
Mike Spice I would also like to send my thanks to you Mike, this is a great project.
regards - bruce
Posted by Stan Jelavic (Member # 6822) on September 13, 2019, 10:28 PM:
Mike, the board has both 5V and 12V terminals on the right hand side if you want to attach extra fan.
Or you can use the existing 5V fan connector since the original fan is pointed the wrong way anyways. Or move the existing fan.
Did not do any thermal testing with the camera. All my tests so far have been short clips. The 5V regulator on the Wolverine power supply gets somewhat hot but have not checked it thoroughly. Something to keep an eye on.
Bruce, that unit that came in looks like new. Has an issue with the controller. That is why it is so cheap. Will check it more tomorrow. Was busy today cleaning up around the house.
Kamel, the schematic is 50% done in KiCad.
Funny, we all had our transfer projects before. Here is mine, ha ha.
https://www.amazon.com/8mm-Film-Video-Tra nsfer-Project/dp/1456548743/ref=sr_1_3?keywords=stan+jelavic&qid=1568431523&s=gateway&sr=8-3
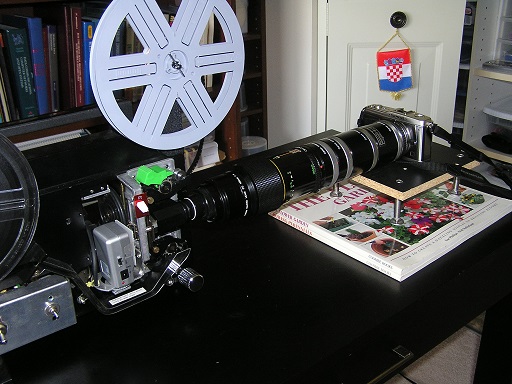
Actually got some pretty good results with it but man was it ever cumbersome.
https://photos.app.goo.gl/WAGCnjKJKSEjHPgK9
Posted by Kamel Ikhlef (Member # 6667) on September 14, 2019, 02:46 AM:
Yes Stan, the good old days! ... It does not make us feel younger ... lol. Thank you Bruce for the link. As soon possible, I will post the 3D files in thingiverse. Mike,for the 2nd additional fan, I will try to integrate it in my future design of the front cover. Still a little work! But we have never been so close to the goal and what a long way!... Very cool for kicad shematics, Stan.
[ September 14, 2019, 08:17 AM: Message edited by: Kamel Ikhlef ]
Posted by Stan Jelavic (Member # 6822) on September 14, 2019, 09:33 AM:
Here is the KiCad interface board V7 preliminary design Kamel.
https://drive.google.com/file/d/1OwPlgPBg5g1V7a3a8wwK4zrUmfj9nwEn/view?usp=sharing
The PCB needs to be completed.
The following usb cable is required for the usb mod:
https://www.amazon.com/8inch-Micro-b-Mi ni-b-Adapter-Cable/dp/B00DHN9CMO/ref=pd_ybh_a_4?_encoding=UTF8&psc=1&refRID=MB2BA8KPPD9E6EYPGQ77
One side plugs into the cam and the other into the interface board. The board routes the connection into the mini b USB connector that will be accessible from the back panel existing hole (no drilling required).
Just added all material costs and it came to $80 which is higher than planned because of low qty. With 2.5 hours for assembly and test the total will be around $130 plus $4 for shipping within US.
[ September 14, 2019, 02:58 PM: Message edited by: Stan Jelavic ]
Posted by Kamel Ikhlef (Member # 6667) on September 14, 2019, 03:08 PM:
It's awesome ! better and better, too smart Stan!... I did not think to integrate 2 components USB male and female directely on the PCB. It's really very good. For me, it's better that a breakout board.
I opened the PCB project in Kicad, no problem. I tried to visualize it in 3d, it makes an error because it does not find the outline of the Board. but I do not master well, it will come. You went very quickly to master kicad!...Me, I hang on ! .
It's great that the connector is directly provided on the PCB. It will be much cleaner. and suddenly I will provide a front cover with ventilation holes and a support for a Camera cooling fan. Amazing job, Stan !
Posted by Stan Jelavic (Member # 6822) on September 14, 2019, 05:12 PM:
Thank you Kamel
Let me know if you need any assistance.
BTW - as I mentioned before the 5V regulator on the Wolverine power supply gets pretty hot but not always. That is why they put the fan close to it. So I suggest we leave that fan as is and use a separate fan for the camera.
Posted by Kamel Ikhlef (Member # 6667) on September 14, 2019, 06:07 PM:
Thank you Stan, you already help a lot with your work and your good advices. For Kicad, I'm starting to understand the software philosophy, I'm learning quietly...
For the camera fan, I totally agree. We must not touch the original one which has its utility. It is necessary to add a 2nd small low noising 30x30mm fan, it should be enough for the camera with a switch on/off (to choose its power in 5v or 12v). The camera will turn hours and hours to digitize... what do you think?
Posted by Stan Jelavic (Member # 6822) on September 14, 2019, 07:45 PM:
Agree, extra fan is needed. Preferably 12V because the 5V regulator is already getting hot.
Houston we have a problem. Today I check the Movie Maker that I bought for $60 and tried to install the new controller in and IT DOES NOT FIT!!!
The box is smaller and the takeup motor is in the way.
But don't despair I will fix that. We need 2 versions of the board. One that we have right now is for the pro unit and the new one that I will work on will be for that basic unit.
Can you please indicate on the spreadsheet which version you have.
Thanks.
One more thing. There is a 2 week wait for the lenses. The supplier ran out of the stock.
[ September 14, 2019, 10:54 PM: Message edited by: Stan Jelavic ]
Posted by Kevin R Sexton (Member # 6774) on September 14, 2019, 11:40 PM:
It's not anything to do with the mod work that's been discussed on this thread recently, but I'm having an issue with what I think is a super 8 reel.
I've done like 40 3 inch 8mm reels, and so far 2 of the 7 inch reels from my grandfather, most of them twice, once zoomed out, and once coming close to filling the frame.
I found that one of the 3 inch reels appears to be super 8, has the larger center hole, larger frame size, and slightly different hole spacing.
But when I load it on the Wolverine and switch to super8, the frame jumps all over the place. Like the teeth aren't engaging right or something.
Anyone seen this issue before? the film looks fine, holes are perfect. I'm not even sure what all is on this reel, if it's something my grandfather filmed or from another source. It starts at least, apparently at Silver Dollar City, which from a search appears to be a theme park.
I've thought of doing this mod, but now that I'm through most of the film, I don't know if there is anything really worth the trouble. There are bits and pieces of family, along with shots of flowers, desert landscapes (grandparents went on rock hunting trips) some bits of air shows etc. A lot of it is poorly focused, over exposed or has similar problems.
The larger reels, taking over 4 hours to scan is a long time. I found on the second one that he must have spliced together film that was shot in 2 different cameras, because the frame jumps up nearly 1/4 of the frame like 4 minutes into the 30 minute reel.
These reels taking 4 times as long with the mod is a lot, but I suppose since it's being done as individual frames, you could actually just stop it and start it back up the next day. Still, 16+ hours for a reel is a lot.
On the pulleys, what the machine has stock aren't pulleys, since they don't turn. In fact 2 of them are rubberized or something, I think they are there to keep the take up reel from pulling the film through the gate too fast, and at the same time allow proper tension on the film rolling onto the reel. Without them the film jumps, with lower speed on the take up, the film doesn't roll up on the reel tightly enough and can just overflow/fall off. This may not be a concern though if the mod is better controlling the take up motor.
Posted by Mike Spice (Member # 5957) on September 15, 2019, 03:27 AM:
Stan reading your IT DOES NOT FIT comment has me slightly alarmed, I have the 720p Wolverine, is it worth me popping the back off of it to see if the board you sent me will fit or are you speaking about a different model
Posted by Kamel Ikhlef (Member # 6667) on September 15, 2019, 05:26 AM:
Mike, maybe it is possible to cut the PCB to the left (there is just the text of the version (no electronic track) so that the takeup Motor does not interfere.To test the card it should work. This is a suggestion, to be confirmed by Stan.
Posted by Bruce Davis (Member # 7072) on September 15, 2019, 06:37 AM:
Stan Jelavic Hi it sounds like the second hand Wolverine you purchased is the standard model that can only take 5 inch reels. All my reels are 7 inch so the Wolverine Pro would be needed, I thought that was what you were getting. I may need to purchase a new unit from B&H https://www.bhphotovideo.com/find/cart.jsp
Regards - Bruce
Posted by Mike Spice (Member # 5957) on September 15, 2019, 06:49 AM:
Stan It would seem the board is too large to fit the 720 wolverine.
how annoying. I do hope we can find a work around to this as I have ordered the camera and lens.
I am having internet issues at home so may not see a reply until monday, I have driven in to work to use the wifi to post these pics I took this morning, so you can see.
I guess it would make sense for me to return the board you sent me, I have your address on the envelope.
I may see a reply from you today on my phone but won't be able to reply until monday when I come to work.
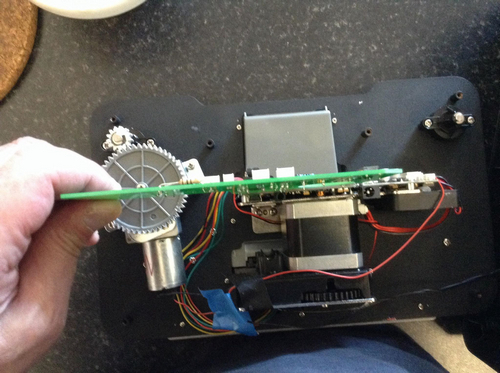
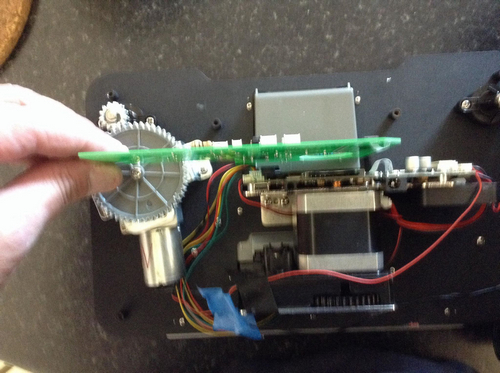
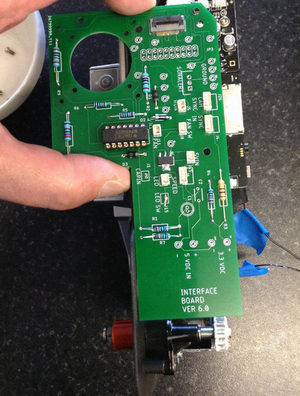
Posted by Stan Jelavic (Member # 6822) on September 15, 2019, 07:33 AM:
Re-edited my previous post with the latest:
- For pro units the new board V6 should work as is.
- For non-pro units without the belt, the board can be cut as shown.
https://photos.app.goo.gl/t8ZUJS8GevM3uL3M8
https://photos.app.goo.gl/QC8R6mAp3d1rKzFc7
After the cut, the stepper speed may not work properly. One alternative is to tack a 10k ohm resistor between U1 pins 1 and 7 and you are good to go.
Another alternative is a minor sw change. You can do that yourself if you have the programmer or ask me to send you the new controller chip.
Or just send the board back and I will fix it for you for free.
- For non-pro units with the belt not sure yet. Working on it.
- For Alain, the board may work as is. As promised I will send him a proto board and then we can go from there.
Kevin, the new controller should handle the takeup better. Definitely no jitter, but I will try it without the rollers and see what happens.
Bruce, yes you should get the pro unit. There is one advertised on ebay:
https://www.ebay.com /itm/Wolverine-Data-MovieMaker-PRO-8mm-and-Super-8-Converter-Up-to-9-Reels-AS-IS-M/202777992600?hash=item2f36829d98:g:jzYAAOSw6WNde6Td
It has screen problems - which we do not use...
I think I dotted all the i's and crossed all the t's...
[ September 15, 2019, 02:55 PM: Message edited by: Stan Jelavic ]
Posted by Bruce Davis (Member # 7072) on September 15, 2019, 08:10 PM:
Stan Jelavic Thanks for the link, that item has been sold but he has a second one https://www.ebay.com /itm/Wolverine-Data-MovieMaker-PRO-8mm-and-Super-8-Converter-Up-to-9-Reels-AS-IS-J/174010721595?hash=item2883d8e53b:g:UoAAAOSwszFbzhFf I have contacted him but he may not do international shipping.
regards - bruce
Posted by Stan Jelavic (Member # 6822) on September 15, 2019, 09:57 PM:
Sent you a private message Bruce.
Got the new compact board that with fit beltless non-pro model.
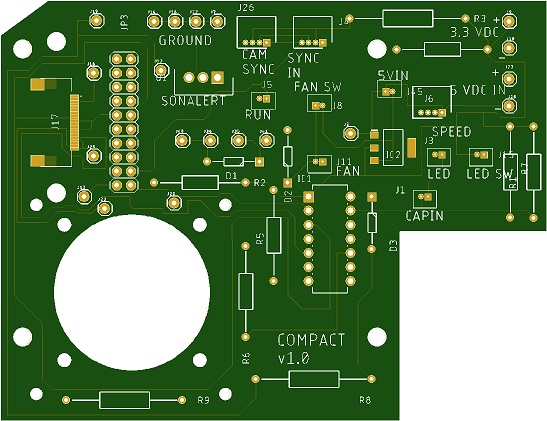
For the belt driven units a notch has to be added for the belt.
Posted by Bruce Davis (Member # 7072) on September 15, 2019, 11:21 PM:
Stan Jelavic have sent you a private message, I am glad you jumped the gun, would be great if you could put a kit together for me.
thanks and regards - bruce
Posted by Stan Jelavic (Member # 6822) on September 15, 2019, 11:33 PM:
Will do.
Posted by Mike Spice (Member # 5957) on September 16, 2019, 02:10 AM:
Thanks Stan I will put the board in the post today or tomorrow.
If I can be supplied with the board that fits I would be most grateful.
Posted by Stan Jelavic (Member # 6822) on September 16, 2019, 08:03 AM:
Sure Mike, no problem. Ordering the new boards today.
Updated the qty spreadsheet as much as could:
https://docs.google.com/spreadsheets/d/11ulozLsHAFLXWV3mcBSc-CuQRRfOLX6nDC3h63EVo9Q/edit?usp=sharing
Please check your name and info on the spreadsheet and make sure that it is correct. It is just for planning purposes so that the "manufacturing team" can plan. Currently I am the only one putting the boards together but hope that Mike and Kamel could pitch in at least to cover Europe. Or anyone with good soldering skills is welcome.
Posted by Alain Gottschalk (Member # 7079) on September 16, 2019, 10:04 AM:
Hi Stan, Kamel and Mike
Stan, thank you very much but take your time, I'm in no hurry.
The work even if it is with pleasure, it is good but health is better.
I am amazed at all the work you all have done to improve a digitization tool worthy of
super 8 scanner name.
It's a pleasure to read you.
Good day to you all.
cordially
Alain
Posted by Mike Spice (Member # 5957) on September 16, 2019, 10:43 AM:
HEY Stan The board is back in the post to you, not tracked, just regular mail.
I've also added my name to the database just to be complete, even tho' you now know which machine I have.
I don't trust myself to be cutting through circuit boards so waiting for the new board is no problem, but I insist you let me have a paypal in pm so I can cover postage this time please.
I wish I could find a dead pro machine to mod and end up with two of the darn things clicking away....
It also goes without saying that I will try and help any UK modders with this mod once I am running along nicely with mine.
I am very happy to do any soldering or give advice once mine is sorted.
I would expect return postage costs to west sussex and a very basic cost for my soldering skills.
I am certainly not out to rip anyone off.
If I had to source the parts for the board you provide then I may have to add an extra hour or two for admin.
I am open to negotiation.
Any UK users who might want my help with this mod would do well to find my facebook group Super8 Rescue where we can be in more immediate contact.
Here is the sort of soldering I do at work, I have been using a soldering iron since around 1970.
I know what every single one of these wires do, and where they go, and what plug they need on the end of them.
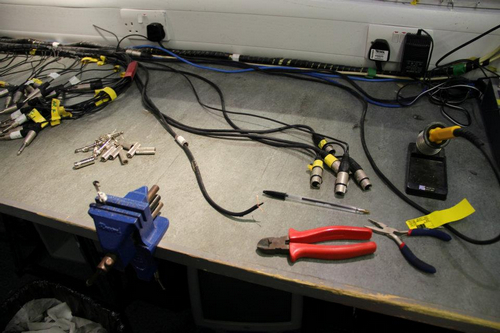
This is what all the wires and soldering is for, a Saber series 40:16:16 mixing desk, and yes, I know what every knob does! So your soldering should be in good hands.
In this photo I am re capping my Alice broadcast phono pre amp
I also spent three years as an O/B engineer for a radio station, and for the last 34 years, been an A/V tech at a UK university where I also teach audio and wires and lighting and computers for students studying Theatre and technicals
Alain
je vous remercie pour vos aimables paroles merci
[ September 17, 2019, 04:47 AM: Message edited by: Mike Spice ]
Posted by Stan Jelavic (Member # 6822) on September 16, 2019, 12:16 PM:
Pretty elaborate setup Mike. Are you sure you know which wire goes where
For the pro unit, there are some on ebay. Search for "Wolverine 8mm for parts".
Thanks for updating the database.
If you want to cover the shipping cost, it is $14.25:
https://photos.app.goo.gl/wv3ZvnfN24zvRqDp9
but pay me when the board arrives.
Oh yes, if ebay will not ship outside of US I can get it for you and ship it.
I bought one for Bruce. In your case no mods are needed (by me) so you cover the unit cost and shipping only. Just a thought.
Almost forgot, mailed you the proto board Alain.
You can cover the shipping cost only $14.25 once you get the board.
Posted by Kamel Ikhlef (Member # 6667) on September 16, 2019, 12:17 PM:
Yes Stan, If I can help I'll do it. but I am a beginner in electronics, just a little resourceful.
For welds, I will try to do them for me because if I miss, I only blame myself. LOL. For other people, I am not experienced enough and it would really take me a lot of time, so I can not commit to it for the moment (with training, maybe). on the other hand, if I can help in other domaines, no problem. But I must already have a personal unit that works!...
I mean it works, but with some improvements that would be nice but optional to add. yet some tests for me, We are almost there... Thank you Alain.
Posted by Stan Jelavic (Member # 6822) on September 16, 2019, 12:38 PM:
I understand Kamel. No problem. Mike can cover France I assume.
Just FYI, here is the material cost sheet I put together. It is based on QTY 5.
So, for example if I bought qty 100 of 100 ohm resistors from amazon and the cost is $10, I divide 10/5 = $2 for a resistor because I do not have use for the rest of the resistors since this is my only project.
https://drive.google.com/file/d/10Irl-ZjZ_W4rqXmp3gF0eVFy7-QtvNGZ/view?usp=sharing
That is why the material alone is $80.
Assembly is 2.5 hours if everything goes well, but it could take longer. One board gave me a really hard time and I spent 6 hours on it. Was a tiny solder short.
The assembly requires a microscope. I use this one:
https://www.amazon.com/Microscope-Magnification-Handheld-Soldering-Windows/dp/B07FP598G6/ref=sr_1_1?keywords=teslong+ms100+scope&qid=1568655492&s=gateway&sr=8-1
Posted by Mike Spice (Member # 5957) on September 16, 2019, 01:01 PM:
"Mike can cover France"
Fell off my chair laughing.

Perhaps we should open a Swiss office too.
I could use a tax deductible holiday....
Each of us bring a unique talent to this mod, so my elaborate setup was to try and re assure folk I do know what I'm doing with a soldering iron if they should happen to trust me to help.
I will be very happy to happy to cover p+p Stan.
Your costs are without doubt, mounting up.
You have done so much already.
Any UK users who might want my help, please do
Join my cine film Fb group
I am happy to help once I am sorted and know what's going on....
It could be Jan 2020 until I can help you, as I don't expect my mod to be complete and films scanned until Dec 2019.
Then I'm all yours, if you need some technical support.
[ September 17, 2019, 04:46 AM: Message edited by: Mike Spice ]
Posted by Stan Jelavic (Member # 6822) on September 16, 2019, 09:24 PM:
Found out that the imagingsource holder is a bit tricky to install. You have to make sure it is centered before tightening the screws.
With that said, the two mounts are pretty close but still off.
The camera holes have to shifted to the right by 0.5 mm.
I will update the board. Probably go with the short board version for all units except for the belt driven.
Also maybe we can add the usb mount to the board. Adds some delay to the shipping but may be worth it? Any suggestions.
[ September 17, 2019, 12:45 PM: Message edited by: Stan Jelavic ]
Posted by Kamel Ikhlef (Member # 6667) on September 17, 2019, 05:08 PM:
OK Stan, But I think for the changes I would like to make to my PCB. We will run out of space or we will have to switch to the SMD components... LOL.
I would like to add a 2nd fan with a switch on / off for the camera. a power indication led, and a usb connector. Starting on the short version, I'm afraid we are limited for lack of space. Specially since there is more "pro wolverine version"?.
But, of course I can do my PCB different, no problem... Just I do not master everything well yet.
It's a shame that I do not master enough, otherwise I could give help on the Kicad schematic.I fight with since 2 days to understand. I sart to the 12v for the 2nd camera fan. I do not know whether to put a protection diode as on the original 5v fan and what diode value. I learn... I learn... I still have learning work but it comes good!
Is it correct ?...
[ September 17, 2019, 06:51 PM: Message edited by: Kamel Ikhlef ]
Posted by Stan Jelavic (Member # 6822) on September 17, 2019, 10:58 PM:
Kamel. D4 should be reversed.
Also, the R,G,and B leads on the RGB led are shorted together. Other than that looks good. But we are running out of space.
Tried to add the usb in KiCad and noticed that the holes did not port over properly from Eagle. Will try to fix it tomorrow.
I know you wanted to work on it but would like to get the new boards with the usb.

Posted by Kamel Ikhlef (Member # 6667) on September 18, 2019, 04:32 AM:
Ah! yes, I see ... Beginner errors! I still have to learn.
For PCBs: why not propose a short "base" kit version and a "PRO" kit version with all connection options?
what will be complicated is also the boxes that are not the same (somikon, winait, reflecta, wolverine, ... ventilated boxes, not ventilated, etc ...). Not obvious at all !.
Thank you for your advice, Stan. I will progress thanks to you.
[ September 18, 2019, 06:07 AM: Message edited by: Kamel Ikhlef ]
Posted by Stan Jelavic (Member # 6822) on September 18, 2019, 07:11 AM:
No problem Kamel, we learn every day.
I actually think that there is enough room on the board. Got to remove a few unused components and squeeze the components tighter.
For usb connection we also need an adapter:
https://www.ama zon.com/90degree-Right-Female-Connector-Adapter/dp/B00N2U0SSO/ref=sr_1_4?keywords=usb+mini+b+right+angle+adapter&qid=1568808317&s=gateway&sr=8-4
and the cable:
https://www.amazon.com/8inch-Micro-b-Mini-b-Adapter-Cable/dp/B00DHN9CMO/ref=pd_ybh_a_4?_encoding=UTF8&psc=1&refRID=MB2BA8KPPD9E6EYPGQ77
Here is the V7 board with the USB interface added. Everything is now pushed together to free up some room on the right hand side.
The camera mount has been adjusted and the board should fit both the pro and non-pro model.
Will order 5 boards first and make sure everything works
and then go from there.
[ September 18, 2019, 07:49 PM: Message edited by: Stan Jelavic ]
Posted by Kamel Ikhlef (Member # 6667) on September 18, 2019, 04:54 PM:
Thanks Stan, Is it possible to have the new shematic ?
Your link for the usb cable is for the amazon dogs. lol
thanks again.
Posted by Stan Jelavic (Member # 6822) on September 18, 2019, 07:55 PM:
Ooops - fixed the cable link wuff wuff.
Here is is the board design:
https://drive.google.com/file/d/1DPQeBGjiFPIaBIrnbY23_mQ3IPaYmEVN/view?usp=sharing
Posted by Mike Spice (Member # 5957) on September 19, 2019, 03:11 AM:
Interface V7 looks great.
Having one board that fits all makes a lot of sense.
What a shame you had to go thro so many boards to get to this point.
Question the image source camera stills.
Are they .tiff images?
any idea a typical image size in Mb?
jpg images will have compression but a smaller file size.
When I scan 35mm transparencies as tiff files they come out at around 23Mb per image
Just trying to do some sums in my head about typical files sizes and so on.
[ September 19, 2019, 08:26 AM: Message edited by: Mike Spice ]
Posted by Stan Jelavic (Member # 6822) on September 19, 2019, 07:32 AM:
If the camera resolution is set to 1600 x 1200 the complete frame is captured with some margin left around the border (holes still visible). The tiff file size is 4.7 MB.
The following formats are available:
- JPG
- TIFF
- BMP
Updated the spreadsheet. So far I have 4 orders to build for the US users. Maybe 5 if Bruce is still interested.
Most of the parts are in. The new board is on order. Should be in early next week.
Noticed a few Winait owners. Can anybody with Winait do a few shots of the controller section with the view of the top and the back.
[ September 19, 2019, 11:23 AM: Message edited by: Stan Jelavic ]
Posted by Kamel Ikhlef (Member # 6667) on September 19, 2019, 06:39 PM:
Here, my TIFF Tests :
2592x1944 24bits (max camera sensor) = 13.9M
2048x1536 24bits = 10.3M
1920x1080 24bits (HD) = 5,56M
[ September 20, 2019, 05:36 AM: Message edited by: Kamel Ikhlef ]
Posted by Bruce Davis (Member # 7072) on September 19, 2019, 08:14 PM:
Stan Jelavic Hi, yes I am still very much interested so please go ahead with the Wolverine Pro.
Thanks and regards - Bruce
Posted by Stan Jelavic (Member # 6822) on September 19, 2019, 08:28 PM:
Thank you Bruce. That makes it 5 boards... will keep me pretty busy next week.
Posted by Mike Spice (Member # 5957) on September 20, 2019, 05:46 AM:
Kamel your kindness and generosity is much appreciated.
I am very grateful for this. Thank You So much for printing these for me.
Until I am ready to make the modification, the parts will remain packed in the envelope.
Arrived today, all safe and sound.
Stan Thanks for the info.
[ September 20, 2019, 08:02 AM: Message edited by: Mike Spice ]
Posted by Kamel Ikhlef (Member # 6667) on September 20, 2019, 06:24 AM:
You're welcome Mike, I'm glad that everything has arrived safely.
You can already install the curved pulleys at first, this preserves the films. This does not require complicated disassembly.
I hope Stan will also soon receive his spare parts. Have fun.
Posted by Stan Jelavic (Member # 6822) on September 20, 2019, 08:23 AM:
Looking forward to receiving these Kamel. This reminds me to check the film transport without pulleys to see if there is any slippage. The original Wolverine uses the clutch with continuous tension and the roller type pulleys would not work. The force would drag the film forward any time the claw disengages. The new controller pulses the motor that pulls the film against the claw (after the cam is done) and then lets go. So it should work.
Posted by Mike Spice (Member # 5957) on September 20, 2019, 10:11 AM:
I've just received an email telling me camera and lens are waiting for me at the office.
Too late to get them today.
I won't be putting my Kamel guides on until I do the mod.
Posted by Kamel Ikhlef (Member # 6667) on September 20, 2019, 10:27 AM:
Not even to test? ...(before and after), LOL.
No problem Mike, I hope the 3D parts will fit.
Posted by Mike Spice (Member # 5957) on September 20, 2019, 10:30 AM:
Simply because I don't want to keep opening the scanner more than needed.
I would have liked to have picked up the camera today, but I have to work all weekend, so I must continue to be patient.
Not an easy thing for me to be patient
Posted by Stan Jelavic (Member # 6822) on September 20, 2019, 01:00 PM:
You have to wait for the new board Mike before you can do anything with the camera. Maybe set it up with the laptop and get it ready. The capture program is pretty simple.
Posted by Mike Spice (Member # 5957) on September 21, 2019, 02:19 AM:
I am happy to wait for the board and other bits I need.
I have two weeks of hell at work, including all weekend this weekend, so no time to do anything much.
I won't get my hands on the camera until Monday, I might just have a sneek peek and show you a photo, but no time for anything else for a fortnight.
Posted by Kamel Ikhlef (Member # 6667) on September 21, 2019, 05:48 AM:
Posted by Kamel Ikhlef (Member # 6667) on September 21, 2019, 05:48 AM:
Stan, I'm trying to understand your shematic (old v6) to learn.
Is it normal that there are tracks without components? what are all the _conn01 (J23, j21 ...) used for testing, are these vias?
I'm going slowly!

Posted by Stan Jelavic (Member # 6822) on September 21, 2019, 07:33 AM:
Good to check the camera just to make sure all is ok, Mike.
Those are the vias Kamel, needed for routing.
Posted by Kamel Ikhlef (Member # 6667) on September 21, 2019, 08:08 AM:
OK Stan thanks,
I was wondering if I had a library that was not loaded because I have tracks that are not connected ?!?
[ September 21, 2019, 11:24 AM: Message edited by: Kamel Ikhlef ]
Posted by Stan Jelavic (Member # 6822) on September 21, 2019, 11:37 AM:
That was for the old style connector.
I added the new version of the connector:

But still kept the old if the new one gives us trouble. But since the new connector works ok (just difficult to solder due to fine pitch) there is no need for the old connector. Removed it in ver7.
Posted by Kamel Ikhlef (Member # 6667) on September 21, 2019, 12:17 PM:
Ah ! OK Stan. Thanks for clearly answer (sorry for my beginner questions).
Posted by Mike Spice (Member # 5957) on September 21, 2019, 12:39 PM:
Beginner questions are very valid.
In the future as other people discover this thread, there will be many beginners who value the simplest of questions.
Stan, you are doing a fine job and I can't wait ( but I will ) for the new board.
I promise to get the camera out of the box and check it out, I won't have time to do that on Monday but hopefully by Weds I can.
So a question for Kamel and Stan when I come to test the camera I would appreciate a tutorial on how best to approach handling the image sensor, lens mount and actually mounting the lens.
I am capable of doing it, I would just like your top tips and sensible suggestions as how best to handle such expensive delicate bits of equipment.
Once tested, should I remove the lens and store back in it's box until ready to mod? etc etc.
Posted by Stan Jelavic (Member # 6822) on September 21, 2019, 01:31 PM:
Like what Mike says - these are good questions. I have some stuff there that I left in, either for testing or flexibility but never had a chance to document. So, please feel free to ask.
I will create a short video on how to install the lens Mike.
Now, a bit about USB.
For the non-pro model there is a hand grip indentation in the housing and it in the way of the L adapter.
So, for that model a different adapter is required:
https://www.amazon.com/AKOAK-Adapter-Degree-Female-Connector/dp/B01DEM7L48/ref=pd_bxgy_23_img_3/144-7758567-5407635?_encoding=UTF8&pd_rd_i=B01DEM7L48&pd_rd_r=54af8fe4-a94f-4f66-829 8-954528e7342e&pd_rd_w=Z8UPe&pd_rd_wg=X6kVg&pf_rd_p=a2006322-0bc0-4db9-a08e-d168c18ce6f0&pf_rd_r=A7F5WA7H7R7V3TC5QBGG&psc=1&refRID=A7F5WA7H7R7V3TC5QBGG
Alternatively, you can do it without the adapter but if will not be that nice:
https://photos.app.goo.gl/z29aR8akZQy6qo7XA
Posted by Mike Spice (Member # 5957) on September 21, 2019, 01:44 PM:
Just had a thought that given where the usb socket is on the board, it won't be possible to mount a fan over the top of the image sensor board, on additional extended spacers/risers as I had first thought.
Unless we are going for empire state scanner....... yikes.
I think I will just take a usb out of the board to the top of the scanner case and make some kind of join there with a soldered lead/extension cable tie affair.
That will take the pressure off of the board USB socket.
I don't need pretty. I just need it to work.
Perhaps taking still images every two seconds, the camera won't get hot enough to require cooling, it will not be tightly covered in my case, only time will tell.
Thinking about where the camera is mounted, dust could be a problem with it 'open to the elements' but equally, closing it in too tight will make it get hot.
Appearance doesn't matter to me, it's only me and the cat looking at it, steampunk is a good look, but dust on the board is not a good look.
I intend to cover the entire scanner and it's 200ft reels, with some kind of upside down clear plastic tub, with vent hole cut in it, during scanning.
When it is not scanning, it will be in it's new sealed box that I have made ready.
A tutorial video would be really helpful Stan, but no hurry
[ September 22, 2019, 03:25 AM: Message edited by: Mike Spice ]
Posted by Stan Jelavic (Member # 6822) on September 21, 2019, 03:11 PM:
The 90 degree adapter might work and allow for a miniature fan on top of the camera if necessary.
https://www.amazon.com/gp/product/B015HL9W8M/ref=ox_sc_act_title_1?smid=A2OKSEIX7OEK0B&psc=1
Posted by Doug Maxwell (Member # 7093) on September 21, 2019, 03:23 PM:
Hello Everyone. Been stalking this thread for a few weeks. My tale is a common one ... I bought a Wolverine a month ago and consider it not terrible but not great. I've sat through enough telecine sessions in my life to make me sad for the missed potential of this machine and started to wonder if anyone was 'improving' this device. I started googling, and here I am. I must say, absolutely great stuff.
I'm blessed with time and a decent pro video editing system, so taking two seconds to scan one frame is fine with me. If the quality is there, then the longer the scan, the better... in my opinion. I'm wanting to 'futureproof' my efforts, so the bigger the better.
I am very interested in adding my name to the list of people buying boards. My questions for now are ...
1) Is there a 'master list' yet of all the current components needed?
2) Can the 3D printed parts be purchased with the board?
3) What's the maximum resolution reached thus far once the pictures are post processed and cropped into a video file? Is it still 1080 (which isn't terrible), or can it reach into 2k or 4k?
4) Is there a rough ballpark estimate of total cost for everything? Not including the Wolverine, of course.
Thank you!
Posted by Mike Spice (Member # 5957) on September 21, 2019, 04:21 PM:
Stalking this thread?
Welcome.
Stan is the man who can answer your questions
Posted by Stan Jelavic (Member # 6822) on September 21, 2019, 07:11 PM:
Hi Doug, Welcome.
The list of parts is here:
https://drive.google.com/file/d/1kRLFXMu_waquZV3C_lqRLaxhZEY6T7EC/view?usp=sharing
The cost estimate is on the spreadsheet also but in unit qty it may be somewhat higher.
The camera, lens, and the lens holder are around $200 for the US including shipping.
We are still in a process of testing the capstan. Do you have lots of film with damaged sprockets? If so then should consider adding the capstan. The motor is on the spreadsheet but I do not have the cost for all 3D parts. Kamel can provide that.
Ah yes - resolution. We had lots of discussion on that subject.
I prefer running the camera using the 9mm spacers with 1300x960 pixel resolution optical resolution.
It is possible to run it using the 5mm spacers and that gives you 1800x1300 resolution.
But..... at that close distance the lens starts struggling and the corners go a bit out of focus. It is very slight but it is there. But it is really up to you because it is easy to change the spacers.
For resolutions higher than this you would have to pick the right lens. So far we have not found one that would meet all our requirements for HD or higher.
Keep in mind that Wolverine HD is not really that. It is half of that (we confirmed that by using their optical setup) and they double the resolution digitally. That is actually one of the causes of digital artifacts, that plus sharpening. In my opinion they should have left that alone, but then again, they are very limited by the original design (based on lapse mode camera product).
Posted by Mike Spice (Member # 5957) on September 22, 2019, 03:30 AM:
I have just purchased one of those USB mini right angled adaptor things from ebay.
Even if I don't mount the fan, it will save me soldering anything for my extension USB affair from the camera board.
Cheaper than amazong as it happens....
Posted by Terry Dowling (Member # 7108) on September 22, 2019, 07:02 AM:
Hi everyone. I'm also new to this forum and really impressed what you guys have achieved with improving the Wolverine MovieMaker!
I've been in the process of trying to set up a system using Joe Herman's RPI film capture software, which can be found on GitHub here: https://github.com/jphfilm/rpi-film-capture. He has some very impressive results using the V1 5MP RPI camera as shown here: https://www.youtube.com/channel/UCQi6WqZvf4OT9eOhWeVfKMg and here: https://vimeo.com/jphfilm
Is the DFM 72BUC02-ML camera you recommend better than than the RPI camera or more for ease of use? It does seem like quite an expensive camera considering you can buy a RPI with a camera/lens for less. Also would there be any benefits using the USB 3.0/3.1 Imaging Source cameras?
That being said I have also bought a faulty Wolverine MovieMaker Pro that I would like to get working and this mod definitely seems like the best way forward.
How do I go about ordering a PCB please? I'm also fine with soldering components myself.
Posted by Stan Jelavic (Member # 6822) on September 22, 2019, 08:45 AM:
Mike, make sure the orientation of the connector is correct.
Hi Terry, can you please add your name to the list stating what unit you bought and any side notes.
The board can be ordered directly from the supplier in China:
https://jlcpcb.com/
Download the V7 gerber:
https://drive.google.com/open?id=1jwJfCwCj-idQViChmxXBzmawzOPdU6Qh
Click on "Quote now" and point to the downloaded gerber and then provide the purchase details and order.
Check the previous posts on this forum regarding RPI. I could get pretty decent video with the RPI camera but the main problem is shading i.e. pink tinge that gets worse around the frame edges. I know what the cause is and I did the sw compensation for it and it improved but it is still somewhat there and I did not like that. The other issue is the cheap lens on these cameras...
https://www.youtube.com/watch?v=nlL9KOLzxrQ
In this video you can see the difference... look for pink tinge.
So, if we could get decent image quality from RPI I could redesign the board for RPI mount pretty fast.
Posted by Terry Dowling (Member # 7108) on September 22, 2019, 10:11 AM:
Thanks for the links Stan, really appreciate it. I have added my name to list.
I'm actually red/green colorblind so that doesn't help! I don't seem to see the pink but obviously will be an issue for others watching..
Looks like Dominique Galland has had some success using non-stock RPI lenses here (either M12 or CS mount):
https://github.com/dgalland/yart/blob/master/yart.md (need to translate to English)
and calibrating the lens with this library:
https://github.com/rwb27/openflexure_microscope_software
I've not really looked into this much myself as still quite a way before I can get this all working correctly.
I think I will buy the DFM 72BUC02-ML camera in the meantime.
Kamel, I'm also interested in getting some of the SMPTE RP-32 pattern test film - if you have any spare is it possible to buy a small piece from you please? It's a shame it's so expensive and you cannot buy shorter lengths.
Posted by Mike Spice (Member # 5957) on September 22, 2019, 11:30 AM:
Stan
This is what I have ordered.
Feel free to tell me it's no good before I blow myself up!
usb lead at flea bay
Posted by Stan Jelavic (Member # 6822) on September 22, 2019, 11:42 AM:
Will get back to you Terry a bit later since we have an emergency here... Mike's well being is in question... Mike it is PERFECT.
Terry, the pink glow is not very prominent. I am not sure which board Joe Herman used, but did a pretty good job calibrating the camera.
Here is where I see pink glow.. in this scene and many others:
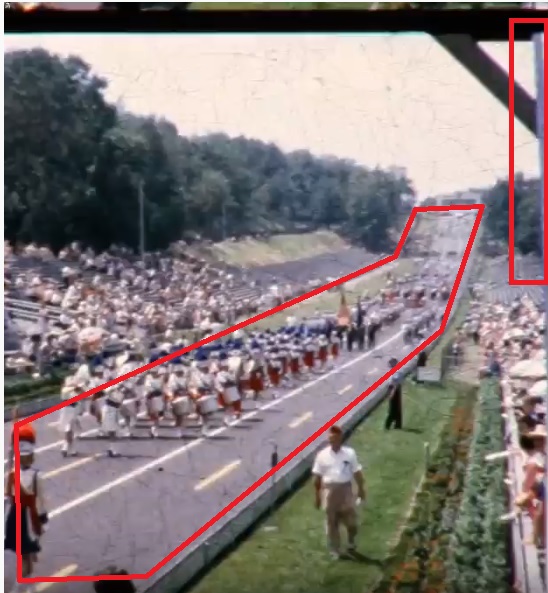
Getting the imagingsource camera is a smart decision in my opinion. I mean if you are looking for something that is better than Wolverine, then might as well spend some more money to make a significant difference.
But for people that want to save and are looking for cheaper alternative, RPI is possible.
I did similar setup to what Dominique Galland did. But in my case I had the V2 camera and could not get rid of the pink glow completely even after calibration... check my earlier posts.
So possibly going with the V1 version and imagingsource 12M lens may be a good alternative.
I also used a shield, and that one gave me good results but it is almost the same cost and imagingsource... so it is a mute point.
Posted by Mike Spice (Member # 5957) on September 22, 2019, 12:44 PM:
Panic over, my well being has, yet again been rescued.....
Roll on Monday morning when the post room opens and I can go sign for my image source camera and lens.
It's like christmas eve.....
Posted by Terry Dowling (Member # 7108) on September 22, 2019, 01:20 PM:
quote:
Terry, the pink glow is not very prominent. I am not sure which board Joe Herman used, but did a pretty good job calibrating the camera.
Still can't see it must be my colorblindness! I believe Joe Herman used the stock RPI lens screwed out as far as possible with an additional 25mm focal length triplet lens to magnify the size.
Mike, where did you end up buying your camera and lens from? I did try open an account with the reseller Scorpion Vision to get prices, but looks like they will only sell to businesses. I've also asked Imaging Source for a quote so waiting to hear back.
Posted by Ray Fox (Member # 7095) on September 22, 2019, 02:46 PM:
Hi. Another new member query I am afraid.
I am now on my second 3rd Generation Winait Film Scanner.
The 1st was returned as the film gate kept jamming.
This second one is out of focus. I am trying to avoid sending this one back as well so I have disassembled to adjust the focus. However they seen to have locked the lens with a pretty hard locking material. I have tried to soften it with IPA, Surgical Spirit, Brush cleaner and some wonderful all purpose cleaning fluid. Nothing seems to touch it. I don't want to use too much force as it is brand new. Does anyone have any suggestions for a solvent/softener. They have appeared to have used the same stuff to the lock connectors in position.
By the way I am very impressed with all the work going on in this thread and others on this board. If this Winait doesn't work out I am considering making my own Telecine device with an old Eumig 610d projector I have spare.
Posted by Stan Jelavic (Member # 6822) on September 22, 2019, 04:05 PM:
Terry, you can order from oemcameras.com.
Here is a copy of my recent order:
https://photos.app.goo.gl/ZYQBwZMXrNvaAfvD8
Mike may have another source.
Thanks for the additional info on the setup.
Mike, glad you are still alive and well
Ray, try vise-grip locking pliers but do not squeeze it very hard. That is what I ended up doing a while back with the Wolverine lens.
Posted by Terry Dowling (Member # 7108) on September 22, 2019, 05:54 PM:
Thanks for sharing copy of your order Stan. I have worked out it will be around $300 with import duties and international shipping to UK. Hoping it will be a bit cheaper to buy here in the UK or Europe.
Posted by Terry Dowling (Member # 7108) on September 22, 2019, 05:55 PM:
Please delete - duplicate post
Posted by Stan Jelavic (Member # 6822) on September 22, 2019, 07:28 PM:
Mike has a local supplier. It is much cheaper than that.
Posted by Terry Dowling (Member # 7108) on September 23, 2019, 06:48 AM:
Hi Kamel, do you have a link for the super 8 sprocket you designed on Thingiverse please? I have tried designing a sprocket before but the teeth never printed well. I have the Monoprice mini V2, do you think it's good enough for printing this?
Posted by Mike Spice (Member # 5957) on September 23, 2019, 07:59 AM:
It would seem Christmas did indeed arrive early
Stan I am most grateful, arrived this morning.
Can't thank you enough Sir.
Not only that, my camera and lens from imaging source arrived.
Welcome Terry Dowling I bought my camera via the imaging source website, I asked for a quote and that in turn led to a couple of uk options.
No account needed, paid Scorpion Vision with a debit card on the phone when the time came.
The quote was just for the camera, once in touch with Robyn at Scorpion I asked for the lens in the quote, she was most helpful getting it sorted.
That said, thier first quote did included a £30 usb lead which I politely declined!
Imaging source
The cost was not too outrageous, £165 total incl p+p
The lens mount would be an additional cost, I think £60 but I can't remember, seems somewhat expensive...
I chose not to buy thier lens mount as I have a bespoke 3D printed lens mount from my amazing new best friend Kamel for which I am very very grateful.
RAY I tried to loosen my lens to see if I could get a tighter focus, but like you I found it tighter than a nun's handbag, so left it well alone as I thought I would end up ripping the lens off ........
Posted by Kamel Ikhlef (Member # 6667) on September 23, 2019, 08:25 AM:
Welcome Terry,
For Printed 3d files. I did not put everything on thingiverse, because I was waiting for the Stan's capstan validation tests but
He has not received the 3D parts yet.
I did not want to make models available until it was really finalized. But if you want them before to test, I can provide them for free without problem. Give me your mail by private message, I send to you the STL files.
For the SMPTE clip, It's not a question of money but unfortunately I do not have much for my personal needs. I will see if I can still a small part of 8-10cm but I'm not sure. I'll find if I'm left somewhere...
your printer has been designed for the PLA (You can use PETG), you have to test ...
For 3D printing, I used ABS or PETG filament : infill 100%, layer 0.1, bed 90 °, temp nozzle 230 °. it should work well !...
Posted by Stan Jelavic (Member # 6822) on September 23, 2019, 08:50 AM:
Glad you got the parts Mike. The new boards will be in on Wed. Also received a bunch of parts from Digikey including the new usb connectors. So, everything is coming together slowly.
Posted by Terry Dowling (Member # 7108) on September 23, 2019, 09:28 AM:
Mike, thanks for that. Just waiting to hear back on a quote. They will not sell unless you have a business.
Kamel, thank you and yes I fully understand. I'm happy to wait till it's all finalised.
I wonder if anyone else is interested in SMPTE test film? Perhaps we could buy roll and split it up. It's 178.50 for 5m excl. shipping. It looks like it's very useful to get everything setup up correctly and would only need a small piece.
I will play around with the settings on the 3D printer. I know others have successfully used ABS on this printer as well. I do have some PETG so will also try with this.
Posted by Mike Spice (Member # 5957) on September 23, 2019, 10:23 AM:
Terry In the quote at imaging source all I did was explain what I was going to do with the camera in terms of film preservation and modifying a cheap rubbish film scanner etc etc.
Next thing an email from scorpion vision with a quote.
No business mentioned. Good luck.
Stan Thanks for the update. As usual, no hurry.
Posted by Doug Maxwell (Member # 7093) on September 23, 2019, 10:56 AM:
Hello again. Stan, I have a few boxes of family films that range from the 1930s to the 1990s. I'm sure I'll have some challenging sprocket scenarios, so the capstan motor is certainly an option worth getting.
I've built many things - computers, discus launch gliders, a digital pinball cabinet, and rewired a few old cars. I'm good at putting things together but soldering a board is well beyond my skill range. Stan, can I buy the ready to go board from you? Also, how do I get on the 'official list'? I'm fine with waiting - just want to get a slot.
Posted by Stan Jelavic (Member # 6822) on September 23, 2019, 11:36 AM:
Hi Doug,
Just add you name onto this list
https://docs.google.com/spreadsheets/d/11ulozLsHAFLXWV3mcBSc-CuQRRfOLX6nDC3h63EVo9Q/edit?usp=sharing
and state what machine you have or no machine, qty etc, and in the notes any specific requirements.
Currently I have 6 boards to do. I can certainly do one for you but since this is manual assembly it could take 2 - 3 weeks.
The capstan is still work in progress and it is not included in the kit until properly tested. We can play it by ear and see how it goes.
Posted by Doug Maxwell (Member # 7093) on September 23, 2019, 06:32 PM:
Excellent. Thank you. Works of art take time, so I'm not in a hurry.
Will the board have to be altered or replaced when a capstan motor is added? Or does it know to compensate for the speed change?
Posted by Stan Jelavic (Member # 6822) on September 23, 2019, 08:31 PM:
Well thanks Doug. Works of art eh! Awesome.
The board is capstan ready. So it is expecting the pulses and it is trying to kick the motor. But if the motor is not connected the film stays stuck.
Here is a reply to Kevin's earlier post. He wrote:
---
On the pulleys, what the machine has stock aren't pulleys, since they don't turn. In fact 2 of them are rubberized or something, I think they are there to keep the take up reel from pulling the film through the gate too fast, and at the same time allow proper tension on the film rolling onto the reel. Without them the film jumps, with lower speed on the take up, the film doesn't roll up on the reel tightly enough and can just overflow/fall off. This may not be a concern though if the mod is better controlling the take up motor.
---
I tested the takeup without pulley tension:
https://photos.app.goo.gl/ug7LiWpNTVF8STtJ9
Here is the result:
https://photos.app.goo.gl/KED7W1Ctv4oAbRvu5
And here is with the pulleys engaged:
https://photos.app.goo.gl/3yDdeo3vgo4Xswih9
I do not see much difference.. but you be the judge.
[ September 23, 2019, 11:27 PM: Message edited by: Stan Jelavic ]
Posted by Mike Spice (Member # 5957) on September 24, 2019, 11:16 AM:
Stan I do like the two scan samples in the post above, which bought a question to mind.
What software are you using to compile your image sequence?
Curiosity more than anything else.
I will be using VirtualDub, for which I have great affection.
In other news, the mini usb extension arrived today.....
Posted by Stan Jelavic (Member # 6822) on September 24, 2019, 04:14 PM:
Here is the shoebox version for takeup:
https://photos.app.goo.gl/TzkRg4iepxuzQPZE9
About the same amount of frame jitter. So I believe the new controller is as good as it gets. The small amount of jitter is caused by the Wolverine claw. Or is it the film itself?
Just a sidenote, the clips not of best quality because I concentrated on jitter, not quality.
I use Film9 Mike as Kamel suggested a while back.
[ September 24, 2019, 07:30 PM: Message edited by: Stan Jelavic ]
Posted by Kamel Ikhlef (Member # 6667) on September 25, 2019, 09:42 AM:
Mike, please could you give me the web link of your camera lens European dealer, because I need to buy a new 12mm M12 Lens.
Mine is an old generation 3M F1.6. In France, the company that had provided me no longer exists and I found another supplier but with a price of shipping more expensive than the price of the M12 lens.
Posted by Mike Spice (Member # 5957) on September 25, 2019, 10:57 AM:
Kamel I first began at this website and asked for a quote using the 'Get Quotation' box
imagingsource
When I got the quote for the camera I got couple of UK suppliers to choose from in the quote page, I chose Scorpion as they are close to me.
Good for shipping costs...
I went to Scorpion Vision, but I understand if you go directly to thier website, they will not provide sales unless you are a business.
so perhaps try the imaging source website for a quote for the lens and see where that takes you.
There is a supplier in Germany among the results for the quotation.
In the quote at imagingsource, be sure to fill in the details about how you are preserving cine films and that may help.
They want to know why you want items, so a good description may work.
I am sorry I can not give you a direct link as my camera and lens came via the 'get a quote' at imagingsource.
Posted by Kamel Ikhlef (Member # 6667) on September 25, 2019, 12:28 PM:
OK Mike,
Thanks for the clarifications. I will continue my research...
Maybe a macro lens to test.
Posted by Stan Jelavic (Member # 6822) on September 25, 2019, 01:09 PM:
Feels like Christmas today:
https://photos.app.goo.gl/x55awcR36o6z8VgM9
Thank you very much Kamel. Very nice of you. I will try it within next few days.
BTW - did you ever receive the board I sent you?
Bruce's unit also arrived a few days ago:
https://photos.app.goo.gl/cuHXdeeTeQxzH9Hr9
https://photos.app.goo.gl/EPKYHitDLWdo1A5k7
Looks in pretty good shape, but will need some dusting with compressed air.
The LCD is cracked but we do not use it anyways so not an issue:
https://photos.app.goo.gl/4dGJSGuurqdr94wH6
The boards should be in today. Running low on switches. These are from amazon and fast delivery.
7 boards to do including the one for Mike. These are all for US users (except for Mike). UK and possibly France guys should contact Mike for assembly. The do-it-yourselfers can contact me for now for any questions regarding the assembly and test.
Posted by Kamel Ikhlef (Member # 6667) on September 25, 2019, 01:34 PM:
Glad that everything has arrived safely.
Yes, I had received your PCB, (Friday the 13th!)... A thousand thanks again.
I will soon test it. I was busy and not yet had time to disassemble everything. certainly, this weekend because I also will need to measure to design the unit front cover.
Posted by Mike Spice (Member # 5957) on September 25, 2019, 02:43 PM:
Thank You Stan
I have been eagerly awaiting the shipping container from china.
I have just about every thing in place for my mod.
Bespoke 3D printing
Ebay wires
Florida wires
Germany circuit boards and Lens.
I bought a mic home today ready for the narration of the final mod video.
Very exciting times.
Again, I am going to say a huge thank you to Stan an Kamel
This has been quite some journey.
My scanning queue is backing up to March 2020
Bring on the soldering iron....
Posted by Mike Spice (Member # 5957) on September 25, 2019, 02:44 PM:
Thank You Stan
I have been eagerly awaiting the shipping container from china to arrive in Florida.
I have just about every thing in place for my mod.
Bespoke 3D printing
Ebay wires
Florida wires
German sensor and Lens.
Very exciting times.
Again, I am going to say a huge thank you to Stan an Kamel
This has been quite some journey.
My scanning queue is backing up to March 2020
Bring on the soldering iron....
Stan, I hope the V6 board is back with you in a day or two.
[ September 26, 2019, 10:41 AM: Message edited by: Mike Spice ]
Posted by Stan Jelavic (Member # 6822) on September 25, 2019, 04:35 PM:
Looks like we will all pretty busy with the home projects, not even mentioning the regular work and the honey-do lists
Thanks Mike, got the board back. No usb routing to the back cover and the camera mount is off a bit... but still usable for the PRO unit.
Posted by Kamel Ikhlef (Member # 6667) on September 26, 2019, 04:20 AM:
Stan,
what are the wires to connect to the capstan motor (there are 6).
I guess there are only two useful to connect to the PCB molex connector, but what to do with others?
Can I replace the switches with mini button switches?
Can I add a switch button on/off on the capstan control or does this cause a problem (MSP430)? (this because big switches take up a lot of space on my front cover design).
Posted by Ray Fox (Member # 7095) on September 26, 2019, 06:17 AM:
Can the TBL 12-2 C 5MP - 12mm lens be used as a direct replacememt for the lens in the Winait Scanner? I presume it is a glass lens as opposed to the plastic one currently in the scanner.
Posted by Kamel Ikhlef (Member # 6667) on September 26, 2019, 07:31 AM:
Ray,
I have already tried this. the original mount is in M12 format, but the focal length does not match because of the fixed distance of the original camera. (about 45mm of the film plan).
It would take a F10mm in the ideal, which is not easy to found. it is likely that this type of scanner lens is an F8mm is used, then the image is processed and compressed which also generates artifacts ...
That's why we choose the 12mm lens. it's a compromise between quality and the camera distance. Stan has a lot more testing than me and he can complete my answer.
Posted by Stan Jelavic (Member # 6822) on September 26, 2019, 12:40 PM:
Kamel, you can either put the switch in series with the capstan motor to turn it on and off. The reverse diode on capstan motor should dampen the oscillation during shut-off to prevent arching on the switch. So that should be OK.
Kamel is right Ray, the 12mm will not work unless you put the whole controller on standoffs. The 8mm lens should work. I do have one here:
http://www.m12lenses.com/8-0mm-F1-6-3MP-Mega-Pixel-CCTV-Board-Lens-p/pt-0816b3mp.htm
It is glass.
I can test it for you side by side with the original Wolverine lens.
My guess is that you will not see significant improvement because of digital artifacts present which will mask any differences. But one never knows.
Tested V7 camera centering. It is centered properly. Finally - took a few tries.
This is full rez:
And this is 1600x1200:
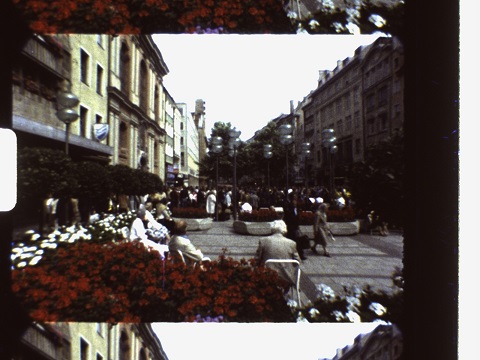
Will try the USB next...
[ September 26, 2019, 09:52 PM: Message edited by: Stan Jelavic ]
Posted by Mike Spice (Member # 5957) on September 27, 2019, 08:03 AM:
Stan I can well imagine you are busy busy, but if you have time to write me a couple of dos and donts regarding placing the lens and 3D mount on the camera, and any handling tips or set up tips, I would be very grateful.
A video is probably overkill for me but your top tips would be welcome.
I ought to run up the camera over the weekend and test it with the laptop I intend to use.
Posted by Mike Spice (Member # 5957) on September 27, 2019, 08:03 AM:
duplicate post of above.
Posted by Stan Jelavic (Member # 6822) on September 27, 2019, 08:23 AM:
Will do Mike. The manual covers lots of details but does not include the camera installation.
https://drive.google.com/open?id=1QdWmdEiLXvubbFjXUEi14x_s3I_0WM_p
Will try to do it before the end of the day today.
Posted by Mike Spice (Member # 5957) on September 27, 2019, 09:34 AM:
Thanks Stan.
I have the capture software installed, I imagine the laptop also needs a driver installed too?
I would hope to have some time on Sunday to test things out.
[ September 27, 2019, 01:00 PM: Message edited by: Mike Spice ]
Posted by Ray Fox (Member # 7095) on September 27, 2019, 02:11 PM:
Stan: If you could test without too much difficulty, that would be great. My problem is that my Winait lens is currently unusable as it has fogged up!
Probably the chemicals I used trying to soften the locking compound.
I have removed it and tried cleaning it but at the moment it looks like it is a gonna! Thus I am looking for a direct replacement - even a plastic one will do. I have emailed Winait re spares but no reply so far.
Posted by Stan Jelavic (Member # 6822) on September 27, 2019, 06:59 PM:
Mike, The driver is installed during sw installation. At least it is on my Windows 10.
Ray, no worry, I have some spare Wolverine lenses I can send you one. Will try to do the test for you this weekend.
Is the sensor still ok?
Here are the camera installation instructions Mike:
https://photos.app.goo.gl/jKC1C24DC6eB4e3f9
Ray, the 8mm lens that I have does not fit the Wolverine holder. It is too snug. Probably the adhesive that they put there in the threads is in the way.
[ September 27, 2019, 11:20 PM: Message edited by: Stan Jelavic ]
Posted by Mike Spice (Member # 5957) on September 28, 2019, 03:05 AM:
Stan I'm most grateful for the video.
I am going to try using an 'offline' windows 7 laptop that just had a re install and update, if that doesn't work I will try my windows 8 laptop.
I'm not a fan of W10 so haven't yet put it on any of my machines, and now it's not free I doubt I ever will.
Thanks for finding the time to do that.
The lens mount tips are very useful
Nothing there to worry about, but thanks for reminding me about static and the board.
In other news, I've just bought some white cotton gloves for future film handling.
No more finger prints on my scans.....Something I should have done a long time ago.
[ September 28, 2019, 05:46 AM: Message edited by: Mike Spice ]
Posted by Stan Jelavic (Member # 6822) on September 28, 2019, 08:23 AM:
White cotton gloves is a great idea Mike.
Where did you get them? I assume they are very thin.
A side note regarding USB. The L adapter that amazon sent me does not match their description. They say mini male to mini female, what I got is a mini male to micro female. Also lots of negative comments with it not working and blown cameras
Requested a replacement. Shopping amazon is like visiting a junkyard many years back, honestly.
Posted by Mike Spice (Member # 5957) on September 28, 2019, 08:43 AM:
The gloves cheap as chips from flea bay
I tried to post the link but for some reason it doesn't appear here correctly.
Head to fleabay and search for white cotton gloves, perhaps with jewellery included if you don't find the right ones.
Gloves for handling jewellery etc.. soft white cotton, cheap as chips.
I intend to go through every foot of my own reels and check sprockets and edits so having gloves makes a lot of sense this time round.
I just checked my usb cornered lead and it is fine.
It can be a bit hit & miss at Amazong.
Fleabay is usually my go to first for small items like this.
Mostly because I have a very high disregard for bezoz
question for Kamel
In Stans camera video, he mentions the right way to secure the lens mount.
Does the 3D printed lens mount have a special way to be placed on the board?
[ September 28, 2019, 10:31 AM: Message edited by: Mike Spice ]
Posted by Kamel Ikhlef (Member # 6667) on September 28, 2019, 10:46 AM:
Mike, indeed, it is a specific support with a cut on the side to go above the components of the camera board (see image).
There is a direction of assembly because of the cut.
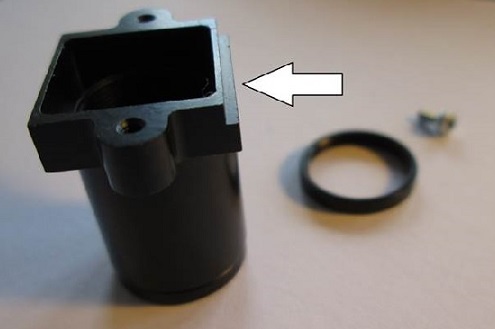
For blocking the lens, I use the different block rings, it's very usefull.
To screw gently !
For testing, you can use the camera without the telecine unit, just for learning IC capture software. It's that I do.
Posted by Mike Spice (Member # 5957) on September 28, 2019, 11:46 AM:
Thank You Kamel
I have not inspected the 3D parts to see this yet, so this is very helpful.
Thank You Thank You Thank You.
I will test the camera and software without the board, I hope to do that on Sunday.
Blocking? I don't understand what that is......
Stan I found the specific driver for the camera, so as I am not on that funky windows 10 shennanigans I have downloaded that for the laptop...
Posted by Kamel Ikhlef (Member # 6667) on September 28, 2019, 11:56 AM:
Mike, In fact once the focus is over the lens must be blocked to stop moving. When you have finished your adjustments, you put one or more rings to block the lens that does not unscrew with the vibrations.
Sometimes we can put a point of hot glue (like wolverine stock)... or a little screw if provided but i'ts not often the case !. I will can design other lens holder with possibility of block screw, if real need?
Posted by Mike Spice (Member # 5957) on September 28, 2019, 01:44 PM:
Kamel now I understand.
Locking, not blocking.
Makes 100% sense now. Thank You. Merci.
Posted by Kamel Ikhlef (Member # 6667) on September 28, 2019, 02:06 PM:
Mike, sorry for my "french" english !
Posted by Stan Jelavic (Member # 6822) on September 28, 2019, 02:16 PM:
Thanks Mike for the info.
Tried the 8mm lens for Ray.
https://photos.app.goo.gl/vspGQb31MGr5K6T17
Came out pretty bad because the lens is not macro but at least it shows that the stock one is close to 8mm. Maybe it is even 6mm because I had to zoom out a bit with the 8mm. But anyways 8mm macro lens should work but there is a catch. The holder needs to be replaced.
Lots of work and cost and still not sure if the results would be any better. I'd say go with the new controller - my 2 cents.
Posted by Mike Spice (Member # 5957) on September 28, 2019, 02:41 PM:
Kamel sorry for my pigeon english.
Stan You're more than welcome.
Posted by Ray Fox (Member # 7095) on September 28, 2019, 03:20 PM:
Stan . Thanks for trying the 8mm lens. I guess that limits my options in finding an alternative.
My sensor looks Ok but unfortunately I cannot find a suitable lens in my collection to properly test it. However it was working after my first attempted lens repair but the lens fogged up as I watched!
I think the Winait lens is a 3 element. I have managed to remove the rear element and IR filter. It is the middle element that appears fogged and I think the problem is on the front side of that. Cannot as yet see an easy way to remove that middle element but I will try tomorrow.
Yes please to your offer of a Wolverine Lens. I will contact you via Private Message.
Thanks again.
By the way I have just reread all 39 pages of the forum and have gleamed a lot more info from all the excellent work that everyone is doing. I suspect one day I will undertake the modification once I have at least scanned all my films with the standard Winait Scanner.
Post Script Edit: I have just seen your latest post after trying the lens for me. Thank you. I must admit it looks soft at the edges, more so on the left than the right which is a bit odd. I think I will still take up your offer if you don't mind.
Posted by Stan Jelavic (Member # 6822) on September 28, 2019, 03:35 PM:
No problem Ray. Just send me your address and I will mail you the lens. I have 3 in here. Will test it fist to make sure it is OK.
Posted by Mike Spice (Member # 5957) on September 28, 2019, 03:39 PM:
39 pages.... that is quite something.
Robert Hudson never saw that coming on the 1st April 2017 when the thread came to life.
I think I joined around page 6.
I love this thread, it vanished to page two for a time, now it's up the top of the forum most days of the week.
Very exciting days now that the Hawkeye mod is on the next page, or the page after ...
[ September 29, 2019, 03:25 AM: Message edited by: Mike Spice ]
Posted by Paul Adsett (Member # 25) on September 28, 2019, 04:56 PM:
This thread really is amazing, but with all the incredible technical knowledge on display here I think you guy's could have got together and designed a great film digitizer from scratch instead of modifying the rather crappy Wolverine.
Posted by Mike Spice (Member # 5957) on September 28, 2019, 05:07 PM:
Paul Adsett that's coming on page 73
Posted by Kamel Ikhlef (Member # 6667) on September 28, 2019, 06:09 PM:
Yes Paul, it's so true, but we're so close now ...
Posted by Stan Jelavic (Member # 6822) on September 28, 2019, 06:15 PM:
Considering all the steps we went through, that is quite doable.
Oops looks like I did not answer Kamel's capstan motor question:
Here is the motor wiring:
https://photos.app.goo.gl/raWZMCiemmsucdDN6
[ September 28, 2019, 07:37 PM: Message edited by: Stan Jelavic ]
Posted by Kamel Ikhlef (Member # 6667) on September 29, 2019, 04:26 AM:
Ah! Thank you very much Stan. I began to despair! ...
Indeed it is a particular wiring. I will see if I can create specific molex picoblade connectors to facilitate unplugging connection.
Thank you again for your time and the share your skills, your knowledge on this great project !
BTW :
I also wanted to know if I could replace the On/Off switches with little switch buttons and a slide switch for speed selection (lack of space for the next 3D Printing design of the telecine front cover).
[ September 29, 2019, 06:22 AM: Message edited by: Kamel Ikhlef ]
Posted by Mike Spice (Member # 5957) on September 29, 2019, 06:34 AM:
Lens Mount attached and camera working
I have completed the build of the image sensor and everything works fine.
A note to windows 7/8 users.
You do need to install the device driver as well as the capture software, otherwise the camera will not be recognised.
Stan mentioned he didn't have to install a driver, perhaps windoze 10 does it for you......
Lens mount & camera test video

Posted by Stan Jelavic (Member # 6822) on September 29, 2019, 08:23 AM:
Wow, great job Mike. The music makes the job much easier
Kamel, I don't see any reason why the pushbutton switch would not work as long as it is latching. The only issue may be fan surge current when turned on. The other switches are very low current 0.33 mA.
The inrush current can be 3 times the normal running current which we can measure.
Posted by Mike Spice (Member # 5957) on September 29, 2019, 08:30 AM:
Any excuse for some easy listening music Stan.
Very happy with the result, the test image I took is not amazing, but I will save messing about with the focus and image quality for when the camera is mounted over some film, and an LED behind it.
Posted by Alain Gottschalk (Member # 7079) on September 29, 2019, 10:02 AM:
Hello Stan, Kamel, Mike
Stan :
I just mount the card on Somikon V1.
Is the connection is correct?
Where should connect the black cable molex?
What should I do as a test?
Thanks for your help.
[IMG] http://8mmforum.film-tech.com/cgi-bin/showpic.cgi?dir=uploads0503&file=DSC_1067copie1.jpg [/ IMG]
[IMG] http://8mmforum.film-tech.com/cgi-bin/showpic.cgi?dir=uploads0503&file=DSC_87.jpg [/ IMG]
[IMG] http://8mmforum.film-tech.com/cgi-bin/showpic.cgi?dir=uploads0503&file=DSC_88.jpg [/ IMG]
cordially
Alain
Posted by Stan Jelavic (Member # 6822) on September 29, 2019, 11:14 AM:
Mike, the lens has very shallow DOF so both the cam and the object have to be very solid. Any small movement will cause the image to go blurry. So the ultimate test is with teh projector as you already pointed out.
Good work Alain.
The manual:
https://drive.google.com/file/d/1QdWmdEiLXvubbFjXUEi14x_s3I_0WM_p/view?usp=sharing
has the test section at the end.
The black cable goes between the camera and the CAM SYNC connector on the board.
Hmm, did I send you some extra cables for the switches + the 5V cable? You will need that to get the board running.
I can send you via regular mail.
Posted by Alain Gottschalk (Member # 7079) on September 29, 2019, 02:38 PM:
Stan,
With the V1 card, there was only the black molex cable.
I accept with pleasure for you to send me additional cables for switches + 5V cable to do the tests.
I will keep you informed of the test results.
I'll ask a quote for the camera and lens in imagingsource.
Thank you for your kind assistance.
cordially
Alain
Posted by Kamel Ikhlef (Member # 6667) on September 29, 2019, 05:18 PM:
Sorry, I know you're very busy Stan. Here is a diagram with the summary of your explanations. is it right ?. only the right pin of the cap in connector is not included (I did not understand what it is for).

Posted by Stan Jelavic (Member # 6822) on September 29, 2019, 09:54 PM:
Will mail it to you tomorrow Alain.
Kamel - here is t wiring diagram:
https://photos.app.hegoo.gl/k1JtdPjKNQJ5zFpo8
Only 1 connection required to cap in since the other one is ground and the ground is already provided by the black wire. So no need for another ground.
Posted by Kamel Ikhlef (Member # 6667) on September 30, 2019, 12:39 AM:
Thank you very much Stan. I go well with your advices and your clarifications.
Your last link for the capstan scheme does not work. I'm going back to my 3D printing design.
Posted by Stan Jelavic (Member # 6822) on September 30, 2019, 09:19 AM:
Does not work for me either
Try this:
https://photos.app.goo.gl/LJajGbSQG1fujdZB8
Posted by Kamel Ikhlef (Member # 6667) on September 30, 2019, 09:53 AM:
Thank you, thank you Stan ...
Posted by Mike Spice (Member # 5957) on September 30, 2019, 12:53 PM:
As well as the cotton gloves, I have just treated myself to a bottle of film cleaner from Van Eck.
Paid for by my last scanning job...
I am really looking forward to re scanning my films in the coming months.

Posted by Stan Jelavic (Member # 6822) on September 30, 2019, 04:31 PM:
Pretty impressed with Kamel's design. The capstan installation went pretty smoothly and IT WORKS!!!
https://photos.app.goo.gl/aFBfAx87o6nDbgp68
Will expand his instructions a bit and add it to the manual.
Another update. Looks like the PRO units sold on ebay have a change in the power supply board. Pin 12 has to be tied to 3.3V in order for the stepper to work. Not sure why yet but used a solder bridge between pins 12 and 11 and that fixed the problem. Pin 11 is 3.3V.
Posted by Terry Dowling (Member # 7108) on September 30, 2019, 05:11 PM:
Mike, have you used this film cleaner before? And have you tried FilmGuard? It seems like it is recommended a lot. I have some very dirty super 8 film that needs cleaning up before scanning.
Stan, that's great news! It looks like it works very well - you & Kamel have done an amazing job!
Is there a way to tell which version power supply I have in the Pro unit?
Posted by Stan Jelavic (Member # 6822) on September 30, 2019, 07:48 PM:
Thank you Terry,
Looks like it works based on a short test. The power supplies have all same numbers except that the one that needs the fix has the following number on the back of the board:
E47G197
The good one has:
E47S197
Posted by Terry Dowling (Member # 7108) on October 01, 2019, 04:43 AM:
Thanks Stan will check when I receive it.
Posted by Mike Spice (Member # 5957) on October 01, 2019, 08:59 AM:
I have been out to buy the switches today, complete with color coding.
Fancy pants huh?
I am lucky to have a model builders store 5 mins away.
It's an absolute delight of just about any component you could ask for.
I did find a nice little aluminium sheet while there, I could use to make a face plate, but
Stan Do you think I could buy the face plate from you to mount the switches?
Terry Dowling, Hi. I have utmost faith in VanEck and have read a lot about film guard.
I just wanted something that will take the finger prints and dust off of my films, pre scan.
In 40 years they have never been cleaned, my finger prints all over them without doubt....
A decent scan means a wipe clean with something at least.
That's after I have donned my cotton gloves and been through every splice and sprocket.
It was just an easy choice, I had watched a few VanEck youtube videos during the day, got home from work, went to the VanEck website and clicked 'purchase now'
Today it is in the post, on it's way...Job Done....
I understand film guard also lubricates for smoother projection, that is not important to me as my reels are unlikely to ever be projected again, even tho I have a nice clean Sankyo 500 projector, I also gather it's not an easy thing to get hold of, so rather than begin an email trail, VanEck seemed a simple solution...
I am quite sure it will clean my film with no problem.
[ October 01, 2019, 12:10 PM: Message edited by: Mike Spice ]
Posted by Terry Dowling (Member # 7108) on October 01, 2019, 09:48 AM:
Mike, that's good to know about Van Eck and film cleaner. I know some of my film has quite a bit of scratches and heard that FilmGuard can help cover these up. Also some film has become stuck together so hopefully can be saved.
I have actually been looking for a film rewinder and came across this on Van Eck website https://shop.van-eck.net/RW-0062.html - it looks like it does a good job in his YouTube videos..
I see you mentioned previously about manual film rewinding - are there any you can recommend?
Posted by Mike Spice (Member # 5957) on October 01, 2019, 09:52 AM:
Terry
249 euros is way too much for me and my dozen reels.
I think a typical cine viewer is sufficient for rewinding, that's what I use. Plenty of viewers on ebay for much less.
I guess it depends on how much you would use the re winders to justify the high price.
That's serious money, almost the price of a wolverine.
There are scratches on my film for sure, I will have to live with that but I don't mind, I think it adds to the era of the film, like the clicks and pops on my records when I play them.
Edit, Oh, I see they do a cheaper version too, further down the page, £70 is still a fair bit of cash to rewind film, a cine viewer is all I need.....
I also have a couple of projectors I can call on for rewinding or spooling.
[ October 01, 2019, 12:06 PM: Message edited by: Mike Spice ]
Posted by Stan Jelavic (Member # 6822) on October 01, 2019, 10:29 AM:
Mike, I do have one to two spare. The cost is $4 for qty 5 plus $16 shipping from the vendor. So $20 divide by qty 5 is $4 per board. Sooo the beer is on you
I will just put it in an envelope with global stamp... should be ok.
Posted by Mike Spice (Member # 5957) on October 01, 2019, 10:36 AM:
Stan there is no question that once I do have your paypal I will be sending you enough for a couple of beers....
Thank You so much.
Posted by Kamel Ikhlef (Member # 6667) on October 01, 2019, 10:42 AM:
Wow! Stan did it! ... I was hoping it worked. Well, I'm very very happy to see your video, Stan it's really amazing.
I have not tested yet as far as you (I did not know how to connect the capstan 6 wires) and I have no spare parts for me, I must print again. in France they say "cobbler badly shod". LOL.
Congratulations Stan, I'm following you ...
Mike,a bit of fantasy that feels good, it's the same as my RGB leds of colors!
Terry, as Stan has validated. I will make the 3D files available as soon as possible.
Posted by Mike Spice (Member # 5957) on October 01, 2019, 10:50 AM:
Remiss of me not to congratulate Stan on the capstan video.
It really is very special......
I have chosen not to go this route, I am going to make life difficult for myself and check every foot of film for sprocket damage and repair where possible or edit out.
Good luck with the printing Kamel
My coloured switches will make a huge difference to the scan quality
Posted by Kamel Ikhlef (Member # 6667) on October 01, 2019, 10:53 AM:
Ha! Ha! Me too with my switches and colored leds !
Posted by Stan Jelavic (Member # 6822) on October 01, 2019, 11:20 AM:
Thank you both. Maybe illuminated RGB switches - never mind...
I am rethinking the USB connection. I think I will just use a 90 degree mini plug and solder it onto the USB pads on the V7 board. The adapters are too much trouble. The micro to mini cables do not work because they are wired for specific applications that do not work with imagingsource camera.
Posted by Terry Dowling (Member # 7108) on October 01, 2019, 11:52 AM:
Mike, thanks yes it is expensive and probably better for professionals or people who deal with 9.5mm and 16mm as well. I only have 8mm so going pick up a cine viewer on ebay as suggested.
Kamel, thank you look forward to printing this. Hope my cheap 3d printer will be good enough!
Posted by Kamel Ikhlef (Member # 6667) on October 01, 2019, 05:06 PM:
Stan,
can we make a specific USB cable angled to Picoblade connector.
I do not know if it's possible, just an idea.
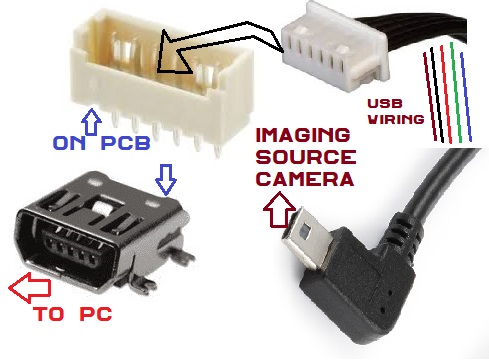
BTW : Here the link for My 3D Printed Design https://www.thingiverse.com/thing:3891738
Posted by Stan Jelavic (Member # 6822) on October 01, 2019, 09:34 PM:
Yes it is possible Kamel. Actually it does not have to be picoblade. Any connector will do, as long as we can get the right angle mini (camera side). Should get something that can be easily soldered.
In the meantime here is my hardwired solution. It works.
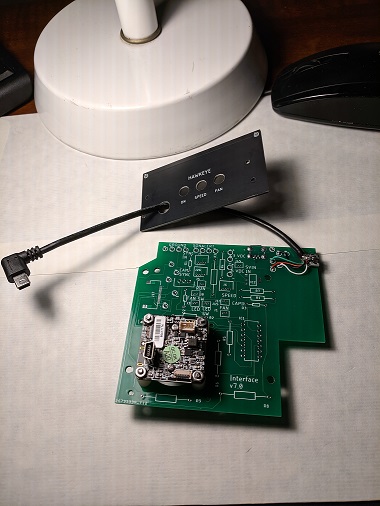
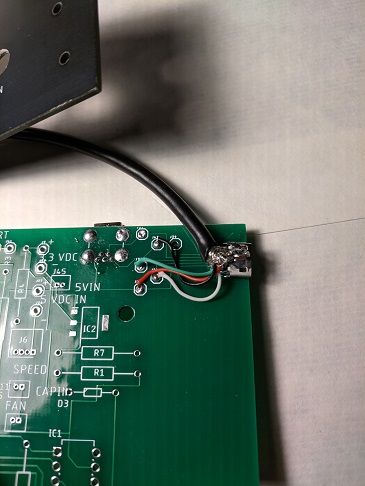
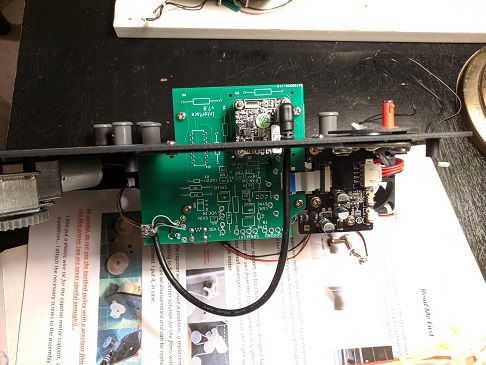
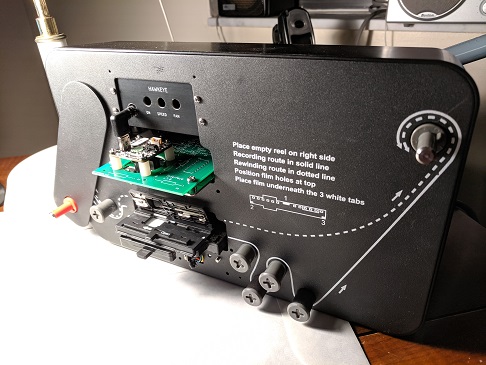
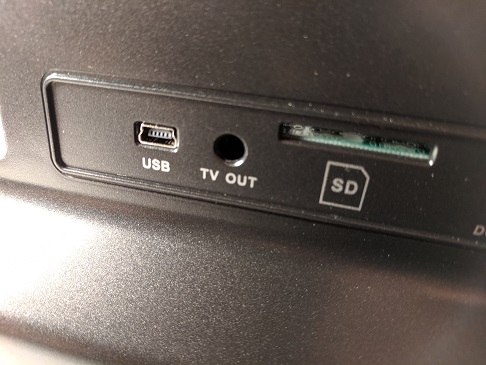
Posted by Terry Dowling (Member # 7108) on October 02, 2019, 07:16 AM:
Kamel, thank you very much for sharing this! BTW what design software do you use?
Posted by Kamel Ikhlef (Member # 6667) on October 02, 2019, 08:46 AM:
Terry,
For my 3d design files, i promised !
I work with Design spark mechanical free version. it's great software, very easy. Have fun !
Posted by Mike Spice (Member # 5957) on October 02, 2019, 10:30 AM:
Stan Loving your work.
That looks like a very elegant solution.
Posted by Stan Jelavic (Member # 6822) on October 02, 2019, 01:04 PM:
Really appreciate you support Mike.
BTW - mailed you the front board today via regular mail. Hope you get it soon.
Also mailed the lens to Ray.
There is another USB solution in the works. Board V8.
This cable:
https://www.amazon.com/gp/product/B01DBTPE6Q/ref=ppx_yo_dt_b_asin_title_o00_s00?i e=UTF8&psc=1
Change USB micro to USB type A on the board:
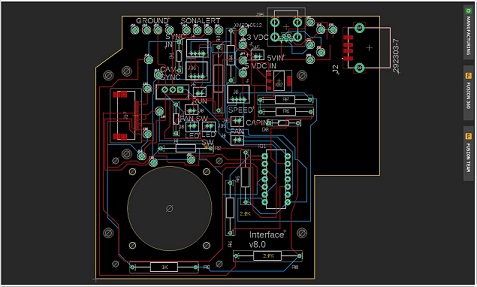
Much easier to solder.
The front panel will need a cutout for the cable:
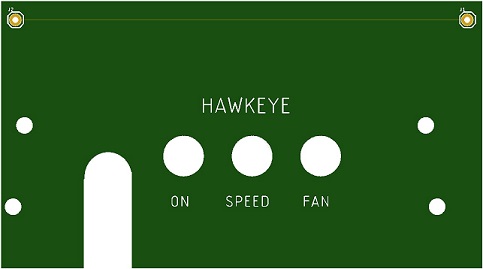
Maybe Kamel can design a small grooved insert that could be inserted from the bottom to cover the slot.
The insert can be indented on the top to fit the cable. Black color.
Posted by Mike Spice (Member # 5957) on October 02, 2019, 01:21 PM:
Many Thanks Stan
It seems the pigeon takes around 10 days to fly here, so I look forward to that face plate.
Then it's just the circuit board and I am good to go.
My gloves and film cleaner should arrive by the end of the week, so I have a couple of weeks to spend pottering around with rewind arms and film cement, and get my reels wound down to some spare 200's ready for the first modded scan.
Once the circuit board is on the way, please do let me have a paypal address in a pm ... cheers.
Posted by Kamel Ikhlef (Member # 6667) on October 02, 2019, 01:38 PM:
Ah! better and better, Stan ... Very good idea (it's better than the wiring weld hack that I had thought of!)...
For the Guide cap of the USB hole, no problem, I will do the 3D design with pleasure.
I will also rehabilitate the design of the front cover, because I'm planning a guide to slide a fan to cool the camera board.
BTW: Would it be possible to have the v8 scheme?
Posted by Brian Lamm (Member # 7099) on October 02, 2019, 04:58 PM:
I am very interested in this project as I'm trying to convert and restore film for a documentary I'm producing. I would be interested in purchasing a conversion kit for my Wolverine Pro once this project is complete with a finished project.
Posted by Stan Jelavic (Member # 6822) on October 02, 2019, 08:15 PM:
Thank you Mike and Kamel.
Here is the schematic Kamel. It is not complete yet.
https://drive.google.com/file/d/1praEMe_AoO7DuQ9DPPmhV4zVfjWjc-Se/view?usp=sharing
Brian, can you please add your name to the list.
https://docs.google.com/spreadsheets/d/11ulozLsHAFLXWV3mcBSc-CuQRRfOLX6nDC3h63EVo9Q/edit?usp=sharing
Do you need the kit soon?
Posted by Kamel Ikhlef (Member # 6667) on October 03, 2019, 05:26 AM:
Thanks Stan for the V8 scheme, but I'm not experienced enough to complete the V8...
I will wait for your finished version, it will be much safer...
I am like a student and his teacher, I try to understand and learn, I am always in a hurry and curious to see the upgrades that you develop.
There, I have just received a new extruder (Bondtech) for my 3D printer and a new all metal nozzle. this will allow me to print new materials (rubber, elastic, flexible filament, and also filaments loaded with aluminum, brass or copper, stone, wood ...) This opens up new perspectives. A wooden front cover telecine?(LOL).
You had mentioned the possibility of adding a 3trd speed of 1 frame /sec. Is this expected or there are too many constraints?
Must I plan an additional RVB led (it's soon Christmas, I'm planning a string of led on the new telecine !).
Posted by Mike Spice (Member # 5957) on October 03, 2019, 08:06 AM:
Kamel Your printing continues to amaze me.
Christmas lights? why not!
Maybe some christmas music too... a loudspeaker built in to the scanner? Perhaps not.....
My film cleaner and cotton gloves arrived today, so while I wait for my circuit board and face plate, I can spend my free time going through my own reels checking splices and perfs.
I will save the film clean until immediately prior to scanning
Posted by Stan Jelavic (Member # 6822) on October 03, 2019, 09:19 AM:
You are getting there fast Mike. I started assembling the boards. So, that will keep my evenings busy for a whole week.
Kamel, I have to wait for the type A connector and cable to come it to verify the connection before I finalize the schematic and layout.
So, here is the plan for the V8 board:
- USB solderless connection to the back cover
- connection and resistors for the RGB led
- capstan motor connector (possibly)
- sound generator (ha ha ha)
Ohhh, almost forgot. The 2 capstan motor screws are too long Kamel. I had to install a thin washer between the motor and the mounting bracket that you designed. Without it, the rotor touches the screws.
At this point the kit includes the following:
- populated V7 board
- switches with connectors installed
- camera spacers and screws
- front panel
- usb cable hardwired to the board
No capstan is provided with the kit. The capstan will be installed if the complete scanner is ordered.
Merv, you put your name on the list. It would be a good idea if you just try the V7 board to see how it fits in the unit since you have the belt version. We may need another version for the belt driven units.
You can order the board directly from the supplier.
Download the gerber:
https://drive.google.com/file/d/1DPQeBGjiFPIaBIrnbY23_mQ3IPaYmEVN/view?usp=sharing
Go to:
https://jlcpcb.com/
Click on "Quote Now", then click on
"Add you gerber file"
and point on the downloaded zip file and then proceed with the order.
Posted by Kamel Ikhlef (Member # 6667) on October 03, 2019, 04:49 PM:
Thank you Mike, I hope the curved pulleys will help you to preserve the films from scratches and make the reel easier. (no more trash with loose film!).
Thanks Stan for the test return. I will try to find shorter screws because I could do a thicker design for the support but I will still lose a bit of motor axis that is already very short.
For the v8, we will be patient. Sonalert is very useful. I will use it (with the capstan).
It's very well thought out : a basic version that works fine and options for those who wish (it is better to predict, even if it is not used for everybody).
[ October 03, 2019, 06:12 PM: Message edited by: Kamel Ikhlef ]
Posted by Stan Jelavic (Member # 6822) on October 03, 2019, 07:46 PM:
Agree, the shorter screws is a better solution Kamel.
Regarding the 3rd speed it is possible Kamel. The only constraint is the encoding on the two input pins of the MSP, pin5 and pin6.
So currently if pin5 is high the speed is 2 sec, if pin6 is high it is 4 sec. If both are high it is 1 sec.
But I wanted to add the rewind.. So, maybe use both pins low, and use a rewind switch that shorts both inputs through diodes. Alternatively, we just have 2 sec and 1 sec and middle of the switch for rewind. The middle of the switch pulls both inputs high.
[ October 04, 2019, 11:59 AM: Message edited by: Stan Jelavic ]
Posted by Kamel Ikhlef (Member # 6667) on October 04, 2019, 01:06 PM:
Thank you Stan for these explanations. As I understand pins 5 and 6 (pins 7 and 8 of msp430 ?) are used.
Foresee rewinding is a very good idea to complete the Telecine system !
So, we would lose speed 4im / sec, right? I have not pushed the tests far enough to know how fast we need to allow recording on the computer hard drive ...
To think, but it's the right way Stan, it's very motivating!
Posted by Stan Jelavic (Member # 6822) on October 05, 2019, 11:05 PM:
Here is the V7 wiring before tiding up. All tests passed. The speed switch middle position is used for rewinding. One second per frame does not work. Will look into that at some point. But for now it is, 4 sec/frame, rewind, and 2 seconds per frame.
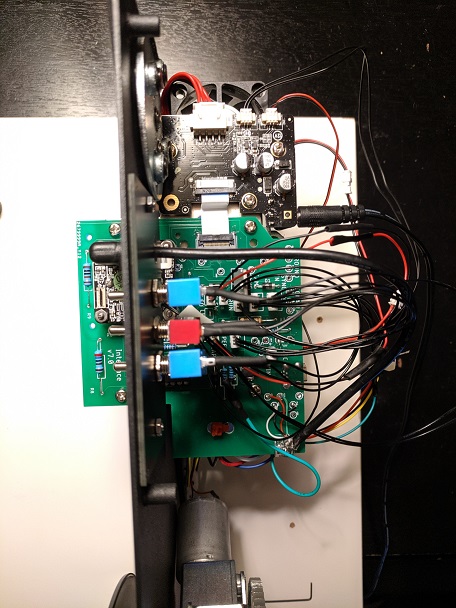
Posted by Mike Spice (Member # 5957) on October 06, 2019, 03:25 AM:
Looks very good.
Amazing work Stan.
Getting more complex with each build.
The rewind will be handy for those without a viewer or projector.
Any chance you have time to make a quick sketch of the wiring diagram for the switches and fan wires please?
[ October 06, 2019, 08:16 AM: Message edited by: Mike Spice ]
Posted by Stan Jelavic (Member # 6822) on October 06, 2019, 11:48 AM:
Will add it to the manual Mike.
Posted by Kamel Ikhlef (Member # 6667) on October 07, 2019, 03:01 PM:
Stan,
Should I choose a 3-position switch to benefit from rewinding? ( ON-ON-ON?)... I am looking for a mini sliding switch.
These are stupid beginner questions, but I still have a lot to learn and I like that.
This project will have taught me a lot. Thanks again Stan.
Posted by Stan Jelavic (Member # 6822) on October 07, 2019, 06:39 PM:
Three position Kamel should work. The first position provides the contact between the 1st post and the center post. the center position all open, and the third position connection between the 3rd post and the center post. That is for the slide switch.
BOARD STATUS:
Here is the kit shipment update:
- The complete pro unit with Hawkeye to Bruce shipped yesterday (10/7/19)
- The board to Mike shipped today (10/8/19)
- The rest of the boards being put together today and tomorrow.
[ October 08, 2019, 01:32 PM: Message edited by: Stan Jelavic ]
Posted by Mike Spice (Member # 5957) on October 08, 2019, 01:44 PM:
Stan I can't wait for the pigeon to drop it off.
Thank You so much for all your hard work.
As I came to the page tonight, I said to myself "I wonder when the board will be on it's way"
And By Jingo, it's in the post.
Very happy to read that.
Now, please send me a paypal address in PM, so I can send you some beer money.
The mod is coming......
Posted by Stan Jelavic (Member # 6822) on October 08, 2019, 07:44 PM:
Did send you the paypal account info Mike and thank you.
Hope the board gets there soon and intact.
On another note running out of solder.. but the new roll should be here tomorrow.
Posted by David Brown (Member # 7133) on October 08, 2019, 10:18 PM:
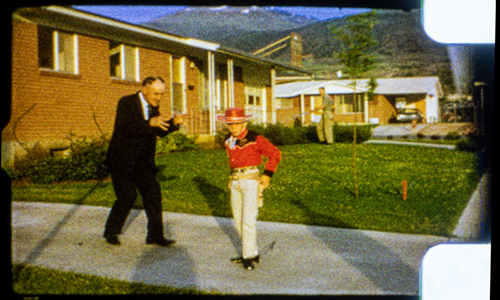
Resizing an 8k image down to 500 pix, I'm exhausted. Abt 7% of the original. I must say it looks a lot smaller than other images I've been seeing? It is also so small, no one will be able to see the grain that I was complaining about. Can't be the film stock, this had to be shot on Kodachrome II in 1965, it's only 8mm. It must be the conversion of film grain to digital pixel array that amplifies it. I've been shooting single frames with a dslr around 8k. For print, the grain is softened some by the printer, but not in a video. That's why I want 4k camera.
Questions:
1. the original camera in the Wolverine MMpro is the same resolution as the replacement being suggested. Can it be reused with the new board?
2. Could a 4k camera, like the one I saw on OEM Cameras also be used in place of the 2k camera suggested?
The 4k is significantly more expensive, maybe 4x. Would only be worth it if the images were to be processed for grain and jitter, then shrunk down to 2k.
I don't know, I would look for a smaller fov lens if keeping the original Wolverine. The digital zoom makes all the noise worse. Not that saving uncompressed stills won't make a huge difference with the same camera.
Posted by Stan Jelavic (Member # 6822) on October 08, 2019, 11:17 PM:
Hi David,
I replied to your private message earlier. Not 100% sure but seems you are looking for a high quality transfer something similar to a DSLR connected directly to the projector and hoping that we can achieve that with the Wolverine. Am I right?
The stock Wolverine is far from that and we had lots of discussion on that in the thread (I know it is lots of reading).
First to answer your questions:
1. The Wolverine camera is not the same resolution. It is 720 x 480 because of the 6mm lens used. Then they double up the frame digitally.
It cannot be reused because the sensor is a part of their controller board. The new 12mm lens that we use with the new cam is far superior.. see some of the test results earlier in the thread.
2. Possible - but the cost is high. Do you think it is worth it?
Here is some bakground info:
Essentially, Wolverine controller uses the following components:
Novatek NT96650 camera sensor controller
Onsemi sensor:
https://www.onsemi.com/PowerSolutions/product.do?id=AR0330
and cheap 6mm lens.
The Novatek controller is used for time lapse mode and that cannot be changed. Similar to this product:
https://www.amazon.com/Crosstour-Dashboard-Recorder-Detection-Recording/dp/B07FXV5WHN
Now the really bad part:
The 6mm lens has wide FOV and thus low optical resolution,sooo they digitally double the frame and that gives lots of artifacts. Additionally the MP4 encoding has high compression. The frames are not stored anywhere but pushed into the mpeg stream by the Novatek chip.
You cannot put a higher FOV lens in there because there is not enough room to back off the controller.
Posted by Mike Spice (Member # 5957) on October 09, 2019, 10:33 AM:
Stan I am most grateful for the face plate, which arrived today.
Thanks for the PP address, have a beer & buy some solder ...
I must remember to click my profile and check messages more often.....
How very James Bond....
Posted by Stan Jelavic (Member # 6822) on October 09, 2019, 12:12 PM:
Should have called it Hawkeye-007
Thanks for the beer plus Mike. All you need is the board now.
I will update the manual shortly with the wiring info etc.
Board status:
Have 6 board almost finished.
4 will be shipped tomorrow which leaves me with two extra boards if anyone is interested. Possibly Doug and Merv?
Also I have a blank board that is cut to the V7 dimension and it is free for anyone who wants to test if it fits. I am still concern that the belt driven units will cause problems.
Posted by Mike Spice (Member # 5957) on October 09, 2019, 01:20 PM:
In a couple of weeks time, I have 'half term' at Uni.
That will be my moment to get the soldering iron out, open up the scanner and rip it to bits and spend a couple of days trying to make it work again.
Really looking forward to it.
Judging by previous mail drops, I expect the new board to be with me mid week next week....
This weekend will be dedicated to checking reels, splices and then a good clean with the VanEck liquid.
If we're lucky, my you tube will be running a premiere of HMS Ark Royal in glorious HD.
On the other hand I could just be bombarding you with HELP... IT DOESN'T WORK .....
Fingers crossed for a great outcome...
Posted by Terry Dowling (Member # 7108) on October 09, 2019, 01:28 PM:
Stan, I would be interested in a board please.
Posted by Stan Jelavic (Member # 6822) on October 09, 2019, 02:51 PM:
Hi Terry, I assume you want the kit with the assembled board the switches and the front panel by no capstan- right? And USB to the back cover.
Posted by Terry Dowling (Member # 7108) on October 09, 2019, 04:39 PM:
Hi Stan, have sent you a PM.
Posted by David Brown (Member # 7133) on October 09, 2019, 09:09 PM:
Hi Stan
The 12mm lens should do what I was hoping for if the Movie Maker Pro's lens is 6mm. I'll be looking back through the thread for those details and samples.
4k is not a good choice for everyone, maybe not most. Those selling 4k capture, claim there is just a little more detail and tonal range left above a 2k scan. I believe a high-quality source has to be there first. I don't know if 4k is worth it to me. I recently intended to have a 50-foot reel scanned at 4k, but with the cost over $100, I changed my mind and went with 2k.
Now I'm troubled by the new Wolverine's output ( I own one) after it is promoted as a 2k sensor.
I have been taking some still captures from 8mm & s8mm with a dslr because some family events are only on 8mm. I don't have a way to frame register the images from 8mm, so capturing movies with my setup would be impossible.
Over the years I've transferred films to videotape, videotape with better scanners, and then dvd. Time to do it again.
Thank you for being there. This thread goes back years! It's been on my mind for years too.
Posted by Stan Jelavic (Member # 6822) on October 09, 2019, 10:45 PM:
David, have you tried playing with the sharpness settings in Wolverine. I assume you did. Yes, the lens is around 6mm because when I install the 8mm lens it gives me a bit of zoom comparing to the stock lens but not much more.
Also the optical measurements point to 6mm.
For us to get to 2K with the Hawkeye mod the lens would have to be changed. The problem with the 12mm that we have is DOF. You bring the lens closer to the object and you get your 2K but the edges start getting soft so although the pixel rez is high the one with lower rez gives you overall sharper image.
An alternative is using the DSLR with a macro lens. The kit can be used for that but the front panel top would have to be cut out to allow the macro lens access.
Once I am done with this project I might consider that.
Posted by Kamel Ikhlef (Member # 6667) on October 10, 2019, 05:30 AM:
Ha! Ha ! maybe a microscope :
https://fr.banggood.com/Andonstar-AD407-3D-HDMI-Digital-Microscope-7-Screen-Electronic-Soldering-Microscope-for-Phone-Repair-with-Adjustable-Stand-p-1549209.html?ID=47757&cur_wareh ouse=CN
Posted by Stan Jelavic (Member # 6822) on October 10, 2019, 12:30 PM:
Interesting but still a microscope cam...
External trigger
Adjustments like gamma correction etc etc..
But it has a nice stand
Possibly go with a camera with c-mount lens with manual iris. Can easily do 4k but we are talking $$$
https://www.bhphotovideo.com/c/product/1305341-REG/computar_m1224_mpw2_2_3_12mm_f2_4_5_0.html/?ap=y&ap=y&smp=y&smp=y&lsft=BI%3A514&gclid=Cj0KCQjwrfvsBRD7ARIsAKuDvMPOLqOyzCf_eTyjNNk _-B39kGLB4wfTO8BM1dAmwgMMIHdzOMpoBW8aApg5EALw_wcB
AND:
https://www.back-bone.ca/4kmicro/product/h5pro/
Are we running here is circles - ha ha.
Posted by Bruce Davis (Member # 7072) on October 10, 2019, 07:49 PM:
Hi Kamel Ikhlef, Stan has shipped a Wolverine Pro unit and it should arrive probably early next week (I think end of this week would be optimistic). I am wondering if the STL files for the printed parts are available or needed, I am not sure exactly what parts might need to be printed. Thanks for your work in developing these items, I know how time consuming it can be, I use Inventor to develop mechanical parts for 3D printing.
Regards - Bruce
Posted by David Brown (Member # 7133) on October 11, 2019, 12:32 AM:
Kamel
I was just looking at that digital microscope last night on ebay!
I feel like I'm living in two time zones. I'm only on page 10 of this thread (2017) and now I'm "back to the future".
I am also now wondering if my WMMP(wolverine Movie Maker Pro) lens is exactly focused.
A note to those in the past: If the lens won't move, use acetone on a q-tip to dissolve the thread lock, not pliers!
Stan
I did try all the settings in the WMMP. The consensus of advice I found was not to use any of them.
There are 2 camps here, those who do post processing and those who don't. I post process. I do sharpening and all the other settings in post. They can contribute to greater compression artifacts if captured. This is also true if shooting new video today, don't sharpen in-camera, use low contrast and color saturation. It looks terrible if you don't post process, but leaves more latitude for adjustment.
So the 12mm lens on the new camera in the Hawkeye upgrade does not cover the entire sensor? 2592x1944 (RGB32/Y800)
Anyway, I like the idea of a new camera that fits in the existing housing. My macro setup with a dslr is VERY close to the film. I would not be able use a projector. In fact I had to make a "film gate" that attaches to the lens, which also eliminates high shutter speeds since this is over 6* magnification.
Posted by Kamel Ikhlef (Member # 6667) on October 11, 2019, 02:06 AM:
Bruce,
Here the link for My 3D Printed Design https://www.thingiverse.com/thing:3891738
Here the installation guide : https://drive.google.com/open?id=1M-9ojbxvb9FvW7craFfegnxl-lFLKF04
If you do not use the capstan. You only need curved pulleys to protect the film and maybe the lens holder.
It will be necessary to put small brass inserts for M3 screws. In the case, the shorter pulley must replace the capstan toothed pulley.
it will also be necessary to sand the pulleys to obtain a better smoothing.
You can load STL File in Inventor.
BTW : I have not finished the front cover yet, I'm waiting for everything to be functional to better anticipate needs...
[ October 11, 2019, 04:01 AM: Message edited by: Kamel Ikhlef ]
Posted by Stan Jelavic (Member # 6822) on October 11, 2019, 07:18 AM:
Good discussion David. I found the microscope in Amazon:
https://www.amazon.com/Andonstar-Microscope-1920x1080p-resolution-Brilliant/dp/B078J4PJGD/ref=sr_1_4?keywords=andonstar&qid=1570795258&sr=8-4
Not sure what they use - lens sensor etc. Probably cheap.
But for that money could reuse the stand.
The 12mm lens cover only 1400 pixels horizontally once you crop the image with the 9mm camera spacers and close to 2K with 5mm spacers. But I like the 1400 pixel image better. Looks sharper.
Believe at the close range we are exceeding the lens capability.
So for 2k or 4k captures I think DSLR would be the best. The top of the front panel opening would have to be cut out
I would use my MarkII and the macro lens:
https://www.bhphotovideo.com/c/product/1399601-REG/venus_optics_ve2528c_laowa_25mm_f_2_8_2_5_5x.html
Obviously this would be only for selected film clips of good quality.
Using low settings during capture ensures that we are within the dynamic range of the sensor. Post-processing can enhance the frames if the original info is there... makes sense.
Posted by Terry Dowling (Member # 7108) on October 11, 2019, 10:00 AM:
I actually bought the Andonstar ADSM302 microscope a while back and find it very useful for soldering small components, especially now with deteriorating eyesight!
How do microscope and macro lenses compare - do they have more distortion?
Wouldn't the shutter life be an issue using a DSLR?
[ October 11, 2019, 11:01 AM: Message edited by: Terry Dowling ]
Posted by Mike Spice (Member # 5957) on October 11, 2019, 01:05 PM:
Terry
As an example of DSLR cameras breaking.
I used a Canon EOS 600 camera for an 18 month time lapse project, a couple of years ago.
It was quite a new camera.
Months of daily shutter action at differing frame rates and it broke the shutter after around 15 months.
I was doing 1 frame per second for some parts and 1 frame per 20 seconds for other bits of it.
So they can die quite easily. Fortunately I didn't have to pay for it......
I had it set so the mirror was up, but the shutter is very delicate on this particular camera.
I used a go pro hero as a second camera in the project, that worked much harder and flew through the process to still work today.
Posted by Bruce Davis (Member # 7072) on October 11, 2019, 05:52 PM:
Kamel Ikhlef Hi, thank you very much for the STL files and the comprehensive instructions, beautifully done, Stan has installed the capstan. According to tracking details just received on Friday delivery should be on the 17th October.
Just a minor not important item, all the files in the Images folder have an "*.stl" extension instead of "*.jpg".
Are the brass inserts of any particular type/style, there are so many different types available.
Thanks again Kamel
Regards - Bruce
Posted by Stan Jelavic (Member # 6822) on October 11, 2019, 07:24 PM:
I expected the comment regarding the shutter life. It is a good point. I would probably run it in one or two small reels. Mark II can do over 8 mil shutter operations. So what is a few thousand more or less.
But anyways I am still not prepared to shell out $400 for the macro lens.
Posted by Kamel Ikhlef (Member # 6667) on October 11, 2019, 08:12 PM:
Bruce,
in fact it's a bug in the automation of thingiverse import files. There are even images that do not belong to me. I will see that.
FORTUNATELY, the STL files were well imported!
To rename files in numbers or change their extensions, I use the free software "antrenamer": https://antp.be/software/renamer It's very useful and easy to use.
BTW: For the small brass inserts, I use those for plastic hot pose. : http://eshop-simaf.com/fr/42-insert-pose-a-chaud?p=2
or Kit on Amazon : https://www.amazon.com/s?k=brass+insert&ref=nb_sb_noss_1
Posted by Stan Jelavic (Member # 6822) on October 11, 2019, 10:11 PM:
Have you tried the new motor mount screws Kamel. The old ones were binding the rotor.
Posted by Kamel Ikhlef (Member # 6667) on October 12, 2019, 05:39 AM:
No Stan, Not yet found with the right thread.
I bought a whole kit of screws of all sizes for computer.
I have to try several to find the right size. I'm going to watch this weekend.
Posted by Kamel Ikhlef (Member # 6667) on October 12, 2019, 05:41 AM:
Stan,
I have a new 3D printer that I have to modify. It takes me a lot of time ... And at the same time I'm learning electronics that fascinates me.
So these days, I have a little neglected the telecine project.
But I can not wait to digitize my films... I really have a lot of reels, several years of family fS8 Movies, some of which my children have never seen! (... And my children are Adults now).
Scan a few for Christmas it would be good but time passes so quickly! ... Otherwise it will be for Easter!...
About electronics, Stan, out of curiosity, can I add the Capacity components (647-UMA1H010MDD1TP, C322C104K5R5TA7303)
on the PCB v6 that you sent me.
Is it better to put them? (I have about ten in advance in my workshop).
What exactly their utility in this case? They have been removed on version7.
I continue my learning by trying to understand.
[ October 12, 2019, 08:58 AM: Message edited by: Kamel Ikhlef ]
Posted by Stan Jelavic (Member # 6822) on October 12, 2019, 09:13 AM:
Something to look forward to Kamel. I have several reels as well that I scanned before using my DSLR setup and will be interesting to compare the results.
I added the capacitors to suppress the noise. The larger electrolytic is used to cut the 50/60 Hz AC noise down and the smaller ceramic cap cuts the high freq noise because electrolytic caps are not good for that.
But since the camera is on a separate USB supply I realized that these components were not required. Just extra work and cost.
Posted by Kamel Ikhlef (Member # 6667) on October 12, 2019, 09:50 AM:
Thank you Stan, for these educational explanations...
Still a few months or years to be comfortable with this world of electronics !.
For the idea of rewinding this is already planned, should it reflash the msp430 with a new code? I do not know where your project is? it's done, or it's underway, I guess you've been so busy lately!
Posted by Stan Jelavic (Member # 6822) on October 12, 2019, 12:09 PM:
Here it is Kamel:
https://drive.google.com/open?id=1DJfu-3pJaA7VXM_7445shjaj-DCgsRf6
Posted by Kamel Ikhlef (Member # 6667) on October 12, 2019, 04:49 PM:
Thank you very much Stan .
Posted by Stan Jelavic (Member # 6822) on October 13, 2019, 10:03 AM:
Any time Kamel.
Have a question for you.
Which 3D print service would you recommend? Thingiverse have only a few options for material.
Additionally, you have two types of rollers - short and long. Which ones do you use?
Boards update:
Finally got my solder Finished all 5 boards and tested one of them. Four to be tested today... and then I am basically done. Ahh yes have one order for a complete unit but that one is no rush. Maybe I will do the V8 version of the board for that one. Add power led, better usb connection and the sound chip (scratch that one)... And yes, new front panel.
Posted by Mike Spice (Member # 5957) on October 13, 2019, 10:58 AM:
All being well, my board will arrive this week, I am pretty much set to go.
Looking forward to an updated instruction pdf....
I have started the mod video, complete with a hint of James Bond music.
All being well, in a couple of weeks, I hope to be scanning in Hawkeye.......
You bit off a big bit of cake Stan, now sending boards and machines around the planet...
I bet you didn't see that coming the day you started to pull a go pro apart.......
Posted by Stan Jelavic (Member # 6822) on October 13, 2019, 12:20 PM:
Ha ha James Bond music. Awesome.
No, never even dreamed that we would get here.
Here is the instruction video Mike. Feel free to delete my boring narration and add some cool music with some text and reuse as much as you need.
https://photos.app.goo.gl/PboRDC7Y6MuP3a498
Posted by Mike Spice (Member # 5957) on October 13, 2019, 01:30 PM:
Thanks for the video Stan, once I get a beer I will sit and watch with interest.
Posted by Stan Jelavic (Member # 6822) on October 13, 2019, 02:31 PM:
A beer is a must.
Posted by Mike Spice (Member # 5957) on October 13, 2019, 02:47 PM:
Great video, not easy holding a cam and working....
I would be grateful for a wiring diagram for the switches and associated wiring. please.
Hand drawn is fine.
Posted by Stan Jelavic (Member # 6822) on October 13, 2019, 03:12 PM:
Here we go Mike:
https://photos.app.goo.gl/BDiEVDEqZ1SMcxyg6
Posted by Mike Spice (Member # 5957) on October 13, 2019, 03:50 PM:
Lovely, thanks Stan. Much appreciated.
Posted by Stan Jelavic (Member # 6822) on October 13, 2019, 04:01 PM:
Any time Mike.
Posted by Kamel Ikhlef (Member # 6667) on October 13, 2019, 05:56 PM:
Stan,
I did not really understand your question. You are looking for a 3D printing service ?.
I think, thingiverse is just a file sharing web platform. I do not know if they offer a printing service. (I'm going to look at this) ...
But, If you need small amounts of parts for your personal need, I can help you out for free, you have helped me a lot already.
For the pulleys : the short pulley is only used if there is no capstan and it is fitted in place of the toothed pulley if not used. the long pulleys (4 for the pro version are all used - 3 for Base version).
The one that is the same size as the capstan Pulley (but smooth without the teeth) is just for testing without removing the Motor. It can also be used. both work (toothed or smoothed).
Posted by Stan Jelavic (Member # 6822) on October 13, 2019, 07:31 PM:
Thank you for the answers Kamel. Thingiverse also offers printing service:
https://printathing.com/order/?thingiverse=3891738
I actually have an order for the complete machine including the capstan. So if you could quote me the price for printing I will just pass along the cost to the buyer. Other people may be interested as well.
One more thing.
I have a stash of older boards:
https://photos.app.goo.gl/L7fSJdbGce8jHHBV7
The blank boards are free. Hate to toss them out.
The populated boards I thought I would ask around $30 plus shipping or BO just to recover some of the material cost. I can test them. I plan a 3 week vacation so maybe after that. But if interested, add your name to the spreadsheet and state what you want.
https://docs.google.com/spreadsheets/d/11ulozLsHAFLXWV3mcBSc-CuQRRfOLX6nDC3h63EVo9Q/edit?usp=sharing
Posted by David Brown (Member # 7133) on October 13, 2019, 08:43 PM:
WOW. Just finished binge reading this thread up to the present. Not since I watched the series 24 have I been so driven to keep reading/watching. This thread could make a great audio book.
After typing for half an hour I advise others to not to type into the reply box. Wright comments elswhere and save often. When done copy and paste!
Stan, Mike, and Kamel This may be a common occurance these days, but THINK ABOUT IT. This project, the three of you have been driving is now, more and more, as it reaches the finishline a GLOBAL event!!?? People from all over the world are interested and offering support.
Kamel It was difficult to find you printables on thingyverse. I have them now. I'll wait for the final go before printing. I also found this.
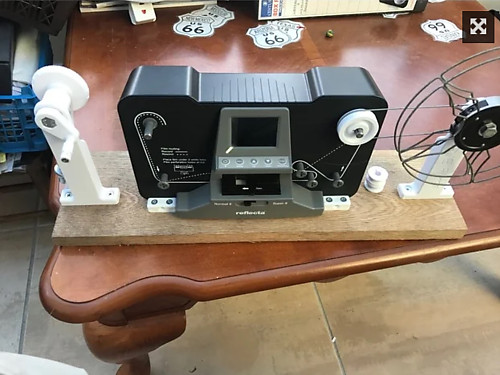
https://www.thingiverse.com/thing:2608936
For those who want to use large reels. I have 400, 600, and 1200 foot reels. I think weight may prohibit the 1200. I also have an editor/viewer with rewinds, but I will print these stantions and belt driven takeup, or order it printed. Thingyverse offers user printers, I believe they are cheaper than commercial prints.
Stan has a book on Amazon! 9 years old but I'm going to buy it. Great coffee table book after this adventure. AND I conceed the long lens award to Stan from his picture with the 3 extension tubes, a 100mm macro and various connectors to his projector. I am humbled! Let me repost that picture.
Posted by Stan Jelavic (Member # 6822) on October 13, 2019, 10:26 PM:
Ha ha I almost fell off my chair laughing when I saw your post David. I should post some of the transfers I did with that monster.
Posted by Kamel Ikhlef (Member # 6667) on October 14, 2019, 03:18 AM:
Stan,
I did not know that thingiverse was offering this type of service. Thank you for the link...
I think it's better for people interested to go through this type of service because I'm just a passionate and it would really take me too much post processing time.
I will not be able to answer the request. If it's for one-time troubleshooting only, of course i'ts no problem.
That's why I have shared my files for the community to help each other. maybe some can print for others?
For PCBs, If you finish the development of a V8, I will be happy and looking forward to having the shematic.
Thanks again Stan for initiating this great project and of course, have very good holidays, well deserved.
[ October 14, 2019, 08:14 AM: Message edited by: Kamel Ikhlef ]
Posted by Stan Jelavic (Member # 6822) on October 14, 2019, 08:29 AM:
No problem Kamel. Thank you anyway. Will try the service. What type of material do you recommend? Would ABS be ok?
I will start working on the V8 when I get back from the vacation.
Posted by Mark Pollock (Member # 6858) on October 14, 2019, 08:37 AM:
David, thanks for the link to the Thingiverse winder plans. That is the kind of thing I was looking for to rewind films.
I'm looking forward to my circuit board!
Posted by Mike Spice (Member # 5957) on October 14, 2019, 09:44 AM:
3 weeks holiday?
I think that is well deserved Stan
I am checking my mail box at work and looking forward to the mod and making a video of it. Big budget video
have a good holiday Stan....
I get a week off in two weeks time, so I will be spending it with a hot soldering iron and a few feet of cine film and a video camera and some 3D bespoke prints from Kamel.
bring it on!
One question, any tips for the final setup of the camera and focusing to the film?
Posted by Kamel Ikhlef (Member # 6667) on October 14, 2019, 09:53 AM:
Stan,
For the 3D printing material, the better choice is ABS : infill 100 %, layer 0.1mm.( color as your choice).
Posted by Stan Jelavic (Member # 6822) on October 14, 2019, 11:43 AM:
Thank you Mike and Kamel.
I will be checking the forum and email every evening. Will be in good old Toronto.
For camera setup I insert the test film, actually any other frame with lots of details will work. In IC Capture i make sure that preview is turned on and ext trigger is off.
Zoom in several times to blow up the image details
(board powered - motor off - led on)
Turn the lens until you get the best focus.
Back of zoom.
Select the lower resolution where you see just the frame without edges and use the auto white balance. Also auto exposure to get you within the ballpark and then switch auto exposure off and adjust manually.
Do not use auto gain.
Set gamma as required to brighten up dark shadows and cut down on overexposed whites.
I do not touch color adjustments. Lower color saturation is better at this stage as we all know.
That is what I have based on my limited experience with this cam.
Posted by Mike Spice (Member # 5957) on October 14, 2019, 11:47 AM:
Cheers Stan, really helpful information.
Wish you a lovely time in Toronto.
No one would blame you for turning off your wifi and making the most of an amazing break.
Be sure to have a beer for me.
Posted by Stan Jelavic (Member # 6822) on October 14, 2019, 12:05 PM:
Thanks again Mike and will have a few to your health.
BTW - I just created the FB page just for Hawkeye. Just in case this site goes down.
https://www.facebook.com/groups/2377941742520210/
Posted by Terry Dowling (Member # 7108) on October 14, 2019, 01:46 PM:
I bought a faulty Wolverine Pro on ebay that I want to do the Hawkeye mod on. I finally received it today and found the take-up motor was not running. Everything else seems to be working fine.
I was recommended to flash firmware by Wolverine support which didn't resolve as I expected. They also quoted $35 for a replacement motor.
I have tested the motor by connecting directly to a battery and found it's working so seems to be a fault with the driver board.
Has anyone had problems with driver board before on this model?
UPDATE:
Found mosfet at position Q5 is faulty. This has the marking of 1AM and is part # MMBT3904L.
[ October 14, 2019, 04:14 PM: Message edited by: Terry Dowling ]
Posted by Stan Jelavic (Member # 6822) on October 14, 2019, 09:52 PM:
Here are a couple test clips that I took with my "monster rig".
https://photos.app.goo.gl/Chu9zXBvcEyeduds9
https://photos.app.goo.gl/Usc1RDaehq4p2tXn6
Posted by Bruce Davis (Member # 7072) on October 15, 2019, 04:15 AM:
Stan Jelavic Hi I wish you much enjoyment on your 3 weeks off and I am very pleased to report that the Wolverine / Hawkeye arrived safely today (Tuesday 15th Oct.). It was extremely well packaged in two boxes.
Stan you have done a marvellous job and I thank you very much.
Regards - Bruce
Posted by Stan Jelavic (Member # 6822) on October 15, 2019, 08:42 AM:
Glad to hear that Bruce. I am shipping 6 boards today. The post office was closed yesterday. I have one more complete unit to do which is no rush and that is it for now. The project is getting close to completion.
Going forward we still have a few things to look into:
- V8 board with better USB
- LEDs for the front panel
- 2K / 4K capability
Posted by Mike Spice (Member # 5957) on October 15, 2019, 11:34 AM:
Hi Stan I have done the mod but a couple of problems.
I have posted pictures and info in your FB group
Posted by David Brown (Member # 7133) on October 15, 2019, 02:05 PM:
Mike
Is this forum in danger of collapse? Why did Stan move to FaceBook?
Posted by Stan Jelavic (Member # 6822) on October 15, 2019, 02:19 PM:
No collapse David. I just wanted a backup site because this one goes down periodically for maintenance and now with a few kits shipped I wanted to be in touch all the time.
Shipped all 6 boards this morning. Will post the tracking info.
Mike had some issues with his kit and non-pro unit. The front panel switches are hitting the housing and if you have a non-pro using you might have to mount the front panel from the front and use spacers to provide room from the switches. I am getting ready for my vacation but will look into this tonight. In any case I will come up with the alternative front panel when I come back. The pro units do not have this issue.
Additionally the front panel it too big on non-pro units but if it is mounted with the spacers the cover should fit ok. Will not look pretty but functional. But ultimately I will redesign it to fit and send the new front panel for free to the non-pro users.
Posted by Mike Spice (Member # 5957) on October 15, 2019, 02:51 PM:
The beauty of the FB group is that we can post very many video clips instantly, to demonstrate problems, photos can be posted in HD by the 100's without re sizing, and it is much quicker to get a reply.
I am happy to say my mod is working well, but I do have to get the correct lens mount from imaging source as the 3D printed lens mount that Kamel made for me is just a bit too deep so I can't focus properly.
The new films guides printed for me by Kamel are very nice.
other than that, very happy.
I understand some folks dislike of the FB platform, but it is possible to join and not give any details other than a name.
An empty profile with no personal details or even rogue details would allow you to at least join mine and Stans group to see what's going on.
Stans group is modding of the scanner, where as mine is more based around my 8mm scan service, but right now, talking about the mod and looking at pictures and clips.
Once my mod is complete, my group will go back to being a film scanning service
My FB group
A few observations from my mod experience today:
Pro users using the Hawkeye face plate for switches will need to buy tiny little nuts and bolts to secure it to the case.
The fan wire may come complete one day, but right now requires joining two wires together in what appears to be the wrong way round. Red to Black on one side and Black to Red on the other.
This is clear in stans original video at the forum.
I had an issue with the LED not coming on, but stan now assures us that further boards will have a short or switch option across the point I shorted today.
Setting the resolution on my camera was a little confusing to begin with, but now sorted.
I stumbled on my first test scan as I didn't follow stans exact instructions about setting the external trigger before then going to the timer and actually starting the timer, even tho the timer as such is not required, because everything is triggered by the scanner.
My very first 14 second test scan in tiff format came out at over 3Gb uncompressed but I got that down to 11mb in mp4
Image size was 2592 x 1944.
Large hard drive space is most certainly the order of the day, that said I will be testing out scans in jpg as well.
I did get a little confused with the LED power wire as I didn't see it specifically being disconnected in stans forum video, but only being reconnected to the new board.
I realised once unplugged from the old board, it dropped away behind the stepper motor un noticed.
[ October 15, 2019, 03:57 PM: Message edited by: Mike Spice ]
Posted by Kamel Ikhlef (Member # 6667) on October 15, 2019, 03:50 PM:
Mike,
Did you try to change the support washers to play on the height because it seems to me that the imaging source lens is about the same size.
I put 2mm more to just get closer to the picture.
In this case, it would be necessary to calculate the exact size. It may not be the same size with my "pro" version (1440x1080).
I do it again a specific design if you tell me what size you need for your unit.
I will send you a new version (free).
Posted by Mike Spice (Member # 5957) on October 15, 2019, 03:53 PM:
I didn't use any support washers when I attached the lens mount.
I screwed the lens mount with just two screws on the back of the board in to your lens mount.
The lens is screwed in to the lens mount as far it will go, as close to the image sensor as the lens mount will allow.
As I unscrew the lens it goes even further out of focus, so appears to need being closer to the sensor, not further away

Posted by Kamel Ikhlef (Member # 6667) on October 15, 2019, 04:03 PM:
OK Mike,
I sent you a second holder lens less high. you have a 7mm metal extension tube on it.
You can try to put it back on the 22mm one to test. This will bring you closer to the frame.
Posted by Bruce Davis (Member # 7072) on October 15, 2019, 08:10 PM:
Mike Spice Hi, I am not a face book fan either, have never tried hard enough to figure out how to use it or how it all works. Forums is what I prefer, I know they are not as flexible.
Mike I am not sure I understand your statement:-
"I stumbled on my first test scan as I didn't follow stans exact instructions about setting the external trigger before then going to the timer and actually starting the timer even tho the timer as such is not required, because everything is triggered by the scanner".
I can not get the Hawkeye to save images to the hard drive unless I start the timer? What is the best resolution to use for capture, I am currently on 1600x1200 and using 2 second capture time.
What program is best to use for post processing all the images. Can Vegas Pro be a recommendation.
Thanks and regards - Bruce
Posted by Stan Jelavic (Member # 6822) on October 15, 2019, 10:50 PM:
Bruce you have to use the timer and set it to 0 minutes 0 seconds. With that setting the picture will be saved to the hard drive each time there is a sync pulse from the stepper.
Posted by Mike Spice (Member # 5957) on October 15, 2019, 11:43 PM:
Bruce I can't remember what resolution I have the capture software set to but it is the maximum size.
That is set in a drop down box along to the upper menu area of the capture software.
5am in the morning here, everything packed away, so writing this from memory for now.
In device properties menu you can set the destination folder and image format, tiff files will be ENORMOUS jpg files will have some compression but be significantly smaller.
Once you have set those, click the external trigger icon along the top of the menus.
Hover he mouse over the icons and it will tell you what each icon does.
Then go to to the timer menu and set it to zero and again I think you can check image type and destination folder here also.
Click start timer, you probably get an alert box open at that point to say something about timings, ignore it, OK it away.
at this point, nothing should happen, start the scanner up and at that point it should start saving images.
for post process I am using VirtualDub (free)
VirtualDub
You will need to also locate the divxX mp4 codec online, also free. Install that codec first from the Divx website only
once running, go to open video file and point the program at the first image in the sequence, it will the automatically load the sequentially numbered images as well.
The viewer windows left, original input screen, right, filtered output screen, can be re sized to your laptop/computer with a right click each.
in the video menu choose FRAMERATE and there select change framerate to and insert your desired fps
in the video menu choose COMPRESSION and hopefully the xvid codec will be among the choices offered.
In the FILE menu choose save as.
Once processing starts, ini the process window un check 'show input and output video options' to save computer resources chugging away while trying to render the video, go have a cup of tea.
let it do its thing, job done.
This is just my personal preference for stringing together an image sequence, there are many other ways of doing it, many video edits will do it too, I would look for youtube tutorials on your particular edit software.
That said, saving as a compressed avi file will degrade quality for post edits....
You could use a different codec, your choice.
VDub will do a myriad of other tricks too but it can be confusing, but basic image sequences are pretty straight forward.
The completed video will still need editing and cropping post VDub.
I hope that helps, and even makes sense, as mentioned, typing this from memory over a 5am coffe before heading out for a long day filming.
good luck, if you can't get the program to capture, my only suggestion is to watch stans video posted a day or two ago, step by step, the bit where he startes it running, worked for me after a couple of goes.
setting the resolution to max was the thing I forgot to set and thus not getting a proper image of the frame in the gate on my live preview
top tip see if you can find a 30 second strip of unwanted film to scan with, over and over, until you get the entire process working well, spend a couple of days perfecting your workflow, rather than trying to scan an entire reel at this early stage.
That way you can work with with jpg and or tiff files to get an idea of file sizes, quality, and the amount of storage space it will be eating up....
I may be wrong but I think tiff files are better for colour correction but they will be enormous compared to jpg.
I don't think jpg files have the same colour profile, I may be wrong, perhaps someone else has more info on this subject.
[ October 16, 2019, 08:14 AM: Message edited by: Mike Spice ]
Posted by David Brown (Member # 7133) on October 15, 2019, 11:56 PM:
Mike
This forum predates the day Kodachrome died! It is not very intuitive (compared to newer forums). It's good to have a backup, though time online may double from fear of missing something in each location.
You need an adjustable camera mount, like a bellows on a rack. I used one for my still camera. Focusing can be front or rear. Lens too close to the film, or too close to the sensor. Stan is able to calculate the lens position, but you may be off by a tiny amount in both directions. It's kind of tedious to add or remove washers. It's also difficult to measure the distances precisely.
.......I would remove the washers/standoffs and move the lens by hand just to see where it ends up in focus. Does the lens have a threaded focus that can be adjusted? That could be a fine tuning for the film to lens distance.
Posted by Mike Spice (Member # 5957) on October 16, 2019, 12:09 AM:
Kamel Don't worry about sending me another mount, I have already been in touch with scorpion vision to have one sent to me.
I am most grateful to you, the film guides are wonderful.
I have only used two guides on the exit of the gate, it doesn't need three guides with stans new take up motor pulse effect.
David thanks for the tips, everything will be fine once I get the right lens mount in place.
Hopefully the only think missing from this forum will be videos and images.
FB is great for visual story telling.
I will certainly try to update here, in text, as I proceed
Posted by David Brown (Member # 7133) on October 16, 2019, 12:19 AM:
Bruce
I'm using Vegas pro 16. I have processed some Wolverine captures. I have also imported numbered Tiffs and Jpgs into the timeline. It has a way to control the framerate of mp4s the Wolverine (20fps) created and crop the image. Just say'n if you already own it, you're good. There are other options out there.
Posted by Bruce Davis (Member # 7072) on October 16, 2019, 09:05 AM:
Stan Jelavic thanks for the advice regarding the timer settings, tested and working.
Regards
Mike Spice Many thanks for going to so much trouble (and at such an early hour) in explaining what needs to be done step by step, I have both MP4 codecs installed including the H.264. Will test tomorrow.
Regards
David Brown I do have version 16 pro, so that is another option for me to try.
Regards
Posted by Mike Spice (Member # 5957) on October 16, 2019, 09:21 AM:
I have a new lens mount arriving from Scorpion vision tomorrow so everything had to come to peices this afternoon.
Really very easy now I am familiar with it.
I thought you might like to see some images.
Thanks Kamel, these are great
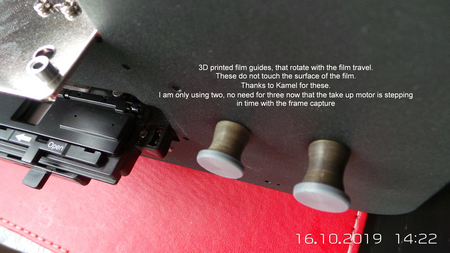
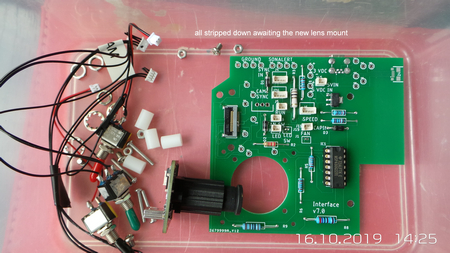
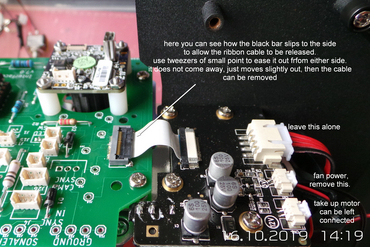
Posted by Kamel Ikhlef (Member # 6667) on October 16, 2019, 10:27 AM:
Thanks Mike,
your tests and experiences are very interresting !
Posted by Mike Spice (Member # 5957) on October 16, 2019, 10:53 AM:
I an expert now
I am sorry I won't be using your lens mount, would you like me to post them back so that someone else can use them?
You went to so much trouble to make them, a pity for them not to be used.
Let me have an address in pm.
I do hope the lens mount I bought today (£30) will solve the focus problem.
The photos above are part of a video I am making, which will be on you tube this weekend, sunday with luck.
I will post a link here, but for anyone who would like to know
My You Tube Channel is here
I know what I am doing now with the mod, it really is very easy.
The software is a little awkward but practice makes perfect.
Kamel, I love the new film guides.
i am not using three guides on the right, it only needs two, now that Stan has designed a step on the take up reel.
I think now with Stan's take up motor mod, one roller guide on the right will be enough, but I will run the film under both guides to the right of the gate.
I am very very happy to have these guides, thank you so much.
They roll freely and no more touching the film surface....
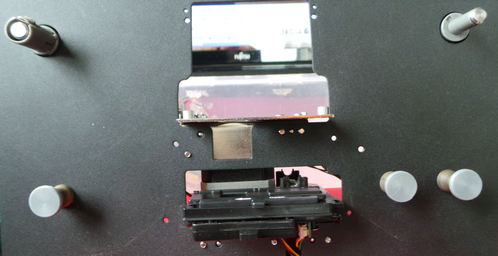
BRUCE You're very welcome, the cat woke me up and I was suddenly wide awake with a head full of super8 mods.
I hope it made some kind of sense.
Posted by Kamel Ikhlef (Member # 6667) on October 16, 2019, 12:38 PM:
OK Mike,
No problem. I can print for me. So you can keep them or give them away.
The metal extension tube M12 can be interesting to keep for you.
It would be interesting to have what size of lens holder it takes for your Telecine unit that I can change the design, it can be helpful for the other users.
Do you have tested the short printed holder version without metal extension ?.
Otherwise, your explanations on the mod are very useful.
It may be missing the connections of the different switches ?... For those who have to weld them
Posted by Stan Jelavic (Member # 6822) on October 16, 2019, 01:00 PM:
Very nice work Mike.
Just as a side note. You could try 5mm camera spacers if you have them to bring the camera closer to the film. I am pretty sure Kamel's holder will work with that. You get close to 2K but the edges may become softer.
This is the holder I used with 9mm spacers (the ones that you have now):
TLH 10-2S Mount w/ Set Screw
Here is the tracking info for the 6 boards that I shipped.
https://photos.app.goo.gl/YVxyhmCWnNoCYKK97
Also, here is the V7 schematic and board pdfs:
https://drive.google.com/open?id=14qYeH0UvOuDEV_cDw7snv5ri1itd1KR5
https://drive.google.com/open?id=1HNj94o5SYZTnzWFOT1oPPI5CWH-PdWzv
For the DIY folks: Note that the 3 resistors on the bottom
of the board layout do not match the values on the schematic.
Use the board values. Reason: got them from amazonia and had to use the
closest library components that have adequate hole sizes.
If you use the schematic values you may run into following issues:
- Flaky frame sync - takeup skipping beats - pics missing
- The unit will not power up with the fan on
BTW - download the pdfs and use the pdf reader- don't use the browser to open them.. bad resolution.
Posted by Mike Spice (Member # 5957) on October 16, 2019, 01:06 PM:
OH NO
Kamel, I have just looked at both mounts you sent, after reading your last post.
I had no idea one of the mounts had an extension screwed in to it.
I am certain, now I know the extension comes away, it would work.
I wish I had known this two days ago
I am so stupid, I should look more carefully.
Had I known this yesterday, I would have taken the extension out and problem would be solved.
I used the mount without the extension and had no idea the other mount had a peice that came unscrewed.
What do I know about 3D printing? zero.
To look at the two mounts with out a lens in, they look the same, I had no idea one mount had a part that unscrewed.
I thought an extension just means it has some more added to it.
I don't know why it's added, but if you add it, I obviously need it.....
***** ***** (swear words because I am annoyed with myself tonight)
I am sorry I missed that, it would have solved all my problems if I had been more careful inspecting your amazing 3D prints.
It would appear that I have spent £30 today on a lens mount that is the same as your lens mount without the extension.....
This is how stupid I am, I have just realised I can unscrew the extension to make the lens mount shorter.
I had no idea it was possible to unscrew the end.
My bad for not understanding your instructions.
I now have two lens mounts worth £30 each to give away to any diy people, let me know!
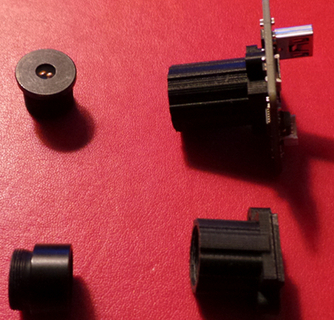
[ October 16, 2019, 03:05 PM: Message edited by: Mike Spice ]
Posted by Kamel Ikhlef (Member # 6667) on October 16, 2019, 03:54 PM:
Really Sorry Mike,
Maybe, I did not know how to explain well with my bad "google" English translation.
Wait to have the original scorpion lens holder, you can test and compare it, can be interesting!
Posted by Mike Spice (Member # 5957) on October 16, 2019, 04:01 PM:
Kamel
Tout est bon. S'il vous plaît être heureux. Merci d'être si gentil et de m'envoyer des cadeaux. Vos cadeaux étaient parfaits, je suis stupide.
Tu es très précieux pour moi et Stan
Subtitles by Google translate.
Posted by Doug Maxwell (Member # 7093) on October 16, 2019, 05:19 PM:
Ordered my camera today. Does the kit come with the spacers for proper camera height? Or do I need to get those made or cut them myself?
Posted by Stan Jelavic (Member # 6822) on October 16, 2019, 06:20 PM:
It comes with the spacers Doug... Mike you exceeded my french capabilities had to consult google.
Posted by Mark Pollock (Member # 6858) on October 16, 2019, 07:57 PM:
I'm so happy to see the tracking numbers!
Kamel, will you be posting the lens mount 3D plan somewhere? I have a printer, so I can print my own.
I appear to have missed the part of this rather lengthy discussion that explained how to do the sprocket-wheel film drive. Which of these 45 pages was it on, or is there another resource for that?
Thanks for all the great work, guys!
Posted by Kamel Ikhlef (Member # 6667) on October 16, 2019, 10:21 PM:
Thank you very much Stan for the pdf schematic.
I just found that on the power component the footprint has changed? pins 19 and 20 and 10-11 are connected is this normal ?.
There have been changes?. I may not have the latest eagle version? Thanks in advance
[ October 16, 2019, 11:28 PM: Message edited by: Kamel Ikhlef ]
Posted by Stan Jelavic (Member # 6822) on October 16, 2019, 10:31 PM:
Check Oct11 posts from Kamel, Mark
It tells you where to get the 3D prints
Wiring diagram for the motor:
https://photos.app.goo.gl/LJajGbSQG1fujdZB8
Motor:
http://www.uxcell.com/micro-motor-12v-4300rpm-%20wire-high-speed-encoder-motor-for-diy-hobby-toy-cars-remote-control-p-1323950.html
Operation summary:
The capstan motor coasts along driven by the film. The sensor at the back of the motor sends pulses to the MSP430 controller. If the pulses stop and the front panel run switch is on, the controller pulses the motor every 10 seconds until the film starts running again.
See my Aug11 post and Sep30 posts.
Hope this helps.
Posted by Mark Pollock (Member # 6858) on October 16, 2019, 11:35 PM:
Thank you Stan, I'm not sure how I missed these. Actually, since this thread is assuming phone-book length, I am actually pretty sure I just didn't read everything.
Posted by Bruce Davis (Member # 7072) on October 17, 2019, 01:15 AM:
Stan Jelavic does it matter what resolution one selects in IC Capture, as long as all the film frame is included, I assume the actual resolution (pixels per mm) is always the same.
By increasing the resolution to Max as Mike suggested it seems to only increase area that is captured but pixels/mm would remain the same.
When the super 8 frame is cropped I end up with a frame that is only 1292x934 (which should be enough resolution for S8 I think) and this res can not be increased unless up scaled.
Regards - Bruce
Posted by Kamel Ikhlef (Member # 6667) on October 17, 2019, 03:40 AM:
Bruce,
To digitize in HD, it would be necessary to capture wider to allow the post-production: denoising, stabilization, etc ...
Then to trim the final size which should be 1440x1080 and then integrate this image in a video 1920x1080 (black band on the sides which brings at 1440 pixels).
The most difficult is to calculate what size to capture in 1440x1080 with the least possible loss of quality.
It is for this reason that it is necessary to capture with the maximum of quality. you have to do some tests, I have not found the right capture format yet and all the suggestions will help.
Posted by Stan Jelavic (Member # 6822) on October 17, 2019, 08:00 AM:
I believe you are correct Bruce. The rez setting just changes the area of the sensor to be used -- similar to crop. But also as Kamel says you may need some margin around for postprocessing depending on how it is done.
Kemel - these were always connected?
One more note for the DIY, pin 9 (counting from the bottom)on the power supply connector has to be shorted to pin10. If not, the stepper will not work on some older units.
Posted by Mike Spice (Member # 5957) on October 17, 2019, 08:50 AM:
My solution to the switches on the front plate being too deep to fit the unit back in the case....
I would always want my final video file to be 1440x1080 with no black bars.
I created a project in my edit with HD bitrate and 1440x1080
When I upload to youtube or FB I don't get bars, just a nice 4:3 video player
Black bars are the work of the devil

Posted by Doug Maxwell (Member # 7093) on October 17, 2019, 10:15 AM:
Mike, I respectfully disagree. Letterbox and Pillarbox are wonderful things. I won't bore everyone with technical rambling, but whenever there is any black bars on a screen, that is great stuff... it means that nothing is being lost.
Now, loading a square video on YouTube in straight 4:3 is fine, since YouTube typically compensates for 16x9 screens and adds pillar boxes if needed. But, if you are planning on putting your scanned and finished square movies on DVDs or video files and sending them to friends and family who will watch them on various types of Standard and HD tv screens, monitors, etc, I would highly recommend 'future proofing' your hard work by putting the 4:3 image in the center of the 16x9 frame. This will prevent the 4:3 image from being automatically stretched horizontally to fit 16x9. And since the 16x9 aspect ratio seems to be the standard for the foreseeable future regardless of pixels, this method only makes more sense.
My method is to go as big as possible in the capture process and scale it down as needed in post. It's easier to take away then it is to add.
I realize this requires more hard drive space and a faster computer, but if you can, go big and reduce it.
Also, you can always export both a straight 4:3 AND a 16x9 pillar box version of the same movie. Remember, it's never a bad idea to 'Future Proof'.
Posted by Mike Spice (Member # 5957) on October 17, 2019, 10:22 AM:
You're very welcome to disagree!
I get the 16:9 tv ratio thing for tv viewing.
My work generally ends up online so at you tube I think it is nicer without the bars.
If I do watch 4:3 on my plasma tv, it automatically switches to 4:3 but I do get grey side bars, generated by the tv.
I realise not everyone has a tv set that does that.
Posted by Brian Fretwell (Member # 4302) on October 17, 2019, 03:32 PM:
Also for anyone contemplating BluRay, there is no provision for native 4:3 only pillar-boxed in 16:9.
Posted by Brian Fretwell (Member # 4302) on October 17, 2019, 03:33 PM:
Duplicate post due to board software saying it was unsuccessful first and second attempt.
[ October 18, 2019, 02:50 AM: Message edited by: Brian Fretwell ]
Posted by Brian Fretwell (Member # 4302) on October 17, 2019, 03:34 PM:
As above.
[ October 18, 2019, 02:50 AM: Message edited by: Brian Fretwell ]
Posted by Bruce Davis (Member # 7072) on October 17, 2019, 10:41 PM:
Hi Stan Jelavic and others your quote Stan "I believe you are correct Bruce. The rez setting just changes the area of the sensor to be used -- similar to crop.
From testing I have done, all the various resolutions just change the area size being captured the actual pixel density always remains the same, so I do not see any point in capturing at the maximum 2592x1944, one just ends up with a large file that later has to be cropped.
In order to capture only the 8mm or super 8mm frame (with a slight margin around) at the full resolution of 2592x1944 one would require a different lens and perhaps move the camera location slightly to line up with S8 frame.
I find that capturing at 1980x1080 is best for me and it still allows a reasonable margin for cropping.
Below is an image of my capture at 1980x1080

Using the Maximum size 2592x1944 seems to me a waste as it all has to be cropped.
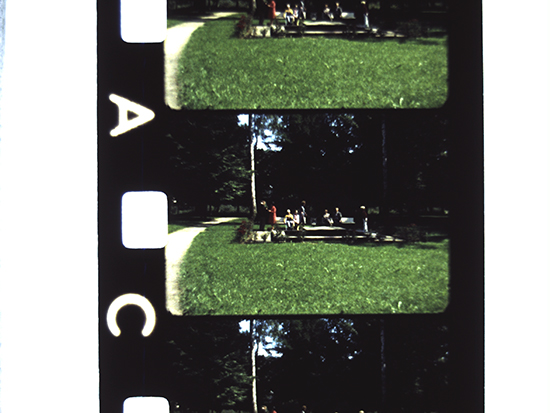
Regards
Posted by David Brown (Member # 7133) on October 17, 2019, 11:34 PM:
[B]Kamel [\B]
Do you have a picture or description for the parts on Thingyverse. There are 21 objects, some I don't recognize. Also are the threaded inserts in the Pulleys commonly available?
https://drive.google.com/file/d/1EJgdBZ-c713On022-ArlQxvcC-MvVI-c/view?usp=sharing
[B]Bruce [\B]
A note about Vegas. If changing the framerate of clips on the time line, be sure to disable RESAMPLE. It is located in 2 places and I think it's the same thing.
This shows up as ghosting.
Right click on a clip, then properties, this is where the playback rate is located and the resample option. If you're selecting multiple clips go thru SWITCH. be sure the head and tail are clipped and finished before you change the playback speed.
https://drive.google.com/open?id=1g2lyZ_QNYETo9CAdaJkT22yoFyUz7b-5
https://drive.google.com/open?id=1QCq1xnKzVQEleF1mV8XK8VTFC7pi1Vah
A question on your captures. If you crop the captures to the frame lines, the 1980x1080 & the 2592x1944, which one is sharper? These options sound like a digital zoom which is done by skipping over pixels or averaging several.
Posted by Bruce Davis (Member # 7072) on October 18, 2019, 04:37 AM:
David Brown thanks for the advice about re-sample. When cropping from either the 1920x1080 or the 2592x1944, the remaining resolution is the same, in other words the pixel density does not change so there is no difference that I can determine.
I captured the same super 8 frame with 1920x1080 and 2592x1944, saved as bitmaps:-
1920x1080 = 6,076 KB
2592x1944 = 14,763 KB
Cropped both in Photoshop to exactly the same size (one super 8 frame size):-
1920x1080 after cropping is now 1334x965 pixels = 3,774 KB
2592x1944 after cropping is now 1334x965 pixels = 3,774 KB
When zoomed in both images display exactly the same pixel size.
There is no digital zoom, the different res settings just uses more or less of the sensor area to capture.
Regards - Bruce
Posted by Kamel Ikhlef (Member # 6667) on October 18, 2019, 05:06 AM:
Bruce,
What would be better is to calculate what size to capture to finally make a crop of 1440x1080 which is perfect to integrate in the resolution HD. Stan's 1600x1200 seems a good compromise. You just have to define the exact distances from the camera position. I will be able to designate precise supports in 3D and to make them available.
David,
To answer the question on thingiverse? the object on the picture is a guide support to test the camera outside the telecine unit. Not useful for the mod.
The inserts are brass and are to buy separately.
I use those for plastic hot pose. : http://eshop-simaf.com/fr/42-insert-pose-a-chaud?p=2
or Kit on Amazon : https://www.amazon.com/s?k=brass+insert&ref=nb_sb_noss_1
Posted by Mike Spice (Member # 5957) on October 18, 2019, 08:28 AM:
I am happy to report
My Hawkeye Mod is working!
The lens mount arrived from Scorpion Vision but I couldn't make it fit properly.
The Allen Key to tighten the lens is really annoying.
After messing about I have gone back to the 3D printed lens that Kamel sent me, without the extension.
Job done!
I wish I had not been so daft as to think both lens mount from Kamel were the same
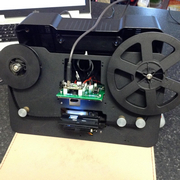

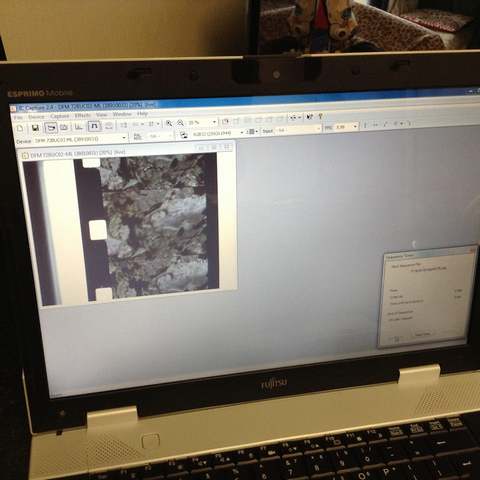
Bruce Might I enquire why you chose bitmaps and not tiff?
I know why you wouldn't choose jpg, compressed.
I thought tiff was better quality, so please educate me
I am doing a scan with jpgs just now, just so see how it comes out, but I had intended to scan in tiff, reading your post suggests I am probably wrong and should be scanning in bitmap?
Please help
[ October 18, 2019, 05:20 PM: Message edited by: Mike Spice ]
Posted by Kamel Ikhlef (Member # 6667) on October 18, 2019, 12:59 PM:
Mike,
Great testing and sharing experiences, it's very helpful. Thank you for that?
I noticed that on your first video test, the frame jumps slightly vertically, we see it on the perforations, I do not know what it can come from. Usually it is more stable ...
BTW : For lens support, I see that the lens is almost completely unscrewed. It should measure this height and I could improve this lens holder to block more easily focus with appropriate rings.
It seems that this lens holder is a little too short and the other is too long? By tests we will get there.
what would be nice is also to show a diagram of the welds to be made for switches, connectors ... This could help.
Posted by Mike Spice (Member # 5957) on October 18, 2019, 02:02 PM:
My HAWKEYE Mod Video
Kamel, I was holding the camera by hand in the first test clip
Your 3D print is very good.
The small rings you sent. is that to lock the focus on the lens?
Many days of testing now. I am very happy so far.
I have a lot to learn in post processing.
Right now, I am using Film9 on a 50ft reel.
I know how to use it, but maybe not to it's best.
I have noticed that missing it's grey plastic facia panel, the scanner now tilts forward.
The front feet are on the bottom of the plastic.
Couple of stick on rubber pads will fix this.
It still works, but with a slight lean forward, it makes threading a film slighty fiddly.
It makes sense to try and set the claw to be down, when threading a film, just makes it easier to get under the tabs.
It wouldnt take long with a Dremmel to cut a bit out of the original facia and make it fit back on
Like terminator with half of it's face missing
[ October 19, 2019, 03:01 AM: Message edited by: Mike Spice ]
Posted by David Brown (Member # 7133) on October 18, 2019, 07:21 PM:
Mike
Thanks for that walk thru! I'm about to open up My Wolverine to determine the roller screw sizes. I guess I'll be in the second round of boards.
My take on BMP or TIF is they can be identical, a Tif can be a lot more. BMP is only 8bit, a tif can be 16bit. I don't know what's being saved, but even the Wolverine's sensor could output a 12 bit raw image. Adobe's DNG file is really a Tif.
Can you check the saved tifs you're getting for 16bit?
Never mind ...
The sensor captures at 8 bit. This spec might be abreviated, others I've seen show higher values for RGB than MJPG.
https://drive.google.com/open?id=1aiZN7l25mZ2CUj57uvBHAVfFnTqRUE87
Kamel
I already had what I was asking you for!@#$%
"kamel_Read Me First-IK_20190912.pdf"
I should have read it first!
From the inserts I ordered M3x3 insert, hoping it will fit your pulley design.The bolts are M3x6.
https://www.amazon.com/Uxcell-a16041800ux0824-Knurled-Threaded-Embedment/dp/B01IYWTCWW/ref=sr_1_9?keywords=brass+insert&qid=1571455465&smid=ATVPDKIKX0DER&sr=8-9
I might print your lens tester, I'm still looking for another lens. The 12mm is too wide, the 16mm has too shallow a DOF, so I'm considering a 12mm CS mount. There are M12_CS adapters and some lenses come with adjustable aperature.
[ October 18, 2019, 11:01 PM: Message edited by: David Brown ]
Posted by Mike Spice (Member # 5957) on October 18, 2019, 08:09 PM:
Hi David.
Here is a HAWKEYE v WOLVERINE
Filmed in a very dark Aircraft Carrier compartment, 1977.
Steve Olive, HMS Ark Royal radio studio.
Sound Super8
I have not mastered the art of post processing by any means.
I look forward to my journey, but it is clear to see by the skin tones, the hands down winner.
Posted by Stan Jelavic (Member # 6822) on October 18, 2019, 10:28 PM:
Great video Mike. You make it all look so easy. What was the issue with the factory mount. I tighten the tension screw while the cam is out and set it such that the lens is snug but still adjustable.
Posted by David Brown (Member # 7133) on October 18, 2019, 11:17 PM:
Mike I guess!
You don't need to identify the Wolverine, It has left it's fingerprints all over the image.
I'm more comfortable adjusting tonal ranges in Lightroom or other software. Video has a different jargon. Here you would lighten the shadows, but in Vegas I'm adjusting the gamma or the gain.
I remember software 20 years ago, and it may still be around. It had an AUTO feature, and would do an entire folder of images. Done fast and they looked great. If you could adjust he images before they're loaded into video... so much time saved!
I see what I can find.
Thanks for the side by side.
Posted by Bruce Davis (Member # 7072) on October 19, 2019, 12:13 AM:
Kamel Ikhlef not sure if I understand your question, IC Capture 2.4 (I assume we all use this) has a limited range of capture resolutions. The 1600x1200 capture size has the same frame ratio as 1440x1080 (1600x0.9=1440 and 1200x0.9=1080).
With the position of camera/lens on my Wolverine/Hawkeye/Pro (Version 7 board) at a 1600x1200 capture resolution the left hand side of the super 8 frame is cut off slightly, see image below. If a slight re-positioning of the camera were possible to overcome the cut off then 1600x1200 would be good, as it is I use 1920x1080 and this resolution produces almost the same file size (1600x1200=5512KB 1920x1080=6076KB in Tiff format).
EDIT NOTE! after the above comment about 1600x1200 cutting off the left side I have just noticed a setting in IC Capture 2.4 under tab "Partial Scan" (set to "Auto-center" by default) will allow the frame to be moved sideways and up - down. Just still learning to use this, SORRY for the confusion.
1600 x 1200 left side cut off
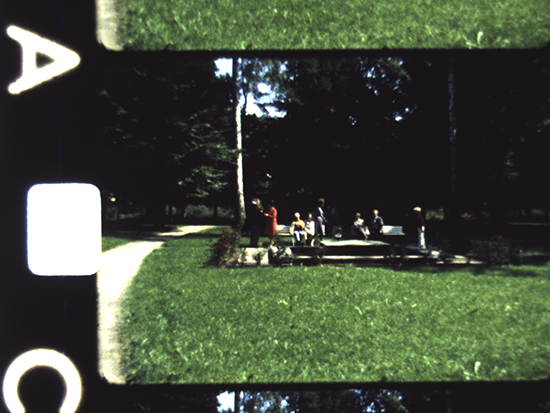
1920 x 1080 full frame is visible, compare with above image
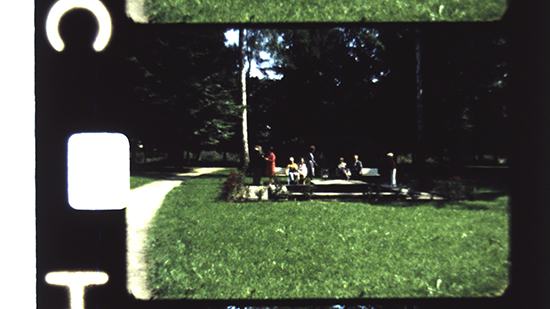
Mike Spice your Wolverine/Hawkeye looks good, the Mod video is great, I liked it.
Mike I am just starting out on this process so I definatley can not educate you as you would know a lot more than I do. I am trying establish a system from Capture to finished video, have not had any luck as yet. Can not seem to be able to save using Video Fred's script without the dual window format before and after.
Normally I do capture in TIFF and only used bitmap files to test for detail at various resolution captures (bitmap is lossless and 24bit and the TIFF I captured are lossless but only 8bit).
Regards - Bruce
Posted by Mike Spice (Member # 5957) on October 19, 2019, 01:42 AM:
Bruce You've just taught me about partial scan in the IC software, so now I have a better centered image, thanks!
I seem to remember it being in stans pdf file, but so many details in the last couple of weeks, it's easy to forget a small detail in the rush to make things work.
We are all learning from each other, or as it's called in my working life, "knowledge exchange"
I too am trying to find a workflow that is going to be a success...
I have little or no colour correcting experience other than a bit of highlight and shadows manipulation in FastStone, for one or two navy photos I post.
I have watched many hours of colour correcting tutorials at you tube, using davinci resolve, but sadly my i5 laptop just about grinds to a halt, so I am stuck with my cheap and cheerful MoviePlus X6 for the foreseeable.
At work I have access to super fast macs and final cut x, so next week I will take some images on a stick and see what I can come up with before I consider buying a new desktop!
VirtualDub is doing my image sequence, altho I found out last night Shotcut will do image sequence, but it crashed when I gave it a quick test last night. I shall try again..
There is some jitter in my scans, I am going to test a strip of film with and without using the takeup.
I wonder if it is possible the take up advances a little more than the film thro the gate.....the tension on the film to the take up is quite tight.
I forgot to mention that I had to butcher the hole for the usb socket as it didn't quite match up.
I only had nose pliers handy, so it's rough as can be....
No worries, just an observation
Here's a question for any VirtualDub users, when you compile and image sequence, what format do you export in for further editing?
At the moment I am using h264 but that is obviously compressing the video, so further editing and exporting is only going to make it look worse isn't it?
Uncompressed saves from Vdub will be enormous...
As it is, a 50ft super8 reel in bmp came out at around 18Gb last night from the capture software.
It took 2 hours 53 minutes to scan.
I am still getting frame jitter
Here is a jitter test scan
The same strip of film, scanned on the higher speed.
The no take up clip had a bit of colour added in the camera properties before scanning, to see what can be achieved.
I am now having success with Shotcut and liking the result.
it can load an image sequence, crop and export, all in one go.
I have created a template at 18fps 1440x1080
I apply a crop and then export.
Export so far has been h264 but I will look at pro res which will be better for extensive editing.
Have done a couple of colour enhancements too, which I have liked.
All good, for now I have returned to using my drop box so I can continue to develop a workflow and my scans are not wasted.
Early bugs like timing on the take up can easily be ironed out in due course..
[ October 19, 2019, 04:31 PM: Message edited by: Mike Spice ]
Posted by Stan Jelavic (Member # 6822) on October 19, 2019, 11:26 AM:
Very nice work Mike. I will address the takeup as soon as I get back home. If anyone with the msp430 programming capability wants to take a stand at it please let me know and I can help with it.
Posted by Mike Spice (Member # 5957) on October 19, 2019, 12:52 PM:
No hurry Stan, enjoy your break.
My drop box is taking care of things for now.
[ October 20, 2019, 03:03 AM: Message edited by: Mike Spice ]
Posted by Kamel Ikhlef (Member # 6667) on October 19, 2019, 05:21 PM:
Bruce,
We can even push further, with 2K/4K. the source imaging camera has a 2592x1944 sensor. the 4K resolution is 3840x2160. for the super 8 we do not need the full width (black sides on 16/9 format). so full sensor, we have almost the entire image. the image ratio is the same 4/3. The limitation is thhe film gate distance and the used Lens.To test...
For the moment, my tests do not satisfy me (I need replace my M12 lens for a better), but Stan and Mike have gone a long way ... All this is very interesting and is progressing. We are starting to have results worthy of a telecine at several thousand dollars!
BTW : I'm going to rework some of the design of the front cover... If others have ideas they will be welcome.
Posted by Bruce Davis (Member # 7072) on October 19, 2019, 07:11 PM:
Mike Spice QUOTE "Here's a question for any VirtualDub users, when you compile and image sequence, what format do you export in for further editing?"
REPLY - You should use a lossless codec like Huffyuv or Lagarith lossless.
I get a very slight amount of jitter but not anywhere near as severe as you, but you only have two film guide rollers installed where I have 3 and I think that reduces the effect of the take up reel. I have read that the Wolverine performs better if the take up is not used at all. I use 2 second scans. The jitter can be removed in post processing (one option would be using Video Fred's Script).
I am using VirtualDub v2 in combination with AviSynth v2.6, I have not done extensive testing but I am very impressed with Video Fred's 8mm Script it does an exceptional job of improving the output. (https://forum.doom9.org/showthread.php?t=144271) Being a newbe, in VirtualDub, with this Script, I have not been able to figure out how to save only the output screen.
Kamel Ikhlef
I was aware the sensor was capable of higher resolution but as you say its a matter of coming up with a suitable lens and distance to capture only the gate (maybe a zoom lens). If I remember correctly Stan Jelavic has done a lot of testing with lenses but one can not try them all (cost restraints). It would be great if you could find a combination that works well for higher resolutions. Your effort and contribution is very much appreciated - thanks
Regards - Bruce
Posted by David Brown (Member # 7133) on October 19, 2019, 08:03 PM:
Mike
Let me recommend you try PhotoscapeX. I'm stunned by it and I already have 3 photo editors, Lightroom, Photoshop, and Photolab2. I like this so well that I will keep it on my machine. I would pay $$, but this is FREE. There is a pro version at $40, but I've not been able to find information on the upgraded tools. Some seem useful,but everything needed to correct the photos is already there in the free version.
Example: I'm not capturing frames yet, so I dumped one of my Wolverine captures to frames. It was close to 3000 frames from a 50 ft roll. This one had severe scene changes from indoors/dark, to outdoors/blue without the daylight filter. Some were good too.
In BATCH mode, I was able to select all 3000 frames (ctrl a) and drag them to the batch window. Selecting AUTO levels, AUTO color, & AUTO contrast. Then I cropped the image to hide the sprockets and frame bars. I overscan the captures.
I hit save. 3000 frames took 4 minutes to process. My computer is not real fast. It is 1 year old. Now I have 3000 frames ready to load in to Vegas and no need to do color or exposure correction. I was checking for capacity of Photoscape X. Can it handle massive numbers of frames?
Then stretching the folder window to the right, I was able to see ~250 frames at once. Easy to see where the scenes changed from dark to light or blue. Just selecting the scene, I adjusted the settings to my liking manually and saved the scene (x number of frames) as scene1_name.tif, and so on.
Pretty fast either way and all a very visual process. Try it, it's free.
web page
This forum software ????????
I must edit because I can't post again.
Kamel
I'm all over this 2k/4k thing. I think we need to go to a CS or C mount lens. There is a physical conflict now. Stan has made a spread sheet in excel that I need to study. I wonder if it will be valid for a larger lens like CS or C. S mount seems to be exhausted for he current sensor 12,16,& 25mm. A CS or C would have a crop factor with the same sensor, enlarging the captured image. I don't know how to calculate that either.
A note again. BMP is an ancient file type. It is only 8 bit. TIF is a better choise as it can handle 8 or 16 bit. Windows shows the info panel on Mikes file as 24bit color. That is confusing to most. Monitors and graphics cards show settings at 24 or 32 bit color. 24 bit color is adding all the colors together. 8 bit is 8bit for red, blue ,and green. Only 256 shades of red or green or blue (2^8). 16 bit color is 16 million shades of each. Use BMP or TIF for 8 bit. 32 bit color is another 8 shades of transparency.
How is the capstan working for you? I would like to add it even though I don't have too many damaged sprockets. Wolverine hangs on a failing cement splice usually.
Posted by Stan Jelavic (Member # 6822) on October 19, 2019, 10:25 PM:
Lots of interesting inputs. While driving today thought a bit about jitter and here is a brief summary of my random thoughts:
- Mikes take up drop box works. Probably because there is nothing to disturb the film between claw disengage and claw engage.
- HE take up disconnects before the claw disengages. We know that because if you observe the film, the film buckles up a bit during each cycle which indicates that the claw is pushing the film while the takeup is off, releasing the tension.
So, the only thing I can think of is that the takeup force is stretching the film. When the takeup is disengaged the film slowly flexes back and the camera picks that. Reducing the force by shortening the pulse should help. Installing the original pulleys back might be a good test.
A few more notes for Mike. Your test video seems to have very dark areas. Try adjusting the camera gamma correction. The colors also seem to be off. Try auto white balance. It worked for me pretty good.
2K 4K. One big advantage of C mount lenses is manual iris. That way you can control the DOF. But the Wolverine mounting bracket is in the way and the film gate may be too close to the front panel. I actually have a Basler camera and c mount lens at work and could try it just to see the mechanical fit.
Greetings from W Virginia.
Posted by Mike Spice (Member # 5957) on October 20, 2019, 03:31 AM:
Bruce Thanks for the tips on which lossless codec is good to use.
I was aware I had to go lossless but in my early tests I just wanted something small and quick to work with .
I am trying a Largarith export now and used a VDub crop to take the frame to 1320x948
It came out full of funny color artifacts and unwatchable, I will persevere
A 1'44 clip of 1873 tiff images (9.74gb) comes out at 1.56gb so roughly 1Gb per minute using the largarith codec.
The same clip saved using the ffmpeg huffyuv came out at 4.25Gb and was just a jumbled up mess of coloured snow.
I've done the same test without any crop and still jumbled up video, so I'm not sure what is going on there.
I think I was the first person to suggest not using the take up and letting the film drop in to a tub.
I have done this with 400ft reels with great success.
I would rather not have to do it with the mod, as the scan time increases significantly and this would risk more airborne dust being attracted to the film and also more risk of film damage should it be disturbed.
Avisynth is amazing, but I haven't got my head round it yet, altho I have used Film9 a few times.
David Thanks for the tip about Photoscape X
I have some time off soon, so I will give it a look then.
Stan Regards the film guides, I am using Kamel's 3D rolling guides now which let the film travel very easily and also do not touch the surface of the film.
I'd like to keep using those, so for now the drop box will continue to be used.
I am aware the recent comparison clip was washed out and messed up, I've clocked up around 22 hours in the last two days, trying out all kinds of different methods and I have changed the camera settings way too much.
I have changed just about every parameter just to see where things go, it was clear that example was washed out, but I was impressed with certain aspects of it.
Tired eyes don't help .....
My next task will be to find a nicely exposed strip of film and re set the camera to something more sensible....
A pleasant way to spend a sunday afternoon.
Something I would appreciate is to know what 'device' settings people who have the DFM 72BUC02-ML image sensor are using.
I have 'auto' set for everything today, but I would be very interested to hear what settings you are using.
Today's scan is very good in my opinion, perhaps a little washed out in places.
Bright white Navy uniform and bright sunshine, everything on the image sensor set to auto.
here is my sunday scan. very happy with this, it is not perfect, but I am getting there
[ October 20, 2019, 04:11 PM: Message edited by: Mike Spice ]
Posted by Kamel Ikhlef (Member # 6667) on October 20, 2019, 05:12 PM:
Mike,
All "auto" settings, it's great!... I have never tried myself!... For the moment, I test différents settings and therefore I try a little all, I can not really really finalized a real workflow.
The Films I gave to scan at a professional lab have a worse result than yours.
I have the impression that you will give us lessons in a very short time ... which is excellent and inspiring!
BTW : I could like to replace my cheaper m12 lens by this low distortion :
http://www.scorpionvision.co.uk/Catalog/Mac hine-Vision-Lens/m12-lenses/near-field-far-field-m12-lenses/s-mount-12mm-f2-8-macro-lens
What do you think, your help will be useful. Thanks in advance.
[ October 21, 2019, 08:11 AM: Message edited by: Kamel Ikhlef ]
Posted by Stan Jelavic (Member # 6822) on October 21, 2019, 08:37 AM:
No IR filter Kamel.
On jitter:
If film stretching is indeed the culprit then the takeup needs some rethinking. Possibly always have some slack i.e. don't let the takeup catch up with the claw. Possibly can be achieved by changing the pulse width. But then the capstan would have to be moved further out from the film gate. Will need some experimenting.
Posted by Kamel Ikhlef (Member # 6667) on October 21, 2019, 10:08 AM:
Stan,
In fact after information from Scorpion Vision, they can provide it with ir cut block but the delay is very long (4/6 weeks) + very high shipping costs. it's a pity that seems to be a good M12 macro low distortion lens. To think...
For the little jitter problem, I can rethink the Motor mount design like this, but will it have the same efficiency?:

I do not know how it works now, but would not there be a slight timing shift take-up (msp430) for winding compared to frame-by-frame scrolling. Well, I do not know !?!
Mike don't use the capstan system and use only 2 pulleys after the film gate !?!? Help ! Stan...
Not Hurry, have good holidays !
[ October 21, 2019, 05:12 PM: Message edited by: Kamel Ikhlef ]
Posted by David Brown (Member # 7133) on October 21, 2019, 11:04 AM:
Mike
That is the best capture I've seen yet from the Hawkeye!
Full auto was a good test.
Very refreshing and hopeful. Thanks for keeping us informed.
Kamel
That lens has twice the resolution of the sensor. How can you go wrong? I don't think these lenses are very expensive.
Stan
I remember Mike's problems with the take up motor. Isn't there a clutch in the take up gearing? Could it not be adjusted? I think dropping torque might be more relevant than the current speed. Remembering my auto load projectors, the take up reel spun fairly fast until engaging the film. Then is slowed down to the films speed. I could also stop the take up with a touch.
Posted by Mike Spice (Member # 5957) on October 21, 2019, 11:20 AM:
Thanks for the comments on the latest scan.
I will re visit it to see if I can tone down the hot white areas and take some yellow out.
For my first 30 hours of testing, it's the best so far, there is room for improvement of course.
I put it side by side with the wolverine scan of the same marching and the difference is striking in favour of Hawkeye.
Phew....
Stan presumably it is possible to retime the pulse on the take up for those with and without capstan?
I would like to use take up reels, but for the time being, my trusty drop box is doing rock solid scans, which puts a smile on my face.
I racked up 11 hours friday, 17 hours saturday and 6 hours sunnday with the scanner and software, so I am at a point where I am now completely confident in the process, I just have to have more time with the software settings.
Some days off next week, set aside for cine films...
I like the look of the lens Kamel mentions, so what is 'No IR' I presume that is infra red?
What effect would not having IR in a lens produce?
My workflow for now is tiff scan, VirtualDub assemble, FPS, Crop and export in h264
That is fine for anything that won't need further editing, which for now, will suit me.
I am going to try and learn the camera settings well enough to control the end result in the scan as much as possible, rather than post.
The fact I can stop a scan on one frame, adjust settings and then continue scanning is a great help in that respect.
I do like the way I can scan a length of film, stop the machine, move the film along and continue scanning, without ending up with broken video files as with the wolverine
That is a real bonus.
Posted by Kamel Ikhlef (Member # 6667) on October 21, 2019, 03:30 PM:
Mike, David...
If there is no IRCut Block, the scans are not as good with a magenta effect by zones on the images.
To proscribe for what one wishes to do with the best possible quality of digitization !...
Stan had already mentioned this topic and did many tests with and without IRCut...
That's why, based on Stan's experiences, it's better to have an IR block on the lens.
I'm looking for a real macro lens that has a very low distortion.
This one looks good to me. With IRCut, it costs 57 pounds, + 40 pounds for shipping to france + fees and VAT. (4/6 weeks of delay).
It's a 2/3" (bigger the imaging source sensor) that should go for the cover of the sensor.
I will think before ordering.
Cameras commons sensors and lens sizes covers :

Posted by Stan Jelavic (Member # 6822) on October 21, 2019, 06:52 PM:
The IR (infra red cut filter) to reduce some artifacts that are generated by the LED infrared spectrum. The lens is not designed for it and will cause degraded image.
Good suggestions on takeup. Will try that plus more when I get back. The idea is that the claw pushes the film into a loose loop of some sort. The takeup spools it by pulling on it but never gets to the point where the film is tight. If we can get to sync that up so that the loose loop is never too long or too tight then we Would have a winner I think. But the proof is in the pudding.
Posted by Mike Spice (Member # 5957) on October 22, 2019, 08:53 AM:
That all makes sense, the IR information.
I find myself with an afternoon off, so I am re scanning the Navy reel I did at the weekend, with different camera settings.
Hopefully later today I can re post a different example.
I think it would be really good to slow down the take up advance, to a point where a loop is present, it doesn't need to be wound tightly on to the take up, and of course, it doesn't want to hang so much it touches the work surface, it just needs taking up, very gently, so at least it is not snaking on the floor.
That may have to be different for the 720 scanner with 200ft reels and the Pro version which does 400ft reels......
A decent rewind is all that is needed, and for me, that is achieved with a cine viewer......
As mentioned, being able to stop the scanner and copy off the images thus far, is a great bonus.
Part way thro a reel, stop the scan, copy off the images to a USB to take to another laptop, and continue the scan. Genius.
So here is this afternoons indication as to whether I have the camera settings good or rubbish.
3.51Gb of tiff images, in to VDub. crop, 15ips and h264 to 63mb. Super 8
(could do with four more pixels off the bottom crop)
Tuesday test scan
I have just worked out why a reel I scanned recently was jumping all over the place
Stan suggested I had the switch for Super 8 set to Standard 8
it wasn't that....It did make me wonder...
It turns out that it was the timer.
The procedure for scanning is to to set live view.
Make it look nice...
Timer setting menu, image type, folder etc etc.
Set the timer settings to zero.
Then set external trigger.
Then start the timer.
Then start the scanner
The jumpy reel was because
I set live preview
Timer settings to zero
Forgot to set external trigger, but started the timer.
So the software is merrily snapping away as fast it as it can on zero timing, regardless of the film advancing thro the gate.
I have just done it again.... but this time, realised what I had done.
Problem solved....don't forget to activate external trigger before starting the timer...
The tell tale clue to this basic human error is to keep an eye on the live preview during a scan.
If you see the film 'dragging' itself through the live preview, you forgot to set the external trigger.
If you just see static frames in the live preview, it's all good.....
Here is the full afternoon scan.
HMS Ganges by Colin Lowe.
8.41Gb of 2183 tiff images. 1300x948 h264
VirtualDub crop took 10 mins and down to 151mb
10 mins on an i5 windows 8 laptop.
I forgot to screenshot the camera settings again...
Monday scan
[ October 22, 2019, 11:19 AM: Message edited by: Mike Spice ]
Posted by David Brown (Member # 7133) on October 22, 2019, 01:18 PM:
Mike
I didn't want to offer any suggestions as I didn't know if any of the exposure extreme was coming from the film. Looks a lot better now because the highlights are not blown out. If you could boost the shadows (there many names for the same thing) shadows, midtones, gamma, less contrast, or whatever your software calls it, exposure could look great.
For a moment, I forgot I was watching a film and thought, "Wow this dirt is very realistic!". It's from watching so many simulated film artifacts used for video.
Kamel
I have been thinking of a C mount lens in hopes of using cropfactor to enlarge the image. So if M12 is available for 1" and 2/3" sensors, that should also work? I am surprised at the cost. I remember looking at some M12 lenses and they were less than $25. Now, I looked again and it's true.They are low megapixel rated.
http://www.m12lenses.com/category-s/74.htm?searching=Y&sort=13&cat=74&show=300&page=1
News of the capstan tests? I have printed the cog wheel and it does seem not fit 8mm or S8mm. That could be that my printer is off scale. Is it intended for 8mm or for both?
Posted by Mike Spice (Member # 5957) on October 22, 2019, 04:03 PM:
I am always open to suggestion.
It won't be the last time you see this reel
Some of my early scan tests on not ideal footage.
This reel has extreme daylight in it, so there will be quite a few more scans of this reel.
What I am trying to do is get is as near to perfect that I am happy with, in the camera settings.
I would like to do post, but I don't really have the computer resources for DV resolve, which is what the Hawkeye scans deserve.
I wish I did.
Happy with where I am right now.
That said, I think I need a color grading monitor now
Hawkeye v wolverine
[ October 23, 2019, 01:21 AM: Message edited by: Mike Spice ]
Posted by Doug Maxwell (Member # 7093) on October 22, 2019, 10:35 PM:
A good rule of thumb with digital photography is that if it's overexposed, the information is gone. But, if it's dark, the information is there and can be brightened up. Granted, with a scan of 8mm film, its only going to be as good as the source image. Depending on what you are using for post production, it will be interesting to experiment with levels. Some rolls might require a darker scan to compensate for bright scenes and the darker images will have to be adjusted to match.
Long story longer... do not fear the darkness. =)
Posted by Mike Spice (Member # 5957) on October 23, 2019, 05:06 AM:
In an effort to better see the scan on a more reliable screen, I have changed capture computer to my Revo.
It has HDMI out to my Sony tv so perhaps I can see things with a more reliable image... we shall see later today.
My old fujitsu latop works very well, but the lcd screen is a pile of pants for contrast and colour definition
Scanning the Aircraft Carrier footage again today, that I did a day or two ago, that looked awful.
Perhaps having a better preview screen will allow me to adjust things with more meaning, we shall find out this evening...
I have also purchased 128Gb memory card for the scans.
I am not scanning to a hard drive, I think it makes more sense to scan images straight to card, less wear on a hard drive, and the files are all ready to move to another machine immediately, rather than having to copy them to card after a scan.
I use two computers, one for the scan, one for the processing.
that way my scanning continues while faffing about with VirtualDub etc.
I have been using a 32Gb card but it is filling up all too fast with tiff images.
With a 50ft reel coming out 10Gb plus, a 128Gb card should see me ok for a 400ft reel....
Here is a sample of todays scan:
4930 tiff images. 1600x1200 19.2Gb
Processed in VirtualDub. 20 mins@ 4.5fps high priority processing thread. h264 now down to 294Mb for viewing.
Todays scan test. HMS Ark Royal 1978
One issue this morning, the 'partial scan' setting wouldn't remember it's setting for some reason, thus you see a few frames shift where I have stopped the scan to make an adjustment, and the partial scan area was getting forgotten.
Must look in to that, It didn't happen when I used the laptop.
The one outstanding thing with this method of scanning is that if you pause the video you get a rock solid still, rather than the wolverine ghosting blurred still frame.
[ October 23, 2019, 08:40 AM: Message edited by: Mike Spice ]
Posted by Kamel Ikhlef (Member # 6667) on October 23, 2019, 10:52 AM:
Mike,
What speed do you use for your scans? (2im / s or 4im / sec).
Frames will have time to register on an SD card or on a hard drive?
You are farther than me in your tests! Thank you for sharing experiences.
For me the best is to finish a crop in 1440x1080 for the HD. But I have not found the right starting format to crop the maximum of the scanned frame. As soon as I can I will resume my tests.
BTW : the new 3D design Capstan Motor mount is finished (new location to test)...
Posted by Mike Spice (Member # 5957) on October 23, 2019, 11:37 AM:
Todays scanning produced a total of 9121 tiff images at 1600x1200 resolution. 34.7Gb
That was around 190ft super 8
Kamel I am scanning at 1600x1200 and cropping to 1330x930 in VirtualDub, to the edges of the frame.
This is not exact, but it looks nice enough for me online.
I am using the faster scan speed and my old Revo computer with
windows 7 is writing to a memory card like a champion!
It is not resource heavy writing image files one at a time.
Also, the camera is not getting hot in a way that concerns me, after 6 hours scan time.
My second scan today it's not 'perfect' but I am very very happy where I am at in the process so far.
[ October 23, 2019, 12:52 PM: Message edited by: Mike Spice ]
Posted by Kamel Ikhlef (Member # 6667) on October 23, 2019, 12:07 PM:
Mike,
What speed do you use for your scans? (2im / s or 4im / sec).
Frames will have time to register on an SD card or on a hard drive?
Posted by Mike Spice (Member # 5957) on October 23, 2019, 12:09 PM:
I use the fast speed.
No problem writing image files to a card with windows 7
Posted by Kamel Ikhlef (Member # 6667) on October 23, 2019, 12:30 PM:
Thanks Mike for your tests sharing.
Posted by Mike Spice (Member # 5957) on October 23, 2019, 12:38 PM:
I did forget to check the bitrate settings on the h264 export.
Today i used the default 9057kbps.
It could do with being just a little bit higher.
11kbps would be better I think.
Posted by Kamel Ikhlef (Member # 6667) on October 23, 2019, 03:28 PM:
David,
I Have designed 3D toothed pulley for Super 8 only. I don't have normal 8 film for testing. I need to know the size and distance tooth.
Personally I will not need it. If anyone wants to do it ...
Posted by David Brown (Member # 7133) on October 23, 2019, 05:52 PM:
Kamel
Good to know the capstan is S8 only. I have both 8 & S8 but I can't say if any of those have torn sprockets. I though it was a good idea. It might work for both formats, the cogs are small enough to catch on 8mm, it would only take a couple of sprockets get the film moving again. I'll test that later. If there are no more changes to the capstan, I'll order the motor and use the parts from Thingyverse. I ordered a soldering iron, that will be here in a couple of days. That is to install the threaded inserts into the pulleys.Those are priceless.
Lets wait for more demand before designing a capstan for 8mm. There would be another problem, how to easily change 8 to S8 with out opening the back.
Posted by Bruce Davis (Member # 7072) on October 23, 2019, 07:13 PM:
Hi to all with IC Capture 2.4 I have been capturing one 3.5 minute super 8 reel at 2 second intervals, over several days, trying various settings and have had no problems until enabling Wide Dynamic Range.
In order to reduce blown out highlights I changed exposure to 200 (makes the capture darker and leaves more detail in the lighter areas).
To compensate for the darker captures, under Device Properties and the WDR tab, I enabled Tone Mapping "Auto" and set intensity to -0.64. Global Brightness Factor was on 0.00.
Capturing at 2 second intervals with the above settings caused strange behavour, Images seemed to contain half to two thirds of the new or next frame and the remainder of the frame was from the previous frame capture, causing a sort of rip/split in the frame which was made up of parts of two frames.
Going to 4 second captures cured this behavour, I am assuming there must be more processing time required but where, in the capture camera board or the capture software on the computer? The computer processor is never under any stress (Intel i5-2500K @ 3.30GHz) and saving to internal HDD is fast.
Thanks for your sharing, regards - Bruce
Posted by Kamel Ikhlef (Member # 6667) on October 24, 2019, 12:48 AM:
Bruce,
That was my question to Mike. I think that the more we will test high resolutions, higher quality or parameters that require calculations, the longer the scan time will be (the larger a picture is, the longer it will take to save on the hard disk.
For some scenes it will be useful to scan at 4 sec and others at 2 sec... For the 4K, in my opinion it will be 4sec, but I have not tested yet...
David,
For the normal 8mm, it will be enough to unscrew the pulley front and change the middle toothed pulley (it's very easy and I had already planned this)... No need to open the telecine unit !
We just need to design a new tpulley N8 with the pitch of the teeth corresponding to the N8) . I could not do it because I do not have the movie N8 for testing (My S8 toothed pulley has hole steps to 4.235 mm).
BTW: It seems that the perforations of the N8 film are much larger than that of the S8, so they will be easier to design and print.
Posted by Bruce Davis (Member # 7072) on October 24, 2019, 03:36 AM:
Stan Jelavic Hi sorry to bother you on your holiday (no need to reply if you do not want to), the Wolverine capstan drive used to pulse with every frame movement just like the take up real, today for some reason it only pulses every third frame movement, yet the take up real continues as normal. This cause the frames locations to be very irregular, worse than Mike's example video. Could this be a firmware problem, where the program has become corrupt?
Regards - Bruce
Posted by Mike Spice (Member # 5957) on October 24, 2019, 08:29 AM:
Bruce my example of jumping frames was because I started the timer without setting the external trigger in the capture software first.
I have done this a couple of times now.
Software merrily taking photos on zero timing regardless of the film thro' the gate.
Easy to spot now I know, the film 'drags' itself thro the live preview in this instance.
Kamel is this any help to you
Posted by Kamel Ikhlef (Member # 6667) on October 24, 2019, 09:09 AM:
Thanks Mike, but I need to know the hole regular 8 size.
I don't find for the moment (on google, my friend)...
BTw: It seems that I already had the information in my docs stored on my computer.

The Holes sizes are : 1,23mmx1.8mm - the steps = 3.81mm.
There is also a larger offset from the left edge of the filmstrip (0.91).
I can design the pulley, I will share it but I will not be able to test on a real regular 8 film. Simply wrap the film on the pulley manually to check if the teeth are centered in the holes of the film.
I think, the Regular 8 Pulley will finished this week-end. I will post it on thingiverse.
It will be a little smaller that S8 Pulley (12 claws or identical teeth but much wider, see picture below).
[ October 24, 2019, 05:47 PM: Message edited by: Kamel Ikhlef ]
Posted by Stan Jelavic (Member # 6822) on October 24, 2019, 06:23 PM:
Bruce, the capstan should not be pulsing if the film is driving it because the sensor at the back of the motor sends the pulses to the controller and as long as the pulses are present the capstan should not be active. If for any reason the pulses t
Are not present the capstan will pulse once every 10 seconds roughly.
So, make sure that the film is engaging the capstan and not slipping. Check the wiring from the motor to the board. The controller failure is highly unlikely. These are very sturdy ICs and rarely fail or get corrupted unless you are keying a 100w transmitter next to it (my radio experience at Motorola).
Also there may be a motor sensor failure. This is a new motor but you never know.
Hope this helps.
Posted by Bruce Davis (Member # 7072) on October 25, 2019, 02:21 AM:
Stan Jelavic thanks for the reply, it has helped to find the problem. After taking a closer look at what is happening sequentially, I have become aware that the film transport mechanism (the small pin that moves up and down, forward backwards) is not always engaging with the holes in the super 8 film (checked that it is set for S8). It is therefore, most of the time, only feeding the film at a second attempt and as you explained that is why the capstan motor is activating and of course the frames are therefore very erratically positioned.
Now a matter of trying to establish why the pin is not engaging every time and just sliding along the underside of the film.
Thanks and Regards - Bruce
Posted by Kamel Ikhlef (Member # 6667) on October 25, 2019, 05:34 AM:
Bruce,
It may be the door closing flap that blocks the movie in his hallway. there are small springs underneath to properly press the film down ?!? I hope this will help.
BTW: I will upload the new Regular 8 toothed pulley today on thingiverse.
If someone tests it, I would like to know if it works because I do not have an regular8 movie.
I updated the new Capstan Motor mount, a new Camera mount and added a pdf Documentation.
https://www.thingiverse.com/thing:3891738
[ October 25, 2019, 06:47 AM: Message edited by: Kamel Ikhlef ]
Posted by Mike Spice (Member # 5957) on October 25, 2019, 08:53 AM:
I always set my gate so that the claw is down to make threading the film under the two little tags a bit easier.
There are two screws that can be unscrewed half a turn, to increase the downward pressure on the film in the gate.
Kamel I should know better than to try and post a google image of engineering things that I know nothing about
IC Capture software problem
I set up a partial scan area and click update in the settings of partial scan and then OK.
do a scan
stop the timer, turn off external trigger and go to adjust a colour setting in live view, and IC Capture does not remember the partial scan setting, so the frame jumps out of position as I turn off external trigger.
it also does not seem to remember auto white balance or auto exposure.
Any ideas? It was rock solid on my fujitsu windows 8, on my Revo windows 7 this seems to happen.
Posted by Kamel Ikhlef (Member # 6667) on October 25, 2019, 10:50 AM:
Mike,
It always helps and it has given me the path to look in my computer my documentations. So always useful!... And thanks for all the tests of the mod, I follow that with a lot of interest
Posted by Mike Spice (Member # 5957) on October 25, 2019, 12:15 PM:
I wonder how much effect the white light of the sprocket hole square affects the cameras' sensitivity?
It's not possible to get rid of it even using partial scan at any resolution.
A constant square of white during many different lighting conditions in the film.....
I am also beginning to realise this mod is more sensitive to extraneous light than the Wolverine was., so I am now shielding the gate area to block out light from the environment around the scanner
[ October 25, 2019, 01:49 PM: Message edited by: Mike Spice ]
Posted by Kamel Ikhlef (Member # 6667) on October 25, 2019, 02:10 PM:
Mike,
In this case it would be necessary to scan the image in the final format directly 4/3 for example: 1440x1080. That's what I'm trying to do. But I have not succeeded yet.
Posted by Mike Spice (Member # 5957) on October 25, 2019, 02:26 PM:
I would love to be able to scan 1440x1080 as an option, but I do like the overscan
The capture settings are a bit of a puzzle.
Partial scan changes when I come out of external trigger.
I check 'auto white balance' and 'auto exposure' and set things in motion.
Next time I look at the settings, the boxes are unchecked.
This is really frustrating.
Mid scan I have gone back to using the laptop and the settings are remembered with no problem.
Very odd, the Revo is up to spec for the task in hand
may have found the answer
Software on the Revo crashed today, since then it forgets it's settings.
On the laptop just now I stopped a scan to see if it had remembered it's settings and I stopped it perhaps a bit to quick before allowing the software to recover from writing.
The IC Capture software went 'non responding' and I had to force close it.
Now it too, forgets it's settings.
I can only guess it is something to do with user/app data/roaming/default.iccf getting corrupted.
I will try deleting it on the Revo and if that doesn't work, I will uninstall and re install IC Capture.
i give up
TWO computers losing settings during a scan!
on the laptop I deleted the app/default file
still losing it's settings during a scan.
on the revo i uninstalled IC Capture and reinstalled.
still losing it's settings during a scan.
It still remembers it's 'save and file number' settings from before me uninstalling the program... so what got left behind during uninstall?
I am really tempted to put my wolverine back to how it was.
I can not scan when settings are not remembered and actually change during a scan.
I was looking forward to four days of cine but right now, I could happily throw the whole lot out of the window.
The first day I started this working, it was fine, now it has all gone to s**t
It's not the mod, it's the software.
I can't scan films if the software settings keep changing.
Looks like a long saturday pulling registry edits and uninstalling again.
[ October 25, 2019, 07:31 PM: Message edited by: Mike Spice ]
Posted by Stan Jelavic (Member # 6822) on October 25, 2019, 07:37 PM:
Bruce, did you say that the machine work ok before? As suggested, check the film gate carefully. Is the film loose in the gate. With the claw disengaged, the film should be somewhat tight to pull.
Possibly damaged claw cam. I have some spare if required.
Mike, don,t give up. You are almost there. Unfortunately I have only my iPad with me so cannot do much testing. But hey, the api is available. I can do a custom sw to interface to the cam. And there we can do whatever we like... The downside is delay. BTW this is a usb cam so some other camera sw may work as well. Something to check.
Just looked at the SDK offered for free from imagingsource for this and other cameras and looks like everything is there for us to do our own version of capture. That also opens up other possibilities... for example if auto settings are to be used, the software can reduce the resolution temporarily to eliminate the white square and do auto exposure etc. then go back to original Rez and continue with the capture. But anyways for the starters we should do just a simple code that would make partial scan easy to do.
Posted by Bruce Davis (Member # 7072) on October 25, 2019, 11:51 PM:
Kamel Ikhlef Mike Spice thanks for the replies, I was not aware that the "door closing flap" had a spring loaded part to it, checked that and found it had a reasonable grip on the film, so that is not the problem. Setting the claw in its down position is what I do also.
Regarding the capture software IC capture, its free and has some bugs. I'm running Win7 and have the same problem, EDIT just happened to me part way through a scan it forgot its auto exposure/WDR settings, not all are forgotten just some. Same happens if a config is saved and reloaded.
Stan Jelavic I found the problem, it has to do with the Claw position in relation to the gate when set to Super8 or Standard8 and partly the fact that the 8mm film has quite a bit of sideway play inside the gate.
On super8 setting the claw side face is only 0.457mm from the gate guide face, super8 film punched hole edge to edge of film is 0.51mm. Its not much I know but enough to stop the claw from penetrating and simply sliding on the underside of the film. Taking into account allowable tolerances in film manufacture and the amount of sideways play in the gate adds to the problem.
I have set (with the sliding switch) the gate position so that it is roughly half way between the 8mm and S8mm settings, this places the Claw right in the center of the S8 punched holes feeding the film successfully.
Thanks for your help, Regards - Bruce
Posted by Mike Spice (Member # 5957) on October 26, 2019, 03:54 AM:
so it is not only me with software issues.
At least that will stop me pulling my hair out for now.
I have sent a message to Imaging Source asking for advice, I doubt I will hear from them until next week.
I will try one uninstall with a registry tidy up and see if that cures it.
As Stan mentioned, there must be other software capable of capture. camera control software perhaps?
EDIT:
I uninstalled the capture software from my laptop, deleted the appdata/roaming/default.iccf and ran a registry tidy up.
Something is still getting left behind, when I re installed the capture software it still remembered where my last file save was and the file name and number.
And sure enough, it is forgetting it's settings again.
This is just stupid, there has to be a simple reason for this to suddenly start happening, not only to me either.
Stan, if you can make software that will do this task then goodness me, I take my hat off to you!
I won't do any more scanning until this issue is sorted, it's just too annoying......
That said, I do have IC Capture on my 'workhorse' fujitsu i5 so I may give that a go later today.
[ October 26, 2019, 06:45 AM: Message edited by: Mike Spice ]
Posted by Stuart Reid (Member # 1460) on October 26, 2019, 07:47 AM:
Mike, is it worth taking a 'snapshot' of your OS before installing the software, then if/when it goes tits up revert to the snapshot.
Posted by Stan Jelavic (Member # 6822) on October 26, 2019, 09:00 AM:
Mike, have you tried save config and load config commands?
Posted by Mike Spice (Member # 5957) on October 26, 2019, 09:11 AM:
Stuart I guess I could have done a system restore point prior to installing the IC Capture, but too late now so I am looking at a program that does a better job of the standard windows uninstaller. There are a number of them, that do a deep search and take out every last trace of a program.
Stan No I haven't tried loading a saved config.
By that I guess you mean make the various selections, save it as a config, and then load that same config prior to scan, and see if it keeps the settings
No I haven't tried that, but it is something to try over the weekend.
I am going to give IC Capture a run on my i5 laptop this evening and see what happens there.
In theory it shouldn't make a difference as the software will run on several o/s
If it too forgets the settings, then I will experiment back with the Revo computer, using save and load configs.
Not an ideal solution by any means, if it means constantly having to reload a config during a scan, but worth a try.
Two computers of mine and also Bruce suffering with it too, so something is clearly amiss in the way we are using IC Capture, I can't imagine Imaging Source would not be aware of this if it were a bug, as the software has been available for download since Feb 2017.
I did wonder if it was worth trying an earlier version.
edit I am now trying a scan with a config loaded of the settings I want for this particular reel, lets see if they stay set.
I wonder if this is the point I am making a mistake
I have been using the default selected 'disable property automations' partly because that's what Stan did in the mod video, and partly because I stupidly always accept the default option and not bother to read exactly what it is offering me.
Partly because it also warns that the quality of some images may suffer!
Presumably that is where the auto white balance and auto exposure are being lost, as they are auto settings on the 'device'
That doesn't explain why the partial scan area would change, like it did yesterday, when de activating the external trigger, as that is not an auto setting, unless it is at the default settings, then partial scan is set to auto
So a scan this afternoon I am selecting 'leave property automations enabled' and have loaded a pre saved config which include auto white balance, auto exposure and my partial scan area settings before activating a capture.
I have also used the 'VIEW' menu to show me the toolbars for white balance exposure and brightness, I can already see that the ones that should be set to auto, are auto checked while the scan is happening, and I can turn them on and off while the scan happens and see the difference in the live preview.
So, for now, promising.
[ October 26, 2019, 10:20 AM: Message edited by: Mike Spice ]
Posted by Stan Jelavic (Member # 6822) on October 26, 2019, 10:17 AM:
Yes that is what I meant. Different configs.
BTW I wanted to disable auto properties because for the clip I ran I went all mamual. Settings.
For uninstall check the software folder for uninstal000.exe or something similar.
Posted by Mike Spice (Member # 5957) on October 26, 2019, 10:28 AM:
If my guess about disabling the property automations at the activation of the external trigger are correct, then the uninstall conundrum is fortunately no longer an issue.
Partial scan area seems to be stable as well, having stopped the scan a number of times, so lets hope that is down to having loaded a config of the partial scan area.
A very tiring week at work left me without focus or brains last night, so a fresh mind today and guidance here, I think we are back on track.
The reel being scanned now, is being done with manual exposure, and I have to say the live view looks promising, it also means I can make scene by scene changes to the exposure.
Manual exposure also means I can stop worrying about the light thro' the sprocket hole.
Having the tool bars up during a scan is very handy, learning new software, always a bit of a jigsaw puzzle.
This photo before I went to manual exposure

[ October 26, 2019, 02:06 PM: Message edited by: Mike Spice ]
Posted by Kamel Ikhlef (Member # 6667) on October 26, 2019, 02:47 PM:
Mike,
"white light of the sprocket hole square"
Could not we hide the piercing side of the scan window (a 1mm band), to reduce the shooting frame.
Thus, we will not see the white spot that influences the automatic exposure). Well, it's just an idea ...
In fact, think about a removable cache to decrease the size of the shooting gate...
Posted by Mike Spice (Member # 5957) on October 26, 2019, 03:12 PM:
Kamel.
I am using manual exposure for a reel today, so the white light of the sprocket hole is not a problem.
I hope this will be my usual method from now on, as I have complete control during the scan, using the tool bars in the IC Capture.
I can manually adjust exposure from scene to scene with a simple mouse click.
test clip from today
A couple of priceless moments from a family reel.
36.7Gb 7470 tiff images was today total for around 190ft
Looks a bit pale. Looks ok on live preview on the lcd tv screen, looks quite 'white' on my laptop lcd screen.
I wouldn't mind having da vinci resolve on a macbook to do some post.
I have got Shotcut which is very clever, I might try that and see where I get.
I love the fact I can now pull out .tiff still frames of people in cine, who we don't have photos of.
Perfect still frame compared to wolverine still frame on screen.
I had to have another go at the 50ft HMS Ganges reel
Where I joined the Royal Navy in 1974.
When I was 17yo
[ October 26, 2019, 06:29 PM: Message edited by: Mike Spice ]
Posted by Kamel Ikhlef (Member # 6667) on October 27, 2019, 03:02 AM:
Mike,
You have picture movies that are beautiful !. This is very encouraging...
This shows the potential of what this modified telecine could do. You went very far in the tests and the results are really up.
I think it will take for some films to go through a post-treatment (davinci resolve, film9 or others ...).
did you try the sharpness function to recover some fuzzy scenes? It seems to me that it works well without bringing too many artifacts like original Wolverine. To test...
But as I said, some professional Scan labs do not do better and there is better for us to master all the processing workflow. We are almost there...
Posted by Mike Spice (Member # 5957) on October 27, 2019, 05:09 AM:
Kamel Merci pour ton commentaire gentil
I would like to do some post, first I want to master the different scan techniques available
Manual exposure for me, every time from now on.
Auto white balance.
I am scanning a reel today with Sharpness at maximum using jpg image files.
In a couple of hours, I hope to see the result
Posted by Stan Jelavic (Member # 6822) on October 27, 2019, 08:29 AM:
In the test clip that I posted originally I used auto white balance and manual exposure Mike. But I was not aware at the time that this can be done as the scan is running which is pretty cool. So I would set the exposure once ending up with some dark scenes.
So the scanner needs a babysitter but that is how scanning should be done of you want decent results, right?
Really excited to play with postprocessing tools when I get back home next week.
Posted by David Brown (Member # 7133) on October 27, 2019, 11:57 AM:
Mike
Did I say how much I appreciate the testing that you share? I wish I could help more but I don't have a camera or controller board yet.
You might be aware of ghosting that I noticed from your last post. It will be most evident with high contrast and motion. I don't know the software you are using to get the tifs to video. It's not likely that this is on the film or each tiff captured. It could be Youtube?
I have had this problem and found it happend when I changed the framerate. I had captured 30 fps (when I used old firmware) and 20 fps from the Wolverine. I had tried ffmpg and found it was just deleting frames!!! I stopped using that but in all fairness I did not fully understand all the options. I had used someone elses suggestions. I would prefer the framerate to be ready before using a video editor.
In Vegas, it is simple to change the frame rate. There is an option that is set by default that tries to smooth the anticipated jerkiness of a lower framerate. They call it "resampling". What happens is that some frames are composited together like a double exposure (that's the ghosting). Problem is I can see it even though it is subtle. That option can be turned off, and problem solved.
I don't why that should happen now that stills are being combined into a video stream. It's my best guess where to look. I certainly don't want to add more to your plate!
Remind me what your assembly is from tifs to video. I can play with it. I need to take better notes along the way. Hawkeye is evolving over time so I find myself going back thru the posts to find the current methods and parts!
Not fast.
Posted by Mike Spice (Member # 5957) on October 27, 2019, 12:50 PM:
David the ghosting on that marching clip is down to my video edit software probably.
I did some raw slow motion 10fps edits last night using VirtualDub and posted them in my FB group.
Flawless.
My work flow is either tiff or jpg scan, manual exposure.
VirtualDub crop and 18fps
export as h264.
Here is today's jpg full sharpness and manual exposure scan
9100 jpg images. 9.23Gb. Compressed to 950mb in VDub.
Thank you for your kind comments on my testing, a lot of testing, a lot of knowledge exchange.
Using the IC software now is very simple, have the VIEW menu show you toolbars, and you can change exposure scene to scene without stopping, or you can just stop the scanner, turn off 'external trigger' to get live view back, make changes, and re start the external trigger, start the scanner, and you're off again...
I have been making exposure changes on the fly today...
[ October 28, 2019, 03:02 AM: Message edited by: Mike Spice ]
Posted by Stan Jelavic (Member # 6822) on October 27, 2019, 02:02 PM:
Great work Mike. You put in a big effort and the results are showing that.
As a side note, notice a bit of a flicker at the start of scenes. Is it the auto white balance doing that. Not a big deal but still something to double check.
Posted by Mike Spice (Member # 5957) on October 27, 2019, 02:14 PM:
flicker at the beginning, that would be the projectionist putting his cigarette out and not paying attention...
Cheers Stan, it is now going well, after my friday night hic up.
At the moment I am just scanning film, I am not paying attention much to small details, just scan after scan and learning what the software is capable of.
refinement will come one day soon....
For now, just scanning, and seeing what I can achieve.
The fancy pants stuff can come in the next lesson.
I consider myself 40% up the ladder of the learning curve.
I am using auto white balance, so it could be that generating the flicker.
I am using manual exposure from here on in.
Auto exposure? no need to do that two times to a film.
[ October 27, 2019, 04:31 PM: Message edited by: Mike Spice ]
Posted by Stan Jelavic (Member # 6822) on October 27, 2019, 06:27 PM:
Possibly auto exposure hunting. Not a big deal.
Posted by Keith Wilkinson (Member # 7162) on October 28, 2019, 04:47 AM:
I am new to the forum, but have been reading this thread with much interest. I have been doing 8mm transfers for some years thanks to my late father leaving me twenty years of material starting in the 1960s. I havent got a Wolverine but use a modified Eumig projector and machine vision camera.
However, I thought Stan especially, would be interested in what can be done with the SDK from Imaging source. See this website:-
http://www.nightshade-arts.co.uk/telecine/postprocessing.html
Looks like the author has written something to replace IC Capture and is using a histogram to help with exposure settings. He also mentions something called pixel binning which reduces noise by combining pixels. Something that IC Capture can do.
Note to Bruce:- to save Video Freds script without the dual window take the S out of the Result line.
ie Result=result1 instead of Result=results1
Posted by Mike Spice (Member # 5957) on October 28, 2019, 06:43 AM:
My naive curiosity got the better of me, reading the nightshade link.
He talks about 'binning' being set to 2.
I thought, I should try it...folly not to...
It crashed my pc and the IC software wouldn't run again until I uninstalled it, and re installed it again.
Working fine again now. No idea why, just a heads up to other curious folk who might be tempted.
In other news, I had a reply from Imaging Source help dept.
Really helpful trying to work out why I was having a problem.
I sent a reply back saying the problem was me, and now solved and thank you .
Posted by Stan Jelavic (Member # 6822) on October 28, 2019, 09:27 AM:
Ouch, better stay away from pixel binning Mike. Not sure why this would crash the PC. My best guess is that the feature is not implemented properly and stalls the camera. IC capture must have a high priority thread that waits for the cam response and with no response it is hogging the PC and that state is saved in registry. Or something similar.
But thank you for raising a red flag.
Thanks Keith for the link. It is interesting and it is similar to what I had in my mind.
A few interesting points
6 to 7 frames per second? We get only 1 frame per 2 seconds. He is grabbing a smaller frame but still his implementation seem to run much faster.
Binning could be useful... Less noise and faster.
Histogram could be useful. Can keep an eye on it and adjust exp and gamma when it misbehaves.
Posted by Bruce Davis (Member # 7072) on October 28, 2019, 11:03 AM:
Keith Wilkinson
Thanks for the thoughtful reply, I asked in video fred's forum about this and was given the same information. I read the user guide documentation but completely missed this.
Regards - Bruce
Posted by David Brown (Member # 7133) on October 28, 2019, 10:54 PM:
Kamel/Stan
My Capstan motor arrived and I have mounted it. The shaft will not rotate in my fingers. Might be bad? There was no pinout or wiring information included. The board is marked with: m1.gnd.c1-c2. 3.3v .m2. I could assume those correspond with the wires. Where does the 12v+ go? I'd like to see it rotate or return it.
Posted by Mike Spice (Member # 5957) on October 29, 2019, 02:26 AM:
The idea of the sprocket/capstan does seems like a good idea for those who want to scan films and leave the machine to it, but it does raise a couple of things for me personally.
You will find settings need changing during a scan....
Having scanned around 900ft now, I have had the odd splice and frame that got stuck, as I baby sit each scan, it was quick to correct, but in the final image sequence I did get static frame for a second.
Also by baby sitting, I don't have to rely on auto exposure, I can change settings scene to scene.
Gamma, exposure, gain, hue can all be adjusted during a baby sitting scan, from scene to scene.
I wouldn't like to have to do that in post.
Every reel I have done so far, I have changed settings scene to scene.
If a 400ft reel was scanning unattended, you wouldn't know about stuck frames until you had rendered out the sequence and would then have to trawl through literally thousands of stills to find the stuck frames to delete and re render.
Hugely time consuming..... given how many stills are generated.
Some of my reels, in excess of 7000 stills, and I haven't done a 400ft yet.
You are going to need a program to let you scroll through thousands of thumbnails quickly and efficiently that will also batch rename.
I use Faststone which is very easy to use, it also has a batch re numbering tool, which is very very useful.
If you have to delete static image files, where the film stuck, bear in mind the entire sequence of images will need to be renumbered from beginning to end, or your software will only load up to the point the number sequence breaks.
Also bear in mind, each scan needs the #number and name changing before scanning, or the IC software will end up numbering and naming images from where the last scan left off.
Something to think about, and consider how your work flow will develop.....
In other news.
I discovered that the IC software sometimes hangs at the splash screen with the camera connected.
Easy fix turned out to be, start IC capture without the camera, when it gets to the point where it says it can't find a device, plug in the camera, it will appear in the device window and away you go.
[ October 29, 2019, 08:38 AM: Message edited by: Mike Spice ]
Posted by Kamel Ikhlef (Member # 6667) on October 29, 2019, 04:55 AM:
David,
Stan had noticed that we had to put very short screws for the motor mount. Check if they do not block the blades. The wiring diagram was given by Stan :
https://photos.app.goo.gl/raWZMCiemmsucdDN6
https://photos.app.goo.gl/LJajGbSQG1fujdZB8
Posted by Stan Jelavic (Member # 6822) on October 29, 2019, 08:04 AM:
Thanks Kamel. So David if you connect the 12V between the motor+ and motor- the motor should run. This is not a stepper just a DC motor.
If the screws are binding, you can add a thin washer between the motor and the mounting bracket. That will back the screws off.
Posted by Terry Dowling (Member # 7108) on October 29, 2019, 10:38 AM:
I finally received camera today through Scorpion Vision, but after removing protective film found the sensor is really dirty:(
Anyone else have any issues with theirs? Not sure if I should get it returned for replacement or try clean it up? What is best way to clean it?
Posted by Mike Spice (Member # 5957) on October 29, 2019, 11:04 AM:
I would speak to Robyn by phone, she is most helpful, and email the photo to them.
DO NOTHING TO IT UNTIL YOU SPEAK TO THEM and they have seen the photo, perhaps take a couple more, from a different perspective, up close.
They wouldn't know, as the sensor is wrapped in light proof plastic and can't be seen.
01590 679333
in other news, HAWKEYE modders
I have come to the conclusion that if anyone doing the Hawkeye mod thinks they can set up a reel of film to scan, and walk away leaving everything on automatic and get a good scan?
It is not going to happen.
The more I scan, the more I learn.
Automatic scans are a thing of the past, once the mod is done.
That is a good thing, but you're going to have to find the time to baby sit reels...
I am happy to be proved wrong, but I don't think I will be..
I am having so much fun clicking exposure and gamma and contrast as every single frame passes under the camera.
Today's scan was a mess, I hope Weds scans will be better.
[ October 29, 2019, 02:56 PM: Message edited by: Mike Spice ]
Posted by David Brown (Member # 7133) on October 29, 2019, 11:53 AM:
STAN
My motor did not come with and screws or wiring! I had some long 3mm screws and had to cut them down. The motor was completely mounted in the Wolverine when I applied power and the screws could be the problem. The shaft was very difficult to rotate before I mounted it, I will pull it out and test it without screws.
Thanks Kamel , I remember seeing the capstan wiring now. At the time I thought I would need that when connecting up the circuit board and didn't focus on the motor pinout descriptions.
I'm not able to give you feedback on the 8mm cogs yet. I had a difficult time printing it. The best one has very short pins, so I'm going to order those from Thingyverse. I'm using PLA and don't expect to jump into ABS anytime soon at home.
Thank you for the pulley designs. I have tried to print 8mm pulleys long before this project and had some success, yours are very strong and freely rotate. I've replace all the Wolverine pulleys and may need to add more with the external winders I've printed from Thingyverse. I'm now able to use 800 foot reels, if they were shimmed up and inch or so I could use 1200' reels. Don't see a lot of those, I only have one.
HOWEVER, That brings to mind Mike's case for doing scene by scene captures. If the final capture is important, you must spend time reviewing the finished product. The time spent re-mounting the film, FINDING the problem scene....
I've done that! It takes too much time. The larger the reel, the greater variety of exposure settings.
I don't know what capacity the IC has for setting white balance manually. I suggest always white balancing the light source. Do it before any film is loaded. I have been capturing 8mm stills for some time now. I've used flash, incandescent, and led. Auto white balance in the camera is not always exact. Using auto white balance in post can work, but there's less color headroom available in a jpeg to change colors. BMP or TIFF have more, but are only 8bit. The best results I've had is with matching the light source in advance. Some times the film will go beyond normal colors, some shots are indoors with daylight film and vice versa. If your light source is balanced in camera, these are easier to correct.
The capstan might cause a problem (running nonstop) during an intentional capture stop? Another switch on the panel? I think the capstan will react faster to get the film moving again than I will. That's with torn sprockets, not sure about a bad cement splice on the left side of the gate. Check for those when cleaning.
Posted by Mike Spice (Member # 5957) on October 29, 2019, 12:00 PM:
The only auto setting I am using is white balance, everything else I am adjusting scene by scene.
Auto white balance seems to be doing a great job.
Much better than I can do by mouse clicks.
Auto exposure is a NO NO as the square of white LED light thro' the sprocket hole will misguide the camera in dark scenes.
My reels will get many scans until I perfect the art of a single exposure click, or gamma correct.
Early days of cine film scanning frame by frame.
This is not Wolverine 'pop on a reel and leave it' and then show Aunty Joan her memories on your macbook....
This is the Holy Grail of frame by frame to still image.
My settings are very important now, in a way I never even begun to realise when 'James Stanley Bond Jelavic' came along with his amazing mods.
One good thing, you get plenty of exercise jumping up and down to go click the mouse!
It is a hugely time consuming project, so if you want auto everything.... send your reels to a scanning house.
I have been a sound engineer for some 30 years, I know that I need to get the best sound at the point of recording with my microphone, before I mix it.
I am now learning very quickly the same is true with capturing still images to process to video files.
A radio shack PZM microphone will perform really well, if you place it correctly in the first place.
The same is true with an accurate camera pointed at some cine film.
If you are considering, or doing The HAWKEYE MOD
Invest in some memory cards.
Don't use your hard drive.
If you must use it, empty the trash, defrag your drive once a week minimum
You can move to another machine with flash memory, mid scan, for a quick test render with one card, pop in another 'same name' card and carry on scanning....
Writing tiff images to card is much better than writing them to a spinning disk ..
Where we have come to with digital storage is simply incredible. 128Gb on something the size of a postage stamp.
One thing this process has taught me. live preview screen with a reliable picture, is Paramount.
If your preview screen is pants, your scans will be pants.
I have to find some kind of test image to put on my Sony tv, to try and calibrate some kind of balance.
Today's scan was very poor.
Nothing more than my preview screen not telling me the truth.
Tuesday scanning....
I scanned 150ft feet today. Disaster.
[ October 30, 2019, 04:53 AM: Message edited by: Mike Spice ]
Posted by David Brown (Member # 7133) on October 29, 2019, 04:04 PM:
Mike
These are what I would use to adjust a monitor quickly. Maybe not these specific images below. Tonal range is brightness and contrast on the monitor. You should be able to identify every shade.
Color charts are too hard, even if you know what they should look like. This kodak scene has a vast range of common colors.
Newer TVs may not let you shift colors hues, adjusting brightness and contrast will impact the saturation. Do the black and white first. Then play with saturation.
Not the best, hope it's a start.
Flickr
Flickr
Posted by Mike Spice (Member # 5957) on October 29, 2019, 04:17 PM:
I am most grateful David.
I will put those on my tv during wednesday shenanigans with the scanner.
Posted by Stan Jelavic (Member # 6822) on October 29, 2019, 06:57 PM:
The shaft should be easy to rotate. Looks like your screws are too long.
Regarding the capstan note, the capstan motor stops when the stepper is turned off.
Posted by David Brown (Member # 7133) on October 29, 2019, 10:52 PM:
Thanks Stan
I removed the motor and applied 12v from two sources, a 2 amp transformer, and a 12v 14 amp battery. Nothing. I put the shaft in my drill motor and ran it very slowly. There is soft resistance on each revolution.
I'm done. It's $10 motor. I'll just buy another one.
Just wondering. Mike are you using VirtualDub2? I had a quick look at VD ver 1.10.4. It won't load tifs. I converted the tifs I had to bmps. In they went.
Posted by Mike Spice (Member # 5957) on October 30, 2019, 04:49 AM:
VirtualDub 2 build 43048
Posted by Kamel Ikhlef (Member # 6667) on October 30, 2019, 05:42 AM:
Mike,
Can we do worse than the original Wolverine ???
(your last scan) it's incredible !
Posted by Mike Spice (Member # 5957) on October 30, 2019, 06:53 AM:
merci Kamel
Some scans look good, yesterdays scan went in the trash can.
Some Wolverine videos have been very good, the Wolverine compression is the killer.
I hope to use a calibration image on my capture screen, I hope that will make a difference to my scans.
Posted by Stan Jelavic (Member # 6822) on October 30, 2019, 08:07 AM:
Try connecting the power to the motor contacts David. Maybe a bad crimp at the connector. Mike, agree, some Wolverine videos are nice, bright and full of color, but then it comes in that digital garbage and spoils everything. The worst part is that one becomes aware of it and app probably appears worse than what it is.
It really bothers me on faces and certain natural scenes like the waves, grass etc.
Posted by Mike Spice (Member # 5957) on October 30, 2019, 08:18 AM:
Thanks to David for the black and white test image.
My screen did need a little brightness to see all the bars.
I probably won't scan until Friday, when I will find out how it affects my preview screen.
---------------------------------------------------------
The fact you couldn't pause a wolferine scan without getting ghosting really annoyed me.
Hawkeye stills are such a blessing.
You could never pull a still from a Wolferine scan.
A wolf in sheeps clothing......
---------------------------------------------------------
Here is my Wednesday top tip for VirtualDub users.
So, you loaded in 7000 images to make a video.
Perhaps you want to export segments of the sequence.
I know I do, quick test render, without having to export the entire sequence for example.
A clip for social media perhaps.
Once you have set frame rate, crop, compression:
Find the segment you want and then choose 'select range' from the video menu.
When you save the video, it will just save that part of the sequence.
Very handy.
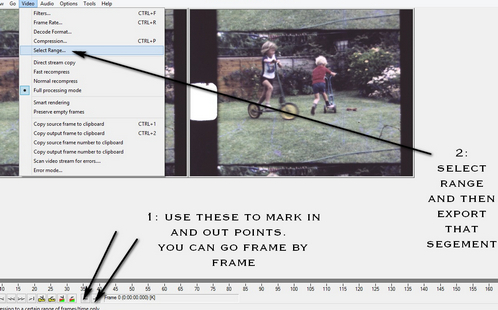
[ October 31, 2019, 11:17 AM: Message edited by: Mike Spice ]
Posted by David Brown (Member # 7133) on October 31, 2019, 11:18 PM:
Stan, you nailed it.
I did an autopsy on the motor. There is barely any clearance inside before the bolts hit the stator. Why the mounting holes could not have been .5mm closer to center?
Look at the depth of the threaded mounting holes before screwing in the bolt, there is maybe 4-5 turns and done.
Anyway, if anyone else does the capstan, there is less room than you think for the mounting bolts.
Amazon is sold out, new motor coming from China by row boat.
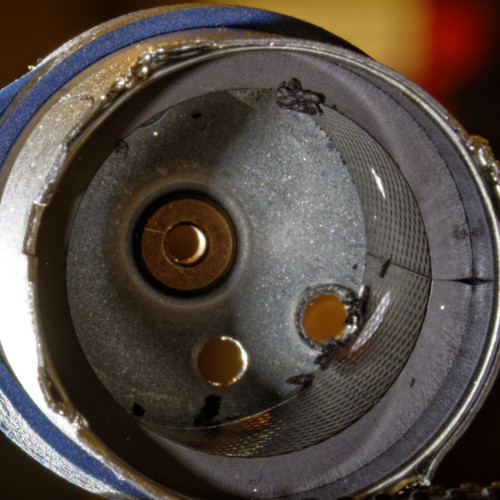
Posted by Kamel Ikhlef (Member # 6667) on November 01, 2019, 03:01 AM:
David,
Another link to order this motor :
http://www.uxcell.com/micro-motor-12v-4300r pm-%20wire-high-speed-encoder-motor-for-diy-hobby-toy-cars-remote-control-p-1323950.html
I do not know if we can replace by another model, Stan could better advise you.
Posted by Stan Jelavic (Member # 6822) on November 01, 2019, 08:20 AM:
I ordered the motor from the link that Kamel posted. It took a while before it got in. The snail mail. Unfortunately i currently do not have any alternatives.
Posted by Mike Spice (Member # 5957) on November 02, 2019, 09:35 AM:
Terry did you get in touch with scorpion vision about the condition of the sensor?
Any outcome?
Posted by Terry Dowling (Member # 7108) on November 02, 2019, 10:06 AM:
Hi Mike, yes I was just told to clean the sensor by both The Imaging Source and Scorpion Vision. Here is the link I was given. https://theimagingsource.deskpro.com/en/kb/articles/how-to-clean-the-camera-sensor
I just find it odd for a brand new sealed camera to have a dirty sensor.
Anyway it's all good now after cleaning with alcohol.
Just waiting to receive board from Stan. Do you know how long postage took from US for you?
Posted by Mike Spice (Member # 5957) on November 02, 2019, 10:18 AM:
I am pleased to hear you got it sorted, and a useful link for cleaning the sensor, from them what know, as a bonus.
Postage from Stan is ten working days to me in W Sussex..
Posted by Stan Jelavic (Member # 6822) on November 02, 2019, 10:44 PM:
I sent the board via regular mail Terry. That worked OK before if the package is small. Maybe they stopped it in customs and returned it back. Will check when I get back home.
Posted by Mike Spice (Member # 5957) on November 03, 2019, 02:31 AM:
I am really struggling to get consistent scans.
Auto exposure is just not going to work, partly because it's reaction time is so slow, the moment is over before a change has happened, the light from the sprocket is having an effect in dark scenes and in light scenes the auto focus in just not responding how I would imagine it to.
..
Using manual exposure is almost impossible for the scene at the moment,
How did the wolverine manage to make it look so well exposed?
I am trying to scan a scene shot with bright sunlight and darker foreground, all I can get get it either a bleached out sky or a foreground so dark the detail is gone.
I have tried with manual gain and auto gain, manual exposure and auto exposure.
The wolverine managed to expose this with great clarity.
I use Gamma and exposure to try and make it look nice but just keep stalling.
Trying to scan a very dark scene all I ended up with by increasing exposure manually was to have light bleed in the edge of the frame from the sprocket hole.
I also notice the back light control is not active and I can't seem to make it active, greyed out.
I would be interested to know how other folk are coping.
Evenly lit scenes are no problem, they come out very nice
here is an example of trying to capture a very dark scene, to increase exposure and this is what I get.
edit I spoke of auto focus in this post, I meant auto exposure. I haven't deleted it as it gets mentioned in the next page.
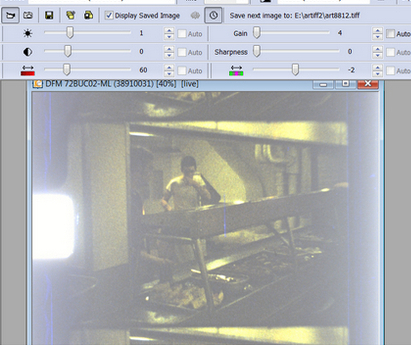
[ November 04, 2019, 10:12 AM: Message edited by: Mike Spice ]
Posted by Bruce Davis (Member # 7072) on November 03, 2019, 04:31 AM:
Mike Spice Hi cheaper CMOS sensors, as far as I can find out, have a problem (but used these days because they are cheaper) with light and dark on the same image (I may be wrong).
As with yourself, I am also disappointed with the results, I have been working on 2 x 50 ft rolls of super 8 for days to try and get reasonable results (post processing). Every scene change seems to be different, I know I am not an editing expert and am still learning, but if things can not be improved, for me it is not worth the time it takes.
I have used Video Fred's script with VirtualDub and it does a good job of good footage, but it is not able to handle or compensate for images with extreme light and dark.
When the same super8 film (with high contrast from Wolverine) is viewed through a projector, firstly the projected image is excellent and if I film the projection with my cheap mobile phone it gives a much better result (but of course the captured video is slightly scewed).
No Mike you are not alone.
I have also tried Nick Whitehead's Telecine program (quite old now), it does, by default, seem to give a better colour reproduction result, but the timing for taking the snapshot does not seem to be quite right. The images are taken while they have not steadied and therefore the images end up wavy.
Regards - Bruce
Posted by Mike Spice (Member # 5957) on November 03, 2019, 05:35 AM:
Thanks Bruce.
I'm not sure the scorpion vision is that cheap, some £80, and a £30 lens, I dare to think what the sensor in the Wolverine is (or isn't) worth...
I won't be able to post any stills until later as I have to go our for a few hours, but I will try and post some later to demonstrate the problem.
I understand exactly what you mean about projected images and then comparing to what the imaging source sensor is losing.
Very frustrating, I have spent the last 24 hours trying to get thro a 400ft reel, in tiff format. Some 82Gb currently copying to my network drive as a back up.
A good deal of it will be no good.
I never thought I would admit that the Wolverine can scan certain scenes better than I can with manual control and a frame by frame capture.
Like you, I am no expert, but given I can adjust exposure, gain, hue, gamma and white balance, I am very frustrated I can't get satisfactory results in cases where there are extremes of dark and light in the same frame, yet the wolverine does it will ease, on the fly.
Posted by Stan Jelavic (Member # 6822) on November 03, 2019, 09:30 AM:
The light bleeding into the dark area could be one of the major causes. I am studying your picture Mike and I dont think it is the sensor that is causing this. It is probably lens flare.
We can try the following
Lower Rez to get the sprocket hole out of the frame and check if the flare is still there. This will probably work but not a solution.
Rig up a tube (lens hood). to see if it is a reflection causing this outside of the lens.
Zoom out on standard Wolverine and check if the problem shows up.
We use a longer focal length lens and that makes the flare worse.
One more suggestion
Contact Imagingsource for advice.
Posted by Bob Vito (Member # 7168) on November 03, 2019, 02:42 PM:
Has anyone experienced multiple frame captures for each frame advance? When I am using the faster frame advance speed on the modified Wolverine, The IC Capture software saves two files for each frame advance. The first file looks fine, but the second is somewhat squished, as if it is capturing the frame as the film is moving. If I use the slower frame advance speed, it captures four files for each frame advance. Any ideas on how to capture one file for each frame advance? Thank you.
Posted by Stan Jelavic (Member # 6822) on November 03, 2019, 02:48 PM:
Bob make sure the sync works. Disconnect the sync from the board. The capture should stop. If that works make sure the timer is set to zero.
One more thought on lens flare. The metal bracket that holds the board is a nice shiny metal. Could it be reflecting back onto the film?
Posted by Bob Vito (Member # 7168) on November 03, 2019, 03:36 PM:
Stan, I disconnected the cam sync connector and the captures stopped. Upon reconnecting the connector, they started again - 2 files each frame advance. The timer is set to zero.
The Device toolbar in IC Capture has an adjustable FPS field. When I increase it, the number of captured frames increases. Unfortunately, the lowest FPS listed is 3.82, and that is when it captures two frames for each frame advance. This is not insurmountable - I would just have to delete every other frame capture. I will continue working with the software to see if there is a better solution. Thank you.
Posted by Bruce Davis (Member # 7072) on November 03, 2019, 06:06 PM:
Bob Vito the FPS settings should not have any bearing on frame captures if your settings are correct. Make sure the "Activate External Trigger" option is active before you start the "Sequence Timer" otherwise it will just snap images as per FPS setting which is not what you want. The external trigger must trigger the camera.
regards - Bruce
Posted by David Brown (Member # 7133) on November 03, 2019, 06:15 PM:
Stan
You should stop reading the forum until you return home!! Helpless.
I can only make general comments as I don't have an operating Hawkeye.
I experienced lens flare early when capturing with a DSLR. I don't know why that is gone now. Maybe the light source and the film and the sensor were not all parallel. With all that resolved, and the same lens, but a light source much like the Wolverine has, it's gone. I still capture the sprockets with the light shining thru and it does not produce any lens flare.
That's not much help for those here, except it was an exposure problem.
I think the Wolverine has always used an auto exposure with the +.5 or -.5 added into the menu, It just put a limit on the auto exposure settings.
I finally captured the sprocket holes when using the Wolverine.
Captures had more detail at full wide, yet the compression was constant.
I wonder why auto focus would be used when the focus distance never changes? How auto focus could even work is a mystery.
Good luck Mike and others, you might wait until Stan returns unless you can find a way to use auto exposure with a limiting factor, and fixed focus.
Posted by Stan Jelavic (Member # 6822) on November 03, 2019, 08:41 PM:
If the capture stops when the ext sync is disconnected indicates that the camera is correctly programmed for ext sync. But the FPS should not have any affect. Was your setup always having this issue Bob? Possibly something turned on that we never used in IC Capture. Is there a reset to defaults? Try resetting the whole system including the computer. Make sure that you have only a single instantiation of IC Capture running.
David I am half crippled without the test system. But we have to start somewhere. The flare can be caused by internal or external reflections. Putting a black tube from the cam down to the film will tell us if it is external. I really do not think it is the alignment unless the spacers are uneven which Is unlikely.
The front hood is off and that is one of the differences between Hawkeye and Wolverine. I did not fully explain how the shiny metal around the camera can reflect back but it is possible. But anyways I will get to the bottom of this when I get back.
Posted by Markus Baur (Member # 7171) on November 03, 2019, 10:29 PM:
I know I am late to the game and have 25 more pages to read to get caught up in this thread.
I was initially interested in the Wolverine but quickly turned off by the image quality of the published sample. I always wanted to build my own after having seen some interesting builds like the rpi jas8mm one. But life got in the way and I never got around to more than a few experiments.
Fast forward to today. After having seen 12voltvids' teardown of his MovieMaker Pro, I saw that not all is bad. I especially like the design of the gate with the spring loaded pressure plates that hold the film down and look like they're doing a good job of keeping the film flat.
So I bought two broken machines in the hopes to get enough working parts. And getting one running turned out to be a lot easier than I had thought. It had a zero use count when I got it working
Instead of working on a new build I started scanning with my new machine and ran into the exact things people were already complaining about: Jittery image, dark splotches across the picture due to debris falling onto the light table and overcompression as expected.
I made a few easy mods to deal with some of the problems I noticed:
(1) The image didn't seem to be as much in focus as it should, so I removed all the plastics and adjusted the lens. Here's where I found one more shortcoming: Are we still in the 1990s? Why the heck does this thing have analog video out with NTSC resolution when it captures in 1080p? Even more of a fubar when I learned that the controller is powered by a Novatek NT96650 which looks like it supports HDMI.
(2) I am pretty good at cleaning my film thoroughly before running it through any kind of machine. Still the Wolverine seems to be able to still scrape off some debris and throw it onto the light table. My quick fix: Run it on it's back like the jas8mm machine. Easy to build something to let it rest on the standoffs for the plastic housing.
(3) I looked at the jitter and arrived at the same conclusion as Mike: The tension of the pick up reel - even though it's reduced by the two rubber posts and the friction clutch seems to be too high. So my fix was to add a little micro switch wired as an interrupter for the take up motor. Here's a picture of my micro switch installation:. And here are two short clips showing the interrupter at work: overview close up
I hope this will add to the discussion. And now back to catching up on this thread and maybe getting on board with the full mod I've read about.
[ November 04, 2019, 09:43 AM: Message edited by: Markus Baur ]
Posted by Mike Spice (Member # 5957) on November 04, 2019, 10:14 AM:
David Brown The mention of auto focus on my earlier post, was an error on my part, I meant auto exposure.
For anyone struggling with IC Capture
This is how I use it.
Begin by making sure
2 (external trigger) is off
1 (live view) is on
Set your resolution 3.
I am using 1200x1600
Use option % near circle 3, to make the preview window look good.
Don't touch 4 (fps) not required.
Choose from the view menu which tools bars you want, you can make various adjustments during a scan with the increment buttons next to each colour/brightness exposure option.
(Once scanning starts you will see the changes made to any settings you change, in the next frame captured in the preview window
In live view, line up some film.
Advance the film a frame or two to make sure the sprockets are correctly registered with the claw, go to capture device settings and make any changes to the 'partial scan' area, so the area of film you want is being captured correctly.
Get the settings for colour, brightness gain exposure etc set the way you want.
Once you have the window and settings how you want them, go to the file/save configuration and save your set up.
Then reload your just saved config file before you proceed scanning. This is your basic set up for scanning.
(Next time you fire up IC Capture, just reload the config file to set it up as you had it, make and save config files for any different set up's you might want to create)
Make a copy of the configs file as well, for back up.
Go to the sequence timer settings, icon adjacent the 'display save image' checkbox in the tool bar.
Choose your settings , image type, path to save, name and prefixes required.
Then, activate external trigger (2), then start timer 6
Then start the scanner.
The sequence timer can be opened with the clock icon next to the timer settings.
Auto exposure easily controlled on or off (5)
Remember if you stop the scanner, turn the timer off, then turn off external trigger to get live view back.
If you have timer turned on, and it is set to zero, without the external trigger activated, the software will capture hundreds of still images in a few seconds, images of nothing.
Get it in your memory:
External trigger on, timer on.
Timer off, external trigger off.
I hope that is of some help
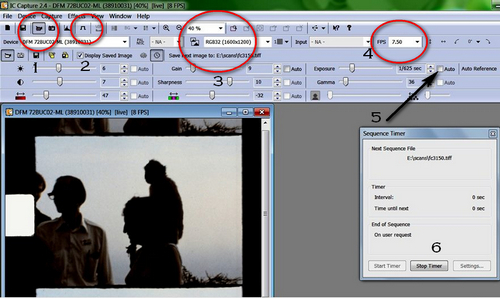
[ November 04, 2019, 01:23 PM: Message edited by: Mike Spice ]
Posted by Bruce Davis (Member # 7072) on November 05, 2019, 09:09 AM:
Thanks to Stan & Mike
Compiled from Stan and Mike's contributions.
For anyone struggling with IC Capture:-
Open the GATE cover flap and check that the "CLAW" is in the disengaged position (lowered position), it's easier to place-position the film if the Claw is out of the way.
Due to the bright glare of the LED, I find it easier at this point to have power OFF. Once the film is correctly loaded close the GATE cover flap.
Start IC Capture 2.4 software without the camera connected, when the "Select Device" window opens, plug in the camera USB cable and wait a moment for the camera to appear, select it by double clicking on it or click on OK. Sometimes the IC Capture software will Freeze if the camera is connected at startup.
Advance the film several frames to make sure the film sprocket holes are correctly registered with the claw.
In the VIEW menu / TOOLBARS select which tool bars you want displayed, e.g. MAIN TOOLBAR, DEVICE BAR, EXPOSURE BAR, GAMMA & SHARPNESS BAR, WHITE BALANCE BAR.
1. Check and make sure "Activate External Trigger" is OFF
2. Check that "Live Display" is ON
3. On the DEVICE BAR FPS (frames per second) for our purposes, has no effect, so do not bother with it.
4. Set "Select Video Size" to a size where you see just the film frame without edges (1024 x 768) and set ZOOM as needed.
5. Under DEVICE menu select PROPERTIES / COLOR tab and make sure "White Balance" is set to AUTO, "White Balance Mode" is GRAY WORLD by default. It may not be necessary to touch color adjustments, Lower color saturation is better at this stage.
6. Under EXPOSURE tab "Auto Exposure" should be selected to get you within the ballpark and then switch "Auto Exposure" OFF and adjust manually, do not use "Auto Gain", by default both AUTO GAIN and EXPOSURE + AUTO MAX VALUE are active.
7. Under IMAGE tab set "Gamma" as required to brighten up dark shadows and cut down on overexposed whites.
8. Under the WDR tab (Wide Dynamic Range) by default AUTO is selected. Try out various settings to see the effects.
9. Nothing selected under the SPECIAL tab.
10. PARTIAL SCAN allows one to select the center point of the area of the film frame that is to be captured, it can be left on AUTO-CENTER or adjusted manually.
11. On the DEVICE BAR, (first bar at the top) to the right of the ZOOM option, POI (Point of Interest) can also be used to visually select an area to be captured (Icon - Small red square with magnifying glass).
12. Once happy with settings go to FILE / SAVE CONFIGURATION to backup your current configuration. One can save as many configurations as needed. Reload the saved configuration to ensure it was saved correctly.
Prepare to Capture film frame by frame:-
1. CAPTURE menu / SEQUENCE SETTINGS / "Filename and Target" tab choose the image save Target Directory, File Name and starting index number.
2. "File Type" tab choose image file type to be saved.
3. "Miscellaneous" tab leave at default, no selection required.
4. "Automated Sequence" tab set "Interval" to Zero minutes, Zero seconds and de-select all "Automatically End Sequence" options.
5. "Activate External Trigger" THIS IS IMPORTANT, otherwise multiple unusable random images are recorded when the timer is started. (Icon - _|-|_). When Trigger is activated a "Activating External Trigger" window will pop up, select the bottom option "Leave the property automations....."
6. CAPTURE menu / SEQUENCE TIMER / click the "Start Timer" button.
7. Start the Wolverine / Hawkeye scanner.
8. To turn OFF/STOP the scanner, turn the timer off, then turn off external trigger to get live view back.
Please get into the habit of:-
----------------------------
External trigger on, timer on.
Timer off, external trigger off.
----------------------------
[ November 05, 2019, 05:52 PM: Message edited by: Bruce Davis ]
Posted by Mike Spice (Member # 5957) on November 05, 2019, 09:47 AM:
I did mention that sometimes the IC software will freeze on startup if the camera is connected, so I always start IC capture without the camera connected.
When the prompt tells you there is no device, plug in the camera, give it a moment to appear in the device window, and job done. I should have put that in my IC post.
It also makes sense to reload the saved configuration, just so you know it's working and correct, before you begin scanning anything.
-----------------------------------------------------------
I am going to experiment with setting the timer to something ridiculous like one hour, so if I forget to activate the external trigger, as I often do, and start the timer first, the software won't suddenly capture a ton of stills before I realise my mistake.
The many images captured by mistake would be because the timer setting is set to zero, so off it goes, as fast as it can.
I hope that by setting it to 60 mins, for example, this little problem can be overcome.
As soon as scanning starts I watch the timer window to see that file names and images are being captured as I expect, so starting the timer, with a long time set, and not turning on the external trigger by mistake, would give room to stop things and re start, with the external trigger selected, before a pile of dead images are captured at zero time.
The external trigger obviously over rides and timer settings, so a long timer setting should do the trick, rather than zero time.
I hope that makes sense....
Posted by Bruce Davis (Member # 7072) on November 05, 2019, 05:46 PM:
Mike Spice thanks Mike for the corrections, I have edited the post, if there is anything else wrong please let me know.
Regards - Bruce
Posted by David Brown (Member # 7133) on November 05, 2019, 09:07 PM:
Thanks Bruce
I love finding compilations!
Posted by Mike Spice (Member # 5957) on November 07, 2019, 10:20 AM:
I have just tried out setting the timer to 60mins in the hope that by forgetting to set the external trigger, and starting the timer, IC software would not merrily snap away as fast as it could on a pile of useless stills.
It is annoying when I forget to start the external trigger before the timer, only solution, remember the order of mouse clicks!
It doesn't work.
It appears if any timer setting other than zero is set, it will over ride the external trigger.
Oh well, no matter. Worth a try.
--------------------------------------------------------------
In other news
I find that using a
resolution of 1280x960
partial scan area
X offset 888
Y offset 496
I can scan a super 8 frame with no sprocket hole or any LED light, so that's good.
Giving a 50ft reel a test run on auto exposure.
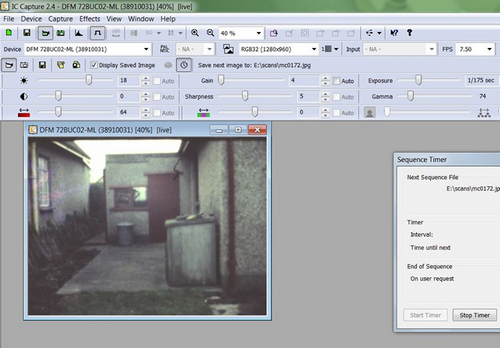
[ November 07, 2019, 03:58 PM: Message edited by: Mike Spice ]
Posted by Bruce Davis (Member # 7072) on November 09, 2019, 01:48 AM:
Hi to All I have done a comparison between a commercial frame by frame scanner (the Flash Scan 8 quite old by now) and the Wolverine/Hawkeye.
No matter what settings I change, for me it is not possible to reproduce the colour and contrast of the Flash Scan 8.
Examples below (very limited quality due to posting limitations):-
FlashScan8
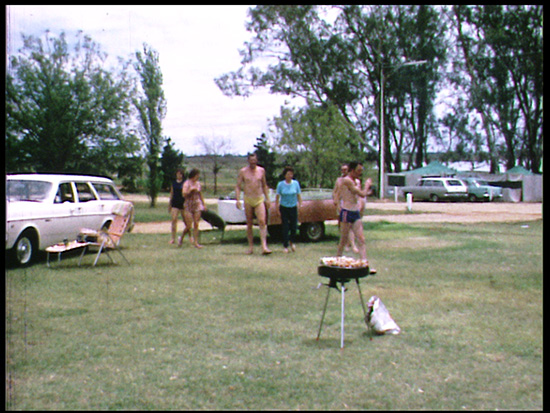
Hawkeye
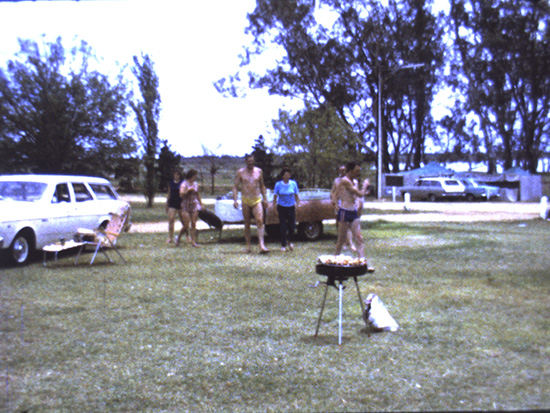
and now with the Video Fred Script applied to both:-
FlashScan8
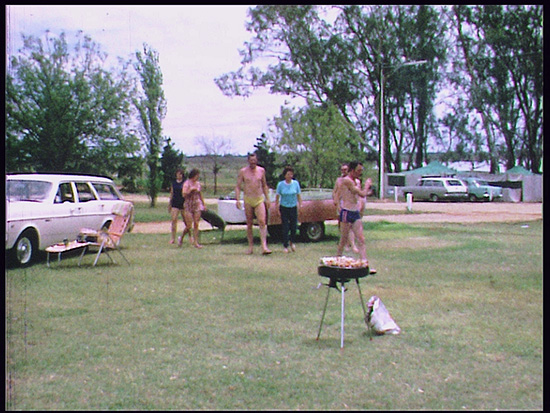
Hawkeye
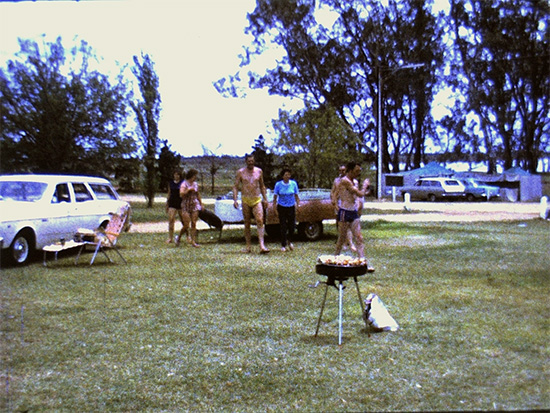
Regards - Bruce
Posted by David Brown (Member # 7133) on November 09, 2019, 09:50 AM:
Bruce
Too much contrast, but you might already know that. I see in Stan's "Wolverine custom camera kit" instructions, there are exposure controls in the IC capture software. Do you use the histogram to set the exposure or is this auto?
Posted by Bruce Davis (Member # 7072) on November 09, 2019, 06:39 PM:
David Brown CCD cameras (as far as I know) handle differences between light and dark much better than CMOS, but CMOS has been adapted because they are cheaper (thanks to Sony if I remember correctly). I think the CMOS camera used here has quality limitations.
On these sample hawkeye images, exposure was set on auto, white balance on auto, highlight reduction enabled (but does not seem to have an effect), WDR was off.
I have experimented with manual settings but in order to prevent blown-out whites or blown-out skies, the remainder overall image becomes very dark.
As an example to eliminate blown-out whites on the motor vehicle, exposure needs to be set on 1/333 sec, but on auto exposure to get a nice balance (with blown-out whites) the setting ends up at 1/74 sec. The contrast setting has its limitations, and does virtually nothing to eliminate blown-out whites.
I am not sure what can be done to improve the image contrast quality, I realise I am a novice, Mike seems to be having similar problems, look at his side by side comparison of the original Wolverine images compared to the current Hawkeye.
I am not sure what is meant to be done with viewing the histogram in IC Capture as adjustments made do not seem to have an effect on the above problem. Please let me know if I am wrong.
Thanks for your interest, regards - Bruce
Posted by Stan Jelavic (Member # 6822) on November 10, 2019, 08:39 AM:
Bruce, have you tried the gamma correction setting. The frame input to the sensor exceeds the sensor dynamic range. The workaround is to use a nonlinear sensor response (gamma). Looking at your pics I believe gamma would fix it. Try different gamma settings until you can get the whites and the blacks.
During post-processing the reverse gamma can be applied. Have not tried that.
With gamma increased the picture contrast will be reduced but in your case you have too much of it anyways.
Posted by David Brown (Member # 7133) on November 10, 2019, 12:54 PM:
Bruce The histogram can show you the range of light levels in a frame. It can give you feedback on the corrections you make. Even if using auto exposure settings, adjusting gamma or contrast can help. I don't have a working model to check the IC software for the Hawkeye yet.
I like these illustrations: https://www.cambridgeincolour.com/tutorials/histograms1.htm
Posted by David Brown (Member # 7133) on November 10, 2019, 08:24 PM:
Still running your Wolverine's takeup into a box, but can't seem to keep your pet cat from leaping into the takeup box?
This might offer temporary relief! A slip clutch that works like a projector did, with no modifications to the Wolverine.
A super8 takeup reel, a paper clamp, a metal washer & a rubber washer cut from some cupboard liner, and a nylon standoff. Things I had in my drawer.
Ran a 50' reel and it worked fine, then thought I should put on a full load.
A 600' reel works as well as the 50'. The reel oscillates because I didn't remove the Wolverine's key from the 8mm takeup spindle. The nylon standoff bends to fit and causes the oscillation.
Note that I did not even use any of the pulleys after the gate. Extra note: the pulleys are Kamels's design but, one is only supported by a finishing nail while I wait for a new motor. The other is used as a storage place for the 8mm sprocket while using the super8.
https://flic.kr/p/2hJ21dF
Posted by Stan Jelavic (Member # 6822) on November 11, 2019, 08:18 AM:
I ran the histogram on both of your images Bruce:
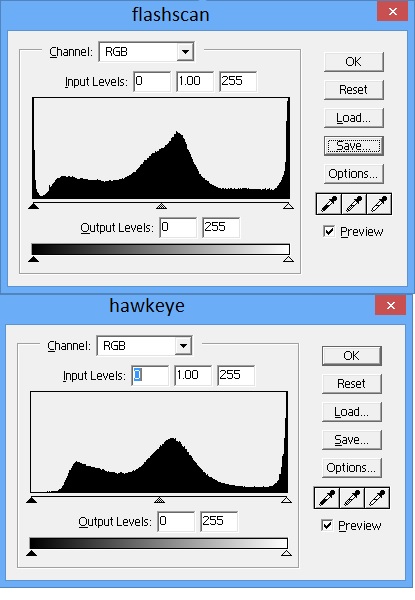
Looks like that you have too much exposure or gain and the black pixels are pushed up and possibly truncating the bright area.
What is the gain set to? Try reducing the gain and or exposure.
I tried to correct it by expanding the histogram in photoshop.
Also correcting the white balance by shifting it towards green.
Here is the result:
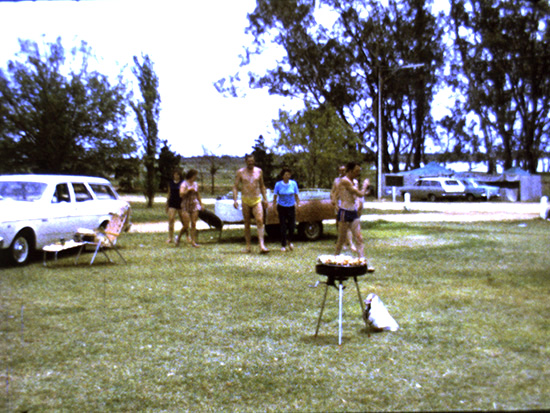
One more note... After doing the correction, the trees look un-natural because the white details are missing I believe. No posprocessing can fix that. Reduced gain should fix that.
Here is the comparison between fred script and photoscop. Pretty close but my photoshop version has more natural looking grass... you be the judge.

Here is the analysis of the white areas. Using photoshop curves I turned off anything that is not close to white. As you can see, hawkeye has all white shades saturated to 255.
The areas behind the trees should be darker white reducing the flare.

Spent several hours comparing Wolverine and Hawkeye.
Observed that IC Capture auto white balance does not work very well with auto exposure. The auto white balance starts hunting and then settles for a value that overexposes the image if the auto exposure is turned on.
I used a test landscape and turned the auto white balance on. Then turned it off and tweaked the values until the sky is blue and the roof is red etc.
Set gamma to 80 to get the tree details out. With these settings, the image looks a bit washed out because the histogram is very low in the black area and needs to be fixed in post-processing.
Here is the comparison:
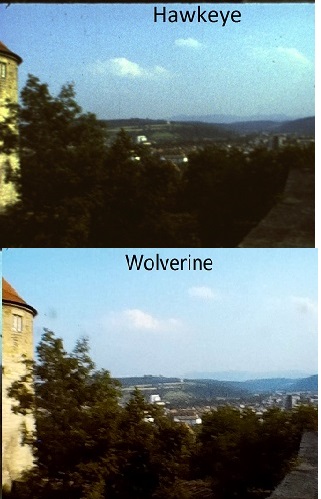
Did some more postprocessing for the hawkeye image to enhance the dark shadows (photoshop curves). Pretty close now. The main advantage of Hawkeye is the lack of digital artifacts (less anyways)
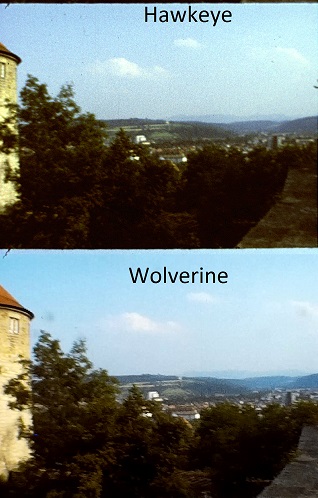
IC Capture settings:
Hue = 0
Saturation = 71
White Balance Auto = off
White Balance Mode = Gray World
White Balance Red = 172
White Balance Green = 113
White Balance Blue = 78
Color Enhancement = on
Brightness = 0
Contrast = 0
Gain = 4
Exposure = Auto
Auto Reference = 128
Highlight Reduction = Enable
Sharpness = 14
Gamma = 80
Denoise = 0
Auto Center = off
X offset = as required
Y offset = as required
Here is another find. With the white balance set to manual, tweak the autoexposure reference to reduce any overexposed areas. I set it to 109 for bright sky with a few clouds.
Now, another trick. If there are really dark shadows, reduce the gamma to say 48 and enable WDR and set it to auto. The dark shadows will jump out and show the details. Better than Wolverine...

[ November 11, 2019, 11:17 PM: Message edited by: Stan Jelavic ]
Posted by David Brown (Member # 7133) on November 11, 2019, 11:27 PM:
Stan
I'm very excited to see where this goes. I'm not even going to bring up any other issues!
Posted by Bruce Davis (Member # 7072) on November 11, 2019, 11:39 PM:
@Stan Jelavic
Hi Stan, thanks for the reply, I gather your are back from your holidays, did not think using the posted images (due low quality) would provide accurate results, but your histograms look the same as the better quality images on photoshop.
The gain settings, I have always left on Manual and at (4), which is the minimum. Sometimes I use Auto Exposure and sometimes manual. Yes I have also noticed the exposure/white balance hunting, if WDR/auto is turned on and there is a considerable change with the film like zooming up really close to an object or person, there is a complete dramatic change in colour and it changes back when zooming back out.
To my eyes the Wolverine seems to do a better overall job with the image, Hawkeye also produces a lot of graininess, not sure if its noise (can be reduced in post processing).
Gamma is normally set to 85 (default is 100), as it is reduced the image becomes lighter with less contrast and looks washed out, similar to reducing contrast.
I find all these settings to be time consuming and complex, they need to be adjusted with each scene change.
As mentioned above "to eliminate blown-out whites on the motor vehicle, exposure needs to be set on 1/333 sec, but on auto exposure to get a nice overall balance (with blown-out whites) the setting ends up at 1/74 sec."
Not sure what to do from here on, if the film images do not have too much dark and light, Hawkeye can do a good job, but in most cases there is always a bright sky to contend with.
Regards - Bruce
Posted by Terry Dowling (Member # 7108) on November 12, 2019, 05:42 AM:
I have been scanning all my family films with Wolverine pro I recently bought, while waiting for parts for Hawkeye mod. I have noticed quite often I get black spots in the video and found there is dirt sitting on the light. I clean it after every scan, but sometimes happens during scan and only notice at the end so have to end up doing scan over. This even happens after I have cleaned the film using filmguard.
Has anyone tried using their Wolverine on it's back to avoid dirt falling on light?
EDIT: have just seen post by Markus Baur running Wolverine on it's back. Going to try this out.
[ November 15, 2019, 05:52 PM: Message edited by: Terry Dowling ]
Posted by Kamel Ikhlef (Member # 6667) on November 12, 2019, 07:36 AM:
Terry, I designed a magnetic door for the original wolverine, If you are interrested, I can share the Design on thingiverse. You can modify it for your needs.
Posted by Stan Jelavic (Member # 6822) on November 12, 2019, 07:40 AM:
Will run a test clip with the settings I have with lots of shadows and blue sky.
I also noticed black spots. Not sure where they are coming from.
Bruce, are you running with auto white balance turned on. If so, try turning it off. You can try my settings or tweak it to your liking. For me auto white balance does not work well.
This morning I took a picture of the film that I tested last night with the microscope.
This is what I got:
Blue sky grain in the film:
https://photos.app.goo.gl/ZJHLgJ9LuQoGDQYh9
Film colors:
https://photos.app.goo.gl/hf7ZUKBWAFHteaJX9
Hawkeye:
https://photos.app.goo.gl/AgjjHdJrEbbFYUar5
Wolverine:
https://photos.app.goo.gl/rqsRAnAAjQyXTXSw9
It looks like the film is grainy and Hawkeye is reproducing that. But this can be fixed in post-processing. It is good to get as close to the original as possible to make sure no info is lost.
Posted by Terry Dowling (Member # 7108) on November 12, 2019, 09:16 AM:
Markus, I quite like the idea of the micro switch you added. Is this connected directly to the motor wiring? Is it possible to take a side view photo of how you have mounted this please? Just wondering how the switch would hold up with constant friction on it?
Kamel, yes I would be interested in seeing your magnetic door design:)
Posted by Kamel Ikhlef (Member # 6667) on November 12, 2019, 11:39 AM:
I added the magnetic Door 3D Design on thingiverse :
https://www.thingiverse.com/thing:3891738
you will have to stick with double-sided tape small magnetic media. For the Hawkeye Mods users, I think for a different Design.
Have Fun...
Posted by Terry Dowling (Member # 7108) on November 12, 2019, 01:28 PM:
Thanks Kamel, looks great!
Does anyone know what kind of light is used in the Wolverine moviemaker?
Posted by Markus Baur (Member # 7171) on November 12, 2019, 08:53 PM:
Now only 5 pages to go before I'm caught up with the Hawkeye mod.
Terry, here is an image how I wired my microswitch. I cut the positive wire between the controller board and the takeup motor and spliced my switch in there. This is how it looks from the side. And another short video showing the machine in operation from the side. I used a little bit of double sided tape to cover the actuator of the switch behind a short piece of plastic tube cut in half.
I am really not very fond of the solution, but it has worked nicely so far. With the Hawkeye mod there are a lot more and better options. In general the takeup and supply reel need to be loosely coupled with the actual advancing mechanism - whether that is a kapstan or a claw. Ideally I'd like to see a small bit of adjustable tension on both the supply and takeup side. But they cannot be fixed as the supply reel will need more and more torque over time as the reel becomes heavier and the point of tension moves farther away from the center of the reel. And likewise the opposite holds true for the supply side.
And that whole tension thing leads me to another gripe I (and a lot of the other members in this thread) have. The "rollers" not being actual rollers. Kamel has the right design I believe. But it could have been so easy. Here is a roller from a broken editor that would have been ideal for the transport:
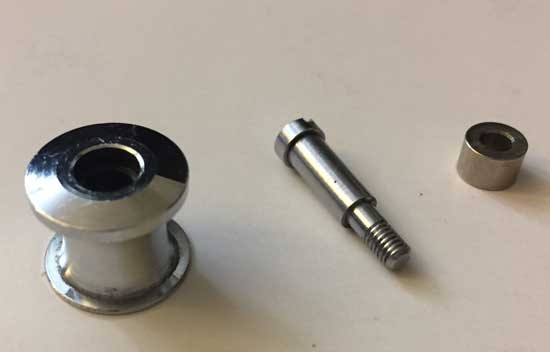
I wish I had more of these or knew where / how to get them. Using curved metal rollers so the film will only touch with its edges with low friction wouldn't have added more than a few cents to the cost of manufacturing the Wolverine!
Posted by David Brown (Member # 7133) on November 12, 2019, 10:52 PM:
Terry I could not find the lamp online, nothing in the Wolverine manual. You could probably remove it from the bottom door.
Certainly, it's LED and will never burn out. It has a slightly blue cast, though I read someone describe it as orange?
This is the IC software that I'm using with a microscope camera. It's on auto white balance because I can't adjust anything. It has other software and I find it interesting that it can be run with the IC for the Hawkeye. If all three color curves match, it's balanced. So much easier with an eyedropper!
https://flic.kr/p/2hK6V1S
I wonder if there is more sophisticated capture software that can be used with these board cameras?
I've been using an led light source to copy 35mm slides and 8mm frames. When I white balance to the light source, most everything looks good.
And here is a comparison with the Wolverine's light source compared to a flash. Not useful for anyone, though you can see where the Wolverine sits in the color spectrum.
picture balanced to the circled square
https://flic.kr/p/2hK5LGy
picture balanced to the Wolverine
https://flic.kr/p/2hK39Vp
Marcus
Look here https://www.thingiverse.com/thing:3891738
You can have Thingyverse or others print for you.
It's two pieces and rotates well.
Posted by Markus Baur (Member # 7171) on November 13, 2019, 12:11 AM:
I was wondering if a roller mounted on a swivel arm and the swivel arm held in position with a spring could be a solution to provide a constant, well defined amount of tension? The swivel arm could have a feedback element like my micro switch give input to the controller on when to engage the take up motor and when to back off.
Posted by Bruce Davis (Member # 7072) on November 13, 2019, 01:54 AM:
Kamel Ikhlef Hi I probably missed the purpose of the Magnetic Door, what it does and where it is fitted. Looked into your PDF file but did not see any reference, could you please clarify.
Thanks - Bruce
Posted by Kamel Ikhlef (Member # 6667) on November 13, 2019, 03:05 AM:
It's just to hide the shooting frame. Protect from dust and external parasitic light. But for hawkeye users, it will have to think another design. I work there ... All ideas are welcome.
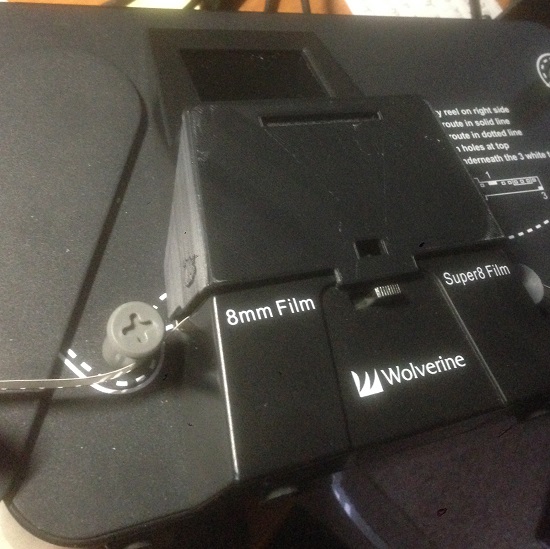
Posted by Terry Dowling (Member # 7108) on November 13, 2019, 06:01 AM:
Thanks Markus, the stand you built looks great as well!
David, I was hoping the light could be improved as mine doesn't seem to have very uniform lighting.
I have stripped it down to have a look and doesn't look like there is any room to change to anything else. It looks like it possibly has side LEDs.
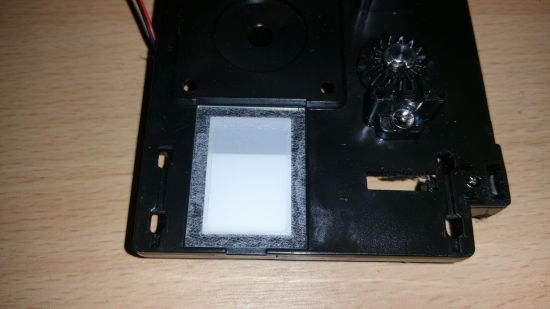
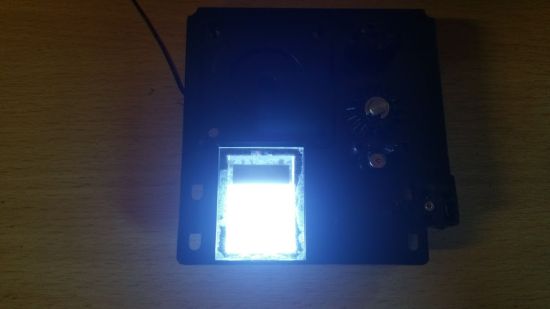
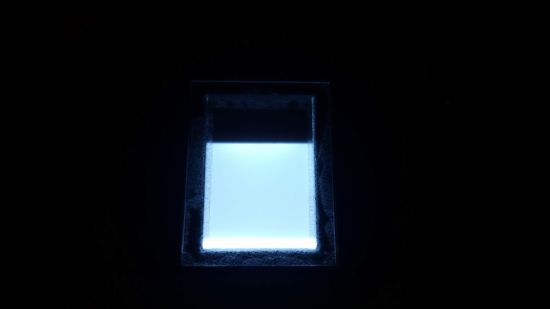
When trying to do a DIY setup before I used a COB LED (shown below) with opal perspex to diffuse light and had very good results.
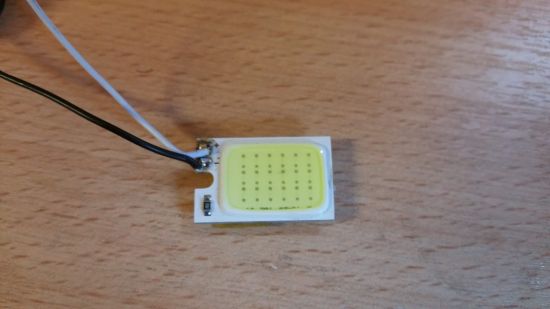
[ November 15, 2019, 05:45 PM: Message edited by: Terry Dowling ]
Posted by Stan Jelavic (Member # 6822) on November 13, 2019, 07:45 AM:
Regarding Bob Vito post:
Has anyone experienced multiple frame captures for each frame advance?
I found out yesterday that older Hawkeye boards have an issue with the frame sync. Sometimes it will miss the frames. Could potentially be the cause of Bob's issues.
Resistor R2 value was 3K, the same as Wolverine. Had to change it to 2.2k. So, check your boards to make sure they have the right value.
https://photos.app.goo.gl/8K7a4FHjPXcxbs8eA
Posted by Kamel Ikhlef (Member # 6667) on November 13, 2019, 08:19 AM:
Hi Stan,
Well back from your Holidays? ... Now, we look forward to the future v8 PCB with various and great upgrades (Power led, USb, Capstan,Sync Takeup, etc...). LOL.
thanks for the R2 new value information.
Posted by Stan Jelavic (Member # 6822) on November 13, 2019, 10:02 AM:
Thanks Kamel. I am back and all's well.
Yes will start on V8 within a few days.
Looked at the Hawkeye image issues and came up with the white balance manual setting procedure. Will document it but have a look:
https://photos.app.goo.gl/4m6f4S3gerxFXm6j7
The colors are very close. Ran a video clip last night and very happy with it.
Would like to point out to some key differences between Hawkeye and Wolverine:
- Much less digital effects - zoom in on this sample photo and look at the leaves on the trees and compare.
- Ran video last night and compared the faces closeups and it is a big difference. Hawkeye faces look natural and Wolverine look like wax dolls - very distorted.
- Frame capture - you know what I mean
- OK on some very dark scenes looks like Wolverine is better but that is about it.
My vote is HAWKEYE, big time.
Will document the latest settings and white balance procedure I used and yes a side by side video with the comments.
Posted by David Brown (Member # 7133) on November 13, 2019, 11:20 AM:
Stan
In that last sample Hawkeye wins hands down with the color balance! Great effort!
Is there visible digital noise, not including film grain? The Wolverine only looks good if viewed on it's own screen, from a distance!
Kamel
Did you decide to order the 12mm macro lens? I know there is a long wait for delivery. I printed the Magnetic Door last night. Looks good on my (still) stock Wolverine. However I no longer use the stock Wolverine to capture film!
Terry
My lamp looks round and it might pull out. I did not try. If the illumination you have covers the captured frame you could be ok, but I would want to change it out. Sounds like you have some experience there. I've had to use 1/8"(3mm) white plastic to diffuse whatever light source I've tried.
Posted by Mike Spice (Member # 5957) on November 13, 2019, 12:09 PM:
I have every faith in Hawkeye and I am glad to see Stan back behind his desk!
There is NO question Hawkeye can spit out better results.
I have made some significantly better results, but I have made some results that would leave you running for the hills.
Re the white balance thing.
It would appear white balance needs to be manual, that said, would it not be better to white balance a blank gate with LED, or to white balance a scene in a frame of film?
If the latter applies, then what happens when a scene changes.
I have made a note of Stans settings further back, and am looking forward to clicking the mouse this weekend on a reel of standard 8mm, and finding a good 'partial scan area' for standard 8.
Should we be looking at the light source of the scanner, and considering a change there too, or some kid of diffuse?
[ November 13, 2019, 01:57 PM: Message edited by: Mike Spice ]
Posted by Markus Baur (Member # 7171) on November 13, 2019, 03:29 PM:
Mike, the best way of setting white balance all depends on what you have available:
In my experience from working with my Nikon based rig, the best way to set white balance is from the film you are trying to capture. If you have a frame that is mostly white or gray, perfect. If not, I'd go with a film from the same batch in the same condition that does have a suitable frame.
And the stock non adjustable white balance of the Wolverine is indeed horrible as seen in previous capture examples. The common theme is the blue tinge on things that should be black. Here is a comparison of the same frame captured with the Wolverine and my Nikon J1(the stock has faded over the decades, so the red tinge is what you get if you capture without setting white balance):
I don't think I need to label those two images for you to know which is which
And I can't wait to see how the Hawkeye will compare.
Posted by Mike Spice (Member # 5957) on November 13, 2019, 04:16 PM:
Thank You Marcus
Posted by David Brown (Member # 7133) on November 13, 2019, 04:32 PM:
Mike
We've missed your tireless testing!
My feeling is the Wolverine's light is great. It's bright and evenly iluminated. I only ran about 200 feet of film when I decided to find a fix for how bad it looks. White balance the empty gate once, move on. I don't think LEDs color shift with age. There might be some unusual film scenes where someone used indoor film outdoors or used colored lighting. That might be a special case to adjust the balance.
You have run thousands of feet thru yours, how's your light doing? LEDs seem to keep on ticking. Terry's unit has an unusual problem that I've not heard of from others. I mentioned the plastic diffuser not knowing what's inside his unit and he already has a lamp. Many lights, including LEDs, I tried before the Wolverine had hot spots on the capture.
So, If it were me, I'd try to get Wolverine to send me a new lamp. No one is selling parts unless it's a broken unit. You had great success getting your motor(s) replaced.
Posted by Bruce Davis (Member # 7072) on November 13, 2019, 07:16 PM:
Stan Jelavic
Quote "Had to change it to 2.2k. So, check your boards to make sure they have the right value".
Looked at the 5 Band Resistor Color Code and the resistor on the one you built for me is a 2K7.
Measured with multi-meter and came out at 2.72K.
Thanks for the time and effort you have put into comparing Wolverine with Hawkeye, not wanting to be negative (just my opinion), but how much time did you spend getting the Hawkeye image to that level compared to the Wolverine.
I do not have a Wolverine to compare, but I assume one just loads the film and the Wolverine does the rest without time consuming settings at each scene change.
At extreme close up there is a difference in pixel structure and size, there is more detail in the Hawkeye image, but at full image viewing size who is going to see the difference (Hawkeye is more contrasty-grainy, Wolverine image seems balanced-smoother).
As Mike has previously mentioned, the bleeding of light at the edge of the frame is also a problem with some settings.
Thanks again and regards - Bruce
P.S. at this stage I am having some larger 400-500ft reels processed by the MWA FLASHSCAN-8 with very good results. Small 50 reels are being done on the Hawkeye.
Posted by Bob Vito (Member # 7168) on November 13, 2019, 07:25 PM:
The resistor on my board has three red stripes which should be 2.2K ohms. I am following the procedures that have been posted for frame capture, but haven't been able to figure out how to get one capture for each frame. The number of captures in my setup is affected by the fps field in IC capture. The smallest number of captures I have been able to get is two per frame. My current process is to delete every other file and rename the remaining files - somewhat annoying, but I can live with it.
Posted by Stan Jelavic (Member # 6822) on November 13, 2019, 09:05 PM:
Happy to see so much activity. My main problem is that this is very time consuming and cannot look into everything but one step at the time.
Let me try to address some concerns the best I can and then have to clean up the test film. It has dirt on it and that annoys me.
Is there visible digital noise, not including film grain.
The sample Hawkeye video has visibly less digital noise that Wolverine. I used the jpag max quality and camera sharpening set to max (14) but have not tested the tiffs or bmps so not sure how much difference this would give us. Maybe Mike can comment here. I am pretty happy with what I saw. The film grain on some scenes does not bother me. Actually I like it.
With sharpening set to 0 the frames a =re a bit soft.
It would appear white balance needs to be manual, that said, would it not be better to white balance a blank gate with LED, or to white balance a scene in a frame of film
I used the white paper in the gate. Here is the procedure:
https://drive.google.com/file/d/1xqdSwcBfqWONn4_NDs9G94uAgod7JxRB/view?usp=sharing
If the latter applies, then what happens when a scene changes.
The scene should not affect the white balance - but will have to do more testing.
I have made a note of Stans settings further back
Check the new white balance values. They are in the pdf file I referenced.
And I can't wait to see how the Hawkeye will compare.
Limited tests look very promising to me but still early to tell.
but how much time did you spend getting the Hawkeye image to that level compared to the Wolverine.
The settings are done once and no significant changes should be required from scene to scene. This is based on my limited testing.
The resistor on my board has three red stripes which should be 2.2K ohms.
I will have to do some head scratching Bob. Sorry for the troubles. This needs fixing for sure.
Posted by David Brown (Member # 7133) on November 13, 2019, 10:46 PM:
Stan Now you can say Thanksgiving has come early, your plate is so full!
Posted by Lee Mannering (Member # 728) on November 14, 2019, 06:44 AM:
Always show an interest in modifications. Built various film to video transfer systems/ideas over the years the first being a rig in 1980 using the then new Fergy Videostar camera with a home made mirror rig and a trusty Eumig sound projector which was quite a play thing. My final project a couple of years ago was using another Eumig heavily modified and outed to full HD.
Here's a frame grab taken from a Super 8 film I shot using a Pathescope Super 8 cine camera in Holland.

Happy times
Posted by Mike Spice (Member # 5957) on November 14, 2019, 09:26 AM:
David Thanks for the kind comment, I am missing my tireless testing too.
Real life work takes me away from scanning for a while.
6 days week slaving in a hot theater at the moment.
Showtime!
My tireless testing was during our half term, I did the mod on the friday afternoon, and then spent around a week testing scans.
I am hoping to scan a reel of standard 8 very soon, and get the partial scan area for that sorted, and try out the manual white balance that Stan is suggesting, along with his other settings..
In the meantime it is nice to sit back and read this thread and watch out for tips and tricks and see what the other folk are up to.
Poor Stan has his work cut out, the problem Bob Vito is having with multiple frame captures is indeed a mystery.
It would be nice to see a re timing on the take up motor, so I can return to using a take up reel and not a drop box.
Much to do...
I was hoping to scan this weekend, but another working Saturday so my free Sunday will be full of chores and not frames.
[ November 14, 2019, 10:35 AM: Message edited by: Mike Spice ]
Posted by Stan Jelavic (Member # 6822) on November 14, 2019, 11:57 AM:
I understand Mike. This activity takes so much time but there is another side to life that needs attending to.
But slowly we will get there.
I ran a white balance on just blank screen without film and with the LED on. Looked pretty good. Was getting ready to run teh test clip but starting getting Bob's issues. So quickly started debugging but shorted something out and zapped my MSP and pretty good.
Think I shorted it to 12V. Poor thing it did not have time to scream blue murder.
But not a big thing. Dropped another one in and back in business.
Will retest the board to see if Bob's issue pops up again. Hope so. Also will run the test clip with the new white balance.
Posted by Mike Spice (Member # 5957) on November 14, 2019, 12:12 PM:
shorted out the MSP?
I don't even know what that means...
My best guess, the chip on the Hawkeye board.
Good luck.
To use an old Naval expression:
'I am gagging' to get the scanner out and continue......

Posted by Kamel Ikhlef (Member # 6667) on November 14, 2019, 12:40 PM:
Lee,
Your Super8 quality result is really great !
All ideas are good to sharing...
We are all looking for the best quality possible with affordable telecine equipment.
And I'm sure we'll get there very soon, some more adjustments and it'll be good ... And now Stan is here!
Posted by Stan Jelavic (Member # 6822) on November 14, 2019, 12:46 PM:
Like you picture Mike.
And yes Lee. Great job. Thanks for sharing. Maybe add a few notes on how you put it together.
Ok I am back and running. Just reproduced Bob's problem I believe. Noticed the frames skipping. The claw misses the hole and then it catches in but sometime it just slides next to the hole. Some splices do not do that. So it must be the film. Bruce had the same issue. Here is what he posted:
Stan Jelavic I found the problem, it has to do with the Claw position in relation to the gate when set to Super8 or Standard8 and partly the fact that the 8mm film has quite a bit of sideway play inside the gate.
On super8 setting the claw side face is only 0.457mm from the gate guide face, super8 film punched hole edge to edge of film is 0.51mm. Its not much I know but enough to stop the claw from penetrating and simply sliding on the underside of the film. Taking into account allowable tolerances in film manufacture and the amount of sideways play in the gate adds to the problem.
I have set (with the sliding switch) the gate position so that it is roughly half way between the 8mm and S8mm settings, this places the Claw right in the center of the S8 punched holes feeding the film successfully.
Bob- check the film advance and make sure it advances every 2 seconds and does not stall.
Revised the white balance. It is a long story but try to summarize:
- Tried unloaded gate (just light) and autobalance. Not bad but too blue.
- Took my MarkII and macro lens and took a picture of the film with lots of open scenery and found out that there is lots of blue. Actually looking at the film with the magnifier shows lots of blue. Possibly the LED, will check in daylight tomorrow. But now the auto white balance gives you exactly what you see with the magnifier.
- Since I didn't like what I saw with the magnifier I went back to the procedure outlined in the pdf file which actually mimics the Wolverine and I like it. So I think it is the LED and Wolverine are compensating for it...
- The latest values:
Temp - 5000
R - 125
G - 85
B - 58
Here is the test clip:
https://photos.app.goo.gl/rsz8BKRbedJkLkDF6
[ November 14, 2019, 06:58 PM: Message edited by: Stan Jelavic ]
Posted by Markus Baur (Member # 7171) on November 14, 2019, 06:11 PM:
Terry had been asking what light is used in the Wolverine. Since I have a parts machine, I wasn't afraid to take it apart:
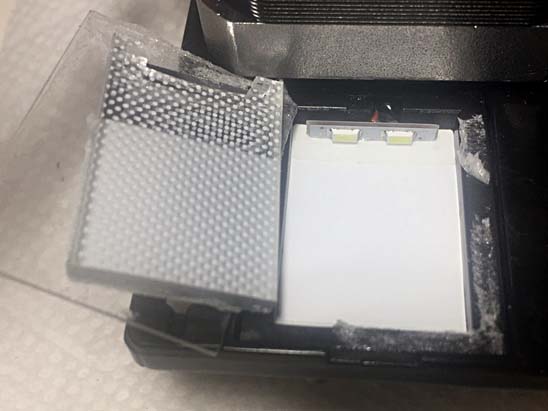
Looking at this I don't see a chance for huge improvements by altering the light source. Given the space available I'd say this is a pretty clever design. Ideal lighting would be an integrating sphere for maximum diffusion, but this is getting very close: The LEDs are at a 90 degree angle to the diffuser making sure that almost 100% of the light passing through the film is reflected at various angles. This ensures even lighting and moreover minimizing the appearance of scratches and dirt.
Posted by Bruce Davis (Member # 7072) on November 14, 2019, 07:02 PM:
Stan Jelavic
Hi Stan, this morning I wanted to process some footage and found that the stepper motor is no longer being powered. When the ON switch (left side) is turned on and the center switch is in the middle position the take up reel motor rotates continuasly as it should, when the ON switch is turned off the take up real motor stops as it should.
The 12 volt supply to the original Wolverine board (CN3-CN1) also powers on/off with the ON switch.
There is a 5 volt supply to CN1.
No power to the stepper motor.
Its impossible to diagnose across the seas but thought you might have some ideas.
Thanks - Bruce
Posted by Stan Jelavic (Member # 6822) on November 14, 2019, 07:16 PM:
Bruce - is the LED on? If so that means that all power supplies are working.
We also had an issue with floating pin12 on the power supply connector (counting from the back cover side of the board )
Carefully short it to either pin11 or pin13 and see if the stepper turns on. You can use a needle or something similar to do the short.
Here is the IC Capture settings procedure. It include the white balance plus much more. Cover most of the settings.
https://drive.google.com/open?id=1aJFqslCVtjdbVqwfUu5jzmtzyvVUGqku
[ November 14, 2019, 09:55 PM: Message edited by: Stan Jelavic ]
Posted by David Brown (Member # 7133) on November 14, 2019, 11:43 PM:
Mike I couldn't stop laughing for 10 minutes, that picture couldn't be better, "the poor thing couldn't even scream....."
Stan I'm ready to order. Check these steps and see if I have missed something .
I have the V7-Gerber.zip: The whole zip, not just the "GerberFiles" inside it, right?
upload that to https://jlcpcb.com/
Buy parts from the BOM.xls. Camera and lens are on that list. I might wait on the camera and lens.
Then follow the "Wolverine_custom_camera_kit-v2.pdf"
Kamel I'm testing the capstan, should be through this weekend with both S8 and 8. If you have tested it let me know what you found. I have seen problems, but I am not ready to report yet.
Posted by Kamel Ikhlef (Member # 6667) on November 15, 2019, 01:30 AM:
David,
No, unfortunately I could not push the tests further.
So your feedback will be very interesting.
Posted by Bruce Davis (Member # 7072) on November 15, 2019, 02:58 AM:
Stan Jelavic
Stan thanks for the reply, I see you have put a lot of work into the white balance setting up and instructions - Many Many Thanks.
Yes the LED in ON, Is there a problem with the micro controller and socket? I noticed the MCU slides in and out of the socket exceptionally easily. I bent the pins outwards slightly as to increase pin friction, the stepper motor is now working 99% of the time, sometimes it will not switch on until the second try. I did not short out pin12 to 11 or 13.
Is there a relay in circuit, when the stepper is successfully powered on there is a slight clunk noise (like a relay).
I will follow your white balance guide and report on the results.
Regards - Bruce
Posted by Stan Jelavic (Member # 6822) on November 15, 2019, 09:05 AM:
Here is the updated BOM David:
https://drive.google.com/open?id=16-QQQmMgjHimrJpunptqGqUM18jagrL4
It is for V8 board but it should work for the V7 as well. Note that the V7 USB solution is not very good. I should be coming up with the V8 board soon.
Yes, you use the zip file to order the boards.
I will review the instruction one more time. Plan to add the IC capture settings there.
Bruce - it could be a bad contact somewhere but try the short.
Pin12 is floating and could be causing the issue. No, there is no relay. The click that you hear is from the motor being hit by the out of sync pulse.
Here is the comparison between the Wolverine LED and daylight.
Used my MarkII macro.
Daylight - left one.

Some discussion on LEDs and white balance
https://forums.whirlpool.net.au/archive/2011107
My settings are not bad but some improvement may be possible. When I ran auto white balance with the unloaded gate the light saturates the camera and the white balance is set for white because all three colors are at the max. So maybe cover the gate with the ND filter and run auto balance and then turn auto off.
Might work.
[ November 15, 2019, 11:29 AM: Message edited by: Stan Jelavic ]
Posted by Markus Baur (Member # 7171) on November 15, 2019, 12:29 PM:
Stan, nice comparison with daylight.
I believe the Wolverine images come out more blueish due to the LEDs that were used. The "white" LEDs used here look to be yellow phosphor coated type. Presumably the designer chose a more blueish color temp due to older film stock typically having faded cyans. So neutralizing the blue tint with something grayish in the gate for white balance setup sounds like a good strategy.
Posted by Terry Dowling (Member # 7108) on November 15, 2019, 02:12 PM:
Markus, thank you very much for showing the internals of LED design. It's a shame there is not more space available to improve light source.
I tried replacing the original "roller" with proper rollers that actually turn and found that this caused major issues because of the take-up motor constantly tugging on the film. After seeing Markus's design with micro switch controlling take up reel motor, and having endless issues of my own with film jumping in the gate or film jamming in the existing "rollers", I decided to try a tensioner system with micro switch, and this is what I came up with this afternoon:
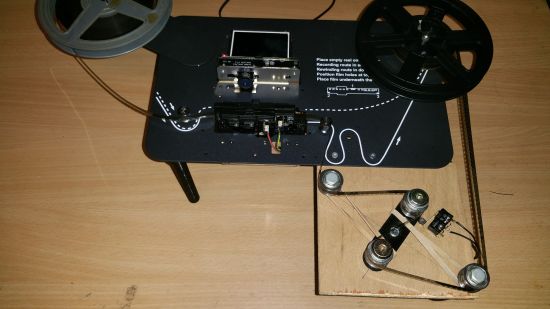
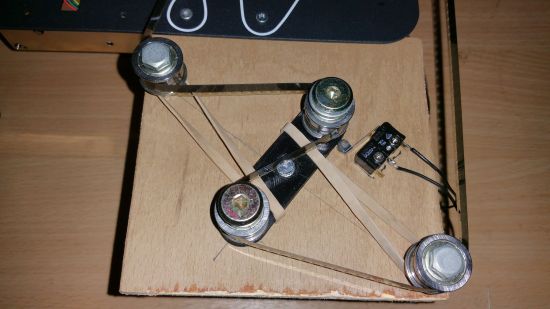
Video of it running:
https://photos.app.goo.gl/iGgbfwi4kJHHnZ3N6
It's not pretty but seems to work quite well. Need to play around with the tension setting (rubber bands!) as well. I will try design and print something a bit better or perhaps make something smaller that can fit in original film path. I would also like to slow the take up motor speed or perhaps use a stepper motor instead for more precise control.
I don't get anymore debris falling on light table since turning the wolverine on it's back which is a bonus..
[ November 15, 2019, 06:15 PM: Message edited by: Terry Dowling ]
Posted by Mike Spice (Member # 5957) on November 15, 2019, 02:23 PM:
Terry that is pretty special.
Posted by Bob Vito (Member # 7168) on November 15, 2019, 06:40 PM:
Stan-I opened the film door so I could watch the claw. It advances the film one frame every two seconds. The claw does not miss any sprocket holes, or have any false starts. Judging by watching the sprocket holes, the same occurs when the door is closed. When I look at the resulting pictures, the first capture looks fine. The second captures looks squished at the bottom as if it is taking the capture when the film is advancing. Thanks for trying to diagnose this long distance. I will continue to work with the machine to see if I am doing something wrong. I am happy that I am able to capture the individual frames.
Posted by Stan Jelavic (Member # 6822) on November 15, 2019, 07:08 PM:
Bob, when I open the gate I see that the claw does not hit the hole in the center but close to the edge. The film gets pushed up and then the claw slides into the hole.
But with the gate closed, the claw misses and catches the film o the second try. When it misses it will still advance the film and the picture is taken with the film half way. That is when you get the mangled picture.
My solution was to push the S-S8 switch to the right a few times to make sure it is at the end.
So, here is what you can do. Remove the film. Open the gate and observe the capture destination folder. Do you get one or two pictures for every claw cycle. If it is one, then you has a slippage issue that I described above and should consider the wide film fix described in the Wolverine FAQ:
Q:MovieMaker - My film wont go through the MovieMaker?
A:
Some old film, split 16mm or Super8 came at a little wider than 8mm or expanded at some sections due to age and for that reason the unit will have a hard time pulling the film from its sprocket holes. A work around this issue would be to get a small piece of paper 1x1.5 inch, fold it four times and wedge it between edge of the flip door and the track in the location shown in the pictures file below to keep the door from closing all the way.
https://www.wolverinedata.com/assets/downloads/Wider_Film_test.pdf
If you get two pictures per cycle then I can send you another board.
Just reproduced the problem. It is two frames per cycle. Started debugging it but the problem was no longer there. Will run for a while and see if I can catch it again.
[ November 15, 2019, 09:11 PM: Message edited by: Stan Jelavic ]
Posted by Bruce Davis (Member # 7072) on November 16, 2019, 01:59 AM:
Stan Jelavic Next day Hawkeye again failed to start the stepper motor. Tried the shorting of pin 12 to 11 & then 13, made no difference. Unplugged the MCU again powered up Hawkeye with MCU removed and the stepper randomly clunked and rotated.
Removed power, plugged MCU in again, powered up and the stepper worked for a couple of on / offs cycles and then stopped again.
Hoping you might know what the problem could be.
Regards - Bruce
Posted by Kamel Ikhlef (Member # 6667) on November 16, 2019, 02:46 AM:
Ah! I see that a digitization of quality that deserves! We have to fight with this telecine to scan our precious films.
What patience!...
Posted by Bob Vito (Member # 7168) on November 16, 2019, 07:05 AM:
I tried a scan without film and get two files each time the claw moves. This is with the fps field at 3.77. I changed the fps field to 10, and get 5 files each time the claw moves. The external trigger button in IC capture is on. Any chance this could be a software bug? Does the white 2 pin connector near the large chip to the right of the camera need to be connected to anything? Mine is unused. Thank you.
Posted by Stan Jelavic (Member # 6822) on November 16, 2019, 08:04 AM:
Bruce, it could be a bad connection. Try pushing on pin 2 of the MSP. Also pin 2 on the PS connector (from the bottom)
https://photos.app.goo.gl/ToFypajijzHBEKw67
This is the stepper clock route shown. If pushing does not help, measure the voltages along the route shown.
The voltage should be around 1V in run position.
Also push on the PS connector pins one by one with a pin.
Bob - I see the same issue but it is not present all the time. Hope I catch it again. I guess you do not own a scope.
Posted by Mike Spice (Member # 5957) on November 16, 2019, 10:07 AM:
Bob
Perhaps your board is different to mine, but the connectors on mine are, top to bottom:
on the left
sync from the claw, sync from the cam, run (on/off) fan switch and LED power
on the right:
5 volt in
speed/rewind
fan power
edit
I have just noticed I have a space where a connector could fit, where you suggest, I can't help with that as I don't have that socket, so perhaps Stan can comment
[ November 16, 2019, 12:56 PM: Message edited by: Mike Spice ]
Posted by Stan Jelavic (Member # 6822) on November 16, 2019, 01:41 PM:
Thanks Mike. That connector is for the capstan sense.
Posted by Bob Vito (Member # 7168) on November 16, 2019, 02:55 PM:
Mike,thanks for the photo. My board is almost the same. Underneath the word "fan" is the location of the empty capstan connector.
Posted by Mike Spice (Member # 5957) on November 16, 2019, 04:53 PM:
I am quite mystified by this problem of multiple captures per frame that Bob is having to put up with.
Wracking my brains trying to think why.
I hope we can get to the bottom of it..
I have had my own software issues, the business of IC Cap not starting if I have my cam connected is almost certainly due to the fact I un installed the software and did a registry 'clean up' and re install, when I was convinced the program had lost it's auto settings.
Turns out, I lost my own auto settings and went a bit mad.
Fingers crossed for some dusty old standard 8 on the scanner and a cheeky cold beer on sunday....
[ November 17, 2019, 01:49 AM: Message edited by: Mike Spice ]
Posted by Stan Jelavic (Member # 6822) on November 16, 2019, 11:33 PM:
Looks like you have your Sunday planned well Mike. I spent some time today working on white balance and have a story to tell but too lazy at this point to write it all down.
In summary I tried to match the Wolverine colors and this are the settings. Came pretty close:
White balance mode = gray world
R = 125
G = 185
B = 77
Color Enhancement = Disabled
The rest of it is as specified in the settings document.
A few more notes. Tested the led by using the unloaded gate and setting the camera to daylight. It comes out bluish as expected.

Wolverine compensate for that using their white balance. For now I just tried to mimic that by taking several Wolverine and Hawkeye frames and using the eyedropper found the white balance correction factors for Hawkeye. Now exactly the same but pretty close in my opinion.
Will provide the side by side clip tomorrow.
Here is the comparison between Wolverine, Daylight with MarkII and Hawkeye:
https://photos.app.goo.gl/Xkh2vNaEfQ8goRKi6
Update on duplicate images:
Will do the scan with the scope connected to frame trigger.
[ November 17, 2019, 05:27 AM: Message edited by: Stan Jelavic ]
Posted by Mike Spice (Member # 5957) on November 17, 2019, 09:41 AM:
I managed to find some time to do a scan with some very tatty standard 8mm.
I used manual white balance & exposure
R 93
G 67
B 55
1/200th exposure
Sharpness 14
Standard 8mm test
[ November 18, 2019, 08:44 AM: Message edited by: Mike Spice ]
Posted by Kamel Ikhlef (Member # 6667) on November 17, 2019, 11:58 AM:
Mike,
there are still jig problems, I also see a fluctuation of the focus. As if the film was moving in its frame(8mm frame gate ?).
I see that with all your tests, this is not really obvious.
I would like to have a basic settings for a correct quality and after it will be easier to post process on a video software.
For my part, I will try to advance on the design of the front cover because I fell far behind the tests of scans compared to you.
I also think to a system to cool the camera because mine heats a lot. I would like a telecine unit completely closed.
In all cases, Thanks for tests sharing.
All days, I am looking for to see the everybody progress...
Posted by Bruce Davis (Member # 7072) on November 17, 2019, 05:56 PM:
Stan Jelavic Hi Stan thanks for your ongoing effort. I assume by your settings you meant:-
R=125
G=85 185 is very green
B=77
Regarding the stepper problem, since the last time I removed the MCU and re-inserted, it has been working. When powering the Hawkeye without the chip, the capstan motor runs at full speed. Due to the printed drive pulley not running true it causes the whole wolverine body to vibrate quite considerably, perhaps this has shaken a poor connection, we will see.
Regards - Bruce
P.S. Blue = 77 rather than 58 looks much better at my end.
Posted by Stan Jelavic (Member # 6822) on November 18, 2019, 08:42 AM:
Was a typo Bruce. Yes you got it right, it is:
R=125
G=85
B=77
Lets hope it was a loose controller.
I ran a side by side Hawkeye and Wolverine video and the colors are pretty good now for me anyways but would like to see more contrast in the Hawkeye video.
Some preliminary observations show that the Wolverine auto exposure sets it to a bit overexposed side. This makes the shadows brighter but overexposes the bright areas.
https://photos.app.goo.gl/muS3JcpJMLGU2ACM9
This makes the Howkeye shadows too dark (not vivid)
But think Howkeye is actually better because it can be fixed in post-processing.
Another issues is that Hawkeye seems to be too sensitive at the low end. The dark tones get pushed up so that the histogram is zero at low end. Histogram stretching during post-processing should fix that also.
Here is the photoshop correction. Histogram stretch and reverse gamma that compensates for the original camera gamma correction.
https://photos.app.goo.gl/wGfXxNGniEMn6fuc6
[ November 18, 2019, 09:57 AM: Message edited by: Stan Jelavic ]
Posted by Doug Maxwell (Member # 7093) on November 18, 2019, 11:11 AM:
I finally found some time to get my kit together. I put the camera on the board with the included spacers, but the bolts appear to be too long (1/4 inch... almost even with the camera lens) and the Hawkeye board won't sit flush on the Wolverine's metal platform. Am I missing a part? Wanted to check before I shortened the bolts.
I tried to include a picture, but I guess this forum software has a bunch of hoops to jump through to do that.
Posted by Bruce Davis (Member # 7072) on November 18, 2019, 03:14 PM:
Doug Maxwell
Hi, adding pictures is very limited, max 200k and 550 res, follow the instructions and you will succeed.
Not sure if the following images are of any help to you, bolts holding the camera are upside down and there are spacers between the plate and board.
Regards - Bruce
Posted by Doug Maxwell (Member # 7093) on November 18, 2019, 04:04 PM:
Oh yeah - a bit of a face/palm moment for me there. I'm annoyed that I didn't figure that out, actually. Spacers were correct of course, but I had the bolts going the wrong way. Thanks for the picture guidance.
Posted by Stan Jelavic (Member # 6822) on November 18, 2019, 04:45 PM:
Looks like you are on the right track Doug.
Back to exposure.
Looking at post-processing tools to see if there is something out there that can do the histogram stretch and apply non-linear curve compensation. Preferably all in one tool.
Looks like Video Fred's script mat be a good candidate. If not will write my own.
Posted by David Brown (Member # 7133) on November 18, 2019, 11:01 PM:
Limited test of the "capstan" that keeps the film moving when stopped by torn sprocket holes.
First I intentionally cut out 6-7 sprocket holes on both R8mm and S8mm.
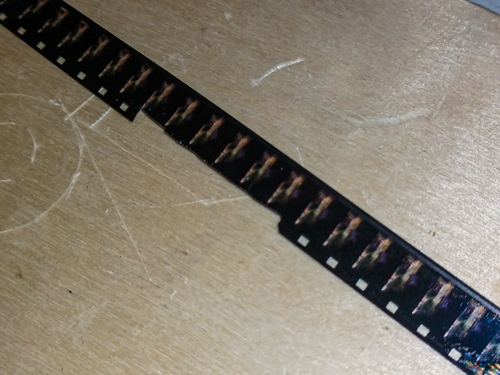
The test is done with a momentary contact switch as I don't have the Hawkeye mod that would be automatic. When the "torn sprockets" pass the claw, the film stops advancing. The motor's pull seems to be stopped by the claw in the next good sprocket hole.
It works, however there are other problems I found.
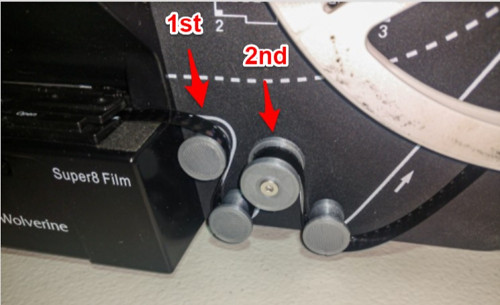
The best location for the sprocket (toothed pulley) is on the second existing position shown above. That is where I began. Using S8 with the gate closed, the claw down.
Problem: From position 2, the motor does not have enough torque to move the film. I then moved the sprocket to position 1. Pulls the film thru the gate very fast!
The second position 1 has less teeth (2-3) engaged with the film. The film contacts a smaller percentage of the sprocket.
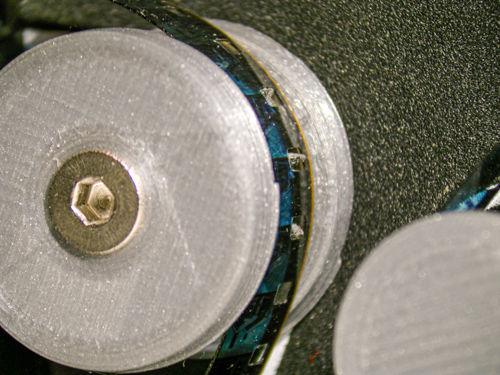
I used the standard Wolverine takeup & a reel without a drive key. Strong and Weak tension, with each the sprocket continues to rotate even when the teeth disengage.
My sprocket wobbles. I tried more than one sprocket.
sprocket video
I'm not sure why it wobbles. I will investigate. Projectors often have a clamp or secondary wheel to maintain contact with the film and sprocket.
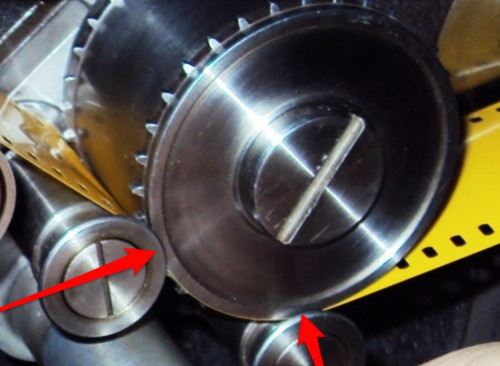
I don't want to add more parts or complexity to this process.
Making the teeth longer (not much longer) or fixing the wobble is best.
That said, all the tests I did with torn sprocket holes S8 & R8 were successful while capturing. The film stops moving, push the button, it resumes.
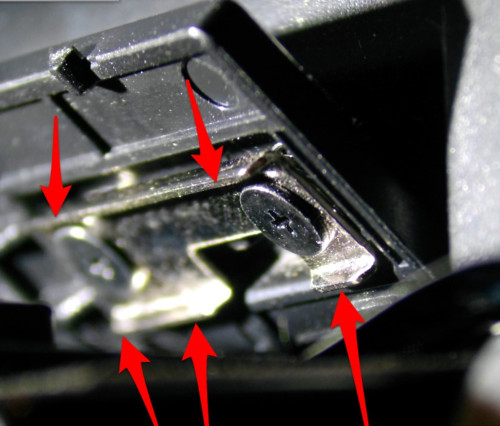
Gate tension is a spring-loaded channel that presses on the outside edges of the film.
I did also have 1 R8 film that could not be moved by the motor from position 1. There was more friction in the gate (?), but only when closed. Looks like I can't adjust the gate tension screws without dismantling the Wolverine. This seems also likely to happen with magnetic striping on S8. Seems I've read of width differences with R8. Caused by the splitter when processed? The film base itself is not thicker than S8.
Also, torn sprockets could be repaired with a single side of Kodak presstape. Damage would be discovered while cleaning the film. If the sprocket perforation damage is extensive, capturing the film will be missing as many frames. Then another method of capture is called for.
I had a cement splice that always stopped outside the gate. Saddly it was broken before I could test it. The motor probably could not pull a bad splice. Not much torque there before reaching speed.
Kamel The R8 sprocket
Posted by Stan Jelavic (Member # 6822) on November 19, 2019, 12:15 AM:
As I mentioned in my previous post I had issues with the black level and gamma and was looking on the ways of fixing it.
Looks like Fiml9 has the capability of correcting teh histogram (black level) and fixing the gamma.
Here is my settings:
And here is the result. Hawkeye on the left and Wolverine on the right.
https://photos.app.goo.gl/HF1JHc7pDW1LxA6j9
Posted by Bruce Davis (Member # 7072) on November 19, 2019, 03:16 AM:
Stan Jelavic
Film9 is certainly much easier to use and adjustments are immediately review-able. Video Fred's script, the process is much slower and I think more difficult to use but results are good once set.
Reviewing your side by side video the Hawkeye seems to have more blue/purple in some scenes, other scenes are comparable, the green grass seems a little too green in some shots.
Getting the colour balance & grey scale right is very difficult, I do not know if it is a camera thing or software (probably just software setting going by your results).
You have certainly been able to achieve better than I.
Are these the only settings you have activated and used in film9.
Regards - Bruce
Posted by Kamel Ikhlef (Member # 6667) on November 19, 2019, 03:47 AM:
David,
Your tests are very very interesting!
This allows we to move forward.
For the R8, the gears look to match well. I did the design without film to test...
You're right, position 2 looks better for the position of the capstan.
But then we should find another capstan motor more powerful?
Any suggestions is good to take.
Stan will be more competent to better advise us...
I do not understand for the wobble problem? is it pulley straight in the axis of the motor ?
the motor 2mm axis is round without flat for effective blocking.
If we could find an other motor with a different axis it would be easy to change the pulley design.
Thank you very much for sharing your experiences.
BTW: What kind of filament did you use for 3D printing? The teeth of the pulley look very good.
Bruce, what did you put to block the lens focus, it's white teflon ?... I block with several rings.
[ November 20, 2019, 10:30 AM: Message edited by: Kamel Ikhlef ]
Posted by Stan Jelavic (Member # 6822) on November 19, 2019, 09:58 AM:
Definitely needs more work. Referring to white balance.
Posted by Doug Maxwell (Member # 7093) on November 19, 2019, 10:12 AM:
I did my first test scan last evening with the Hawkeye upgrade. Very pleased. Of course, the scan quality depends greatly on the source material... I have a roll of S8 of a mystery family at Disney. It came with a lot of used film gear I bought in the 90s. It's my go to test roll because of no sentimental value. It's bright and vivid and mostly in focus and has lots of different colors (bright reds and yellows, good greys, etc) and hot spots and dark areas throughout.
Scanned on auto settings into jpeg images. I imported it into Adobe Premiere Elements and reduced the speed to get it close to 18 fps. Cropped and exported at 1080.
1 minute 57 seconds of jpegs was about 3 gig, which is not shocking. I wanted to go as big as possible and this is a good start.
Premiere Elements is rather frustrating when you're used to the full house Final Cut Pro, so I couldn't center and enlarge the image, but I'll sort that out eventually.
I have another roll scanning. I'll be doing a lot more experimenting. Any updates or lessons worth mentioning will be posted.
Side note, I didn't use the takeup reel and instead let the film dangle into a clean plastic tote and then rewound it with a mechanical rewind. This method didn't seem to affect the gate quality.
Scan is uploaded here.
https://youtu.be/9KwIBGx0z5w
Posted by Mike Spice (Member # 5957) on November 19, 2019, 11:43 AM:
Doug It looks really very very good, but I am curious as to how it ended up looking like that at youtube.
As close to 'film' as I have so far seen...
While the scan looks nice, the box effect of a small scan in a 16:9 window is a bit odd...
Perhaps it is just a test upload for us to see....
Consider making a 4:3 project and exporting in 4:3
I am taking a cheeky day off on wednesday and just for the heck of it, I am going to scan black and white cine film...
Bring on the contrast!
Posted by Doug Maxwell (Member # 7093) on November 19, 2019, 01:08 PM:
Thank you. I exported it out of Adobe Premiere Elements with a built in setting. Basically a 1080 export to watch on a computer. There are many other options that I'll explore. The two minutes of footage exported to my hard drive was 451 mb. I'm purposely starting with big files because my system is pretty quick and hard drive space is cheap.
I rambled about the '4:3 in a 16:9' pillar box look in a past post. It's basically to preserve the 4:3 image and keep it from being stretched out to fill a 16:9 frame. I didn't intend it to be that small and off center, but I'm learning a new editing system and all the obvious stuff is made overly complicated in the version I'm using. My goal is to have it full screen top to bottom with some black on the sides to preserve the 4:3. Still playing with everything... I might change things later on.
Still much to learn and play with.
Posted by Mike Spice (Member # 5957) on November 19, 2019, 01:35 PM:
It is a learning curve without doubt.
[ November 19, 2019, 10:46 PM: Message edited by: Mike Spice ]
Posted by David Brown (Member # 7133) on November 19, 2019, 08:51 PM:
DOUG
That looked great on my monitor. I'm referring to the colors and the tonal range. I'd be happy with that capture!
That said, I'm wondering if we are all seeing the same things? I had a different reaction to Stans's last test than Bruce. I thought the Wolverine looked too green and too much saturation.
I think if you have multiple displays, view your captures on each. Mike was concerned about getting his TV adjusted. He's right if that is to be his standard.
I had someone point me to this website for monitor adjustment. I'm not saying anyone should use it, I looked at it and wondered when I would have enough time to understand and use it. For reference only! Monitor adjustment
I'd say if you have access to 3 monitors and your captures all look similar, your probably ok.
A quick question for Stan
Digikey is sold out of these through the end of the year.
I can buy 2 on Amazon for $14 each, or other sites sell a minimum of 25 - 40 @ $1 each.
I look at the Wolverine's board and I think I see three of these being used. That would be all I need. That board will become useless anyway.
Am I right?
Posted by Bruce Davis (Member # 7072) on November 19, 2019, 09:04 PM:
Kamel Ikhlef Quote " Bruce, what did you put to block the lens focus, it's white teflon ?... I block with several rings. "
The unit I have was built by Stan Jelavic, it does not have the 3D printed lens adapter but looks like metal. The lens only just screws into the adapter thread by about 2 turns. Stan used Teflon tape perhaps to seal against light or perhaps to add friction on the thread to stop it rotating by itself, Not sure.
Doug Maxwell, your capture seems very dark, have you compared the image quality between projection and Hawkeye. I still get better resuts by capturing the projected film/images with my smart phone from the projector.
Have you tried using VirtualDub v2_43803 and AVISynth v2.6 official, I find this combination (mainly using VirtualDub, AviSynth allows running Scripts like Video Fred) for me is better than trying to wrestle with premiere.
David Brown Hawkeye is on the left and yes I mentioned the grass seemed too green.
Posted by Stan Jelavic (Member # 6822) on November 19, 2019, 11:05 PM:
Not sure what you need David.
Hawkeye needs those for:
- power switch (RUN)
- Fan sw
- 5V supply
Do you need extra cables?
Bruce I used Teflon for friction. Not sure now but I believe your lens holder does not have adjustment screw and without Teflon it would be loose making the focus unstable.
Regarding the video I posted. The grass is too green and in some scenes the colors are off. I will compare it against the daylight. On a positive note the shadows are no longer washed out and the resolution in the dark areas is pretty good.
Generally looks like the Hawkeye rez is same as Wolverine and in some cases better and definitely less digital artifacts.
Posted by Doug Maxwell (Member # 7093) on November 20, 2019, 08:51 AM:
Widely varying monitor quality has certainly been a long term issue since everything went digital. My big computer uses a 50" 4K LG OLED TV for a monitor. It is also the TV I watch most of my TV and movies on, so I have spent much time tweaking the settings to make it look beautiful. The scan is a touch dark, I agree there. It was literally my first scan with the Hawkeye upgrade.
In film production world, there are generally two types of telecine transfers for film. A 'one light' and a 'scene to scene'. Pretty self explanatory. I haven't played with it enough yet to determine if the auto exposure setting on IC Capture adjusts the levels as it goes along (scene to scene) or gets an exposure with the first several frames and locks in that level for the rest (one light). Though in general, a projector is certainly considered 'one light' for obvious reasons, so it's just a question of finding the exposure level that makes the whole roll look good (assuming the source film is properly exposed). Anyway, I will be curious to see who has played around with the setting to get a proper exposure level from frame to frame.
A quick note about Premiere ... I will eventually be getting the full version of Adobe Premiere for some other projects, so I'm sure my current post scan woes will be eased. For now, I'm just in the slow lane feeling out the gears.
A general statement concerning colors, etc. My personal mantra for scanning and preserving family films for the future (FFftF?) is to have everything nice and sharp and visible. Color quality is certainly desired, but not #1. With that, I would say that in your scans, don't fight the film stock. Film stocks varied between manufacturer and had different looks and color tones. If greens and blues are a bit saturated, don't fight it (unless it's obviously wrong, of course). The natural inclination might be to make it look proper across the whole spectrum, but that might not be possible and, to me, would take away the charm a bit. Let the Kodak be a bit more red and yellow, let the Fuji be a bit more blue and green. They were made to be that way.
Posted by David Brown (Member # 7133) on November 20, 2019, 09:50 AM:
Bruce
Yes, I since reread your comments on Stan's capture and I agree with you. I have also checked Doug's capture on another monitor and found it a little dark. This means my computer's monitor is too bright. I guess I'll be checking that!
Stan I just thought I could reuse the 2 pin picoblades from the Wolverine. I will have all the parts except the camera and those 2 plugs. That's not including the V7 board. I've decided to wait for the V8. Don't want to do a face/palm and say, " I could've had a V8!"
[ November 20, 2019, 03:48 PM: Message edited by: David Brown ]
Posted by Doug Maxwell (Member # 7093) on November 20, 2019, 01:59 PM:
What are the changes made for V8?
Posted by David Brown (Member # 7133) on November 20, 2019, 03:54 PM:
Kamel
I just wanted to be certain of a proper print. I have no PETG yet. I went to https://www.shapeways.com/
Took a week, they are located in NY & The Netherlands.
Although there was a choice of steel or aluminum, there was no ABS or PetG!
MJF Plastic PA12
Also known as HP Multi Jet Fusion PA12, Professional Plastic, HP Nylon Plastic, PA12, Polyamide
Multi Jet Fusion (MJF) Plastic PA12 is HP's nylon plastic with excellent mechanical properties and a slightly grainy finish.
Common Applications
Mechanical & structural parts, mounts, cases, eye frames, tech accessories, drone parts, home décor, miniatures, art, prosthetics
Posted by Kamel Ikhlef (Member # 6667) on November 20, 2019, 03:58 PM:
OK David, Thanks for your feedback.
Posted by Stan Jelavic (Member # 6822) on November 20, 2019, 10:11 PM:
Oops forgot that you will do your own board David. Don't think you can reuse any of the Wolverine cables. I would send you some of mine but I am also running low and have them on backorder from Digikey.
But you can use there from amazon:
https://www.amazon.com/gp/product/B013JRWCBU/ref=ppx_yo_dt_b_asin_title_o05_s00?ie=UTF8&psc=1
They are 3" long which should be ok. These cables are also used for fan extension.
The changes for V8:
- better usb connection
- possible capstan improvement
- power leds
Posted by Kamel Ikhlef (Member # 6667) on November 21, 2019, 04:26 AM:
In the wish list, it would be perfect if the takeup motor problem was fixed because emptying into a trash is not really a solution (it is one of the biggest telecine defect of frame jig). another thought would be to provide a 12v output with a switch for a other fan to cool the camera (optional). let's be crazy it's soon Christmas.
[ November 21, 2019, 07:42 AM: Message edited by: Kamel Ikhlef ]
Posted by Stan Jelavic (Member # 6822) on November 21, 2019, 07:52 AM:
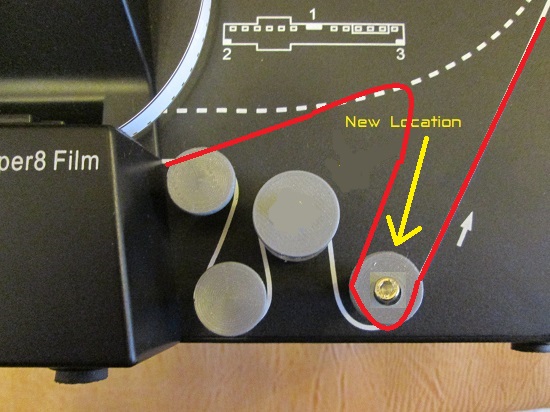
Possibly something like this Kamel. Based on your idea.
The MSP counts the frame pulses from the claw and knows how much the film advanced. It then the pulses the takeup motor until the count from capstan matches the number of claw cycles.
if the film is stuck there will be no input from capstan and in that case it will pulse the capstan and turn off the takeup until the jam is cleared.
The film routing will have to be different but just a general idea.
Posted by Kamel Ikhlef (Member # 6667) on November 21, 2019, 09:39 AM:
Stan,
Unfortunately, we can not put the capstan motor at this location for lack of space, the shaft hole is too low (or it would be necessary to drill the front cover!).
In addition it would be necessary to reverse the direction of rotation of the motor !
Can not we desynchronize the winding of the film on the reel.
Waiting for a number of scanning frames before winding the film on the receiver reel (keep a loop of security). Finally an idea like that ...
Posted by David Brown (Member # 7133) on November 21, 2019, 08:24 PM:
Stan
Thanks for that link. I already have those connectors, and testing them, they fit the Wolverine 2p socket. I still have more orders to be delivered. So far then I will only be short the spacers. Sparkfun is backordered, I believe I will find some at Home Depot.
Looking over the parts and reading the Wolverine_custom_camera_kit-v2.
I might have misunderstood this process.
I guess I don't have a kit since all the parts are provided, less the camera?
Not worried yet and there's no rush.
I have flashed the Wolverine's OS a few times testing altered firmware I found online. Don't bother looking, it's not any better output, for those who might try to find it!
It was fairly easy to do, just boot with the new file on the SD card. I had to restore the original firmware.
Does the Hawkeye's OS load in a similar way onto the new board?
Posted by Stan Jelavic (Member # 6822) on November 21, 2019, 10:10 PM:
Just wanted to start the thinking process of combining the capstan and takeup Kamel. Th esolution that I proposed will not work but maybe something similar. Have to spend more time on it.
David, the flashing of the Hawkeye is not as simple as Wolverine but not very hard.
Here is some stuff from one of the previous posts:
The MSP430 sw is on the google drive in freq_gen2 folder. Drop this folder into your CCS workspace and compile it. Then you can flash the MSP430 using the launchpad.
I used this:
https://www.amazon.com/gp/product/B00HPLQS58/ref=ppx_yo_dt_b_asin_title_o00_s00?i e=UTF8&psc=1
The standalone part is:
MSP430G2231IN14 from Mouser.
You will need the Code Composer Studio from TI:
http://software-dl.ti.com/ccs/esd/documents/ccs_downloads.html
I can put a short video together on how I program the part.
Pretty straight forward.
BTW - I bought quite a few of the spacers from Sparkfun maybe depleted their stock
Can send you 4 of them via regular mail.
Posted by Markus Baur (Member # 7171) on November 22, 2019, 02:29 AM:
Stan and Kamel,
I'm slowly getting the idea how the capstan and the take up are going to work together. The claw pulse tells how much film (different for R/8 and S/8) has moved past the gate. The real problem is that this doesn't tell the takeup how much angular rotation will be needed to wind this film. The fuller the takeup spool gets, the more film will be spooled for the same angular rotation. This is where the kapstan comes in:
For best feedback it should sit as closely as possible to the take up reel. And per Kamel's suggestion (which matches my experience with the microswitch) it should lag behind somewhere in the ballpark of 10-50 frames to leave a safety loop of film to prevent tugging at the claw. I don't think drilling a new hole into the metal plate should be a big issue if the motor gets in the way of the housing (not a problem in my setup). I'd rather have a well working system. And having a new, bigger plastic housing printed later shouldn't add too much to the cost if so desired.
And on a different note, to take up David's suggestion, wouldn't it possible to incorporate a USB bootloader into the MSP430 code? That way later code upgrades would be very simple for anybody with a Hawkeye. Something like this:
https://github.com/simpleavr/boot430
Posted by Kamel Ikhlef (Member # 6667) on November 22, 2019, 05:14 AM:
I'm not sure that drilling a new hole for a new capstan location improves something.
Several film paths should be tested and a winding delay of the film programmed. What do you think ?
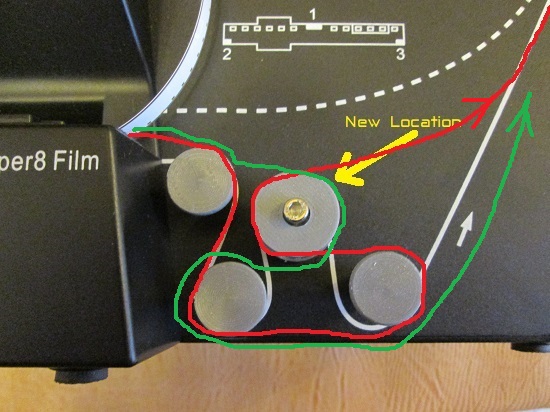
Posted by Stan Jelavic (Member # 6822) on November 22, 2019, 09:35 AM:
Possibly use geared motor with the constant takeup tension. The geared motor would prevent the takeup from pulling the film at the gate and could advance slowly synchronized with the claw so that the film at the gate is always a bit loose.
https://www.digikey.com/product-detail/en/digilent,-inc./290-008/1286-1056-ND/4428833&?gclid=Cj0KCQiAq97uBRCwARIsADTziyYsKDEP0rsR3Qv2Mh9rOA_BfLrw82BwTZpuUSqIs-EdcEmux2Q1WzcaAjrsEAL w_wcB
Specs:
http://www.farnell.com/datasheets/2022064.pdf?_ga=2.176909029.150716241.1574436457-2076060055.1574436457&_gac=1.24998216.1574436457.Cj0KCQiAq97uBRCwARIsADTziyZQknCdBOfrh2ZCxBhQZx9z 1mjtXmD5oOB06QuZNdG9tks-GsgNnPIaAlyyEALw_wcB
Posted by Kamel Ikhlef (Member # 6667) on November 22, 2019, 11:14 AM:
Stan,
Very good idea, it's a good track to test. I will order one...
I will have to redo the design for the new motor support.
the datasheet of the link corresponds to the model 290-006 in 12v 639rpm. the 290-008 is a model in 6v 125rpm. which one to order (farnell)?
Posted by Stan Jelavic (Member # 6822) on November 22, 2019, 03:10 PM:
12V is better since we already have 12V readily available. My thinking is that the geared motor will have enough reverse torque to prevent the takeup from pulling the film but that has to be verified.
The motor has the sensor, similar to the original motor so that the MSP can pulse it if the film gets stuck.
Here is the ordering info:
https://www.digikey.com/products/en/motors-solenoids-driver-boards-modules/motors-ac-dc/178?k=&pkeyword=&sv=0&pv14=87868&sf=0&FV=-8%7C178%2C-1%7C1286&quantity=&ColumnSort=0&page=1& pageSize=25
Posted by Kamel Ikhlef (Member # 6667) on November 22, 2019, 04:49 PM:
Stan,
Here an other 12v 159rpm encoder motor.
https://www.digikey.com/product-detail/en/dfrobot/FIT0441/1738-1157-ND/6588579
Datasheet :
https://media.digikey.com/pdf/Data%20Sheets/DFRobot%20PDFs/FIT0441_Web.pdf
what do you think ?
Posted by Stan Jelavic (Member # 6822) on November 22, 2019, 10:44 PM:
Looks pretty good Kamel. One concern is that the gear motor has lots of torque and can do lots of damage to the film if something goes wrong.
Posted by Kamel Ikhlef (Member # 6667) on November 23, 2019, 03:19 AM:
AH! OK, It's better not to rush then ... I will not order at the moment and continue to think about a better solution. thanks a lot for the advice Stan.
Posted by David Brown (Member # 7133) on November 23, 2019, 01:32 PM:
Kamel / Stan
I found the cause for the wobble of the motor sprocket. It's the set screw that locks it to the motor shaft. I printed several of those. They don't wobble before adding the inserts and the set screw. Thinking the insert was too large, I drilled the hole larger, and went too deep. That allowed the set screw to push the motor shaft off-center.
I can't think of how this new motor can function as both regulating the takeup speed and sensing the film movement. I will wait to hear more!
This morning I dismantled the takeup reel to examine the clutch (MovieMaker-PRO). There is no adjustment except to shorten the spring or replace it with a weaker spring. I'm going to find a weaker spring. The takeup rotates with the same speed and force when recording or rewinding. Too much for one and not enough for the other.
I don't use the rewind feature. It's faster to just use a pencil or small screwdriver and rotate the source reel. Either way, the film is dragged across the casing without holding a guide above the two reels.
Kamel
The hole on the end of the Back_Toothed_Pulley_v27 is too large for a 3mm insert. That one fastens to the Front_Toothed_Pulley_v27. I had to glue the insert with epoxy. I'm assuming that you will redesign the assembly for the new motor?
Posted by Stan Jelavic (Member # 6822) on November 23, 2019, 10:34 PM:
David, the geared motor that we discussed can do both. The motor is geared with a high reverse torque. In another words if you try to turn the rotor by rotating the shaft you would experience very high resistance.
So, when the takeup pulls on the film the capstan will not move and the film will be under tension between the capstan and the takeup. The takeup can run continuous.
As the claw advances the MSP can advance the capstan the same amount so that the film between the claw and the capstan is loose. If the film gets stuck, the capstan torque may not be sufficient to pull it through and will stall the motor. The monitor pulses will stop and the MSP can increase the torque via the PWM pin.
But this is not a good solution. The geared motor torque is high and if it gets out of sync with the claw it could rip the film.
Possibly put the monitor capstan at the source pulley and geared motor on the takeup side. When the jam is detected the claw is disengaged and the geared motor pulsed. After that the claw is run several times and the monitor observed if the jam is cleared. This can be done several times until the jam is cleared. Once cleared the normal operation resumes.
All of this needs testing. The film may slip from the geared motor capstan because it has tension on one side and no tension on the other. A guide may be needed. This is actually similar to the old projectors - two capstans and lose loop of the film driven by the claw.
Posted by David Brown (Member # 7133) on November 24, 2019, 12:35 AM:
Today I replaced the spring in the takeup slip clutch with a weaker one. This significantly changes the pull and ends the capture jitter from the takeup reel. Not hard to do in 15-20 minutes.
I was able to find springs at Home Depot.
https://www.homedepot.com/p/Everbilt-Spring-Assortment-Kit-84-Pack-13554/203133714

This is the web description. There could be 4 springs in the box, I pulled out 2.
For those who do not have a nearby Home Depot, The spring dimensions (measured from calipers) are below.
New spring on the right.
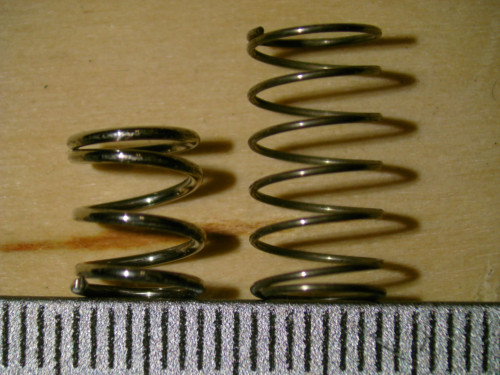
original spring
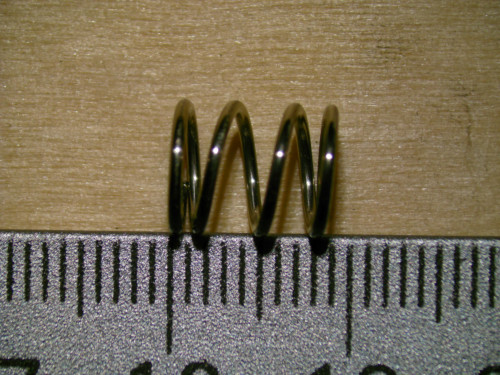
diameter of wire: 0.78mm
diameter of spring: 8.75mm
length of spring: 8.70mm
replacement spring (the one I picked)
diameter of wire: 0.49mm
diameter of spring: 7.55mm
length of spring: 14.30mm
I can show the disassembled takeup if there is any interest.
Note: I was still able to rewind a 50-foot reel on the Wolverine.
Posted by Bruce Davis (Member # 7072) on November 24, 2019, 01:49 AM:
Hi David Brown, This is of interest to me, had always thought that the clutch friction was to high.
Thanks very much for posting, have not yet dis-assembled it.
Would be interested in seeing how it is put together.
Regards - Bruce
Posted by Kamel Ikhlef (Member # 6667) on November 24, 2019, 03:37 AM:
David,
I checked my 3D files design. I had no problem because ABS or PETG got a lot of printing retraction and I planned a little more large to compensate.
For other filaments, we would need surely reduce the diameter of the holes a little (maybe 4.25mm for M3 inserts).
Thanks for the return of experiences and thanks for the tips of the springs (improving the takeup).
The frames jig is one of the big problems of this telecinema!
This is very interesting because we always want to improve the telecine system.
BTW : You can find a 4.25 diameter version on thingiverse : "Back_Toothed-Pulley-S8-v29"
https://www.thingiverse.com/thing:3891738
[ November 24, 2019, 07:35 AM: Message edited by: Kamel Ikhlef ]
Posted by Stan Jelavic (Member # 6822) on November 24, 2019, 08:38 AM:
Great work David.
If this indeed works then the original capstan design will probably work. Hopefully the tension is strong enough to pull the capstan.
Posted by David Brown (Member # 7133) on November 24, 2019, 04:51 PM:
Wolverine Slip Clutch on the takeup reel
OK, now I will rebuild the pulley assembly and test the force needed for the current capstan. After adding the lighter spring I ran the film right from the gate to the takeup reel.
All my pulleys came off with the motor.
If more tension is required, a heavier spring can be used.
The takeup reel spindle is held on with two screws. Warning, The 3 retaining clips are the type that often fly across the room during removal. Sometimes they are never found again!
The gear on the end of the shaft is pulled off with fingers.
Too many pictures to upload to this forum!
Takeup Slip Clutch
a long time later........
Stan Good call, "can this change in the takeup reel keep the capstan turning"? NO.
If I were not interested in the capstan, I would be done. I'd leave the takeup spring that I replaced, in. There is enough pull to wrap around 1 or 2 pulleys before the takeup reel, but the film will never stay tight.
It might take a pulling force equal to the original spring to keep the film tight on the capstan and keep it turning. The claw is pushing the film out of the gate with a strong force that pops it off the capstan. The takeup reel doesn't have any force beyond winding the film on the reel.
There is only a fixed amount of space for the compressed spring in the clutch. I have not measured that yet. The first spring I used was longer with thinner wire. A heavier spring I added was thicker than the available space and I had to keep cutting it down. This leaves an unfinished end that must be bent flat.
Cutting the original spring shorter is probably the best choice. But how much shorter? I don't want to lose the option to return to the original setup. I have many springs, but how do I quantify this process for others?
I'd say for Mike, get a lighter spring so the takeup can work without adding jumpy frames. He's not interested in the capstan.
I looked at a compression spring calculator, some of the input I don't have, and it may not even help with a slip clutch. I don't like to add complexity.
I'm out of testing time for a while. I would say to Stan, continue with the new motor, but only if it's fun!
[ November 24, 2019, 09:10 PM: Message edited by: David Brown ]
Posted by Bruce Davis (Member # 7072) on November 24, 2019, 09:15 PM:
David Brown thank you, those images are very help full
Regards - Bruce
Posted by Kamel Ikhlef (Member # 6667) on November 25, 2019, 04:14 AM:
Thanks a lot David. every contribution to improve scan quality is always very useful.
Posted by Stan Jelavic (Member # 6822) on November 25, 2019, 08:07 AM:
Thank you David. Nicely done. So we have a solution for the people that are not interested in capstan.
I will spend more time on capstan. Also, plan to test the delay between the claw and the takeup and the camera. Maybe the margin is too narrow.
Re:
Posted by Bob Vito (Member # 7168) on November 03, 2019, 02:42 PM:
Has anyone experienced multiple frame captures for each frame advance?
I checked the trigger spec for the camera and the current requirement for the camera trigger is 3.5 mA.
With the 2.2k resistor and 3.3V we drive it with only 1.5 mA.
With a low drive it is possible to have a flaky trigger. But, let me test it first with my unit because I am concerned that a low
resistor value could damage the Wolverine optical detector. I did have duplicate frames at one point and will see if I can reproduce that and then
sub the resistor.
[ November 25, 2019, 09:20 AM: Message edited by: Stan Jelavic ]
Posted by Kamel Ikhlef (Member # 6667) on November 25, 2019, 12:38 PM:
Stan,
Can not we put a trigger to avoid the bounce effects of the sync signal (be sure that it sends only one pulse at a time: a square signal). Finally, I am not competent enough. Just an idea!
Posted by Stan Jelavic (Member # 6822) on November 25, 2019, 01:05 PM:
Will look into that. Thanks Kamel.
Posted by Bob Vito (Member # 7168) on November 25, 2019, 01:33 PM:
Just a brief update on the multiple frame captures - since I have to delete every other file, the remaining files need to be renamed so no numbers will be skipped. After doing some internet research, I wrote a batch file to do this. This makes it a lot less burdensome.
Posted by Stan Jelavic (Member # 6822) on November 25, 2019, 01:59 PM:
Bob, can you do the following test:
Remove the film and open up the gate. Setup the camera for external trigger and slowly advance the claw a bit at a time by flicking the switch on and off. Observe where in the claw cycle the camera captures the frames.
Posted by Bob Vito (Member # 7168) on November 25, 2019, 07:34 PM:
Stan,
This was an interesting experiment. I turned the machine on without film and with the door open. The external trigger was on. The claw started at the top, right-most position. I turned the switch on and off quickly to see when frame captures would occur. I paused for a few seconds each time the switch was turned off to make sure there wasn't any kind of a delay in capturing the frame. When the claw was nearly at the top, left-most position (90% of the way up), the machine would capture frames without stopping. It would continue to do this until the claw moved all the way up and then roughly 10% of the distance to the right. Then the frame captures would stop until the claw until it returned to the same position again (near the top, left).
Since it behaved in this manner, I wanted to verify it's behavior with film. I turned the machine on with film and recorded 11 frames. It performed two captures for each frame. The first file is the good capture (i.e. Image0459), and the second is the squished capture (i.e. Image0460). The time each file was created is shown below, although with hardware delays, this may not correspond to when the Wolverine actually did the capture. The files appeared on my computer
screen when the claw was at the top, right side of its travel.
This does explain something that has puzzled me. Sometimes, when I turned the machine on, it would start capturing frame after frame continuously, and other times it would start capturing frames only after I turned the switch on. As it turns out, it does this based on the position of the claw.
Frame Captures With Film
Command to capture time stamp: forfiles /c "cmd /c echo @file @ftime"
"Image0459.jpg" 7:38:47 PM
"Image0460.jpg" 7:38:47 PM
"Image0461.jpg" 7:38:49 PM
"Image0462.jpg" 7:38:49 PM
"Image0463.jpg" 7:38:51 PM
"Image0464.jpg" 7:38:52 PM
"Image0465.jpg" 7:38:53 PM
"Image0466.jpg" 7:38:54 PM
"Image0467.jpg" 7:38:55 PM
"Image0468.jpg" 7:38:56 PM
"Image0469.jpg" 7:38:57 PM
"Image0470.jpg" 7:38:58 PM
"Image0471.jpg" 7:39:00 PM
"Image0472.jpg" 7:39:00 PM
"Image0473.jpg" 7:39:02 PM
"Image0474.jpg" 7:39:02 PM
"Image0475.jpg" 7:39:04 PM
"Image0476.jpg" 7:39:04 PM
"Image0477.jpg" 7:39:06 PM
"Image0478.jpg" 7:39:06 PM
"Image0479.jpg" 7:39:08 PM
"Image0480.jpg" 7:39:08 PM
Posted by Stan Jelavic (Member # 6822) on November 25, 2019, 08:38 PM:
This is a very good test and good input for me Bob. Do you have a voltmeter?
Here is an update:
Read the following blog:
https://www.theimagingsource.com/media/blog/archive/20080602/
So, this makes sense I think. The camera external trigger has an optocoupler that requires 3mA to drive it.
We drive it with 3.3V / (2.2k + 0.82k) = 1mA
This can create continuous trigger for the duration of claw passing by the Wolverine sensor. The FPS does impact this --
check the referenced documentation.
The possible solution is to cut the resistor value down to 1K but a better solution is to rewire the camera trigger.
I am checking to see if there is an easy way of doing that.
A few more notes.
If FPS is set to 1/60 we may be able to run faster...
White balance update. Using the auto white balance with unloaded gate works pretty well but there is a magenta tinge,
possibly due to the film type (Kodak). Wolverine has a cyan tinge. Will post a clip.
[ November 25, 2019, 11:11 PM: Message edited by: Stan Jelavic ]
Posted by Kamel Ikhlef (Member # 6667) on November 26, 2019, 02:41 AM:
Here an other imaging source documentation for camera triggering :

Stan ,
I was thinking about this type of editing to avoid rebounds.
I think there is already a similar system built into the camera but I'm not sure. Otherwise in the future PCB V8.
[ November 26, 2019, 04:59 AM: Message edited by: Kamel Ikhlef ]
Posted by Bob Vito (Member # 7168) on November 26, 2019, 07:08 AM:
I do have a voltmeter, but no oscilloscope.
Posted by Stan Jelavic (Member # 6822) on November 26, 2019, 07:46 AM:
I don't think this is a switch bounce problem Kamel. With the camera opto-isolator it is possible to have pulses if the drive is not sufficient.
I will try the following mod:
https://photos.app.goo.gl/jegKhad54EXnQkY7A
If it works Bob can try his board. If that works I will implement the change in V8.
Tested it. The pulse polarity is reversed. Will need a transistor to invert the polarity. In the meantime Bob you can try to tack another 2.2K resistor over R2 so that the two resistors are in parallel giving effective resistance of 1.1K. That might work.
Update:
Reproduced the problem. It is the claw leaving the opto detector causing a small glitch. The glitch is low enough to cause a second trigger.
Adding a 2.2K resistor across R2 fixes the issue for me.
Bob, can you try the same fix. This is not the final solution but should be OK for now.
[ November 26, 2019, 04:31 PM: Message edited by: Stan Jelavic ]
Posted by Bruce Davis (Member # 7072) on November 26, 2019, 04:48 PM:
Stan I assume I am not seeing this problem because the resistor you installed on mine is a 1K8 resistor not a 2K2.
Posted by Bob Vito (Member # 7168) on November 26, 2019, 05:44 PM:
I tried it and still have the same issue. Do you think the resistor need to be soldered to R2 to work properly? I only tried holding the leads in place.
Posted by Stan Jelavic (Member # 6822) on November 26, 2019, 06:29 PM:
Bruce, some units seem to be better, Mine starts giving me problem only after a while so I am not sure if 1.8K resistor is the reason. But it is better than 2.2K.
Bob, make sure the resistor leads are clean.
Can you check the voltage without additional resistor while the unit is not triggering. Then position the claw so that the unit is capturing continuously and check the voltage.
Hawkeye vs Wolverine latest comparison:
https://photos.app.goo.gl/WaQ2dzZDf5VayhTw8
A few comments:
https://photos.app.goo.gl/3Qz5deYT67394m9n7
Posted by Bob Vito (Member # 7168) on November 26, 2019, 08:43 PM:
I cleaned the resistor leads with some sandpaper, then inserted the leads under the R2 leads and measured the resulting resistance - around 1.1 K ohms. Unfortunately, no change to the frame capture behavior.
I removed the extra resistor, and moved the claw to a position that it was not triggering. The voltage from the right side of R2 (meaning the takeup reel side) to ground was a little over 3 volts. The voltage from the left side of R2 to ground was around 1.6 volts. The voltage across the R2 resistor was around 1.4 volts.
I moved the claw to a position that it was continuously triggering. The voltage from the right side of R2 to ground was a little over 3 volts. The voltage from the left side of R2 to ground was right around 0.2 volts (the needle barely moved), and the voltage across the R2 resistor was about 2.9 volts or so.
Posted by Stan Jelavic (Member # 6822) on November 26, 2019, 09:36 PM:
Thanks Bob. Looks like your camera is programmed for level trigger instead of edge. It is triggering on high level instead of rising edge.
Can you get the model number of the camera. We will have to contact the tech support.
Posted by Bob Vito (Member # 7168) on November 27, 2019, 06:42 AM:
The camera model number is DFM 72BUC02-ML.
Posted by Stan Jelavic (Member # 6822) on November 27, 2019, 08:08 AM:
I sent the question to imagingsource.
What firmware and driver version do you have?
Posted by Bob Vito (Member # 7168) on November 27, 2019, 08:42 AM:
DFM 72BUC02-ML
Serial #08910106
Firmware Revision 140
Driver Version 2.9.8.2001
Thanks for contacting them.
Posted by Kamel Ikhlef (Member # 6667) on November 27, 2019, 12:11 PM:
Thanks a lot, Stan, for you greats tests and all your helps.
Posted by David Brown (Member # 7133) on November 27, 2019, 01:39 PM:
YEAH, Thanks Stan!
On the subject of triggers, I would like the option to trigger an external camera with the Hawkeye. I plan to use a dlsr and/or other camera that uses a momentary switch from the usb/multi port. I think the best way to do this and protect the camera, would be thru a relay. The shutter triggers when the leads are connected.
Your thoughts? This does not need to be added to the Hawkeye, I could connect my own.
Posted by Stan Jelavic (Member # 6822) on November 27, 2019, 02:14 PM:
Thank you for your support.
David, a solid state relay should work. Look for one that runs at 3.3V and then you do not need any mods.
The latest IC Capture instructions are here:
https://drive.google.com/file/d/1_TaVulHyo31rpYCjGHBHQxAQG2Sfsoym/view?usp=sharing
Pretty happy with the results. Do not use any corrections with Film9 but run the final video through Movie Magix and the colors look nice and pretty natural (in my eyes).
Will post the clip.
BTW - the clip has a flicker midway. That is that double frame capture that Bob experienced and that is where I implemented the fix.
Also I reduced the takeup timing and looks like it worked but will double check.
Posted by Kamel Ikhlef (Member # 6667) on November 27, 2019, 03:40 PM:
I see that it works a lot to improve our homemade telecinema.
For my part, I work on a control panel with switches and leds (to learn and have fun on Kicad) if it can be useful.
This PCB will can be screwed on the future telecine front cover (3D printing design not finished yet)...
As you see I put leds everywhere (I have visual problems and it will help me, but they are optionnal).
this is not really useful but remains fun to achieve !
It's not over yet, it's a draft. I'll send it to Stan for validation when it's over.
If Stan agrees of course! Waiting for the V8 ...
[ November 27, 2019, 04:49 PM: Message edited by: Kamel Ikhlef ]
Posted by Bruce Davis (Member # 7072) on November 27, 2019, 05:26 PM:
Stan thanks very much for dedicating so much time to help everyone. Just a very minor correction, page 6 of your instructions you indicated a resolution of 1080 x 1024, I assume you meant it to be 1280 x 1024.
Regards - Bruce
P.S. for anyone who might be interested, I use VirtualDub v2 with Huffyuv lossless codec to assemble all the images into an avi video format file, it reduces file size considerably. If using Film9 the only lossless codec option is Lagarith.
[ November 28, 2019, 08:48 AM: Message edited by: Bruce Davis ]
Posted by Stan Jelavic (Member # 6822) on November 27, 2019, 08:19 PM:
Interesting looking front panel Kamel. Sure I would be more than happy to do the test.
Thanks Bruce. Here is version3 with the correction and additional note at the end.
Edit - A few changes added - now V4
https://drive.google.com/file/d/1Omu9B6pfP8tK6-HPwwwrmD9JyaheP583/view?usp=sharing
Bob, got a reply from imagingsource engineer and she is puzzled and says that she never came across issue like this but will look into it. Here is another test. Connect the trigger to 3.3V directly (will have to cut the trigger + cable) and see if it triggers continuously. I can send you a new cable after the test.
Bruce - you wrote:
I use AviSynth v2 with Huffyuv lossless codec to assemble all the images into an avi video format file
Can you share the script that you use. Would like to try it.
[ November 28, 2019, 08:16 AM: Message edited by: Stan Jelavic ]
Posted by Bruce Davis (Member # 7072) on November 28, 2019, 08:46 AM:
Stan Jelavic sorry Stan I incorrectly wrote AviSynth instead of VirtualDub v2, no script required, just need to click on file tab and "Open video file...".
In the Open video file window select "Linked segments" and "Image sequence input level(internal)" then the first image in the sequence "Open" (I always save captures in tiff format).
Before saving click on the Video tab then select "Compression" and whatever form of compression you would like to use.
Back to File tab and "Save video...".
Sorry I misled you or others - Bruce
Posted by Stan Jelavic (Member # 6822) on November 28, 2019, 08:59 AM:
No problem Bruce. Will try that. Thank you.
Added another section on the bottom of the capture document:
https://drive.google.com/open?id=1CMEoCWHi623Jpmnu17UW963zGnEPICd2
This is the proof in the pudding in my opinion.
Hawkeye is better and it does what we intended it to do:
- FRAME GRAB
- LESS ARTIFACTS
- BETTER RESOLUTION
- Open Design
- On a fly adjustments
It requires more work during scan but you get better quality.
Curious to see your inputs.
[ November 28, 2019, 10:31 AM: Message edited by: Stan Jelavic ]
Posted by Kamel Ikhlef (Member # 6667) on November 28, 2019, 12:10 PM:
Stan,
The question does not arise! Hawkeye is better! In addition, it allows us a freedom of scan. separate still images that can be post-processed as we want.
This is what I've been looking for a long time ... Of course there are small things to improve but overall it's great!
Posted by David Brown (Member # 7133) on November 28, 2019, 10:19 PM:
I'm on the sidelines here, just watching the results that have been posted. It's looking good, just some annoying little bugs that are almost fixed!
The motors and the claw are at your command. Impressive. Equally the recommendations for exposure and tone quality are very important to be set during capture. Not everyone would be as successful. They are well worth the effort.
I have only 3 things left to order. I have held off on the camera and lens, though I have no problem with the camera.
Some time ago talking about the limits of the current lens and others, you mentioned using a c-mount lens. I have to believe you knew it is an option for this camera. I thought it would involve starting over.
I noticed the image you posted for Bob of the Hawkeye camera. It has a c-mount lens! I had no idea it can be ordered that way. I say that assuming it would project a larger sensor image. I know it's not that simple, and it would be huge.
I don't think the dslr option I will try can be enduring. The setup will be cumbersome and not something I'll do more than once or twice.
I digress, the pudding is delicious!
Posted by Stan Jelavic (Member # 6822) on November 28, 2019, 10:43 PM:
Thanks Kamel. Like your positive attitude.
Good inputs David. I used the C mount at work and the lens is pretty big and would require a different mechanical arrangement. I have a few spare Wolverine units here that I use for testing and at one point I will bring in the Bassler camera with the C mount lens and mount the whole thing on a board all loose parts and see what I get. The big advantage of the C mount is as you said you can get a larger image that covers the sensor but also adjustable aperture that is a must.
Here is the updated instructions.
https://drive.google.com/file/d/1r60hjc81AR9okJSQ_IQ5tpX-TJWBswx-/view?usp=sharing
Posted by Bob Vito (Member # 7168) on November 29, 2019, 08:20 AM:
Stan, I pulled the trigger+ wire out of the white connector that attaches to cam sync on the Hawkeye board. This would be the wire that is closest to the two short pieces of wire in the white connector. I held the wire to the +3VDC terminal on the board - basically what is described in the photo from your Nov 26, 7:46AM post. I started up IC Capture and turned on the machine. When the wire is touching the +3VDC terminal, it captures frames continuously. When I remove the wire, no frames are captured.
Posted by Stan Jelavic (Member # 6822) on November 29, 2019, 08:50 AM:
I will forward your input to the imagingsource engineer, Bob. May be a faulty camera.
HERE IS LATEST UPDATE ON JITTER:
Did a test with no takeup tension, pulsed tension, and continuous tension. Found out that the jitter is significant in all three cases. Studying the claw operation found out that the gate cover is inserting quite a bit of force on the film. On some film the claw is not perfectly aligned and it hits the film and then engages the hole. Extra tension does not help that and could cause jitter.
So, I applied teh Wolverine fix for wide film:
https://www.wolverinedata.com/assets/downloads/Wider_Film_test.pdf
https://photos.app.goo.gl/1u9hygTttNQCSsZH9
That almost eliminated all jitter even with the standard Wolverine it is almost gone.
Here is the test:
https://photos.app.goo.gl/ywUfD9mK4XAgroUe9
Try using different number paper pieces. It also may be possible that the cover is too loose in which case you have to adjust the cover screws.
So, looks like this should fix the jitter issue and capstan should work as is - no changes except for capstan connector.
HAWKEYE RUNNING 1 FPS
Running 1 FPS. Tested JPEG for now. Will check BMP and TIFF later.
https://photos.app.goo.gl/LLSnMuAigquTyhaU9
And the resulting video:
https://photos.app.goo.gl/zc3Wpkoxf9oka7ba9
TIFFs also work
https://photos.app.goo.gl/YUqeojzQKLw7HENF6
Set slow frame rate in Virtual Dub...
One issue - capstan code is disabled because MSP cannot keep up.. will have to test.
Also possible 2 FPS I think... will need some more work.
[ November 29, 2019, 02:29 PM: Message edited by: Stan Jelavic ]
Posted by Kamel Ikhlef (Member # 6667) on November 29, 2019, 03:37 PM:
Wow! What a nice job Stan, it gives us motivation. Thank you really for sharing.
Damage to the capstan because I really need it and the speed of 1im / sec is really great.
What resolution did you capture? 1600x1200? because
for the BMP or tiff files, the hard disk does not follow the pace. Need a very good pc very fast?
The progress that has been made in recent weeks is enormous and make us want to continue improving this telecine.
Long live the hawkeye
Posted by Stan Jelavic (Member # 6822) on November 29, 2019, 06:02 PM:
I have a fast PC Kamel. I will test the capstan at 1FPS. 2 FPS may be possible by changing the size of motor step. Would be a bit noisier. At 2 FPS not sure if the TIFFs will be available but JPEGs are pretty good quality. If this works I would set it for two speeds 2FPS and 1FPS so it is a speed vs quality...
RUNNING at 2 FPS. JPEG IMAGES.
https://photos.app.goo.gl/Ss2Fk2iEP8HcFf5F8
https://photos.app.goo.gl/Wajr5Rr4bptq1BXU9
The capstan is still possible but will need some more thinking.
Several possible solutions. Will discuss with Kamel.
[ November 29, 2019, 08:17 PM: Message edited by: Stan Jelavic ]
Posted by Kamel Ikhlef (Member # 6667) on November 30, 2019, 04:21 AM:
Stan,
1FPS is already very good ! Go speed it is automatically compress more and lose quality or then provide a switch 3 ou 4 positions: 1FPS-2FPS-1F2S and rewind for those who would one day capture in 2K / 4K. To think about ...
If I have to design new parts or supports, no problem. With pleasure ! I Love Hawkeye mods !
[ November 30, 2019, 09:23 AM: Message edited by: Kamel Ikhlef ]
Posted by Stan Jelavic (Member # 6822) on November 30, 2019, 12:33 PM:
I did some testing and a 4 position switch looks doable:
1 FPS
2 FPS
0.5 FPS
Rewind
The board and front panel will have to be redesigned. Nothing major.
Capstan available in 0.5 FPS mode only.
We are getting close to running the Hawkeye similar to Wolverine.
The speed is close, and no adjustments during scan.
Run auto exposure and fixed white balance and WDR preset (very important).
Post-processing can be run in parallel to scanning so no time lost there.
SUGGESTION:
I would like to finish the board ver8. In the meantime can some of you with Hawkeye and another machine comment on transfer quality.
- resolution - do we have to go higher. Not optical but maybe more pixels per frame. 2K is possible (will double check) with existing setup and C mount
(different camera)
https://www.oemcameras.com/dfk-72buc02.htm
- white balance - I think further improvements are needed - Am I right? Can someone compare with side by side with other setup.
If it is way off I am willing to write our own capture based on algorithms published by:
https://www.youtube.com/watch?v=eZniFhJR17M&feature=youtu.be&app=desktop
I really like the results.
- LED - it is blue - I checked that and that is probably why Wolverine has a blue tinge because they do not compensate well for that.
We can correct for that but still needs improvement. I opened up the LED enclosure and have an idea how it can be changed
to RGB led that "DIY Cool" used.
- I will try DSLR setup with my spare Wolverine. Essentially dismantle the unit and mount components on a piece of wood. See what kind
of quality I get. Is it worth going that way in a long run?
Just be honest... We put in lots of work and some money into this but should not be biased by that.
[ December 01, 2019, 11:34 AM: Message edited by: Stan Jelavic ]
Posted by Kamel Ikhlef (Member # 6667) on December 01, 2019, 12:49 PM:
Stan, of course having better quality is great. It was the goal, otherwise it is useless if it is to return to the stock Wolverine.
I think it's amazing how far the progress made with your skills and your ideas.
If we can still improve this telecine now, I totally agree.
in default of 4k the 2K would already be very good if the system is reliable (not jitter).
But I do not know how to help for the moment.
I can design the supports for the new test configuration camera...
all your tests interest me a lot and I admit that I wait impatiently the tests progression. (LED,Capstan, Takeup,USB,...)
I will modify the design of my front PCB and 3D Printing control panel based on your progress. Tell me how can I help...
Posted by David Brown (Member # 7133) on December 01, 2019, 01:32 PM:
5 things that cause film capture to jitter.
1. There is inherently some jitter with film.
Here is a recent super8, shot in October this year. If you buy Kodak super8 today it is processed and scanned by Kodak.
"iceland on SUPER 8
2. Slow SD card. This a streaming problem, single frame captures would show up differntly. Not sure what would happen if the capture rate exceeds the save rate?
3. Torn sprocket holes, when not completly torn through.
capture the film backwards, the top of the sprocket hole will be intact. This also can help reduce the severity of deep scratches that are reflecting light. This is more of a problem with the light source. The Wolverine's light should be very difuse, the light source is at the end of the panel, not directly under it.
4.The width of the film. I never heard of this issue before the Wolverine! The paper in the door clearly works as Stan's test shows. Wolverinedata says to fold the paper 4 times. That is too much, I can't even close the gate. I don't know why this method works, the gate seems to be made of one piece. I'm not going to verify that!
5. Gate pressure is too tight. I'm still looking for more information on that. I expect extra thickness with Super8 sound. Splices should not matter inside the gate.
Changing gate pressure might be too hard for many. I have just completely dismantled the Wolverne and while there, I will be playing with gate pressure.
Has anyone adjusted the 3 pressure screws?
Mike, did you do this?
From October: There are two screws that can be unscrewed half a turn, to increase the downward pressure on the film in the gate.
Since I'm suggesting capturing backwards, Here is The best editors of 2019. Free versions in the first 7 minutes.
Primal Video-Best editors
Posted by Stan Jelavic (Member # 6822) on December 01, 2019, 02:39 PM:
Kamel, I am not ruling out 4K. Just more money.. I wanted to take one of the 2K or 4K cameras and import it to one of the 3D cad programs together with Wolverine mechanics and see how it fits. Maybe you can help in this area since you have quite a bit of experience in 3D.
David, pretty stunning video. The quality is pretty amazing. Now you will have to spill your secrets out for us he he.. I know you discussed the tools before but would like to know the process that you used in this transfer.
I used 3 pieces of paper between the cover and the gate. Close the cover partially and slide the paper from right to left until you hit a small tab. Then press on the cover and close it. Pretty sure that is the cause of my jitter issues. The cover screws are all the way in (least force) and the film is too tight without the paper. With the paper in the scanner goes almost completely silent.
Posted by Kamel Ikhlef (Member # 6667) on December 01, 2019, 05:57 PM:
Panel Command V2 with new switch 4 positions and picoblade 5 pins.
it's Christmas leds garlands !...
I hope my shematic is correct ? I am electronic beginner... to test...
Visit www.film-tech.com for free equipment manual downloads. Copyright 2003-2019 Film-Tech Cinema Systems LLC

UBB.classicTM
6.3.1.2