|
Author
|
Topic: That awful Elmo Lamp Socket
|
Paul Adsett
Film God
Posts: 5003
From: USA
Registered: Jun 2003
|
 posted October 02, 2012 09:22 AM


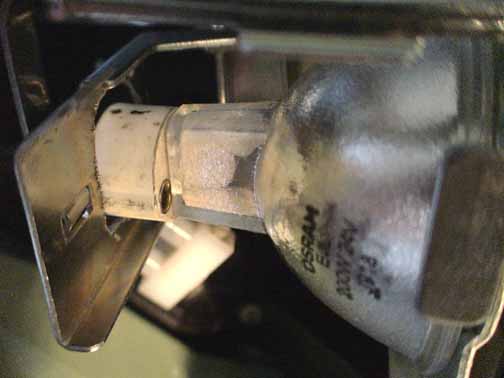
Getting dim pictures from your GS1200 or ST1200? Don't blame the bulb, blame that awful lamp socket design. You know, the one where the bulb slides sideways into the ceramic socket.
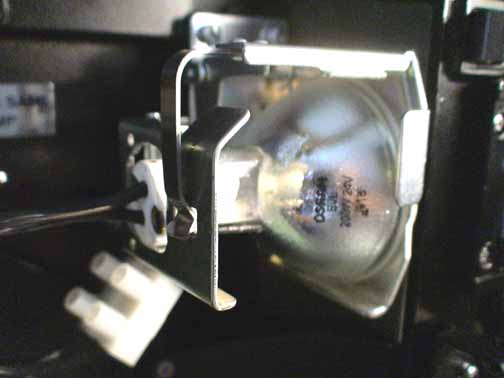
My light output was getting terrible on my GS, and I thought it was time to replace the bulb. On removing the bulb I found that one pin of the bulb had totally eroded, and the socket contact had disintegrated. The reason for this is inherent in the Elmo lamp socket design, which has a spring loaded flat contact pushing on the outside diameter of the circular lamp pin. So what you essentially have is a line contact, which of course has ZERO contact area! So you have a very high contact resistance, and the result is sparking at the contact interface which eventually eats up the pin of the bulb and the socket contact. Before that happens though you start getting a dimmer and dimmer picture, because the bulb is not getting the full 24 volts - there is a big drop in voltage across that lousy contact.
I have replaced my GS sockets several times, and the scenario is always the same - they eventually self destruct. Well, no more. I have replaced my GS lamp socket with a regular GX5.3 socket which contacts the lamp pins fully around the surface of the pin. Result - truly brilliant pictures again!
--------------------
The best of all worlds- 8mm, super 8mm, 9.5mm, and HD Digital Projection,
Elmo GS1200 f1.0 2-blade
Eumig S938 Stereo f1.0 Ektar
Panasonic PT-AE4000U digital pj
| IP: Logged
|
|
|
|
|
|
Paul Adsett
Film God
Posts: 5003
From: USA
Registered: Jun 2003
|
 posted October 02, 2012 12:35 PM


That's exactly right Hugh. To put this problem in real terms, I found that the light output of my 200 watt GS1200 had dropped to a level comparable to my 100watt Eumig! That's how much these poor sockets can kill screen brightness!
The modification is very simple because you can still use the existing metal cradle that positions the lamp. All you have to do is cut the lamp wires as close as possible to the existing cermic socket, trim the wire ends, and attach a piece of terminal block. The terminal block makes it really easy to replace the socket again if you have to in the future. Remove the old cermic socket from the metal cradle by removing the two little nuts and bolts. Be careful not to spill nuts, washers, and springs into the innards of the projector. Now the new GX5.8 socket comes with flying leads. Trim the lead length to about 6 ins and insert into the terminal block and tighten all 4 screws. The socket will not quite fit through the rectangular hole at the back of the lamp cradle, so you simply file it out until it will slip through and you can push it fully onto the lamp pins (make sure you don't do this filing operation near the projector- remove the cradle first). There is plenty of room in the existing lamphouse to accomodate the little terminal block and the extra lead wire, but you do need to unscrew and remove that central plate from the black lamp house cover.
Job done!


[ June 05, 2017, 09:42 AM: Message edited by: Paul Adsett ]
--------------------
The best of all worlds- 8mm, super 8mm, 9.5mm, and HD Digital Projection,
Elmo GS1200 f1.0 2-blade
Eumig S938 Stereo f1.0 Ektar
Panasonic PT-AE4000U digital pj
| IP: Logged
|
|
|
|
Paul Adsett
Film God
Posts: 5003
From: USA
Registered: Jun 2003
|
 posted October 02, 2012 07:29 PM


Hi Mal,
Good to hear from you.
The socket that I used is all ceramic construction, so no danger of melting there. I was concerned about the insulation around the wire pigtails, but I ran the lamp on full power for an hour, and there was no sign of the insulation melting up next to the ceramic block, so for the particular connector that I used it is a non-issue. Certainly a plastic connector would melt almost immediately.
--------------------
The best of all worlds- 8mm, super 8mm, 9.5mm, and HD Digital Projection,
Elmo GS1200 f1.0 2-blade
Eumig S938 Stereo f1.0 Ektar
Panasonic PT-AE4000U digital pj
| IP: Logged
|
|
|
|
|
|
|
|
Paul Browning
Phenomenal Film Handler
Posts: 1006
From: West Midlands United Kingdom
Registered: Aug 2011
|
 posted June 23, 2017 04:28 PM


Tom, the ceramic base is not that important, what is though is the connections made at the pins, avoid the flat style connections as these arc, and erode the pins, the enclosed style connector is more suited, most disco type suppliers do these type, as many of the earlier lighting effects used 24v 250 watt projector lamps. Martin lighting used this lamp base, and many years later are still working fine. Certainly go for the silicone type cables, unfortunately I would suggest just soldering the cables to the pins, this would eliminate any "spark erosion" at the pins, but this style of stranded cable is almost impossible to solder.
| IP: Logged
|
|
|
|
|
|
|
|
|
|
|
|
|


 UBBFriend: Email this page to someone!
 Printer-friendly view of this topic


 UBBFriend: Email this page to someone!
 Printer-friendly view of this topic