|
Author
|
Topic: Review Wolverine Reels2Digital MovieMaker 8mm film digitizer
|
Werner Ruotsalainen
Film Handler
Posts: 97
From: Helsinki, Finland
Registered: Dec 2017
|
 posted January 10, 2018 12:41 AM


quote:
but I have observed that also as it has been doing some, reels, begin the unrest and instability, that cough you have noticed in the Wolverine ...
I've found out the following: this mainly happens after splices and similar stuff. With the no-splice long films I've scanned so far (for example, some of the GDR DEF "Heimkino" travel stuff - for example the one (12.5 min at 20 fps) at https://www.youtube.com/watch?v=I-Yl20Ayg4s ), nothing similar has happened.
The way I scan my home movies is as follows: just stop scanning at every splice, remove the film from the track and, after cleaning the dirt falled on the white screen below with a strong vacuum cleaner, place the film in the track again, but now just after the splice.
This has greatly reduced the cases I had to re-scan a given film because of the instability. (It still happens in about 20% of the cases. Nevertheless, it's now much rarer than previously, when I tried scanning entire 7" rolls in one step. The latter approach was also inferior in that the white diffusor screen also gathered a lot of dirt, falling from the film above, at the end of scanning, and this visibly deterioriated the output.)
| IP: Logged
|
|
Werner Ruotsalainen
Film Handler
Posts: 97
From: Helsinki, Finland
Registered: Dec 2017
|
posted January 20, 2018 05:17 PM
MacOS folks wanting to change the framerate of their files (Windows users: let me know if you need a similar tutorial for Windows as well!),
I've written a small shell script that iterates over the *.??4 files (meaning it'll match both .mp4 and .MP4) in the current directory, remuxes them with the fps 16 (you can, of course, use 18 instead by changing 16 to 18) and stores the results in the (previously-created) "output" directory.
1. Copy the following four rows in a text file ending at .sh (any name can be used). I assume the name "conv.sh" below. Copy it to your work directory.
#bash
for f in *.??4
do
./ffmpeg -y -i "$f" -c copy -f h264 tmp.avc
./ffmpeg -y -r 16 -i tmp.avc -c copy "output/$f"
done
2. In Console, in the same directory, issue the "chmod a+x filename" command; for example, in my case, "chmod a+x conv.sh". This will make it executable.
3. if the ffmpeg executable isn't in your path, copy it there or in the current directory. You can obtain the file directly from, say, http://ffbinaries.com/downloads (just click the "Download" button in the "ffmpeg" (first) column next to the "OS X (64 bit)" (last) row.) (Previously, I used the files at http://ffbinaries.com/downloads . The site is no longer maintained, it seems.)
4. Copy your source MP4 files in the directory and issue the "./conv.sh" command in Console. (Note the leading ./!)
This is by far easier for mass-transformation than using any GUI app.
| IP: Logged
|
|
Laurent Bellier
Junior
Posts: 5
From: Bourg Saint Andéol, France
Registered: Jan 2018
|
posted February 13, 2018 04:13 PM
Hi to all of you,
And first of all, a big Thank You! Indeed, it has been realy so great for me to have been able to learn and benefit from your so wide experiences!
A few words about my story:
I was in november 2017 at the point to convert an old second hand Heurtier 8mm/super 8 projector in order to convert some 8mm/super 8 family movies with my HD Cam. Then, a friend told me about this relativly new alternative of low cost scanner he's rent for a week end to proceed with a few reels scan. Finding this genius forum thanks to Google, I've been reading most of your previous posts (tough job, several long evenings....), and I've been convinced to change my initial plan, and invest in a Somikon HD XL 8mm film scanner 1080.
I've purchase a second hand 1 month old scanner on ebay, and ... its motor failed during the first reel scan... (Thanks to what I've lernt here, I was not fully surprised ....).
The original 2nd generation motor has been replaced by the 3rd generation motor by the initial vendor under its one year leagal warranty (PEARL near Paris in France), and I've finaly started scanning a dozen of reels.
--------------------
Laurent
| IP: Logged
|
|
Laurent Bellier
Junior
Posts: 5
From: Bourg Saint Andéol, France
Registered: Jan 2018
|
posted February 13, 2018 04:21 PM
Hi to all of you,
And first of all, a big Thank You! Indeed, it has been realy so great for me to have been able to learn and benefit from your so wide experiences!
A few words about my story:
I was in november 2017 at the point to convert an old second hand Heurtier 8mm/super 8 projector in order to convert some 8mm/super 8 family movies with my HD Cam. Then, a friend told me about this relativly new alternative of low cost scanner he's rent for a week end to proceed with a few reels scan. Finding this genius forum thanks to Google, I've been reading most of your previous posts (tough job, several long evenings....), and I've been convinced to change my initial plan, and invest in a Somikon HD XL 8mm film scanner 1080.
I've purchase a second hand 1 month old scanner on ebay, and ... its motor failed during the first reel scan... (Thanks to what I've lernt here, I was not fully surprised ....).
The original 2nd generation motor has been replaced by the 3rd generation motor by the initial vendor under its one year leagal warranty (PEARL near Paris in France), and I've finaly started scanning a dozen of reels.
Then my question:
I'm now in stand-by mode on this scan project, because wondering if my scanner is working properly. I've noticed that the scan picture are relativly "noizy" (I mean by "noizy" the picture random disturbance resulting from the scann that reduce picture quality). I've notice that first when playing the scan movies, then I've looked deeper picture by picture trying to understand, and comparing with results from other on this post or on youtube.
My temporary conclusion at that point:
the focus seems to be OK,
the picture contrast and luminosity are quiet good,
changing from low quality to medium or high quality on the device menue do not change significantly the problem.
Looking again on the internet, I feel there are two different kinds of scanned movies:
Some looking very close to my own results (whatever coming from Somikon, Wolverine, or Reflecta devices) , i.e. whith rather high level of digital noize, like original scans.
Some with very low level of digital noize, but also I feel with not sosharp pictures. My understanding is that to obtain that, they have using digital post processing of the scan movies (reducing digital noize, and also unfortunately loosing picture details)
In order to illustrate, I will try uploading here two differents samples extracted from the scan movies (obtained directly by screnn copy on my PC, and I'm trimming the sample picture in order to keep the resolution, whil complying to the 555 pixel wide picture rule of this forum:
First picure is an extract of a family movie I've scanned:

The second sample is what I'm obtaining when scanning just the empty scanner windows (i.e. just after the reel tape has escape from the scanner at the end of a scan run):

I've been surprised to visualise the same noizy effect on the empty picture I was expected to be completely white (the strange unexpected pattern visible here is different from one picture to another within a scan file, resulting in moving pattern when playing the empty movie. I've never observed anything like that with my Sony Full HD Camcorder, except in very very dark conditions.
So, am I really expecting too much from this 8mm/super 8 scanning method, or is my device different than yours, or should I wait one or two more years for the equipement/technology to improve?
--------------------
Laurent
| IP: Logged
|
|
Dan Esmond
Junior
Posts: 16
From: Lawrence, KS, USA
Registered: Oct 2013
|
posted February 14, 2018 05:21 PM
Hi Laurent,
That noise you are seeing is compression artifacts from the too-low MP4 bitrate these devices use. People have complained about it ever since these were first introduced in late 2016. Unfortunately, there are no real solutions, as Wolverine etc. claim that it is impossible to increase the bitrate any higher to reduce the noise.
The High/Medium/Low setting you speak of I believe is the sharpness control, not picture quality. I and others have found that using the Low setting reduces the prominence of the noise artifacts (they are still present but adding sharpness makes them more visible). The side effect of that is a "softer" looking movie.
An ideal solution would have been for these machines to have an option to just write out each frame as a JPEG image on the SD card. Then, users could compile those images back into a movie on their computers at whatever bitrate/format/frame rate they choose. Of course that would not be user friendly for novices.
I spent several years trying to devise a telecine device to transfer my parents' & grandparents' films, but never had the time and expertise needed to get it done and working acceptably. Meanwhile, the Wolverine device came onto the market and I just decided that it was more important to get the films digitized so that I could share them with my family.
I have done that now, and am putting each film on youtube. Some of the films are over 70 years old and it is providing my family members so much joy to re-live those old times.
However, I remain quite dissatisfied with the picture quality of the Wolverine. So even though I have transferred all of the films with it I have committed to myself that I will scan them again once a better device is available.
With technology now it really would be possible to come up with a much "smarter" scanner--one that uses the optics to achieve precise alignment by lining up the edges of each frame (and then no need to use a claw at all which would allow scanning of films with torn sprockets and/or warping due to vinegar syndrome). It could also overcome the dynamic range problems by using an HDR technique--scanning each frame twice (once with underexposure, and then again with overexposure and then combining the two). Professional-level telecine devices are already using these techniques. With the success of the Wolverine/Somikon devices maybe they will work on making even better scanners.
I think the reason the Wolverine gets good reviews on amazon is because people are just amazed to be able to watch their old movies again--they aren't concentrating on the detailed image quality. Plus, compared to all previous DIY methods or sending off your films to a service, the Wolverine is very cheap and easy for a perfectly watchable result.
Aa a film aficionado, I know that there is more quality in these 8mm/Super-8 films that the Wolverine isn't capturing. When I was working on capturing via DSLR and an enlarging lens I was able to see the actual film grain--the Wolverine doesn't show that. Not to mention the problems the Wolverine has with auto-exposure (another issue which cannot be adjusted nor disabled).
So is the Wolverine a worthy method of archiving these old movies forever? My answer to that is no. To me, archiving means capturing digitally all of the analog quality that is there, and the Wolverine does not do that.
But it is (relatively) cheap and easy to use. If I waited years for a more archival quality transfer, some family members who would really enjoy seeing those films may die or lose their sight, etc. So for me, I decided the Wolverine was a decent compromise for now so that I could share these memories with loved ones (none of whom have even noticed the deficient picture quality). Hopefully someday I will get another transfer that satisfies my high standards.
| IP: Logged
|
|
Werner Ruotsalainen
Film Handler
Posts: 97
From: Helsinki, Finland
Registered: Dec 2017
|
posted February 14, 2018 05:42 PM
Laurent, are you absolutely sure you have the latest firmware, with the bumped-up, 9 Mbps bitrate and 20 fps?
With it, you shouldn't see THIS much compression artefacts when shooting with NO film (not even a transparent area of the film). An example I've just digitized - a 1:1 crop of a framegrab, without any kind of resizing; that is, one pixel corresponds in this image to one pixel in the original video:

Note that I deliberately selected an area with some dirt fallen from the previously-scanned film. As you can see, my results do exhibit some artefacts but the frame is definitely cleaner than in your crop.
These kinds of compression artefacts (in both images) are more likely attributable to the extremely high (automatic) contrast the firmware tries to apply to extremely homogenous input (resulting from only shooting the white diffusor under the film gate) like this. For example, the dirt speckles aren't at all noticeable in the digitized film (that is, when there's some actual film in the digitized footage) showing the contrast bump wasn't that huge there. The artefacts you see there are more like plain film grain and can easily be cleaned up with, say, Neat Video. (See my and Berend De Meyer's examples at 8mmforum.film-tech.com/cgi-bin/ubb/ultimatebb.cgi?ubb=get_topic;f=1;t=011636 ) IMHO, Neat Video is a must if one scans film and wants to get rid of the grain.
| IP: Logged
|
|
|
|
|
|
|
|
|
|
Dan Esmond
Junior
Posts: 16
From: Lawrence, KS, USA
Registered: Oct 2013
|
posted February 15, 2018 11:41 AM
Neat Video and other software plugins can help lessen the prominence of the compression artifacts. But they can never recover the detail lost to those artifacts in the first place. It's a garbage in->garbage out type situation. The problem with these machines is they produce mp4 files that are bitrate-starved. Compression artifacts are the result when there is too much detail for the capture settings to reproduce accurately. Yes you can make them look a little bit better but that does not fix the actual underlying problem: that detail was never captured by the wolverine in the first place--it's permanently lost.
It would be like copying a master audio recording onto an old cheap cassette using a tape player with dirty, worn heads. You could import that cassette into a computer and try to clean it up, but much of the original sound quality has been permanently lost due to the transfer method.
Software plugins can actually improve on the *original* when you have a high quality reproduction to work with (in the above analogy, like a studio remastering a recording). Some of the results I've seen from VideoFred's avisynth plugins are incredible. But the Wolverine gives you an inferior starting point. Thus any tweaks you are making are mainly to attempt to lessen the flaws the Wolverine itself introduced.
I have not had the guts to try a hacked firmware either, though I am very glad people smarter than I are working on it. Because aside from the jittery/wobbly capture issue, the bitrate is the primary problem with these devices. It would also be wonderful if the auto-exposure and auto-white balance could be turned off but that's not useful without controls to adjust them manually through the UI.
Mainly, I just hope this becomes a profitable market for the manufacturer(s) such that they invest the resources to keep making them better. It's an ingenious design but there is so much room for improvement.
By all means, buy one and use it to get your footage digitized so you can share it with friends and family. These old films do no one any good sitting in their canisters unwatched. If you have a discerning eye though, do yourself a favor and hold onto the original films so you can give them a better transfer when a better method becomes available. The Wolverine/Somikon machines are not capturing all of the detail 8mm/Super-8 has to offer.
| IP: Logged
|
|
|
|
|
|
Werner Ruotsalainen
Film Handler
Posts: 97
From: Helsinki, Finland
Registered: Dec 2017
|
posted February 15, 2018 03:52 PM
quote:
I am very tempted to try the homebrew firmware upgrade for the wolverine.
I am thinking of the 1440x1080 16000 bitrate version.
Has anyone tried this yet? any advice welcome, as to if it is better than my default firmare.
Firmware flashing etc. went without a hitch. The GUI differences from the latest (20 fps) Somikon version:
- no waiting before fast forward starts - this is great
- no countdown on-screen any more during scanning - this is pretty bad as, unless you have an external clock, you won't know how much film has already been digitized.
For example, I took advantage of the clock a lot to keep track of the next split so that I know when I should come to overwatch the scanner whether everything is OK after the split. Most of my films are just joined-together std8/super8 films, meaning splits are at regular, highly predictable intervals.
To be able to do the same with this firmware, I need to use an external clock now.
A definite advantage of the hacked firmware is it being 30 fps, which is natively supported by FCPX. This means no framerate conversion will take place (meaning additional frames added by FCPX and introducing stuttering) if you don't want to change it but, say, only clean up noise / crop / stabilize etc. For the same to be done with the original 20 fps videos, you will first need to repack the h.264 stream first - via, say, my ffmpeg script above. Doing this with the latter is very fast and simple (without any quality decrease) but still requires an additional step.
With regard to the image quality, I couldn't discern much quality difference between the two versions. I'd say they're on par. Feel free to check out framegrab pairs of exactly the same input frames. They're from the following two scans:
20 fps (original FW)
30 fps 16 Mbps hacked
These are both original, out-of-scanner files (the 20fps has been trimmed by QuickTime. No quality changes as simple trimming doesn't re-encode the video.).
| IP: Logged
|
|
Laurent Bellier
Junior
Posts: 5
From: Bourg Saint Andéol, France
Registered: Jan 2018
|
posted February 15, 2018 04:28 PM
Thanks a lot, it's wonderful to receive so accurate and documented answers to my question,
Dan:
I will then probably arrive to the same conclusion as yours: in this case, not putting to much effort (or any effort at all) in trying to correct something that in not feasable, but continuying scanning as it is in order to share with my brothers and they children movies, the oldest from the 50's showing my great-great father....
(And I'm also afraid that whith post treatment, improving one parameter if often obteined by loosing one anoter one, i.e. reducing efficiently noize created by compression artifact, might result in visible picture detail losses).
Werner:
Might differences between our results be also the result of a different light intensity setting? Despite your picture is more white and mine gray, the pixel size looks the same to me, the contrast of the noize pattern being much higer for mine.
The properties ot the video files I've obtained are 1440x1080, 9724 Kbits/s, 20,00 frames/s (when checking the file properties with microsoft windows): is there anything else to check?
Mike:
I share the same tentation as yours with the firmware upgrade to 16000 bitrate version (But my scanner is Somikon branded, not wolverine as yours, I'm not sure is the firmaware beahviour can be the same....?)
Antoine:
Your picture quality in term of noize level looks perfect, just as I would expect if using my Sony Full HD Cam corder. Have you applied some noize filter, or is it just as scanned? (I don't know Power Director 15 ).
On the other hand, we can observe some resulting flicker that is not obtained when using the picture by picture scanner.
I can share with you below another sample, that I've obtained around 10 years ago, with a different process: the famous converting box with a 45° etche glass, with the projecteur at one side, and the camcorder a 90° located other side. I was using at that time only a 8 mm DV video camcorder (ie picture definition= 720x576 pixels/picture):
I'm feeling Flicker is horrible (of course not visible on this still picture ;+)
Pixel size is visible because of the lower definition
(But the noize level was however lower than with the Sominkon HD 1080 scanner)
Compare with that, I feel that despite compression artefact, Somikon scanned picture will give a much higher quality video...

--------------------
Laurent
| IP: Logged
|
|
Pere Pasqual
Film Handler
Posts: 43
From: Gandia, València, Spain
Registered: May 2017
|
posted February 15, 2018 04:33 PM

Dan Esmond, I don't mean to be rude, but I think you are misleading people with some of your comments. The bitrate limitation has been sorted out months ago both with homebrew firmwares (like the ones I posted) or with the original Somikon update. You don't need any guts for testing them - apart from being already tested by many using thus being safe, there's no way your machine can be broken as even after flashing your machine with a non-working, defective or corrupted firmware will let you to flash it again with your original firmware (I did it dozens of times while experimenting).
And, as Werner already noted, those artifcats are not only due to compression, as they still exist somehow in 9 Mbps firmware. That's such a high bitrate that it proves it coudln't be due to compression at all.
In my opinion, the capture example by Antoine is of much less quality than what you can get with the Wolverine. Didn't anyone notice that big amount of flickering?
| IP: Logged
|
|
Werner Ruotsalainen
Film Handler
Posts: 97
From: Helsinki, Finland
Registered: Dec 2017
|
posted February 15, 2018 05:18 PM
quote:
In my opinion, the capture example by Antoine is of much less quality than what you can get with the Wolverine. Didn't anyone notice that big amount of flickering?
Agreed. Antoine's YouTube video is of MUCH lower quality of what is achievable via the Somikon/Wolverine.
BTW, I've just uploaded some new scans. The first is the full version of the Austrian flypast (flyover) (shot in the 1970's) film I've already posted some scans of (to Google Drive), with additional 60p optical flow and stabilization in FCPX.
Link
Note: due to the excessive dirt on the film, I scanned this in two steps (cleaning the gate in between). This is why there's a temporary jump in the auto color temperature at around 01:48.
EDIT:
And here's a Finnish film scan of the same subject (shot around 1980), demonstrating whether my PP attempts were successful (in this case, nope):
1. directly the scanner's output at 18 fps (framerate changed by my ffmpeg script above):
Link
2. the same with an added 60p Optical Flow in FCPX 10.4 to make the framerate much-much better:
Link
As you can see, as opposed to the Austrian 60p + stabilized scan above, not even this has worked. The results are sometimes absolutely awful with major artefacts.
3. and, finally, a 60p Optical Flow (see previous step) + stabilized version:
Link
This version is atricous with some MAJOR cropping - again, the FCPX results of the Austrian one is orders of magnitude better.
The Finnish example shows in some cases Optical Flow can cause awful results. In those cases, it's just safer to stick with the original 18p framerate.
| IP: Logged
|
|
|
|
Dan Esmond
Junior
Posts: 16
From: Lawrence, KS, USA
Registered: Oct 2013
|
posted February 15, 2018 10:22 PM
Pere Pasqual there is no need for any of us to be rude, as we are all just sharing information and opinions on this web site. Perhaps I left you and others with the impression that the Wolverine produces extremely poor results--if that is the case then I apologize for not being clearer. Let me state it equivocally:
The Wolverine (I have not tried the Somikon or anything other than stock Wolverine firmware) produces files that are perfectly fine for sharing on youtube, etc. with friends and family. My transfers have been shared with many people and so far no one has said anything other than that they are amazed to see these old films again after so many years.
Compared to old VHS telecines, filming off the wall or mirror boxes like Laurent mentions, the Wolverine is quite an improvement indeed. The classic flicker problem inherent in the inability to sync frame rates is solved and there is finally an easy, cheap method for the end user to do a frame-by-frame scan, which is how film should be digitized.
My point was that the noise/compression artifacts/whatever is created by the Wolverine unit--it is not film grain and it is not present in the film itself. Whatever is causing it (I maintain it bears all the hallmarks of low-bitrate compression) it is causing a reduction in picture quality on the resulting transfers. To someone who is eyeing detail it is obvious and distracting. You have admitted yourself that the resulting movies from machines running hacked firmware still show artifacts, so I'm not sure why you think my complaints are unjustified. The artifacts (whatever their cause) are a deficiency/limitation of these units that up to now have not been fully resolved by yourself or anyone else. So my point to Laurent (and others reading who are considering buying one of these) are that for now you just have to accept that your videos from these machines will have those artifacts in them. You can try to reduce them using software plugins but (as Laurent mentioned) but you will not eliminate them completely without causing other problems.
And that's not even mentioning the other issues afflicting these units--the jumpiness/wobbly issue which has been widely discussed here is a big one. Some films I had to scan 3 or 4 times to get a transfer that was stable. The auto white balance has also been an issue (although I think it has been improved in more recent firmware releases), where colors shift in the middle of a scene. Along those same lines, the auto-exposure in these machines can also easily get fooled and you end up with alternating dark and light frames in a single scene.
My hesitation with the firmware situation is that with the Wolverine machines at least, the different hardware revisions use different firmware files. My friend has one of the oldest belt-driven models and mine is the model that used gears instead. Wolverine sent me a firmware update last year that worked fine on my unit but caused my cousin's to lock up hard. Fortunately I was able to flash it with the correct firmware file after Wolverine sent it to me. But it made me quite hesitant to flash anything unofficial because I'm sure Wolverine would not support it in that case. I do not know if the hacked firmwares can be used on all the hardware generations of the Wolverine but I was not prepared to risk my warranty to take a guess.
My overall point here (perhaps missed in all my wordiness) is that 8mm and Super-8 films can look incredible with a very high quality frame-by-frame transfer using low compression in both the luma and chroma layers. In my opinion, the Wolverine unit does not give such a. high quality transfer. But no consumer-level product does (and some professional transfers may even be worse) with perhaps the exception of the $1000 Reflecta Super 8 scanner--but it is much more expensive, can't do Regular-8 and has its own reliability issues.
I think people should buy the Wolverine and use it to transfer their films so they can be enjoyed, especially by lay people who have lower expectations. But if you are an aficionado and lover of the inherent beauty of film (which I think many people who come to this site are), you should not expect the Wolverine unit to give you results that fully capture everything the film has to offer. My hope is that someday such a transfer will be readily attainable with more innovation, but we are not there yet.
If you feel differently than I do, that's fine. To some degree this is subjective. But I do not think I am misleading people at all by pointing out the flaws with these machines. To the contrary, I have done a great deal of research and everything I shared was my personal hands-on experience. Hope it helps someone.
Edit: I think this video (https://www.youtube.com/watch?v=vj9rApV_Yx4), which shows a side-by-side comparison of a professional transfer vs. the same film transferred by the Wolverine shows quite clearly that the Wolverine doesn't capture all of the quality in the original film. Is it good enough for most uses? Absolutely, especially for the price and ease of use. But I think eventually we will have machines that will capture with quality comparable to professional frame-by-frame transfers.
| IP: Logged
|
|
|
|
|
|
Werner Ruotsalainen
Film Handler
Posts: 97
From: Helsinki, Finland
Registered: Dec 2017
|
posted February 26, 2018 01:31 PM
quote:
Along those same lines, the auto-exposure in these machines can also easily get fooled and you end up with alternating dark and light frames in a single scene.
Incidentally, does anyone know of an exposure pumping remover plug-in / process for any video editor (preferably FCPX, but anything else will do)? This kind of exposure pumping is indeed a serious one with these scanners. For example, in the video https://youtu.be/S5682D__zB4 (60p, cropped version with FCPXs Optical Flow processing; original out-of-scanner one, with 18p header: https://youtu.be/_rIMal9dll8 ), there are several scenes with pumping.
For example, the one starting at 03:08, of which the original scanner output is the following:
https://drive.google.com/open?id=16kXnEA7rsjTFTFAUhkjgNCsQ77dFd3uz
and the original of the second one, where no less than three(!) scenes suffer from this problem and starting at 07:50,
https://drive.google.com/open?id=1vs93FbIenWs4fL12aFFovagCdtQ8kRPE
Ive searched high and low but to no avail. (Found https://forums.creativecow.net/thread/8/1217300 but nothing else.)
| IP: Logged
|
|
Werner Ruotsalainen
Film Handler
Posts: 97
From: Helsinki, Finland
Registered: Dec 2017
|
posted February 27, 2018 11:41 AM
The constant dirt buildup on the white light diffusor under the gate, necessiating frequent scan stops, film gate cleans and scan restarts, got me thinking.
Certainly the way standard projectors work should be used - or, for that matter, the only scanner I know of to have a vertically-aligned light source (the $900 Reflecta one). What about making our Somikon / Wolverine's diffusor vertical, then? Easily (the two shots also show my other tweaks: strong clips and blocking the take-up reel NOT to add additional tension to the film, making the insecure film transportation even worse):
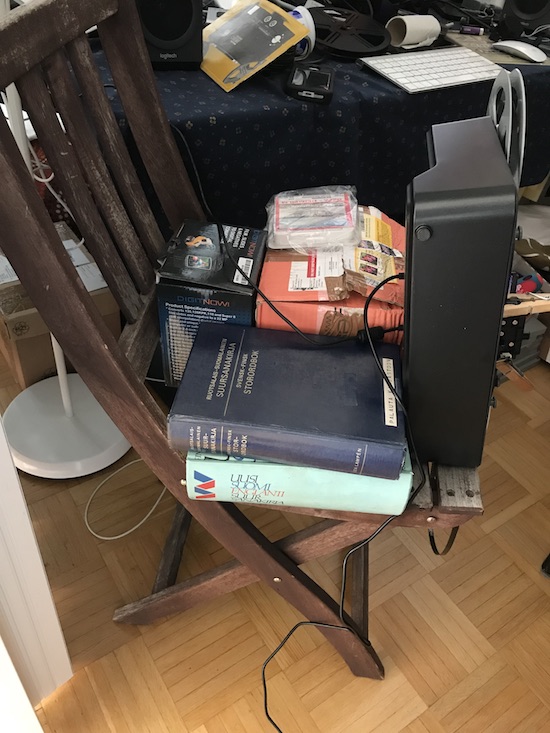
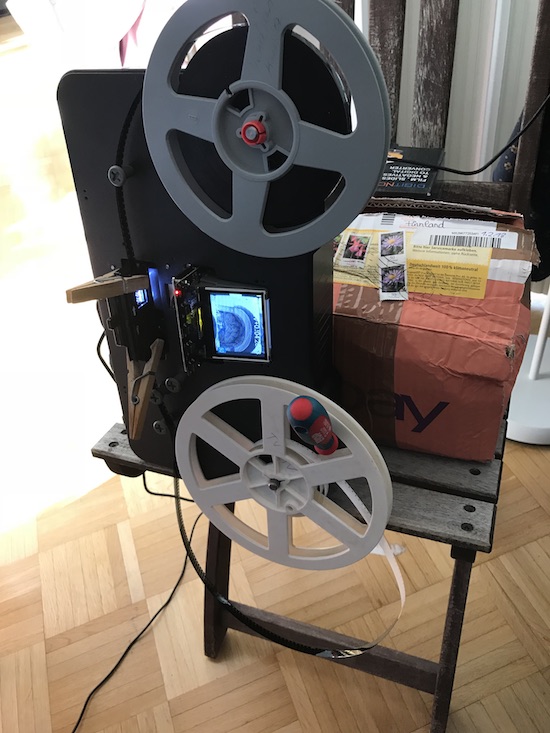
I'm happy to report that dirt buuildup is almost entirely gone.
EDIT: I've already mentioned the take-up reel should be disabled for as wobble-free scanning as possible. SOme other people have done exactly the same observation. An excerpt from the now-latest review at amazon.de :
"Vermutlich durch den zu starken Zug der Aufwickelspule ruckeln die produzierten Videos zum Teil grauenhaft. Ich habe deshalb den zu scannenden Film nicht aufwickeln, sondern in eine Plastikwanne laufen lassen. Das hat das Ergebnis verbessert, es ist mir aber trotzdem nach zahlreichen Versuchen niemals gelungen, einen vollkommen ruckelfreien Film zu erzeugen."
That is, "Probably due to the strong strain of the take-up reel, the scanned videos jerk sometimes horribly. That's why I did not made the film to be taken up by the take-up reel but let it run in a plastic tub. This has improved the result, but I have still NEVER managed, after many attempts, to create a completely smooth film."
[ February 27, 2018, 02:14 PM: Message edited by: Werner Ruotsalainen ]
| IP: Logged
|
|
|
|
|
|
|


 UBBFriend: Email this page to someone!


 Printer-friendly view of this topic