8mm Forum


my profile | my password | search | faq | register | forum home
  next oldest topic   next newest topic
» 8mm Forum   » 8mm Forum   » Review Wolverine Reels2Digital MovieMaker 8mm film digitizer (Page 55)

 - UBBFriend: Email this page to someone!  
This topic comprises 56 pages: 1  2  3  ...  52  53  54  55  56 
 
Author Topic: Review Wolverine Reels2Digital MovieMaker 8mm film digitizer
Kamel Ikhlef
Expert Film Handler

Posts: 213
From: Arches, France
Registered: Oct 2018


 - posted November 25, 2019 12:38 PM      Profile for Kamel Ikhlef   Email Kamel Ikhlef   Send New Private Message       Edit/Delete Post 
Stan,
Can not we put a trigger to avoid the bounce effects of the sync signal (be sure that it sends only one pulse at a time: a square signal). Finally, I am not competent enough. Just an idea!

 |  IP: Logged

Stan Jelavic
Master Film Handler

Posts: 314
From: Fort Lauderdale, FL, USA
Registered: Jan 2019


 - posted November 25, 2019 01:05 PM      Profile for Stan Jelavic   Email Stan Jelavic   Send New Private Message       Edit/Delete Post 
Will look into that. Thanks Kamel.

 |  IP: Logged

Bob Vito
Junior
Posts: 14
From: Otisville, MI, USA
Registered: Oct 2019


 - posted November 25, 2019 01:33 PM      Profile for Bob Vito         Edit/Delete Post 
Just a brief update on the multiple frame captures - since I have to delete every other file, the remaining files need to be renamed so no numbers will be skipped. After doing some internet research, I wrote a batch file to do this. This makes it a lot less burdensome.

 |  IP: Logged

Stan Jelavic
Master Film Handler

Posts: 314
From: Fort Lauderdale, FL, USA
Registered: Jan 2019


 - posted November 25, 2019 01:59 PM      Profile for Stan Jelavic   Email Stan Jelavic   Send New Private Message       Edit/Delete Post 
Bob, can you do the following test:
Remove the film and open up the gate. Setup the camera for external trigger and slowly advance the claw a bit at a time by flicking the switch on and off. Observe where in the claw cycle the camera captures the frames.

 |  IP: Logged

Bob Vito
Junior
Posts: 14
From: Otisville, MI, USA
Registered: Oct 2019


 - posted November 25, 2019 07:34 PM      Profile for Bob Vito         Edit/Delete Post 
Stan,
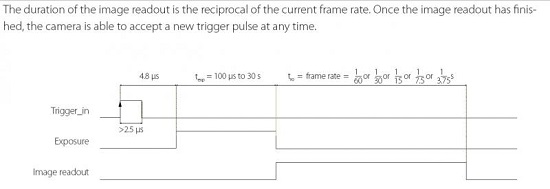
This was an interesting experiment. I turned the machine on without film and with the door open. The external trigger was on. The claw started at the top, right-most position. I turned the switch on and off quickly to see when frame captures would occur. I paused for a few seconds each time the switch was turned off to make sure there wasn't any kind of a delay in capturing the frame. When the claw was nearly at the top, left-most position (90% of the way up), the machine would capture frames without stopping. It would continue to do this until the claw moved all the way up and then roughly 10% of the distance to the right. Then the frame captures would stop until the claw until it returned to the same position again (near the top, left).

Since it behaved in this manner, I wanted to verify it's behavior with film. I turned the machine on with film and recorded 11 frames. It performed two captures for each frame. The first file is the good capture (i.e. Image0459), and the second is the squished capture (i.e. Image0460). The time each file was created is shown below, although with hardware delays, this may not correspond to when the Wolverine actually did the capture. The files appeared on my computer
screen when the claw was at the top, right side of its travel.

This does explain something that has puzzled me. Sometimes, when I turned the machine on, it would start capturing frame after frame continuously, and other times it would start capturing frames only after I turned the switch on. As it turns out, it does this based on the position of the claw.

Frame Captures With Film
Command to capture time stamp: forfiles /c "cmd /c echo @file @ftime"

"Image0459.jpg" 7:38:47 PM
"Image0460.jpg" 7:38:47 PM

"Image0461.jpg" 7:38:49 PM
"Image0462.jpg" 7:38:49 PM

"Image0463.jpg" 7:38:51 PM
"Image0464.jpg" 7:38:52 PM

"Image0465.jpg" 7:38:53 PM
"Image0466.jpg" 7:38:54 PM

"Image0467.jpg" 7:38:55 PM
"Image0468.jpg" 7:38:56 PM

"Image0469.jpg" 7:38:57 PM
"Image0470.jpg" 7:38:58 PM

"Image0471.jpg" 7:39:00 PM
"Image0472.jpg" 7:39:00 PM

"Image0473.jpg" 7:39:02 PM
"Image0474.jpg" 7:39:02 PM

"Image0475.jpg" 7:39:04 PM
"Image0476.jpg" 7:39:04 PM

"Image0477.jpg" 7:39:06 PM
"Image0478.jpg" 7:39:06 PM

"Image0479.jpg" 7:39:08 PM
"Image0480.jpg" 7:39:08 PM

 |  IP: Logged

Stan Jelavic
Master Film Handler

Posts: 314
From: Fort Lauderdale, FL, USA
Registered: Jan 2019


 - posted November 25, 2019 08:38 PM      Profile for Stan Jelavic   Email Stan Jelavic   Send New Private Message       Edit/Delete Post 
This is a very good test and good input for me Bob. Do you have a voltmeter?

Here is an update:
Read the following blog:
https://www.theimagingsource.com/media/blog/archive/20080602/

So, this makes sense I think. The camera external trigger has an optocoupler that requires 3mA to drive it.
We drive it with 3.3V / (2.2k + 0.82k) = 1mA

This can create continuous trigger for the duration of claw passing by the Wolverine sensor. The FPS does impact this --
check the referenced documentation.

The possible solution is to cut the resistor value down to 1K but a better solution is to rewire the camera trigger.
I am checking to see if there is an easy way of doing that.

A few more notes.

If FPS is set to 1/60 we may be able to run faster...

White balance update. Using the auto white balance with unloaded gate works pretty well but there is a magenta tinge,
possibly due to the film type (Kodak). Wolverine has a cyan tinge. Will post a clip.

[ November 25, 2019, 11:11 PM: Message edited by: Stan Jelavic ]

 |  IP: Logged

Kamel Ikhlef
Expert Film Handler

Posts: 213
From: Arches, France
Registered: Oct 2018


 - posted November 26, 2019 02:41 AM      Profile for Kamel Ikhlef   Email Kamel Ikhlef   Send New Private Message       Edit/Delete Post 
Here an other imaging source documentation for camera triggering :

 -

 -

Stan ,
I was thinking about this type of editing to avoid rebounds.
I think there is already a similar system built into the camera but I'm not sure. Otherwise in the future PCB V8. [Wink] [Smile]

 -

[ November 26, 2019, 04:59 AM: Message edited by: Kamel Ikhlef ]

 |  IP: Logged

Bob Vito
Junior
Posts: 14
From: Otisville, MI, USA
Registered: Oct 2019


 - posted November 26, 2019 07:08 AM      Profile for Bob Vito         Edit/Delete Post 
I do have a voltmeter, but no oscilloscope.

 |  IP: Logged

Stan Jelavic
Master Film Handler

Posts: 314
From: Fort Lauderdale, FL, USA
Registered: Jan 2019


 - posted November 26, 2019 07:46 AM      Profile for Stan Jelavic   Email Stan Jelavic   Send New Private Message       Edit/Delete Post 
I don't think this is a switch bounce problem Kamel. With the camera opto-isolator it is possible to have pulses if the drive is not sufficient.
I will try the following mod:
https://photos.app.goo.gl/jegKhad54EXnQkY7A
If it works Bob can try his board. If that works I will implement the change in V8.

Tested it. The pulse polarity is reversed. Will need a transistor to invert the polarity. In the meantime Bob you can try to tack another 2.2K resistor over R2 so that the two resistors are in parallel giving effective resistance of 1.1K. That might work.

Update:
Reproduced the problem. It is the claw leaving the opto detector causing a small glitch. The glitch is low enough to cause a second trigger.
 -

Adding a 2.2K resistor across R2 fixes the issue for me.
Bob, can you try the same fix. This is not the final solution but should be OK for now.

[ November 26, 2019, 04:31 PM: Message edited by: Stan Jelavic ]

 |  IP: Logged

Bruce Davis
Film Handler

Posts: 47
From: Adelaide, Australia
Registered: Sep 2019


 - posted November 26, 2019 04:48 PM      Profile for Bruce Davis   Author's Homepage   Email Bruce Davis   Send New Private Message       Edit/Delete Post 
Stan I assume I am not seeing this problem because the resistor you installed on mine is a 1K8 resistor not a 2K2.

 |  IP: Logged

Bob Vito
Junior
Posts: 14
From: Otisville, MI, USA
Registered: Oct 2019


 - posted November 26, 2019 05:44 PM      Profile for Bob Vito         Edit/Delete Post 
I tried it and still have the same issue. Do you think the resistor need to be soldered to R2 to work properly? I only tried holding the leads in place.

 |  IP: Logged

Stan Jelavic
Master Film Handler

Posts: 314
From: Fort Lauderdale, FL, USA
Registered: Jan 2019


 - posted November 26, 2019 06:29 PM      Profile for Stan Jelavic   Email Stan Jelavic   Send New Private Message       Edit/Delete Post 
Bruce, some units seem to be better, Mine starts giving me problem only after a while so I am not sure if 1.8K resistor is the reason. But it is better than 2.2K.

Bob, make sure the resistor leads are clean.
Can you check the voltage without additional resistor while the unit is not triggering. Then position the claw so that the unit is capturing continuously and check the voltage.

Hawkeye vs Wolverine latest comparison:
https://photos.app.goo.gl/WaQ2dzZDf5VayhTw8

A few comments:
https://photos.app.goo.gl/3Qz5deYT67394m9n7

 |  IP: Logged

Bob Vito
Junior
Posts: 14
From: Otisville, MI, USA
Registered: Oct 2019


 - posted November 26, 2019 08:43 PM      Profile for Bob Vito         Edit/Delete Post 
I cleaned the resistor leads with some sandpaper, then inserted the leads under the R2 leads and measured the resulting resistance - around 1.1 K ohms. Unfortunately, no change to the frame capture behavior.

I removed the extra resistor, and moved the claw to a position that it was not triggering. The voltage from the right side of R2 (meaning the takeup reel side) to ground was a little over 3 volts. The voltage from the left side of R2 to ground was around 1.6 volts. The voltage across the R2 resistor was around 1.4 volts.

I moved the claw to a position that it was continuously triggering. The voltage from the right side of R2 to ground was a little over 3 volts. The voltage from the left side of R2 to ground was right around 0.2 volts (the needle barely moved), and the voltage across the R2 resistor was about 2.9 volts or so.

 |  IP: Logged

Stan Jelavic
Master Film Handler

Posts: 314
From: Fort Lauderdale, FL, USA
Registered: Jan 2019


 - posted November 26, 2019 09:36 PM      Profile for Stan Jelavic   Email Stan Jelavic   Send New Private Message       Edit/Delete Post 
Thanks Bob. Looks like your camera is programmed for level trigger instead of edge. It is triggering on high level instead of rising edge.
Can you get the model number of the camera. We will have to contact the tech support.

 |  IP: Logged

Bob Vito
Junior
Posts: 14
From: Otisville, MI, USA
Registered: Oct 2019


 - posted November 27, 2019 06:42 AM      Profile for Bob Vito         Edit/Delete Post 
The camera model number is DFM 72BUC02-ML.

 |  IP: Logged

Stan Jelavic
Master Film Handler

Posts: 314
From: Fort Lauderdale, FL, USA
Registered: Jan 2019


 - posted November 27, 2019 08:08 AM      Profile for Stan Jelavic   Email Stan Jelavic   Send New Private Message       Edit/Delete Post 
I sent the question to imagingsource.

What firmware and driver version do you have?

 -

 |  IP: Logged

Bob Vito
Junior
Posts: 14
From: Otisville, MI, USA
Registered: Oct 2019


 - posted November 27, 2019 08:42 AM      Profile for Bob Vito         Edit/Delete Post 
DFM 72BUC02-ML
Serial #08910106
Firmware Revision 140
Driver Version 2.9.8.2001

Thanks for contacting them.

 |  IP: Logged

Kamel Ikhlef
Expert Film Handler

Posts: 213
From: Arches, France
Registered: Oct 2018


 - posted November 27, 2019 12:11 PM      Profile for Kamel Ikhlef   Email Kamel Ikhlef   Send New Private Message       Edit/Delete Post 
Thanks a lot, Stan, for you greats tests and all your helps.

 |  IP: Logged

David Brown
Film Handler

Posts: 42
From: Centerville, UT, USA
Registered: Oct 2019


 - posted November 27, 2019 01:39 PM      Profile for David Brown   Email David Brown   Send New Private Message       Edit/Delete Post 
YEAH, Thanks Stan!

On the subject of triggers, I would like the option to trigger an external camera with the Hawkeye. I plan to use a dlsr and/or other camera that uses a momentary switch from the usb/multi port. I think the best way to do this and protect the camera, would be thru a relay. The shutter triggers when the leads are connected.

Your thoughts? This does not need to be added to the Hawkeye, I could connect my own.

 |  IP: Logged

Stan Jelavic
Master Film Handler

Posts: 314
From: Fort Lauderdale, FL, USA
Registered: Jan 2019


 - posted November 27, 2019 02:14 PM      Profile for Stan Jelavic   Email Stan Jelavic   Send New Private Message       Edit/Delete Post 
Thank you for your support.
David, a solid state relay should work. Look for one that runs at 3.3V and then you do not need any mods.

The latest IC Capture instructions are here:
https://drive.google.com/file/d/1_TaVulHyo31rpYCjGHBHQxAQG2Sfsoym/view?usp=sharing

Pretty happy with the results. Do not use any corrections with Film9 but run the final video through Movie Magix and the colors look nice and pretty natural (in my eyes).
Will post the clip.
BTW - the clip has a flicker midway. That is that double frame capture that Bob experienced and that is where I implemented the fix.
Also I reduced the takeup timing and looks like it worked but will double check.

 |  IP: Logged

Kamel Ikhlef
Expert Film Handler

Posts: 213
From: Arches, France
Registered: Oct 2018


 - posted November 27, 2019 03:40 PM      Profile for Kamel Ikhlef   Email Kamel Ikhlef   Send New Private Message       Edit/Delete Post 
I see that it works a lot to improve our homemade telecinema.
For my part, I work on a control panel with switches and leds (to learn and have fun on Kicad) if it can be useful.

This PCB will can be screwed on the future telecine front cover (3D printing design not finished yet)...

As you see I put leds everywhere (I have visual problems and it will help me, but they are optionnal).

this is not really useful but remains fun to achieve !
It's not over yet, it's a draft. I'll send it to Stan for validation when it's over.
If Stan agrees of course! Waiting for the V8 ... [Wink] [Smile]

 -

[ November 27, 2019, 04:49 PM: Message edited by: Kamel Ikhlef ]

 |  IP: Logged

Bruce Davis
Film Handler

Posts: 47
From: Adelaide, Australia
Registered: Sep 2019


 - posted November 27, 2019 05:26 PM      Profile for Bruce Davis   Author's Homepage   Email Bruce Davis   Send New Private Message       Edit/Delete Post 
Stan thanks very much for dedicating so much time to help everyone. Just a very minor correction, page 6 of your instructions you indicated a resolution of 1080 x 1024, I assume you meant it to be 1280 x 1024.
Regards - Bruce
P.S. for anyone who might be interested, I use VirtualDub v2 with Huffyuv lossless codec to assemble all the images into an avi video format file, it reduces file size considerably. If using Film9 the only lossless codec option is Lagarith.

[ November 28, 2019, 08:48 AM: Message edited by: Bruce Davis ]

 |  IP: Logged

Stan Jelavic
Master Film Handler

Posts: 314
From: Fort Lauderdale, FL, USA
Registered: Jan 2019


 - posted November 27, 2019 08:19 PM      Profile for Stan Jelavic   Email Stan Jelavic   Send New Private Message       Edit/Delete Post 
Interesting looking front panel Kamel. Sure I would be more than happy to do the test.

Thanks Bruce. Here is version3 with the correction and additional note at the end.
Edit - A few changes added - now V4
https://drive.google.com/file/d/1Omu9B6pfP8tK6-HPwwwrmD9JyaheP583/view?usp=sharing

Bob, got a reply from imagingsource engineer and she is puzzled and says that she never came across issue like this but will look into it. Here is another test. Connect the trigger to 3.3V directly (will have to cut the trigger + cable) and see if it triggers continuously. I can send you a new cable after the test.

Bruce - you wrote:
I use AviSynth v2 with Huffyuv lossless codec to assemble all the images into an avi video format file

Can you share the script that you use. Would like to try it.

[ November 28, 2019, 08:16 AM: Message edited by: Stan Jelavic ]

 |  IP: Logged

Bruce Davis
Film Handler

Posts: 47
From: Adelaide, Australia
Registered: Sep 2019


 - posted November 28, 2019 08:46 AM      Profile for Bruce Davis   Author's Homepage   Email Bruce Davis   Send New Private Message       Edit/Delete Post 
Stan Jelavic sorry Stan I incorrectly wrote AviSynth instead of VirtualDub v2, no script required, just need to click on file tab and "Open video file...".

In the Open video file window select "Linked segments" and "Image sequence input level(internal)" then the first image in the sequence "Open" (I always save captures in tiff format).

Before saving click on the Video tab then select "Compression" and whatever form of compression you would like to use.
Back to File tab and "Save video...".

Sorry I misled you or others - Bruce

 |  IP: Logged

Stan Jelavic
Master Film Handler

Posts: 314
From: Fort Lauderdale, FL, USA
Registered: Jan 2019


 - posted November 28, 2019 08:59 AM      Profile for Stan Jelavic   Email Stan Jelavic   Send New Private Message       Edit/Delete Post 
No problem Bruce. Will try that. Thank you.

Added another section on the bottom of the capture document:
https://drive.google.com/open?id=1CMEoCWHi623Jpmnu17UW963zGnEPICd2

This is the proof in the pudding in my opinion.
Hawkeye is better and it does what we intended it to do:
- FRAME GRAB
- LESS ARTIFACTS
- BETTER RESOLUTION
- Open Design
- On a fly adjustments

It requires more work during scan but you get better quality.
Curious to see your inputs.

[ November 28, 2019, 10:31 AM: Message edited by: Stan Jelavic ]

 |  IP: Logged


All times are Central
This topic comprises 56 pages: 1  2  3  ...  52  53  54  55  56 
 
   Close Topic    Move Topic    Delete Topic    next oldest topic   next newest topic
 - Printer-friendly view of this topic
Hop To:

Visit www.film-tech.com for free equipment manual downloads. Copyright 2003-2019 Film-Tech Cinema Systems LLC

Powered by Infopop Corporation
UBB.classicTM 6.3.1.2