8mm Forum


my profile | my password | search | faq | register | forum home
  next oldest topic   next newest topic
» 8mm Forum   » 8mm Forum   » Review Wolverine Reels2Digital MovieMaker 8mm film digitizer (Page 25)

 - UBBFriend: Email this page to someone!  
This topic comprises 56 pages: 1  2  3  ...  22  23  24  25  26  27  28  ...  54  55  56 
 
Author Topic: Review Wolverine Reels2Digital MovieMaker 8mm film digitizer
Stan Jelavic
Master Film Handler

Posts: 314
From: Fort Lauderdale, FL, USA
Registered: Jan 2019


 - posted June 15, 2019 08:05 AM      Profile for Stan Jelavic   Email Stan Jelavic   Send New Private Message       Edit/Delete Post 
Cool design Kamel. Have you tested them?

 |  IP: Logged

Stan Jelavic
Master Film Handler

Posts: 314
From: Fort Lauderdale, FL, USA
Registered: Jan 2019


 - posted June 15, 2019 12:47 PM      Profile for Stan Jelavic   Email Stan Jelavic   Send New Private Message       Edit/Delete Post 
My previous post:
Correction:
The JST connector info that I posted earlier is not correct. The Wolverine connectors are most likely Molex Picoblade. Very similar to JST 1.25mm connector but not compatible with them.

Update:
Just received a few picoblade 1.25mm connectors from Digikey and they fit perfectly Wolverine 4-pin and 2-pin connectors. JST are very close and visually look identical but DO NOT WORK. Picoblade are from Molex.

 |  IP: Logged

Stan Jelavic
Master Film Handler

Posts: 314
From: Fort Lauderdale, FL, USA
Registered: Jan 2019


 - posted June 19, 2019 07:53 AM      Profile for Stan Jelavic   Email Stan Jelavic   Send New Private Message       Edit/Delete Post 
Here is the interface board:
https://photos.app.goo.gl/cnyCfdNtiiWXviTW7
A few details:
- mounts in place of the existing controller
- camera mount holes
- LED connector
- Fsync in and out connectors
- Takeup motor control
- RPI mount holes

Ordered qty 5 for testing.

 |  IP: Logged

Kamel Ikhlef
Expert Film Handler

Posts: 213
From: Arches, France
Registered: Oct 2018


 - posted June 19, 2019 08:32 AM      Profile for Kamel Ikhlef   Email Kamel Ikhlef   Send New Private Message       Edit/Delete Post 
Hi Stan,

ouah !!! Great work !
Great job. I think some people will be interested in your kit module. Me first!... For my part, I have not tested the pulleys because I would like to sand them more finely. I have ordered very fine sandpaper and would like to polish them to preserve our precious films.

 |  IP: Logged

Stan Jelavic
Master Film Handler

Posts: 314
From: Fort Lauderdale, FL, USA
Registered: Jan 2019


 - posted June 19, 2019 08:32 PM      Profile for Stan Jelavic   Email Stan Jelavic   Send New Private Message       Edit/Delete Post 
Sure thing Kamel. Will keep you posted. May be able to do some testing this weekend. Also got the 12mm lens from imagingsource.com but this one has 2.8 F stop which should give more uniform focus.

 |  IP: Logged

Stan Jelavic
Master Film Handler

Posts: 314
From: Fort Lauderdale, FL, USA
Registered: Jan 2019


 - posted June 22, 2019 01:53 PM      Profile for Stan Jelavic   Email Stan Jelavic   Send New Private Message       Edit/Delete Post 
The board should be here on Tuesday. In the meantime got the MT9P001 camera working (similar to the one that Kamel bought but much cheaper). Here is the test shot:
https://photos.app.goo.gl/5oGATxPF6N7EopTDA
Used this lens:
https://www.oemcameras.com/lens-tbl-12-2c-5mp.htm
This is the camera info (usb and can be run from windows or Linux):
https://dlscorp.com/shop/mt9p001-5-0-mp-m12-mount-camera-module-w-ls-6020-lens/
and the usb shield:
https://dlscorp.com/shop/arducam-usb-camera-shield/

Here is the test setup. Still using my old beat up mount:
https://photos.app.goo.gl/RgQC7ZZse67zzGhM7

[ June 22, 2019, 07:42 PM: Message edited by: Stan Jelavic ]

 |  IP: Logged

Jeff Self
Junior
Posts: 7
From: Chesapeake, VA, USA
Registered: Jun 2019


 - posted June 24, 2019 11:55 AM      Profile for Jeff Self   Author's Homepage   Email Jeff Self   Send New Private Message       Edit/Delete Post 
Hello all! I just joined the forum. I have a lot of 8mm and some Super 8mm film. I've had some reels converted in the past from Video Conversion Experts. They are expensive but do a very good job. But I've always wanted to do this myself. Last night I came across the Wolverine Movie Maker Pro and I was very interested. That's how I found this forum.

Anyway, I'm interested in getting it even with the concerns about the compression. I even emailed them about it and asked about firmware updates or even a new model that was a bit more professional.

Here is their response:

quote:
Our units were created for consumers to be able to scan their 8mm and Super 8 at a reasonable cost. The unit produce a very good quality videos. However, the unit cannot produce JPEG or PNG individual frames because it does not use a typical digital camera. It uses a Time-Laps camera. Compression was set to minimum and we cannot go lower.
So I wonder what time-lapse camera they are using that compresses so much. Seems more like something used for security cameras.

It seems like there is a major gap between this product and the similar products costing a lot more.

 |  IP: Logged

Stan Jelavic
Master Film Handler

Posts: 314
From: Fort Lauderdale, FL, USA
Registered: Jan 2019


 - posted June 24, 2019 10:57 PM      Profile for Stan Jelavic   Email Stan Jelavic   Send New Private Message       Edit/Delete Post 
Hi Jeff,
Check the following forum:
https://www.goprawn.com
It has a section on NovaTek cams...
Essentially, Wolverine is based on a dashboard cam and the Novatek chip is programmed for the time lapse mode. That is why it is very limited.
Welcome on board.

 |  IP: Logged

Jeff Self
Junior
Posts: 7
From: Chesapeake, VA, USA
Registered: Jun 2019


 - posted June 25, 2019 07:03 AM      Profile for Jeff Self   Author's Homepage   Email Jeff Self   Send New Private Message       Edit/Delete Post 
Thanks Stan! I'll check it out.

 |  IP: Logged

Stan Jelavic
Master Film Handler

Posts: 314
From: Fort Lauderdale, FL, USA
Registered: Jan 2019


 - posted June 26, 2019 08:29 PM      Profile for Stan Jelavic   Email Stan Jelavic   Send New Private Message       Edit/Delete Post 
Here is the new controller update:
- received the boards and installed it into the Wolverine together with the MT9p001 camera and 12mm lens from Imagingsource.
A small adjustment was needed and will have to run another board version with a few more tweaks.
https://photos.app.goo.gl/DzC4xUeB64eMrbs68
https://photos.app.goo.gl/gtRRjx8jyAJAtPZm8
Here is a cropped test shot. It shows that the camera alignment is pretty good (no rotation required).
https://photos.app.goo.gl/KRemY2LYsSsygHuc9

Next steps:
- mount rpi on the board.
- run camera from RPI.
- Install LED connector
- Add Frame Sync connector and bias components
- Install motor shield somewhere

 |  IP: Logged

Kamel Ikhlef
Expert Film Handler

Posts: 213
From: Arches, France
Registered: Oct 2018


 - posted June 27, 2019 09:55 AM      Profile for Kamel Ikhlef   Email Kamel Ikhlef   Send New Private Message       Edit/Delete Post 
Hi Stan,

I am appreciative of your work and I am waiting impatiently the next episodes of your project. I am testing several M12 lenses. I created a Camera support outside the Wolverine. I will put pictures as soon as possible.

 |  IP: Logged

Kamel Ikhlef
Expert Film Handler

Posts: 213
From: Arches, France
Registered: Oct 2018


 - posted June 28, 2019 05:12 AM      Profile for Kamel Ikhlef   Email Kamel Ikhlef   Send New Private Message       Edit/Delete Post 
here are the pictures of my 3d printing camera test. I will post the clip results later. I still have to test the external camera trigger . I have not yet dared to disassemble everything like Stan, but I will do it soon.
 -
it works also with day light :
 -

 |  IP: Logged

Stan Jelavic
Master Film Handler

Posts: 314
From: Fort Lauderdale, FL, USA
Registered: Jan 2019


 - posted June 28, 2019 05:35 PM      Profile for Stan Jelavic   Email Stan Jelavic   Send New Private Message       Edit/Delete Post 
Cool work Kamel.
I can send you one of the boards with the trigger connectors on it.
You should get a few of these cables. This will give you access to the trigger output:
https://www.digikey.com/products/en/cable-assemblies/rectangular-cable-assemblies/450?k=picoblade+cable+assembly&k=&pkeyword=picoblade+cable+assembly&sv=0&pv88=6&sf=0&FV=ffe001c2&q uantity=&ColumnSort=0&page=1&pageSize=25

 |  IP: Logged

Kamel Ikhlef
Expert Film Handler

Posts: 213
From: Arches, France
Registered: Oct 2018


 - posted June 29, 2019 10:53 AM      Profile for Kamel Ikhlef   Email Kamel Ikhlef   Send New Private Message       Edit/Delete Post 
Thank you very much Stan, it's nice of you. But I will wait for you to advance in your RPI project (module Kit).
I can buy you your module when it is ready.
It will be much more interesting because my camera will not be able to record the frames at the cadence of the Wolverine (2 frames/seconds) but rather 1 frame every 2 or 3 per seconds if we do not compress the captured frames(bmp or tiff). for the moment I will test the trigger of the camera with an external 3.3v switch manually to see how long it takes to process an frame save it then move on to the next. for my optical tests. here is the best result obtained with the 12mm lens (distance of film 55mm). I think the focus can still be improved but we are getting closer to the 63 lines of resolution and sometimes 80 in the center. I continue my tests...
 -
12mm Lens capture 1920x1080

[ July 01, 2019, 03:39 PM: Message edited by: Kamel Ikhlef ]

 |  IP: Logged

Ian McAfee
Junior
Posts: 1
From: Verona, IL, USA
Registered: Jun 2019


 - posted June 30, 2019 06:45 AM      Profile for Ian McAfee   Email Ian McAfee   Send New Private Message       Edit/Delete Post 
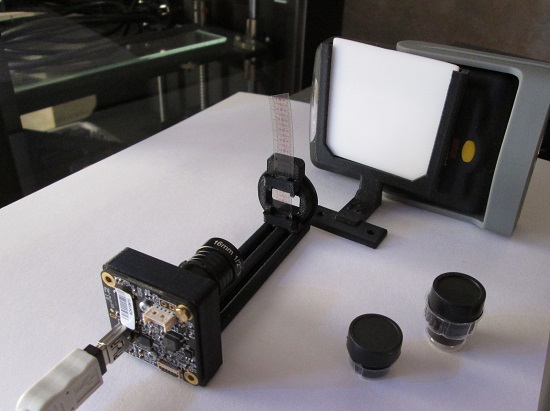
I have been watching this post for years and it's finally where it should be, modding of the wolverine base model.

I too am weary of the artifacting and haven't yet bought one, i have been waiting for someone to overcome this issue, and i think you guys are very close.

If you get all the bugs worked out, i would be more than willing to buy a kit or assembled mechanism for sure.

I read a few pages back something about mjpeg format which my blackmagic intensity video capture card uses, i was thinking maybe there was a way to mod the moviemaker to get a 3.5mm jack or RCA to transmit to a capture card which would make an MJPEG video that could be edited, i was going to do that with the 20mp F2D but that would have literally taken forever... Maybe using the moviemaker to passthrough and mechanize the F2D which has a 3.5mm video out jack for tv viewing is a solution... pump it to a capture card instead of a tv using the F2Ds 20mp video camera...

Keep up the good work.

[ July 01, 2019, 01:19 AM: Message edited by: Ian McAfee ]

 |  IP: Logged

Jeff Self
Junior
Posts: 7
From: Chesapeake, VA, USA
Registered: Jun 2019


 - posted July 01, 2019 09:11 AM      Profile for Jeff Self   Author's Homepage   Email Jeff Self   Send New Private Message       Edit/Delete Post 
Stan & Kamel,

You guys are doing some amazing stuff! I was thinking about building my own scanner utilizing a Raspberry Pi 4 and one of the cameras for it. It looked simple enough to use Python to capture the images. But if you guys can produce a kit that allows us to modify the Wolverine, I'm all in. I may go ahead and order one now.

 |  IP: Logged

Kamel Ikhlef
Expert Film Handler

Posts: 213
From: Arches, France
Registered: Oct 2018


 - posted July 01, 2019 02:10 PM      Profile for Kamel Ikhlef   Email Kamel Ikhlef   Send New Private Message       Edit/Delete Post 
still some tests. with the stock M12 lens of the wolverine mounted on my camera imaging source - Full sensor 2592x1944 :

 -
??F Wolverine Stock Lens - Full sensor 2592x1944

 -
12mm imaging full sensor 2592x1944.

We can see the difference in quality. but especially that of original lens of the Wolverine does not cover the full sensor. it is clear in the center and reaches the 63 lines but very blur on the edges. I can not define the focal length of the wolverine stock lens ( maybe F6 or F8mm). Very difficult to cover an HD image in 1920x1080. With the 12mm imaging source ($ 30) we have the large margin. it should try a better macro M12 8mm. I will order one and I will repeat the tests because the more we move away from the image less depth of field.
This is the maximum image I can have with the stock wolverine lens with the sensor 1/2.5 of my camera board. I continue my tests...

 |  IP: Logged

Stan Jelavic
Master Film Handler

Posts: 314
From: Fort Lauderdale, FL, USA
Registered: Jan 2019


 - posted July 01, 2019 11:38 PM      Profile for Stan Jelavic   Email Stan Jelavic   Send New Private Message       Edit/Delete Post 
Got the basic setup working. The motor runs at around 4 frames per second and the camera is triggered by the sync pulse. Still do not have the takeup motor control. The part needed for that just came in.
Jeff, I do use RPI3 and python code for motor and camera control but thinking of simplifying it by use a PIC. It may be possible. Will post a video of the setup tomorrow some time after work.
Kamel, I tested the Wolverine lens and it is around 8mm. I think you are putting it too close to the film. Try to put it at the same distance as in Wolverine. That will give better focus but the optical magnification of the 8mm lens is still around 50% of the HD image so they double the image and sharpen it and that gives lots of unwanted artifacts. Possibly worse that the MPEG compression after that. They should have left it at low rez.

 |  IP: Logged

Kamel Ikhlef
Expert Film Handler

Posts: 213
From: Arches, France
Registered: Oct 2018


 - posted July 02, 2019 04:58 AM      Profile for Kamel Ikhlef   Email Kamel Ikhlef   Send New Private Message       Edit/Delete Post 
Thank you for your good advice Stan.
Yes, indeed, I am stuck to move back the lens of the film because the support of my camera imaging is too high (16mm high). I have to find another one for the lens to be closer to the sensor. Here is a table of correspondence of the sensors.
 -
 -

The fixing holes of the support are of 18mm (difficult to find) I will go to design the part so I will be able to test several heights and transform my optics in macro (tube lengthen).
 -

[ July 02, 2019, 08:34 AM: Message edited by: Kamel Ikhlef ]

 |  IP: Logged

Stan Jelavic
Master Film Handler

Posts: 314
From: Fort Lauderdale, FL, USA
Registered: Jan 2019


 - posted July 02, 2019 09:17 PM      Profile for Stan Jelavic   Email Stan Jelavic   Send New Private Message       Edit/Delete Post 
Here is a short video covering my project. Used two boards because the camera mounting holes needed a tweak. So used one board just for camera mounting and the other for all other electrical connections. When done, obviously it will be only one board. In addition to the interface board I have the RPI3 controller, Arducam and ST stepper controller. Hopefully when it is finalized I will have less components. Possibly a PIC controller driving the wolverine stepper control and the takeup. The camera can be connected to a pc or a linux machine and will be triggered by my interface.
https://photos.app.goo.gl/HTR374exjan1pmwC7
Here is a sample video created with ffmpeg from captured frames. No post-processing or cropping done:
https://photos.app.goo.gl/cSnqgtny1Y9YehDx8

[ July 02, 2019, 11:42 PM: Message edited by: Stan Jelavic ]

 |  IP: Logged

Kamel Ikhlef
Expert Film Handler

Posts: 213
From: Arches, France
Registered: Oct 2018


 - posted July 03, 2019 06:52 AM      Profile for Kamel Ikhlef   Email Kamel Ikhlef   Send New Private Message       Edit/Delete Post 
Ah! yes great work ... We start to see the end of the tunnel as we say in France. The stability of the image is excellent. quality looks very good. it's very promising and gives hope. Congratulations Stan. I am very far from achieving this result.

[ July 03, 2019, 09:20 AM: Message edited by: Kamel Ikhlef ]

 |  IP: Logged

Jeff Self
Junior
Posts: 7
From: Chesapeake, VA, USA
Registered: Jun 2019


 - posted July 03, 2019 08:44 AM      Profile for Jeff Self   Author's Homepage   Email Jeff Self   Send New Private Message       Edit/Delete Post 
Looks awesome Stan! Are you streaming the images to another PC and then processing them on that PC? Or are you letting the raspberry Pi do everything?

I was reading up on what Joe Herman did with a projector and Raspberry Pi. He wrote a separate client and server piece for his setup. He was streaming the images in order to keep the frame rate up.

 |  IP: Logged

Stan Jelavic
Master Film Handler

Posts: 314
From: Fort Lauderdale, FL, USA
Registered: Jan 2019


 - posted July 03, 2019 09:09 AM      Profile for Stan Jelavic   Email Stan Jelavic   Send New Private Message       Edit/Delete Post 
We are getting there Kamel slowly. A light at the end of the tunnel. We say that here also. Played with ffmpeg a bit and it is quite powerful. Maybe better keep the camera at lower settings so that the images look a bit washed out so that the original content is not saturated and not lost. Then fix it with ffmpeg or other video editing sw. The guys here probably have tons of experience with that. Any good guides on how to use ffmpeg? Would like to fix the white balance. Found an article on how to do it with photoshop and ffmpeg.

 |  IP: Logged

Kamel Ikhlef
Expert Film Handler

Posts: 213
From: Arches, France
Registered: Oct 2018


 - posted July 03, 2019 09:21 AM      Profile for Kamel Ikhlef   Email Kamel Ikhlef   Send New Private Message       Edit/Delete Post 
Stan, what size do the jpg files (resolution and Megaoctet). how do you think you crop the captured frames ?

Here You Find a great free software for clip post production :

https://contact41766.wixsite.com/film9/home-1

 |  IP: Logged

Mike Spice
Master Film Handler

Posts: 421
From: none of your business
Registered: Jun 2017


 - posted July 03, 2019 02:46 PM      Profile for Mike Spice     Send New Private Message       Edit/Delete Post 
I have to say Gents, the work you are undertaking between you is truly amazing.

I did wonder for a while if it was worth modding the wolverine, going to all that trouble to try and make the best of what is a pretty poor film transport system to create a system of capture to beat the factory rubbish.

I am truly impressed with what is slowly coming together and send you rapturous applause for the work you are all doing.

Talk of Stan not making a sutiable take up assembly?
Even if you did, I would not use it, I actually prefer to let the film snake in to coils in a large plastic tub.

Keep up the amazing work, really quite something, coming together. Thank You too for the time it takes to upload evidence of progress, in the way of notes, stills and movie clips.

In other news, I just scanned 11 50ft reels for a friend, for free and it came out as per usual, grainy, but steady, by NOT using the pathetic wolverine take up and instead, relying on my fancy pants plastic box.

BZ!

 |  IP: Logged


All times are Central
This topic comprises 56 pages: 1  2  3  ...  22  23  24  25  26  27  28  ...  54  55  56 
 
   Close Topic    Move Topic    Delete Topic    next oldest topic   next newest topic
 - Printer-friendly view of this topic
Hop To:

Visit www.film-tech.com for free equipment manual downloads. Copyright 2003-2019 Film-Tech Cinema Systems LLC

Powered by Infopop Corporation
UBB.classicTM 6.3.1.2