8mm Forum


my profile | my password | search | faq | register | forum home
  next oldest topic   next newest topic
» 8mm Forum   » 8mm Forum   » Review Wolverine Reels2Digital MovieMaker 8mm film digitizer (Page 26)

 - UBBFriend: Email this page to someone!  
This topic comprises 56 pages: 1  2  3  ...  23  24  25  26  27  28  29  ...  54  55  56 
 
Author Topic: Review Wolverine Reels2Digital MovieMaker 8mm film digitizer
Stan Jelavic
Master Film Handler

Posts: 314
From: Fort Lauderdale, FL, USA
Registered: Jan 2019


 - posted July 03, 2019 11:19 PM      Profile for Stan Jelavic   Email Stan Jelavic   Send New Private Message       Edit/Delete Post 
Thanks Mike for the positive feedback. I will implement the takeup control this weekend.
Thanks Kamel for the link. Tried it. Here is the result. Keep in mind this is my first attempt. Looks like I overexposed the frames. Will have to turn the camera gain down a bit.
https://photos.app.goo.gl/dytc3J5xT8FEcHXP7

Here is that same clip taken with the original Wolverine.
https://photos.app.goo.gl/he2mgvNPapM7W57W6

These are some of the ffmpeg examples that I used before you sent me the video editor link:
ffmpeg -start_number 6 -i image%d.jpg -vcodec mpeg4 -b:v 8M test.avi
ffmpeg -i test.mp4 -vf "crop=1291:953:550:540" test_cropped.mp4
ffplay -vf eq=brightness=0.4:saturation=4:contrast=2.0 test.avi

 |  IP: Logged

Kamel Ikhlef
Expert Film Handler

Posts: 213
From: Arches, France
Registered: Oct 2018


 - posted July 04, 2019 03:07 AM      Profile for Kamel Ikhlef   Email Kamel Ikhlef   Send New Private Message       Edit/Delete Post 
Stan, thank you for sharing your experiences...
I have the impression that the post production has degraded the original quality of the image. You have to do tests to refine the film9 settings. Because this software is known to improve our movies and not the opposite.but for a first test it's promising !

 |  IP: Logged

Stan Jelavic
Master Film Handler

Posts: 314
From: Fort Lauderdale, FL, USA
Registered: Jan 2019


 - posted July 04, 2019 08:53 AM      Profile for Stan Jelavic   Email Stan Jelavic   Send New Private Message       Edit/Delete Post 
Agree. I used auto settings which is not very good. It takes time and experience. Will try again.

 |  IP: Logged

Jeff Self
Junior
Posts: 7
From: Chesapeake, VA, USA
Registered: Jun 2019


 - posted July 04, 2019 01:25 PM      Profile for Jeff Self   Author's Homepage   Email Jeff Self   Send New Private Message       Edit/Delete Post 
Stan,

How do the jpegs look before you run them through FFmpeg? Are you applying any sharpening or noise reduction to each image during capture? If you can get the jpeg's to be sharp then the post processing is really secondary. I, for one, would probably just import all the images directly into Final Cut Pro.

Have you considered taking multiple exposures of the same frame? Maybe -1, 0, +1 exposure. This would help with underexposed or overexposed film.

 |  IP: Logged

Stan Jelavic
Master Film Handler

Posts: 314
From: Fort Lauderdale, FL, USA
Registered: Jan 2019


 - posted July 05, 2019 07:35 AM      Profile for Stan Jelavic   Email Stan Jelavic   Send New Private Message       Edit/Delete Post 
Good suggestions Jeff. I started looking at the problem frames. I adjusted the exposure so that the saturated areas are no longer saturated. Then in video editor I will try adjusting the gamma which will boost the dark areas without increasing the white. If that does not work then will try bracketing as you suggested. The nice thing about this approach is that the individual frames are available.

 |  IP: Logged

Kamel Ikhlef
Expert Film Handler

Posts: 213
From: Arches, France
Registered: Oct 2018


 - posted July 05, 2019 09:01 AM      Profile for Kamel Ikhlef   Email Kamel Ikhlef   Send New Private Message       Edit/Delete Post 
I tried manually to capture individual frames with my imaging source camera board. my jpegs are 1.5 MB and 5.6 MB in uncompressed tiff and bmp, for a resolution of 1920x1080.
So it takes a while to save them on the pc hard drive. but it remains the best solution to have the best quality and especially the greatest flexibility of post production: stability, denoising, etc ... the best is to directly frame the original image because the crop and the resize too degrade the final image .

 |  IP: Logged

Stan Jelavic
Master Film Handler

Posts: 314
From: Fort Lauderdale, FL, USA
Registered: Jan 2019


 - posted July 05, 2019 09:32 PM      Profile for Stan Jelavic   Email Stan Jelavic   Send New Private Message       Edit/Delete Post 
Here is another attempt. Reduced the camera exposure and increased the gamma in Film8. Also added some sharpening.
https://photos.app.goo.gl/5Qc2XuFB8rfTn9pG6
It is pretty good in my opinion. Similar to Wolverine but without annoying artifacts. But anyways, although I would like to spend more time on video editing, my prime intention here is to come up with the mod kit and since the camera and lens selection looks pretty good I will spin another version of the interface board and include the mounting holes for both imagingsource and arducam cameras.
Will also check if the Wolverine motor controller can be reused. That would make the kit much simpler.

 |  IP: Logged

Kamel Ikhlef
Expert Film Handler

Posts: 213
From: Arches, France
Registered: Oct 2018


 - posted July 06, 2019 02:11 AM      Profile for Kamel Ikhlef   Email Kamel Ikhlef   Send New Private Message       Edit/Delete Post 
Yes Stan, this 2nd test is definitely better! indeed, the movies can be corrected in post-production with dedicated softwares. it's not really a problem.

But the result you get is already very encouraging.(Better wolverine stock) it is certain that the main thing is to improve the wolverine and to bring a independence of scan with the choice of the camera and its capture compression. (frame by frame : jpg,bmp,tiff...with flexibility of compression)

Your kit project is great and will be of great interest to those looking for quality.

Your idea of ​​including the holes fixation for the imaging source and arducam cameras is excellent and makes your module more open. make it simpler for people like me, that's fine.

Another idea would be a scroll of the film by capstan to pass the film whose perforations are damaged ... But that's another story ...

 |  IP: Logged

Stan Jelavic
Master Film Handler

Posts: 314
From: Fort Lauderdale, FL, USA
Registered: Jan 2019


 - posted July 06, 2019 07:35 AM      Profile for Stan Jelavic   Email Stan Jelavic   Send New Private Message       Edit/Delete Post 
Question Kamel,
Do you manually set your camera gain? The arducam that I use has all manual settings, RGB gain and exposure.

 |  IP: Logged

Kamel Ikhlef
Expert Film Handler

Posts: 213
From: Arches, France
Registered: Oct 2018


 - posted July 06, 2019 08:26 AM      Profile for Kamel Ikhlef   Email Kamel Ikhlef   Send New Private Message       Edit/Delete Post 
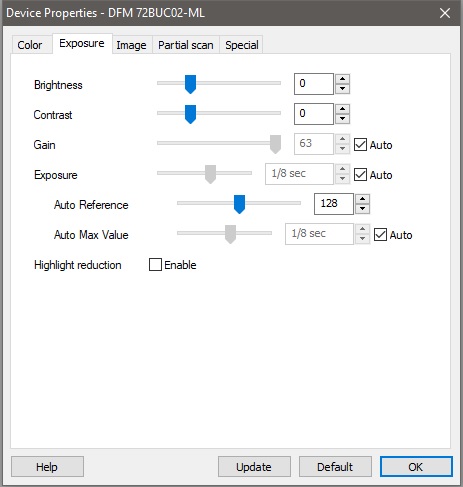
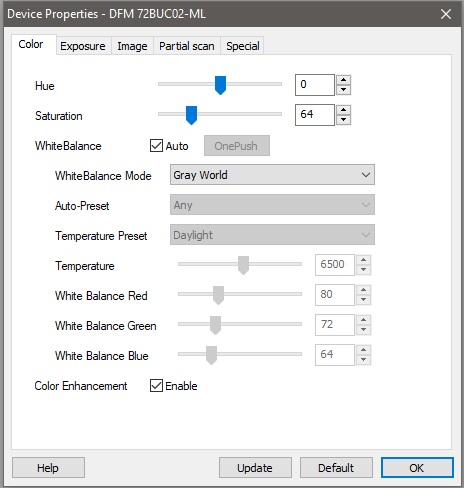
No, for the moment I only used the automatic settings. the ICCapture Software is very complete it is free but I do not know if it works with the camera arducam.
Settings examples :
 -

 -

 |  IP: Logged

Stan Jelavic
Master Film Handler

Posts: 314
From: Fort Lauderdale, FL, USA
Registered: Jan 2019


 - posted July 06, 2019 10:15 AM      Profile for Stan Jelavic   Email Stan Jelavic   Send New Private Message       Edit/Delete Post 
Thanks Kamel. I just bought the 72BUC02-ML camera. I think it is more flexible than Arducam.
One note, using the auto exposure may give you flicker. Have you tried it for a number of frames?

 |  IP: Logged

Kamel Ikhlef
Expert Film Handler

Posts: 213
From: Arches, France
Registered: Oct 2018


 - posted July 06, 2019 12:43 PM      Profile for Kamel Ikhlef   Email Kamel Ikhlef   Send New Private Message       Edit/Delete Post 
No Stan, I have not tested yet with the progress of the film. my tests are outside Wolverine. I have to make a switch to manually remote control the camera but for the moment I do not have the cable for the external trigger yet. I'll let you know as soon as I move on the project. for the caméra it's a very good choice.

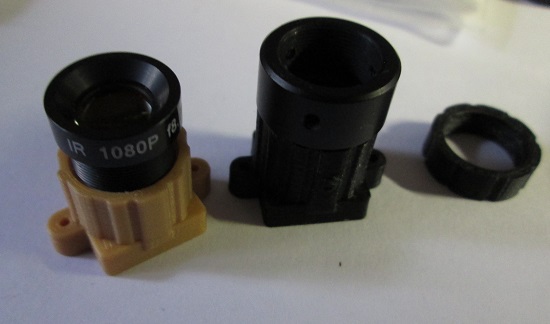
I just finished printing my cameras support of different heights.
 -

 |  IP: Logged

Stan Jelavic
Master Film Handler

Posts: 314
From: Fort Lauderdale, FL, USA
Registered: Jan 2019


 - posted July 06, 2019 11:27 PM      Profile for Stan Jelavic   Email Stan Jelavic   Send New Private Message       Edit/Delete Post 
Let me know Kamel if you have problems getting the cable. I bought several. These are picoblade 4 pin with connectors on both ends.
Got some pretty exciting news. Checked the Wolverine power board and figured out which stepper controller it uses. It is this one:
https://www.onsemi.com/pub/Collateral/LV8728MR-D.PDF
Found the clock pin. It runs 12.8kHz clock which gives 2 frames per second. So I am now planning to add a small MSP430 micro controller that will be able to control the stepper speed using the existing controller. That eliminates the need for RPI and extra stepper. Pretty happy about that.

 |  IP: Logged

Kamel Ikhlef
Expert Film Handler

Posts: 213
From: Arches, France
Registered: Oct 2018


 - posted July 07, 2019 02:54 AM      Profile for Kamel Ikhlef   Email Kamel Ikhlef   Send New Private Message       Edit/Delete Post 
Thank you very much Stan. I ordered the connectors picoblade I wait for them. For the controller step by step, this is a very big and good news because it was my main problem with the imaging source camera : it was to slow down the engine to allow the camera software to have time to record uncompressed frames. with your discovery and your progress, I think that project will become reality. it's really super. you do a great job.

 |  IP: Logged

Stan Jelavic
Master Film Handler

Posts: 314
From: Fort Lauderdale, FL, USA
Registered: Jan 2019


 - posted July 07, 2019 01:12 PM      Profile for Stan Jelavic   Email Stan Jelavic   Send New Private Message       Edit/Delete Post 
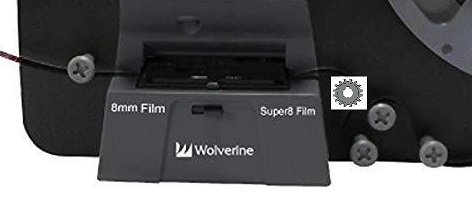
Here are some thoughts on capstan design.
Replace the first roller with capstan.
 -
Here is one of the sprocket wheel designs:
https://www.shapeways.com/product/X9FHUQZRW/film-sprocket-super8-format-20teeth-001?optionId=13213109
Maybe Kamel you can look into designing one of these. Mount the wheel on a motor shaft. The motor has an encoder. The encoder can be connected to the MSP430 which can then sense the lack of pulses and give the motor a nudge. If the pulses are ok the power is cut off and the motor is just going with the flow [Smile]
BTW - the MSP430 can also activate a buzzer...
https://www.amazon.com/uxcell-10000RPM-Encoder-Remote-Control/dp/B077WWHJRN

 |  IP: Logged

Kamel Ikhlef
Expert Film Handler

Posts: 213
From: Arches, France
Registered: Oct 2018


 - posted July 07, 2019 02:59 PM      Profile for Kamel Ikhlef   Email Kamel Ikhlef   Send New Private Message       Edit/Delete Post 
Cool, Stan ! I have a lot of film with damaged perforations. impossible to pass them with the wolverine. capstan can be a good solution. Thanks for the links. It helps me to think and actually, I will try to design a cogwheel. Your idea is very good and it is very inspiring. I'm a beginner and not very competent in electronics : Still bread on the board ... It says that in France. [Smile]

 |  IP: Logged

Stan Jelavic
Master Film Handler

Posts: 314
From: Fort Lauderdale, FL, USA
Registered: Jan 2019


 - posted July 08, 2019 10:10 AM      Profile for Stan Jelavic   Email Stan Jelavic   Send New Private Message       Edit/Delete Post 
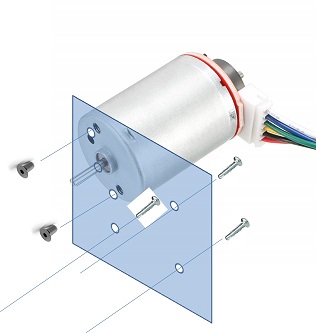
No worry Kamel. We all learn every day. Here is the motor that I picked.
http://www.uxcell.com/micro-motor-12v-4300rpm- wire-high-speed-encoder-motor-for-diy-hobby-toy-cars-remote-control-p-1323950.html
I plan to mount it on a small pcb that can be mounted using the existing roller screws. I.e. remove the rollers, place the board with the motor at the back of the front panel and then remount the 3 rollers back using longer screws.
 -

[ July 08, 2019, 01:08 PM: Message edited by: Stan Jelavic ]

 |  IP: Logged

Kamel Ikhlef
Expert Film Handler

Posts: 213
From: Arches, France
Registered: Oct 2018


 - posted July 08, 2019 11:12 PM      Profile for Kamel Ikhlef   Email Kamel Ikhlef   Send New Private Message       Edit/Delete Post 
Ah! very clever Stan!... I will even create a support designed in 3d printing, it will be easier for me. I will order the small motor. With your help and your kit module we will eventually make this wolverine machine a high-end film scanning machine. [Smile]

 |  IP: Logged

Stan Jelavic
Master Film Handler

Posts: 314
From: Fort Lauderdale, FL, USA
Registered: Jan 2019


 - posted July 09, 2019 08:13 AM      Profile for Stan Jelavic   Email Stan Jelavic   Send New Private Message       Edit/Delete Post 
Thanks Kamel. I ordered the motor. One concern may be the tug of the motor on the film when not powered up because of the permanent magnet used. In that case I can provide a bias power to the motor to reduce the back torque.

 |  IP: Logged

Kamel Ikhlef
Expert Film Handler

Posts: 213
From: Arches, France
Registered: Oct 2018


 - posted July 09, 2019 09:59 AM      Profile for Kamel Ikhlef   Email Kamel Ikhlef   Send New Private Message       Edit/Delete Post 
yes cool, but 4300 rpm is not too fast for the scrolling of the film ?. finally, I do not know enough about it. I'm learning, I'm documenting myself ...
I also ordered the mini motor, I should have it in two or three days ... Today, I work on the pin wheel which must be very accurate provided for perforations super 8 film format.

 |  IP: Logged

Stan Jelavic
Master Film Handler

Posts: 314
From: Fort Lauderdale, FL, USA
Registered: Jan 2019


 - posted July 09, 2019 05:09 PM      Profile for Stan Jelavic   Email Stan Jelavic   Send New Private Message       Edit/Delete Post 
It is not the speed of the motor Kamel. If you take the dc motor and turn the shaft without powering it up you will notice a resistance because the magnet inside the motor. So under normal conditions the takeup reel will pull on the film but the capstan motor will resist somewhat. My concern is that that resistance may damage the film perforations. Hope I am wrong on that one. But even if that is true I can bias the motor a bit reducing the resistance.
Yes, the capstan design is very tricky. Also the material has to be very smooth and glossy. Check the notes on the link that I sent you.

 |  IP: Logged

Kamel Ikhlef
Expert Film Handler

Posts: 213
From: Arches, France
Registered: Oct 2018


 - posted July 11, 2019 05:41 AM      Profile for Kamel Ikhlef   Email Kamel Ikhlef   Send New Private Message       Edit/Delete Post 
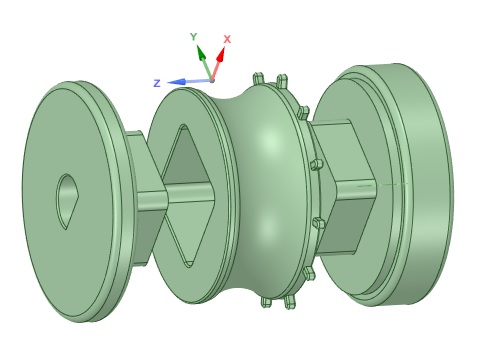
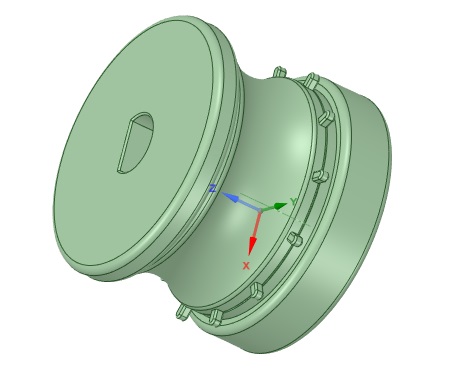
here, I almost finished modeling the super 8 toothed pulley. I designed it in 3 parts for ease of printing 3d. diameter 18mm. remains to do tests. ABS printing for the moment. I will make available the model when I have a little more advanced.

 -

 -

 |  IP: Logged

Kamel Ikhlef
Expert Film Handler

Posts: 213
From: Arches, France
Registered: Oct 2018


 - posted July 11, 2019 09:24 AM      Profile for Kamel Ikhlef   Email Kamel Ikhlef   Send New Private Message       Edit/Delete Post 
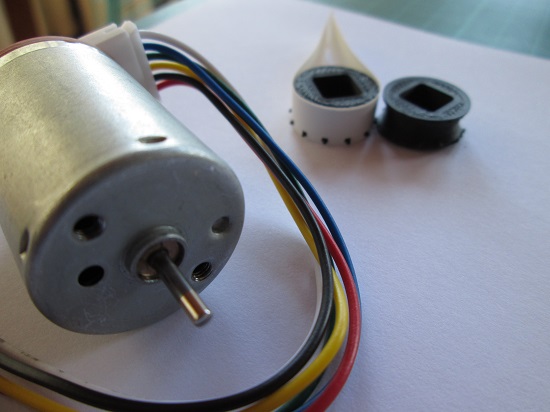
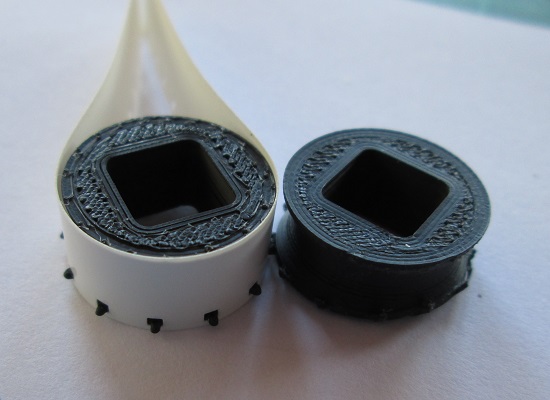
I just got the little motor on stan's advice.
the axis is round, no flat for blocking. I must find a solution to put my toothed pulley.
 -

I made my first 3d print of the central part with pins, in draft mode, to go faster to adjust the right distance of the pins. it is necessary to calculate the retraction of the plastic (ABS).

 -

not obvious, it's not bad for a first test but it's not yet that. I continue...

 |  IP: Logged

Kamel Ikhlef
Expert Film Handler

Posts: 213
From: Arches, France
Registered: Oct 2018


 - posted July 12, 2019 04:20 AM      Profile for Kamel Ikhlef   Email Kamel Ikhlef   Send New Private Message       Edit/Delete Post 
I found this link if it could interest someone :

http://www.drviragopete.com/film-scanner-maintenance.php

[ July 12, 2019, 06:52 AM: Message edited by: Kamel Ikhlef ]

 |  IP: Logged

Stan Jelavic
Master Film Handler

Posts: 314
From: Fort Lauderdale, FL, USA
Registered: Jan 2019


 - posted July 12, 2019 09:08 AM      Profile for Stan Jelavic   Email Stan Jelavic   Send New Private Message       Edit/Delete Post 
Pretty impressive Kamel. Possibly add a threaded hole for a lock screw. Or make the center hole a bit smaller so that the part can be pushed on.

 |  IP: Logged


All times are Central
This topic comprises 56 pages: 1  2  3  ...  23  24  25  26  27  28  29  ...  54  55  56 
 
   Close Topic    Move Topic    Delete Topic    next oldest topic   next newest topic
 - Printer-friendly view of this topic
Hop To:

Visit www.film-tech.com for free equipment manual downloads. Copyright 2003-2019 Film-Tech Cinema Systems LLC

Powered by Infopop Corporation
UBB.classicTM 6.3.1.2