8mm Forum


my profile | my password | search | faq | register | forum home
  next oldest topic   next newest topic
» 8mm Forum   » 8mm Forum   » Review Wolverine Reels2Digital MovieMaker 8mm film digitizer (Page 35)

 - UBBFriend: Email this page to someone!  
This topic comprises 56 pages: 1  2  3  ...  32  33  34  35  36  37  38  ...  54  55  56 
 
Author Topic: Review Wolverine Reels2Digital MovieMaker 8mm film digitizer
Stan Jelavic
Master Film Handler

Posts: 314
From: Fort Lauderdale, FL, USA
Registered: Jan 2019


 - posted September 10, 2019 07:18 PM      Profile for Stan Jelavic   Email Stan Jelavic   Send New Private Message       Edit/Delete Post 
Not even that Mike. Maybe a square yard of the swampland he he.
But that is OK. Are we having fun or what?

It should be easy to add the rewind. Maybe another position of the speed switch. So it is just a sw change.

Welcome on board Mike Cruz. Sorry to hear about your dad.
Hope you have lots of fun doing the mod and scanning all those precious old memories.

 |  IP: Logged

Mike Spice
Master Film Handler

Posts: 421
From: none of your business
Registered: Jun 2017


 - posted September 11, 2019 09:00 AM      Profile for Mike Spice     Send New Private Message       Edit/Delete Post 
I am happy to bypass the rewind mod you might do in the future.
I will never use the scanner for rewinding.

 |  IP: Logged

Stan Jelavic
Master Film Handler

Posts: 314
From: Fort Lauderdale, FL, USA
Registered: Jan 2019


 - posted September 11, 2019 10:47 AM      Profile for Stan Jelavic   Email Stan Jelavic   Send New Private Message       Edit/Delete Post 
No problem Mike. You do not have to do anything different.
One note regarding the lens mount. The one that comes with the camera is somewhat offset to the left but still has enough margin. The mount that Kamel sent me (he bought from 3rd party) is closer to the center. Will see what happens with the holder that Kamel designed once I receive it. I guess these mounts are not exact. Hope they are consistent from batch to batch.

Here is another alternative for the camera. The board has an opening for the camera. You could get one of these camera stands:
https://www.bhphotovideo.com/c/product/483954-REG/Kaiser_205361_Repro_Kid_Copy_Stand. html

Set the Wolverine with the new board on the base on the stand and mount an SLD with a macro lens above that using the stand camera attachment.
The opening is wide enough to capture the whole film gate with the SLR. I could do a small mod to the board for SLR shutter.
Now you have a $4000 system. Well almost.. the film transport is not as good.

BTW the speed would also be higher... limited by the claw ruggedness and the SLR shutter rate.

 |  IP: Logged

Alain Gottschalk
Junior
Posts: 7
From: Eurre, France
Registered: Sep 2019


 - posted September 11, 2019 02:08 PM      Profile for Alain Gottschalk   Email Alain Gottschalk   Send New Private Message       Edit/Delete Post 
Hi Stan and Mike

Stan, here are some photos of the somikon seen from above and from below.
I hope it's identical to Wolverine.
I appreciate very much your kindness and your dedication to me.

[IMG] http://8mmforum.film-tech.com/cgi-bin/showpic.cgi?dir=uploads0503&file=somikon03.jpg [/ IMG]

[IMG] http://8mmforum.film-tech.com/cgi-bin/showpic.cgi?dir=uploads0503&file=somikon04.jpg [/ IMG]

[IMG] http://8mmforum.film-tech.com/cgi-bin/showpic.cgi?dir=uploads0503&file=somikon05.jpg [/ IMG]

Mike, thank you for your solutions; I already applied them when I had these problems.
That's why I read you with great pleasure on this forum friendly.

Thanks to you two.

cordially

Alain

 |  IP: Logged

Stan Jelavic
Master Film Handler

Posts: 314
From: Fort Lauderdale, FL, USA
Registered: Jan 2019


 - posted September 11, 2019 08:05 PM      Profile for Stan Jelavic   Email Stan Jelavic   Send New Private Message       Edit/Delete Post 
Looks like it should work Alain. If you send me your address either here or in a private message I will send you the test board. The test board does not have all of the features implemented but enough to make sure that it compatible.

Here is one USB connector possibility. Use Sparkfun USB breakout and attach it to the modified board. That way the existing USB opening on the cover can be reused for camera connection.
 -

The board on the bottom is the Wolverine controller as a reference to show how much the board has to be extended for the USB connector back cover alignment.

 |  IP: Logged

Mike Spice
Master Film Handler

Posts: 421
From: none of your business
Registered: Jun 2017


 - posted September 12, 2019 04:17 PM      Profile for Mike Spice     Send New Private Message       Edit/Delete Post 
Not sure what my solution will be yet.

I did find a nice sturdy moulded Belkin USB cable in my box of junk today.

I may be taking the soldering iron out to make it shorter and find some kind of USB socket to glue on somewhere....

It is possible I might take a hole in the back case for it....

[ September 13, 2019, 02:36 AM: Message edited by: Mike Spice ]

 |  IP: Logged

Stan Jelavic
Master Film Handler

Posts: 314
From: Fort Lauderdale, FL, USA
Registered: Jan 2019


 - posted September 12, 2019 10:28 PM      Profile for Stan Jelavic   Email Stan Jelavic   Send New Private Message       Edit/Delete Post 
Will be exciting putting all of this together Mike. I was very happy when the stuff started working. Going forward, here are a few things that came to my mind:
- Wait for Mike, Kamel and Robert to finish testing and get their feedback.
- Ordered Sparkfun usb board and cable. Will look into it when the parts get here.
- Low on 3.3V regulators and picoblade cables. Need to order some.
- Re-evaluate the material cost based on planned qty.
- Add bias resistors for Kamel's power LED.
- Capstan test once the parts get here.
- Received a big package tonight. Believe it is the used Wolverine. Will check tomorrow.
- 8 reels to do - family stuff - but when?

The fun never ends.

 |  IP: Logged

Kamel Ikhlef
Expert Film Handler

Posts: 213
From: Arches, France
Registered: Oct 2018


 - posted September 13, 2019 06:00 AM      Profile for Kamel Ikhlef   Email Kamel Ikhlef   Send New Private Message       Edit/Delete Post 
Friday 13! ... (luck or bad luck? ... Day of luck for me!
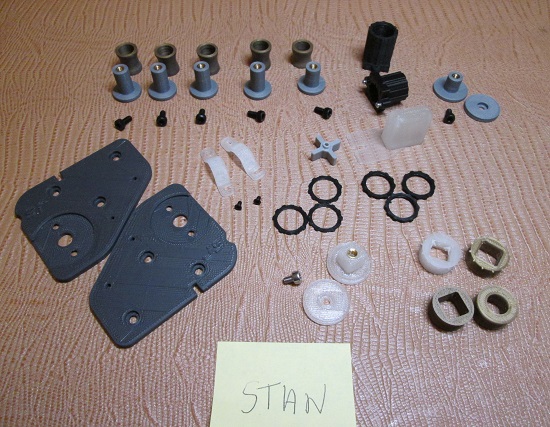
I received my PCB. Many thanks Stan. Everything is OK.Not yet tested, but what a job, very professional. Thank you very much, very much, you have done an outstanding job, I have been waiting for this for a long time. You have made two men happy this week ! [Smile]

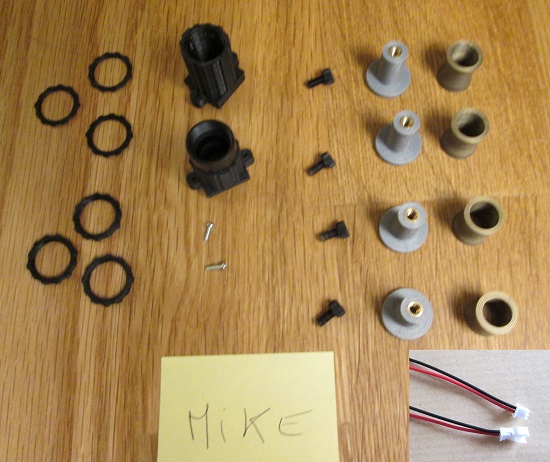
Your 3D parts are gone, as well as those of Mike (a little later than expected, because a lot of very delicate post-processing work). waiting for their reception (according to the post office, they will be at your home, normally during the next week - mike will have it faster because his country is closer)...
Here is the content of the 2 packages:

 -

 -

I also wrote a little documentation for the installation.
https://drive.google.com/file/d/1tQPAf4dRcasVtvULCWl9dKTxKCVz_rx-/view?usp=sharing

... What amuse you! [Smile]

Regarding 3D files, I will put them on thingiverse free access to respond to Bruce Davis.

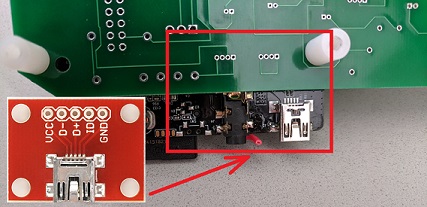
Where do you go for the changes you make on the new PCB?
(leds indication, usb, 2nd fan switch, etc ...).
How can I help you ?. Right now, I'm learning Kicad.
It looks a lot like Eagle but no limitations. I will use this software instead. I tried to import version 6 in kicad, it works well, some small adjustments to make.
Soon the super telecine! ... Have Fun !

[ September 13, 2019, 07:22 AM: Message edited by: Kamel Ikhlef ]

 |  IP: Logged

Stan Jelavic
Master Film Handler

Posts: 314
From: Fort Lauderdale, FL, USA
Registered: Jan 2019


 - posted September 13, 2019 08:35 AM      Profile for Stan Jelavic   Email Stan Jelavic   Send New Private Message       Edit/Delete Post 
Wow great job Kamel. Thank you very much for all the hard work you put into this.
Will try Kicad. I will do the schematic change and you can try doing the board. I get the boards from:
https://jlcpcb.com/quote#/
Once done with the PCB design go to this site and upload the gerber. See if there are any errors reported and then just order the boards.

BTW - the $60 Wolverine came in. Will check it today for wear and tear.

 |  IP: Logged

Mike Spice
Master Film Handler

Posts: 421
From: none of your business
Registered: Jun 2017


 - posted September 13, 2019 09:15 AM      Profile for Mike Spice     Send New Private Message       Edit/Delete Post 
Kamel you are a star!

I am very happy to see the photo and send you my grateful thanks.

The 3D printing is stunning!

Thank you for thinking to send me a fan extension cable, that is very thoughtful.

I am indebted to you and Stan for giving me these amazing gifts to my film scan work.

I will never be able to repay you both but I will take forward your kindness by re scanning films that I have done for my navy boys without cost to them again, and going forward will always offer free film scans to the Navy lads who still have films of thier time in the navy.

question why two lens mount?

what difference will I see between using a 22mm or 12mm lens mount?

 |  IP: Logged

Kamel Ikhlef
Expert Film Handler

Posts: 213
From: Arches, France
Registered: Oct 2018


 - posted September 13, 2019 09:36 AM      Profile for Kamel Ikhlef   Email Kamel Ikhlef   Send New Private Message       Edit/Delete Post 
Ha, Ha! wait to receive the 3D parts to be sure they are good! [Smile] ...
After your tests there will surely be changes that I did not think. This is also where your contribution and your help are very useful! this improves the future Telecine system.

With your participation and the skills of each i'ts possible to make a great telecine with a good quality to digitize finally our precious films, in a faithful quality to the original film.

This is the ultimate goal... And, then we learn a lot of things in many domaines, mechanical, optical, electronic ... very interesting all that.
Thanks to you because it is by reading you that I wanted to join this project.

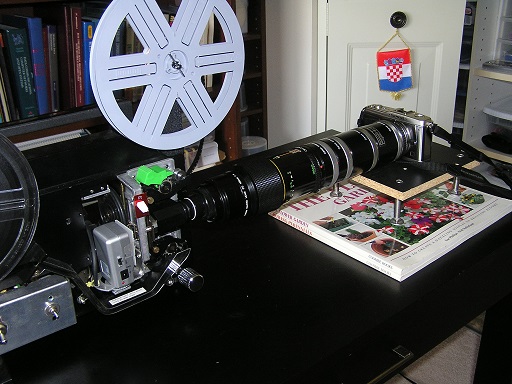
BTW : Mike, for lens mount, no difference just a copy in case... but the 12mm is for testing and can be used with the 7mm metal extension ring (finally 23mm : base 4mm+tube 12mm +extension metal 7mm).
the threads of the metal tube of the lens holder are less fragile.
https://www.amazon.fr/LaDicha-Lens-Extension-Metal-Cam%C3%A9ra/dp/B075N3KVB1

I sent you one because I do not use it. I print my parts to the desired size.

Personally I use the one that is entirely plastic printed in 3D. you just have to go slowly to screw it the first time, after that you're fine.

Thank you Stan for the PCB link.
I can not wait to see your new schematic !

 |  IP: Logged

Mike Spice
Master Film Handler

Posts: 421
From: none of your business
Registered: Jun 2017


 - posted September 13, 2019 09:38 AM      Profile for Mike Spice     Send New Private Message       Edit/Delete Post 
[Smile] [Smile] [Smile]
You are very kind.

Thank you for explaining the different lens mount.

My camera and lens should be with me in a week...

 |  IP: Logged

Stan Jelavic
Master Film Handler

Posts: 314
From: Fort Lauderdale, FL, USA
Registered: Jan 2019


 - posted September 13, 2019 12:30 PM      Profile for Stan Jelavic   Email Stan Jelavic   Send New Private Message       Edit/Delete Post 
Reading your posts Mike prompted me to design the new controller. So whether you like it or not, you started all of this. And thank you very much for that because it was (and still is) tons of fun.

 |  IP: Logged

Mike Spice
Master Film Handler

Posts: 421
From: none of your business
Registered: Jun 2017


 - posted September 13, 2019 01:14 PM      Profile for Mike Spice     Send New Private Message       Edit/Delete Post 
Cheers Stan, you are too kind.
It certainly has been a journey for all of us.

Way back, one contributor began by trying to hack the firmware of the camera to get better results.
alas no luck but it was an exciting moment.

Then an app to warn of film stuck in the gate and now here we are on the verge of an image sequence.

I have found a new home for my scanner for when the mod is done, a place it can sit for hours and click away.

I am visiting the shop tomorrow to buy three switches, and tonight I am about to finish the last 400ft reel of the latest job.

Now comes my fun, hopefully the camera and lens will arrive end of this coming week, If I am lucky an envelope from florida and france will come too.

As soon as I have everything together and a free weekend, I will begin the transformation to a better video quality.

I don't have filmguard for my reels but they certainly will be getting a gentle microfibre wipe and edit check and made ready for the big day.

Seeing my Ark Royal film made with an image sequence will hopefully be amazing with a few clicks in VirtualDub.

Fortunately for me the last scan job will not require me to return the reels, so I have plenty of film I can use for testing until everything is ready.

If the new camera has a live preview, then it should be able to record video, how about just setting the stepper motor to 16fps and we'll make videos in H265 instead.....

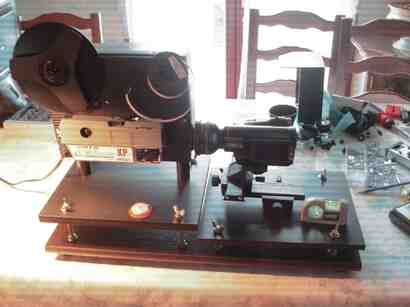
Perhaps I should try and mount the camera on the front of my sankyo 500 projector, flash up VirtualDub live capture and give it a whirl, just for the sake of it.

[Smile]

[ September 13, 2019, 04:53 PM: Message edited by: Mike Spice ]

 |  IP: Logged

Kamel Ikhlef
Expert Film Handler

Posts: 213
From: Arches, France
Registered: Oct 2018


 - posted September 13, 2019 05:43 PM      Profile for Kamel Ikhlef   Email Kamel Ikhlef   Send New Private Message       Edit/Delete Post 
Mike, it reminds me of my tests with my 4k camcorder. I tried a lot of things. camera lens in projector lens, macro ...: problem of alignment, camera synchro ... I have a workprinter of moviestuff that I tried to modify without success. frame-by-frame capture gives the best result. Unfortunately it is very long to scan!

 -

I wait for new Stan's schematic PCB and it will very right ! [Wink]

 |  IP: Logged

Mike Spice
Master Film Handler

Posts: 421
From: none of your business
Registered: Jun 2017


 - posted September 13, 2019 06:13 PM      Profile for Mike Spice     Send New Private Message       Edit/Delete Post 
That's a great photo Kamel.

I have a space ready for the modded scanner.

it can sit for hours and take photo's

I look forward to VirtualDub movies.

I am looking at finding a small fan to put on spacers, above the camera.

Stan, how could I easily power a small computer type fan over the camera?

How hot do you think the camera will get doing 200ft reels?

One would guess I could dump the main fan and use that power supply to run a fan on to the camera from above, on some more spacers above the camera?

 |  IP: Logged

Bruce Davis
Film Handler

Posts: 47
From: Adelaide, Australia
Registered: Sep 2019


 - posted September 13, 2019 07:36 PM      Profile for Bruce Davis   Author's Homepage   Email Bruce Davis   Send New Private Message       Edit/Delete Post 
Stan Jelavic "BTW - the $60 Wolverine came in. Will check it today for wear and tear" thanks Stan I am very happy to hear that it has arrived.

Kamel Ikhlef Thank you, I look forward to your release of the printed parts, another service that you might try for price
https://www.seeedstudio.com/fusion.html I have used them in the past for small boards and found them very reasonably priced.

Mike Spice I would also like to send my thanks to you Mike, this is a great project.

regards - bruce

 |  IP: Logged

Stan Jelavic
Master Film Handler

Posts: 314
From: Fort Lauderdale, FL, USA
Registered: Jan 2019


 - posted September 13, 2019 10:28 PM      Profile for Stan Jelavic   Email Stan Jelavic   Send New Private Message       Edit/Delete Post 
Mike, the board has both 5V and 12V terminals on the right hand side if you want to attach extra fan.
Or you can use the existing 5V fan connector since the original fan is pointed the wrong way anyways. Or move the existing fan.
Did not do any thermal testing with the camera. All my tests so far have been short clips. The 5V regulator on the Wolverine power supply gets somewhat hot but have not checked it thoroughly. Something to keep an eye on.
Bruce, that unit that came in looks like new. Has an issue with the controller. That is why it is so cheap. Will check it more tomorrow. Was busy today cleaning up around the house.
Kamel, the schematic is 50% done in KiCad.

Funny, we all had our transfer projects before. Here is mine, ha ha.

https://www.amazon.com/8mm-Film-Video-Tra nsfer-Project/dp/1456548743/ref=sr_1_3?keywords=stan+jelavic&qid=1568431523&s=gateway&sr=8-3

 -

Actually got some pretty good results with it but man was it ever cumbersome.

https://photos.app.goo.gl/WAGCnjKJKSEjHPgK9

 |  IP: Logged

Kamel Ikhlef
Expert Film Handler

Posts: 213
From: Arches, France
Registered: Oct 2018


 - posted September 14, 2019 02:46 AM      Profile for Kamel Ikhlef   Email Kamel Ikhlef   Send New Private Message       Edit/Delete Post 
Yes Stan, the good old days! ... It does not make us feel younger ... lol. Thank you Bruce for the link. As soon possible, I will post the 3D files in thingiverse. Mike,for the 2nd additional fan, I will try to integrate it in my future design of the front cover. Still a little work! But we have never been so close to the goal and what a long way!... Very cool for kicad shematics, Stan. [Smile]

[ September 14, 2019, 08:17 AM: Message edited by: Kamel Ikhlef ]

 |  IP: Logged

Stan Jelavic
Master Film Handler

Posts: 314
From: Fort Lauderdale, FL, USA
Registered: Jan 2019


 - posted September 14, 2019 09:33 AM      Profile for Stan Jelavic   Email Stan Jelavic   Send New Private Message       Edit/Delete Post 
Here is the KiCad interface board V7 preliminary design Kamel.

https://drive.google.com/file/d/1OwPlgPBg5g1V7a3a8wwK4zrUmfj9nwEn/view?usp=sharing

The PCB needs to be completed.

The following usb cable is required for the usb mod:
https://www.amazon.com/8inch-Micro-b-Mi ni-b-Adapter-Cable/dp/B00DHN9CMO/ref=pd_ybh_a_4?_encoding=UTF8&psc=1&refRID=MB2BA8KPPD9E6EYPGQ77

One side plugs into the cam and the other into the interface board. The board routes the connection into the mini b USB connector that will be accessible from the back panel existing hole (no drilling required).

Just added all material costs and it came to $80 which is higher than planned because of low qty. With 2.5 hours for assembly and test the total will be around $130 plus $4 for shipping within US.

[ September 14, 2019, 02:58 PM: Message edited by: Stan Jelavic ]

 |  IP: Logged

Kamel Ikhlef
Expert Film Handler

Posts: 213
From: Arches, France
Registered: Oct 2018


 - posted September 14, 2019 03:08 PM      Profile for Kamel Ikhlef   Email Kamel Ikhlef   Send New Private Message       Edit/Delete Post 
It's awesome ! better and better, too smart Stan!... I did not think to integrate 2 components USB male and female directely on the PCB. It's really very good. For me, it's better that a breakout board.

I opened the PCB project in Kicad, no problem. I tried to visualize it in 3d, it makes an error because it does not find the outline of the Board. but I do not master well, it will come. You went very quickly to master kicad!...Me, I hang on ! [Wink] .

It's great that the connector is directly provided on the PCB. It will be much cleaner. and suddenly I will provide a front cover with ventilation holes and a support for a Camera cooling fan. Amazing job, Stan !

 |  IP: Logged

Stan Jelavic
Master Film Handler

Posts: 314
From: Fort Lauderdale, FL, USA
Registered: Jan 2019


 - posted September 14, 2019 05:12 PM      Profile for Stan Jelavic   Email Stan Jelavic   Send New Private Message       Edit/Delete Post 
Thank you Kamel [Smile]
Let me know if you need any assistance.
BTW - as I mentioned before the 5V regulator on the Wolverine power supply gets pretty hot but not always. That is why they put the fan close to it. So I suggest we leave that fan as is and use a separate fan for the camera.

 |  IP: Logged

Kamel Ikhlef
Expert Film Handler

Posts: 213
From: Arches, France
Registered: Oct 2018


 - posted September 14, 2019 06:07 PM      Profile for Kamel Ikhlef   Email Kamel Ikhlef   Send New Private Message       Edit/Delete Post 
Thank you Stan, you already help a lot with your work and your good advices. For Kicad, I'm starting to understand the software philosophy, I'm learning quietly...
For the camera fan, I totally agree. We must not touch the original one which has its utility. It is necessary to add a 2nd small low noising 30x30mm fan, it should be enough for the camera with a switch on/off (to choose its power in 5v or 12v). The camera will turn hours and hours to digitize... what do you think?

 |  IP: Logged

Stan Jelavic
Master Film Handler

Posts: 314
From: Fort Lauderdale, FL, USA
Registered: Jan 2019


 - posted September 14, 2019 07:45 PM      Profile for Stan Jelavic   Email Stan Jelavic   Send New Private Message       Edit/Delete Post 
Agree, extra fan is needed. Preferably 12V because the 5V regulator is already getting hot.

Houston we have a problem. Today I check the Movie Maker that I bought for $60 and tried to install the new controller in and IT DOES NOT FIT!!!

The box is smaller and the takeup motor is in the way.

But don't despair I will fix that. We need 2 versions of the board. One that we have right now is for the pro unit and the new one that I will work on will be for that basic unit.

Can you please indicate on the spreadsheet which version you have.

Thanks.

One more thing. There is a 2 week wait for the lenses. The supplier ran out of the stock.

[ September 14, 2019, 10:54 PM: Message edited by: Stan Jelavic ]

 |  IP: Logged

Kevin R Sexton
Junior
Posts: 8
From: Littlerock, CA, USA
Registered: Dec 2018


 - posted September 14, 2019 11:40 PM      Profile for Kevin R Sexton   Email Kevin R Sexton   Send New Private Message       Edit/Delete Post 
It's not anything to do with the mod work that's been discussed on this thread recently, but I'm having an issue with what I think is a super 8 reel.
I've done like 40 3 inch 8mm reels, and so far 2 of the 7 inch reels from my grandfather, most of them twice, once zoomed out, and once coming close to filling the frame.
I found that one of the 3 inch reels appears to be super 8, has the larger center hole, larger frame size, and slightly different hole spacing.
But when I load it on the Wolverine and switch to super8, the frame jumps all over the place. Like the teeth aren't engaging right or something.
Anyone seen this issue before? the film looks fine, holes are perfect. I'm not even sure what all is on this reel, if it's something my grandfather filmed or from another source. It starts at least, apparently at Silver Dollar City, which from a search appears to be a theme park.

I've thought of doing this mod, but now that I'm through most of the film, I don't know if there is anything really worth the trouble. There are bits and pieces of family, along with shots of flowers, desert landscapes (grandparents went on rock hunting trips) some bits of air shows etc. A lot of it is poorly focused, over exposed or has similar problems.

The larger reels, taking over 4 hours to scan is a long time. I found on the second one that he must have spliced together film that was shot in 2 different cameras, because the frame jumps up nearly 1/4 of the frame like 4 minutes into the 30 minute reel.

These reels taking 4 times as long with the mod is a lot, but I suppose since it's being done as individual frames, you could actually just stop it and start it back up the next day. Still, 16+ hours for a reel is a lot.

On the pulleys, what the machine has stock aren't pulleys, since they don't turn. In fact 2 of them are rubberized or something, I think they are there to keep the take up reel from pulling the film through the gate too fast, and at the same time allow proper tension on the film rolling onto the reel. Without them the film jumps, with lower speed on the take up, the film doesn't roll up on the reel tightly enough and can just overflow/fall off. This may not be a concern though if the mod is better controlling the take up motor.

 |  IP: Logged


All times are Central
This topic comprises 56 pages: 1  2  3  ...  32  33  34  35  36  37  38  ...  54  55  56 
 
   Close Topic    Move Topic    Delete Topic    next oldest topic   next newest topic
 - Printer-friendly view of this topic
Hop To:

Visit www.film-tech.com for free equipment manual downloads. Copyright 2003-2019 Film-Tech Cinema Systems LLC

Powered by Infopop Corporation
UBB.classicTM 6.3.1.2