8mm Forum


my profile | my password | search | faq | register | forum home
  next oldest topic   next newest topic
» 8mm Forum   » 8mm Forum   » Review Wolverine Reels2Digital MovieMaker 8mm film digitizer (Page 45)

 - UBBFriend: Email this page to someone!  
This topic comprises 56 pages: 1  2  3  ...  42  43  44  45  46  47  48  ...  54  55  56 
 
Author Topic: Review Wolverine Reels2Digital MovieMaker 8mm film digitizer
David Brown
Film Handler

Posts: 42
From: Centerville, UT, USA
Registered: Oct 2019


 - posted October 16, 2019 12:19 AM      Profile for David Brown   Email David Brown   Send New Private Message       Edit/Delete Post 
Bruce
I'm using Vegas pro 16. I have processed some Wolverine captures. I have also imported numbered Tiffs and Jpgs into the timeline. It has a way to control the framerate of mp4s the Wolverine (20fps) created and crop the image. Just say'n if you already own it, you're good. There are other options out there.

 |  IP: Logged

Bruce Davis
Film Handler

Posts: 47
From: Adelaide, Australia
Registered: Sep 2019


 - posted October 16, 2019 09:05 AM      Profile for Bruce Davis   Author's Homepage   Email Bruce Davis   Send New Private Message       Edit/Delete Post 
Stan Jelavic thanks for the advice regarding the timer settings, tested and working.
Regards

Mike Spice Many thanks for going to so much trouble (and at such an early hour) in explaining what needs to be done step by step, I have both MP4 codecs installed including the H.264. Will test tomorrow.
Regards

David Brown I do have version 16 pro, so that is another option for me to try.
Regards

 |  IP: Logged

Mike Spice
Master Film Handler

Posts: 421
From: none of your business
Registered: Jun 2017


 - posted October 16, 2019 09:21 AM      Profile for Mike Spice     Send New Private Message       Edit/Delete Post 
I have a new lens mount arriving from Scorpion vision tomorrow so everything had to come to peices this afternoon.

Really very easy now I am familiar with it.
I thought you might like to see some images.

 -

Thanks Kamel, these are great
 -

 -

 -

 |  IP: Logged

Kamel Ikhlef
Expert Film Handler

Posts: 213
From: Arches, France
Registered: Oct 2018


 - posted October 16, 2019 10:27 AM      Profile for Kamel Ikhlef   Email Kamel Ikhlef   Send New Private Message       Edit/Delete Post 
Thanks Mike,

your tests and experiences are very interresting !

 |  IP: Logged

Mike Spice
Master Film Handler

Posts: 421
From: none of your business
Registered: Jun 2017


 - posted October 16, 2019 10:53 AM      Profile for Mike Spice     Send New Private Message       Edit/Delete Post 
I an expert now [Roll Eyes]

I am sorry I won't be using your lens mount, would you like me to post them back so that someone else can use them?

You went to so much trouble to make them, a pity for them not to be used.

Let me have an address in pm.

I do hope the lens mount I bought today (£30) will solve the focus problem.

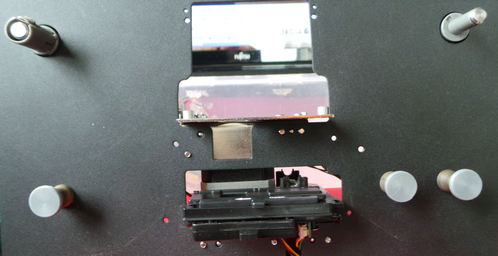
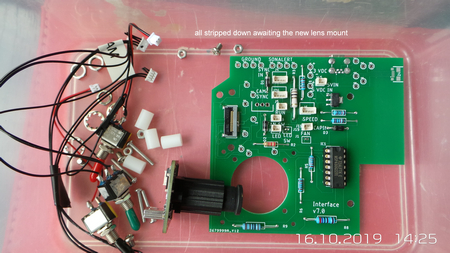
The photos above are part of a video I am making, which will be on you tube this weekend, sunday with luck.

I will post a link here, but for anyone who would like to know

My You Tube Channel is here

I know what I am doing now with the mod, it really is very easy.

The software is a little awkward but practice makes perfect.

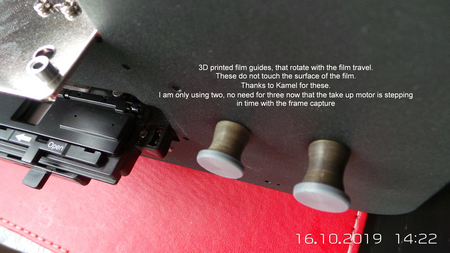
Kamel, I love the new film guides.
i am not using three guides on the right, it only needs two, now that Stan has designed a step on the take up reel.

I think now with Stan's take up motor mod, one roller guide on the right will be enough, but I will run the film under both guides to the right of the gate.

I am very very happy to have these guides, thank you so much.

They roll freely and no more touching the film surface....

 -

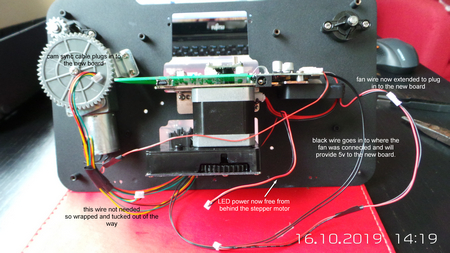
BRUCE You're very welcome, the cat woke me up and I was suddenly wide awake with a head full of super8 mods.
I hope it made some kind of sense.

 |  IP: Logged

Kamel Ikhlef
Expert Film Handler

Posts: 213
From: Arches, France
Registered: Oct 2018


 - posted October 16, 2019 12:38 PM      Profile for Kamel Ikhlef   Email Kamel Ikhlef   Send New Private Message       Edit/Delete Post 
OK Mike,
No problem. I can print for me. So you can keep them or give them away.
The metal extension tube M12 can be interesting to keep for you.

It would be interesting to have what size of lens holder it takes for your Telecine unit that I can change the design, it can be helpful for the other users.
Do you have tested the short printed holder version without metal extension ?.

Otherwise, your explanations on the mod are very useful.
It may be missing the connections of the different switches ?... For those who have to weld them [Wink] [Smile]

 |  IP: Logged

Stan Jelavic
Master Film Handler

Posts: 314
From: Fort Lauderdale, FL, USA
Registered: Jan 2019


 - posted October 16, 2019 01:00 PM      Profile for Stan Jelavic   Email Stan Jelavic   Send New Private Message       Edit/Delete Post 
Very nice work Mike.
Just as a side note. You could try 5mm camera spacers if you have them to bring the camera closer to the film. I am pretty sure Kamel's holder will work with that. You get close to 2K but the edges may become softer.
This is the holder I used with 9mm spacers (the ones that you have now):
TLH 10-2S Mount w/ Set Screw

Here is the tracking info for the 6 boards that I shipped.
https://photos.app.goo.gl/YVxyhmCWnNoCYKK97

Also, here is the V7 schematic and board pdfs:
https://drive.google.com/open?id=14qYeH0UvOuDEV_cDw7snv5ri1itd1KR5
https://drive.google.com/open?id=1HNj94o5SYZTnzWFOT1oPPI5CWH-PdWzv

For the DIY folks: Note that the 3 resistors on the bottom
of the board layout do not match the values on the schematic.
Use the board values. Reason: got them from amazonia and had to use the
closest library components that have adequate hole sizes.
If you use the schematic values you may run into following issues:
- Flaky frame sync - takeup skipping beats - pics missing
- The unit will not power up with the fan on

BTW - download the pdfs and use the pdf reader- don't use the browser to open them.. bad resolution.

 |  IP: Logged

Mike Spice
Master Film Handler

Posts: 421
From: none of your business
Registered: Jun 2017


 - posted October 16, 2019 01:06 PM      Profile for Mike Spice     Send New Private Message       Edit/Delete Post 
OH NO

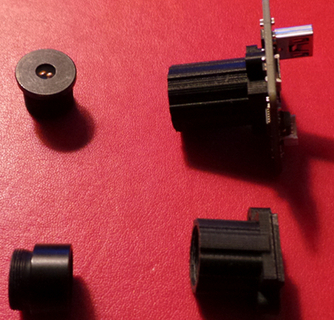
Kamel, I have just looked at both mounts you sent, after reading your last post.

I had no idea one of the mounts had an extension screwed in to it.

I am certain, now I know the extension comes away, it would work.

I wish I had known this two days ago

I am so stupid, I should look more carefully.

Had I known this yesterday, I would have taken the extension out and problem would be solved.

I used the mount without the extension and had no idea the other mount had a peice that came unscrewed.

What do I know about 3D printing? zero.

To look at the two mounts with out a lens in, they look the same, I had no idea one mount had a part that unscrewed.

I thought an extension just means it has some more added to it.

I don't know why it's added, but if you add it, I obviously need it.....

***** ***** (swear words because I am annoyed with myself tonight)

I am sorry I missed that, it would have solved all my problems if I had been more careful inspecting your amazing 3D prints.

It would appear that I have spent £30 today on a lens mount that is the same as your lens mount without the extension.....

This is how stupid I am, I have just realised I can unscrew the extension to make the lens mount shorter.

I had no idea it was possible to unscrew the end.
My bad for not understanding your instructions.

I now have two lens mounts worth £30 each to give away to any diy people, let me know!

 -

[ October 16, 2019, 03:05 PM: Message edited by: Mike Spice ]

 |  IP: Logged

Kamel Ikhlef
Expert Film Handler

Posts: 213
From: Arches, France
Registered: Oct 2018


 - posted October 16, 2019 03:54 PM      Profile for Kamel Ikhlef   Email Kamel Ikhlef   Send New Private Message       Edit/Delete Post 
Really Sorry Mike, [Confused]

Maybe, I did not know how to explain well with my bad "google" English translation.
Wait to have the original scorpion lens holder, you can test and compare it, can be interesting!

 |  IP: Logged

Mike Spice
Master Film Handler

Posts: 421
From: none of your business
Registered: Jun 2017


 - posted October 16, 2019 04:01 PM      Profile for Mike Spice     Send New Private Message       Edit/Delete Post 
Kamel

Tout est bon. S'il vous plaît être heureux. Merci d'être si gentil et de m'envoyer des cadeaux. Vos cadeaux étaient parfaits, je suis stupide.
Tu es très précieux pour moi et Stan

Subtitles by Google translate. [Big Grin]

 |  IP: Logged

Doug Maxwell
Junior
Posts: 12
From: Charleston, WV, USA
Registered: Sep 2019


 - posted October 16, 2019 05:19 PM      Profile for Doug Maxwell     Send New Private Message       Edit/Delete Post 
Ordered my camera today. Does the kit come with the spacers for proper camera height? Or do I need to get those made or cut them myself?

 |  IP: Logged

Stan Jelavic
Master Film Handler

Posts: 314
From: Fort Lauderdale, FL, USA
Registered: Jan 2019


 - posted October 16, 2019 06:20 PM      Profile for Stan Jelavic   Email Stan Jelavic   Send New Private Message       Edit/Delete Post 
It comes with the spacers Doug... Mike you exceeded my french capabilities had to consult google.

 |  IP: Logged

Mark Pollock
Junior
Posts: 3
From: Davis, CA, USA
Registered: Feb 2019


 - posted October 16, 2019 07:57 PM      Profile for Mark Pollock   Email Mark Pollock   Send New Private Message       Edit/Delete Post 
I'm so happy to see the tracking numbers!

Kamel, will you be posting the lens mount 3D plan somewhere? I have a printer, so I can print my own.

I appear to have missed the part of this rather lengthy discussion that explained how to do the sprocket-wheel film drive. Which of these 45 pages was it on, or is there another resource for that?

Thanks for all the great work, guys!

 |  IP: Logged

Kamel Ikhlef
Expert Film Handler

Posts: 213
From: Arches, France
Registered: Oct 2018


 - posted October 16, 2019 10:21 PM      Profile for Kamel Ikhlef   Email Kamel Ikhlef   Send New Private Message       Edit/Delete Post 
Thank you very much Stan for the pdf schematic.
I just found that on the power component the footprint has changed? pins 19 and 20 and 10-11 are connected is this normal ?.
There have been changes?. I may not have the latest eagle version? Thanks in advance [Confused] [Smile]

[ October 16, 2019, 11:28 PM: Message edited by: Kamel Ikhlef ]

 |  IP: Logged

Stan Jelavic
Master Film Handler

Posts: 314
From: Fort Lauderdale, FL, USA
Registered: Jan 2019


 - posted October 16, 2019 10:31 PM      Profile for Stan Jelavic   Email Stan Jelavic   Send New Private Message       Edit/Delete Post 
Check Oct11 posts from Kamel, Mark
It tells you where to get the 3D prints

Wiring diagram for the motor:
https://photos.app.goo.gl/LJajGbSQG1fujdZB8

Motor:
http://www.uxcell.com/micro-motor-12v-4300rpm-%20wire-high-speed-encoder-motor-for-diy-hobby-toy-cars-remote-control-p-1323950.html

Operation summary:
The capstan motor coasts along driven by the film. The sensor at the back of the motor sends pulses to the MSP430 controller. If the pulses stop and the front panel run switch is on, the controller pulses the motor every 10 seconds until the film starts running again.

See my Aug11 post and Sep30 posts.
Hope this helps.

 |  IP: Logged

Mark Pollock
Junior
Posts: 3
From: Davis, CA, USA
Registered: Feb 2019


 - posted October 16, 2019 11:35 PM      Profile for Mark Pollock   Email Mark Pollock   Send New Private Message       Edit/Delete Post 
Thank you Stan, I'm not sure how I missed these. Actually, since this thread is assuming phone-book length, I am actually pretty sure I just didn't read everything. [Big Grin]

 |  IP: Logged

Bruce Davis
Film Handler

Posts: 47
From: Adelaide, Australia
Registered: Sep 2019


 - posted October 17, 2019 01:15 AM      Profile for Bruce Davis   Author's Homepage   Email Bruce Davis   Send New Private Message       Edit/Delete Post 
Stan Jelavic does it matter what resolution one selects in IC Capture, as long as all the film frame is included, I assume the actual resolution (pixels per mm) is always the same.

By increasing the resolution to Max as Mike suggested it seems to only increase area that is captured but pixels/mm would remain the same.

When the super 8 frame is cropped I end up with a frame that is only 1292x934 (which should be enough resolution for S8 I think) and this res can not be increased unless up scaled.
Regards - Bruce

 |  IP: Logged

Kamel Ikhlef
Expert Film Handler

Posts: 213
From: Arches, France
Registered: Oct 2018


 - posted October 17, 2019 03:40 AM      Profile for Kamel Ikhlef   Email Kamel Ikhlef   Send New Private Message       Edit/Delete Post 
Bruce,
To digitize in HD, it would be necessary to capture wider to allow the post-production: denoising, stabilization, etc ...

Then to trim the final size which should be 1440x1080 and then integrate this image in a video 1920x1080 (black band on the sides which brings at 1440 pixels).
The most difficult is to calculate what size to capture in 1440x1080 with the least possible loss of quality.

It is for this reason that it is necessary to capture with the maximum of quality. you have to do some tests, I have not found the right capture format yet and all the suggestions will help.

 |  IP: Logged

Stan Jelavic
Master Film Handler

Posts: 314
From: Fort Lauderdale, FL, USA
Registered: Jan 2019


 - posted October 17, 2019 08:00 AM      Profile for Stan Jelavic   Email Stan Jelavic   Send New Private Message       Edit/Delete Post 
I believe you are correct Bruce. The rez setting just changes the area of the sensor to be used -- similar to crop. But also as Kamel says you may need some margin around for postprocessing depending on how it is done.
Kemel - these were always connected?
One more note for the DIY, pin 9 (counting from the bottom)on the power supply connector has to be shorted to pin10. If not, the stepper will not work on some older units.

 |  IP: Logged

Mike Spice
Master Film Handler

Posts: 421
From: none of your business
Registered: Jun 2017


 - posted October 17, 2019 08:50 AM      Profile for Mike Spice     Send New Private Message       Edit/Delete Post 
My solution to the switches on the front plate being too deep to fit the unit back in the case....

I would always want my final video file to be 1440x1080 with no black bars.

I created a project in my edit with HD bitrate and 1440x1080

When I upload to youtube or FB I don't get bars, just a nice 4:3 video player

Black bars are the work of the devil

 -

 |  IP: Logged

Doug Maxwell
Junior
Posts: 12
From: Charleston, WV, USA
Registered: Sep 2019


 - posted October 17, 2019 10:15 AM      Profile for Doug Maxwell     Send New Private Message       Edit/Delete Post 
Mike, I respectfully disagree. Letterbox and Pillarbox are wonderful things. I won't bore everyone with technical rambling, but whenever there is any black bars on a screen, that is great stuff... it means that nothing is being lost.

Now, loading a square video on YouTube in straight 4:3 is fine, since YouTube typically compensates for 16x9 screens and adds pillar boxes if needed. But, if you are planning on putting your scanned and finished square movies on DVDs or video files and sending them to friends and family who will watch them on various types of Standard and HD tv screens, monitors, etc, I would highly recommend 'future proofing' your hard work by putting the 4:3 image in the center of the 16x9 frame. This will prevent the 4:3 image from being automatically stretched horizontally to fit 16x9. And since the 16x9 aspect ratio seems to be the standard for the foreseeable future regardless of pixels, this method only makes more sense.

My method is to go as big as possible in the capture process and scale it down as needed in post. It's easier to take away then it is to add.

I realize this requires more hard drive space and a faster computer, but if you can, go big and reduce it.

Also, you can always export both a straight 4:3 AND a 16x9 pillar box version of the same movie. Remember, it's never a bad idea to 'Future Proof'.

 |  IP: Logged

Mike Spice
Master Film Handler

Posts: 421
From: none of your business
Registered: Jun 2017


 - posted October 17, 2019 10:22 AM      Profile for Mike Spice     Send New Private Message       Edit/Delete Post 
You're very welcome to disagree! [Razz]

I get the 16:9 tv ratio thing for tv viewing.
My work generally ends up online so at you tube I think it is nicer without the bars.

If I do watch 4:3 on my plasma tv, it automatically switches to 4:3 but I do get grey side bars, generated by the tv.

I realise not everyone has a tv set that does that.

 |  IP: Logged

Brian Fretwell
Phenomenal Film Handler

Posts: 1785
From: London, UK
Registered: Jun 2014


 - posted October 17, 2019 03:32 PM      Profile for Brian Fretwell   Email Brian Fretwell   Send New Private Message       Edit/Delete Post 
Also for anyone contemplating BluRay, there is no provision for native 4:3 only pillar-boxed in 16:9.

 |  IP: Logged

Brian Fretwell
Phenomenal Film Handler

Posts: 1785
From: London, UK
Registered: Jun 2014


 - posted October 17, 2019 03:33 PM      Profile for Brian Fretwell   Email Brian Fretwell   Send New Private Message       Edit/Delete Post 
Duplicate post due to board software saying it was unsuccessful first and second attempt.

[ October 18, 2019, 02:50 AM: Message edited by: Brian Fretwell ]

 |  IP: Logged

Brian Fretwell
Phenomenal Film Handler

Posts: 1785
From: London, UK
Registered: Jun 2014


 - posted October 17, 2019 03:34 PM      Profile for Brian Fretwell   Email Brian Fretwell   Send New Private Message       Edit/Delete Post 
As above.

[ October 18, 2019, 02:50 AM: Message edited by: Brian Fretwell ]

 |  IP: Logged


All times are Central
This topic comprises 56 pages: 1  2  3  ...  42  43  44  45  46  47  48  ...  54  55  56 
 
   Close Topic    Move Topic    Delete Topic    next oldest topic   next newest topic
 - Printer-friendly view of this topic
Hop To:

Visit www.film-tech.com for free equipment manual downloads. Copyright 2003-2019 Film-Tech Cinema Systems LLC

Powered by Infopop Corporation
UBB.classicTM 6.3.1.2